Wood kitchen cabinets bring pattern as well as color into a room. A flat door, a framed front and a fluted drawer can give the same broad wood tone very different character. The surrounding paint, floor and counters also change whether that wood feels quiet, rustic or lively.
These 20 examples cover complete wood kitchens, selected cabinet walls and islands mixed with painted storage. They include ideas for keeping existing cabinets as well as planning new ones. Compare finished samples and cabinet construction before ordering; the look alone does not establish the wood species, durability or care requirements.
PART 01
Choose the amount and character of wood
IDEA 01 / 20
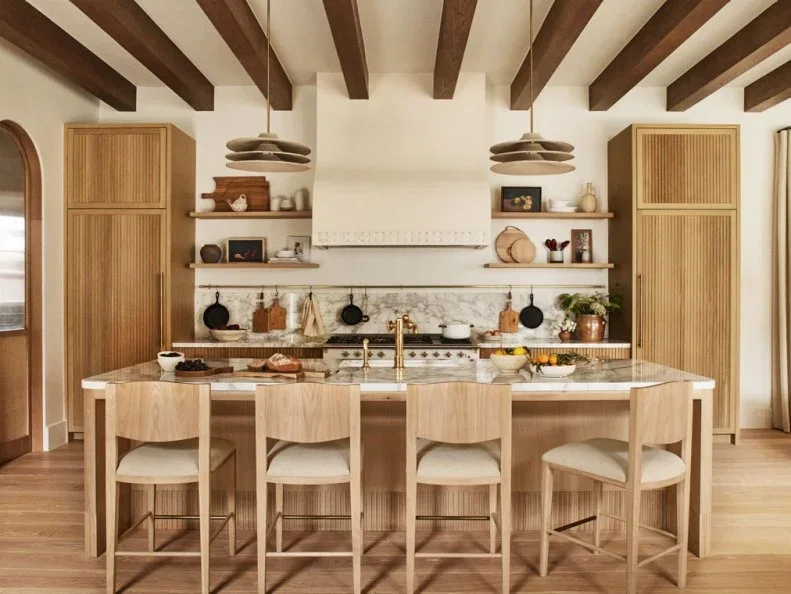
Balance Tall Wood Cabinets Around the Range
 SaveSupport Non AI Creator
Image credit: Photo: Sam Frost. From: Lindye Galloway
Two tall fluted cupboards give this kitchen a balanced frame around the broad pale hood. Lower shelves keep the center more open, while the wood island and stools repeat the warm finish at a different height. Dark ceiling beams add depth without requiring the cabinets themselves to be heavily stained.
Check the storage capacity on both sides before committing to a symmetrical elevation. One side may need an appliance housing while the other holds adjustable shelves. Compare full door samples with the floor, and confirm how the fluted fronts will be cleaned around handles and the lower edges that receive frequent contact.
IDEA 02 / 20
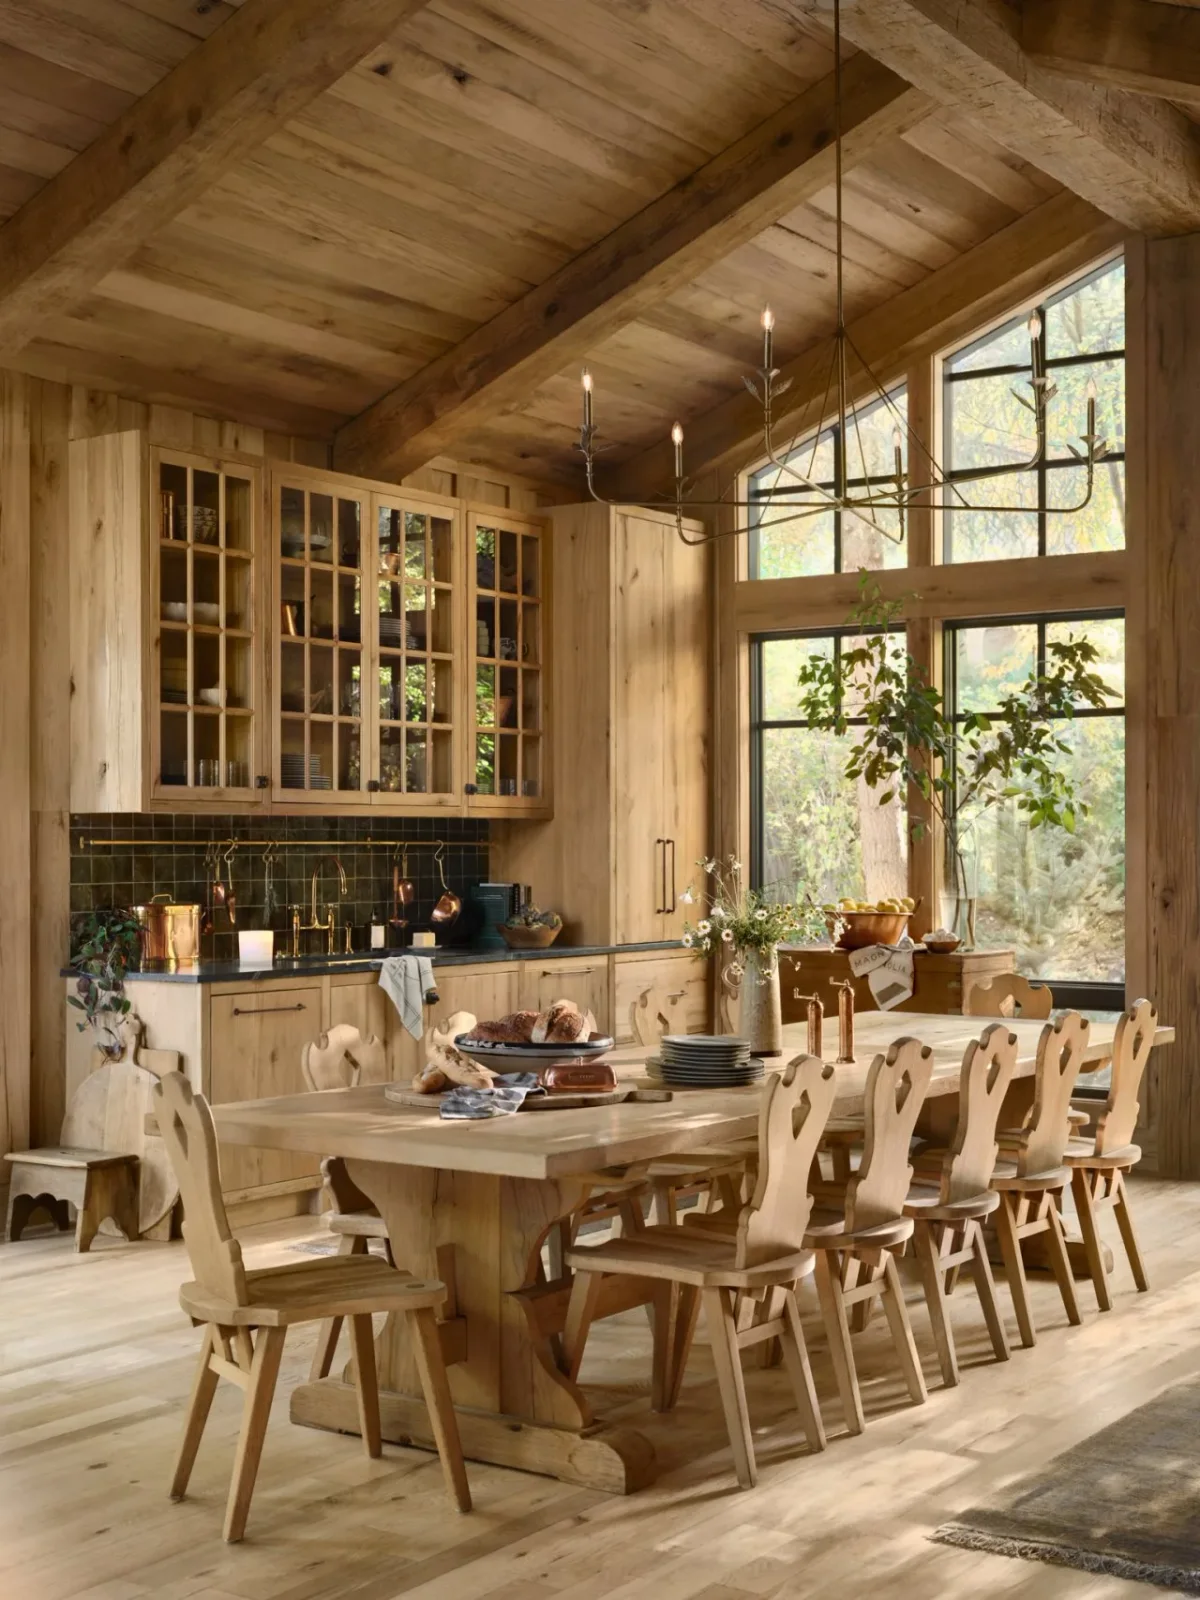
Connect Glass-Front Cabinets to a Wood-Clad Room
 SaveSupport Non AI Creator
Image credit: Photo: Courtesy of Magnolia Network. From: Chip Gaines, Joanna Gaines and Fixer Upper: Colorado Mountain House
In this wood-clad room, glass-front cupboards break up the cabinetry without changing its warm palette. The dark backsplash provides a clear band beneath them, separating the working surface from the wall above. A large window and lighter dining furniture help the extensive wood feel connected to the room rather than visually closed in.
If cabinets, walls and ceiling are all wood, compare their finishes together instead of approving each in isolation. Use the glass-front section for dishes you are comfortable keeping visible. Check shelf heights against actual plates and bowls, and make sure nearby dining chairs can move without blocking access to the lower cupboards.
IDEA 03 / 20
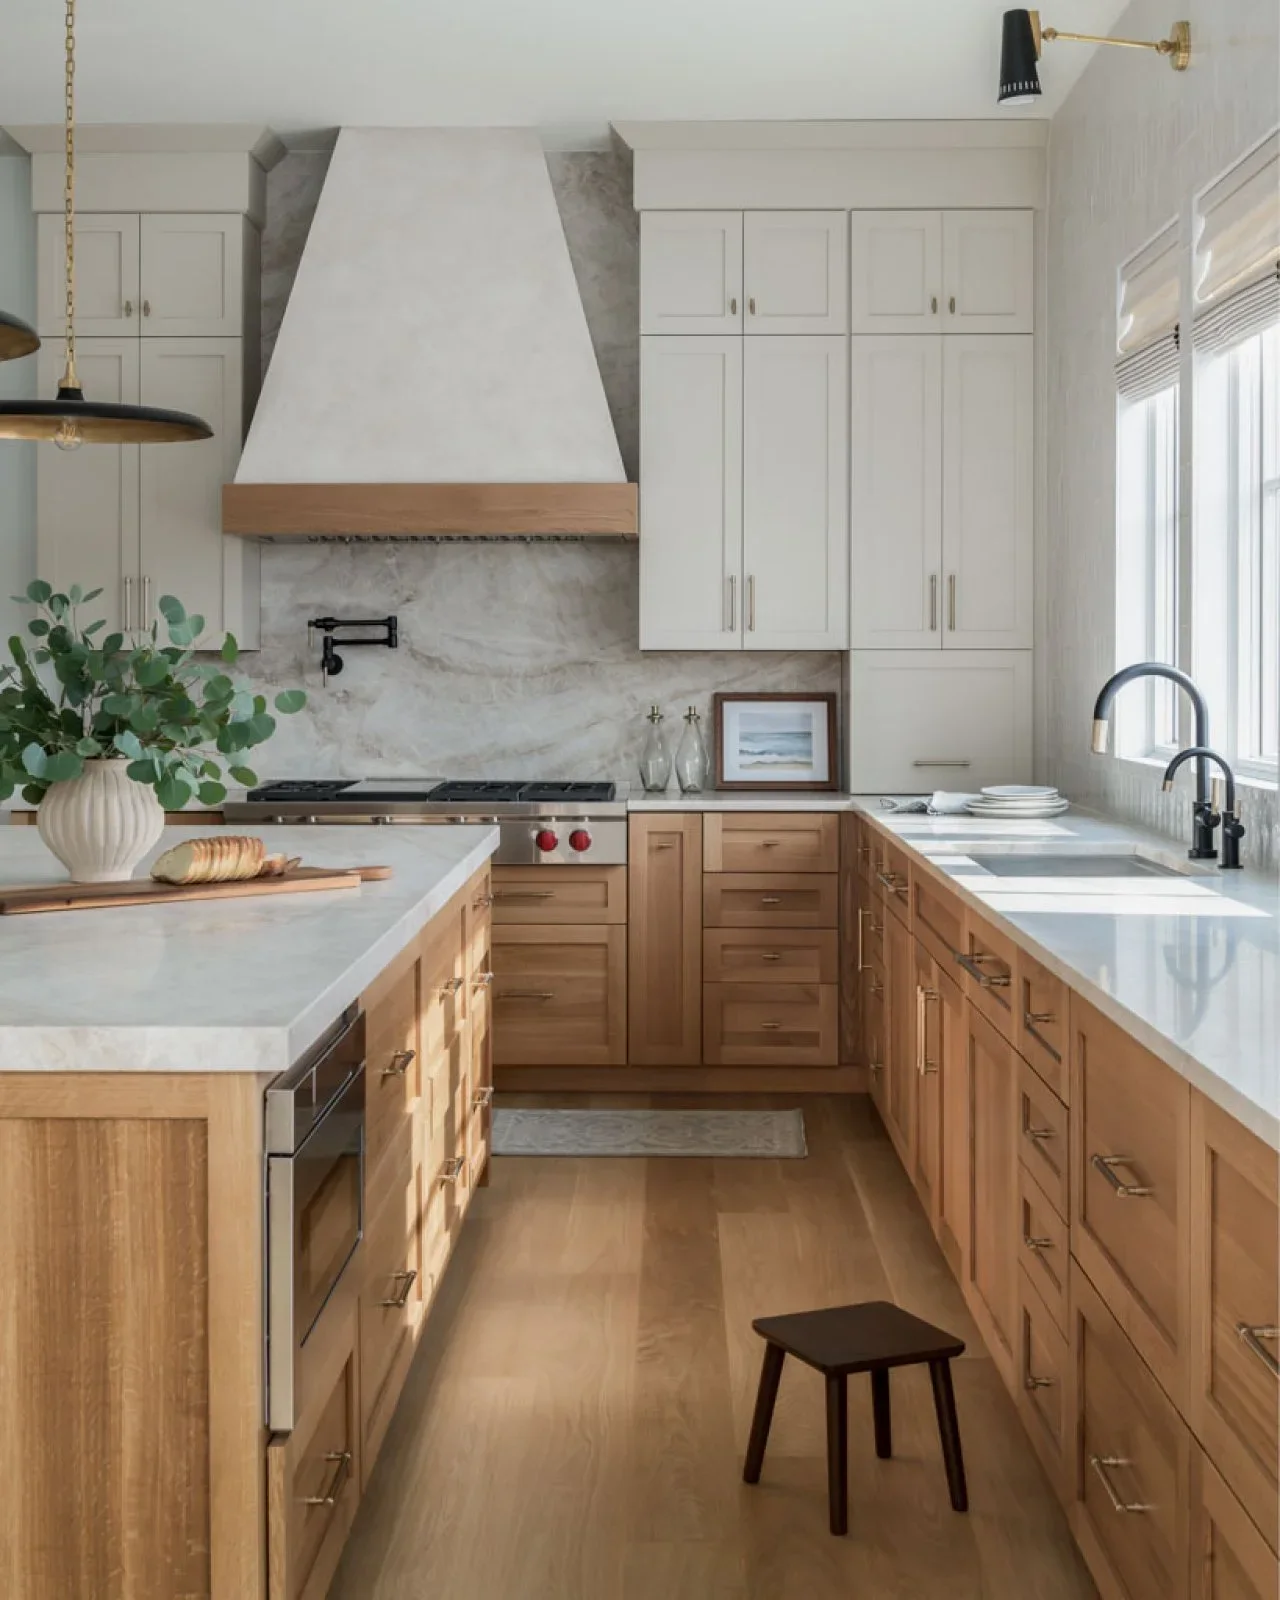
Pair Light Wood Bases with Pale Upper Doors
 SaveSupport Non AI Creator
Image credit: Photo: Meghan Balcom, Grant Homes, Kerri Faux Plaster. From: Moose Interior Designs
Light wood lower cabinets establish a warm base beneath the pale uppers and broad hood. A narrow wood band on the hood repeats the lower finish without adding another large block of grain. Pale counters and a softly patterned backsplash keep the transition between the two cabinet finishes gentle.
Choose the upper paint and wood finish at the same time, including the end panels you will see from adjacent rooms. Our two-tone kitchen cabinet ideas show other ways to divide the finishes. Plan practical drawer widths around cookware and utensils before deciding where the visual lines should fall.
IDEA 04 / 20
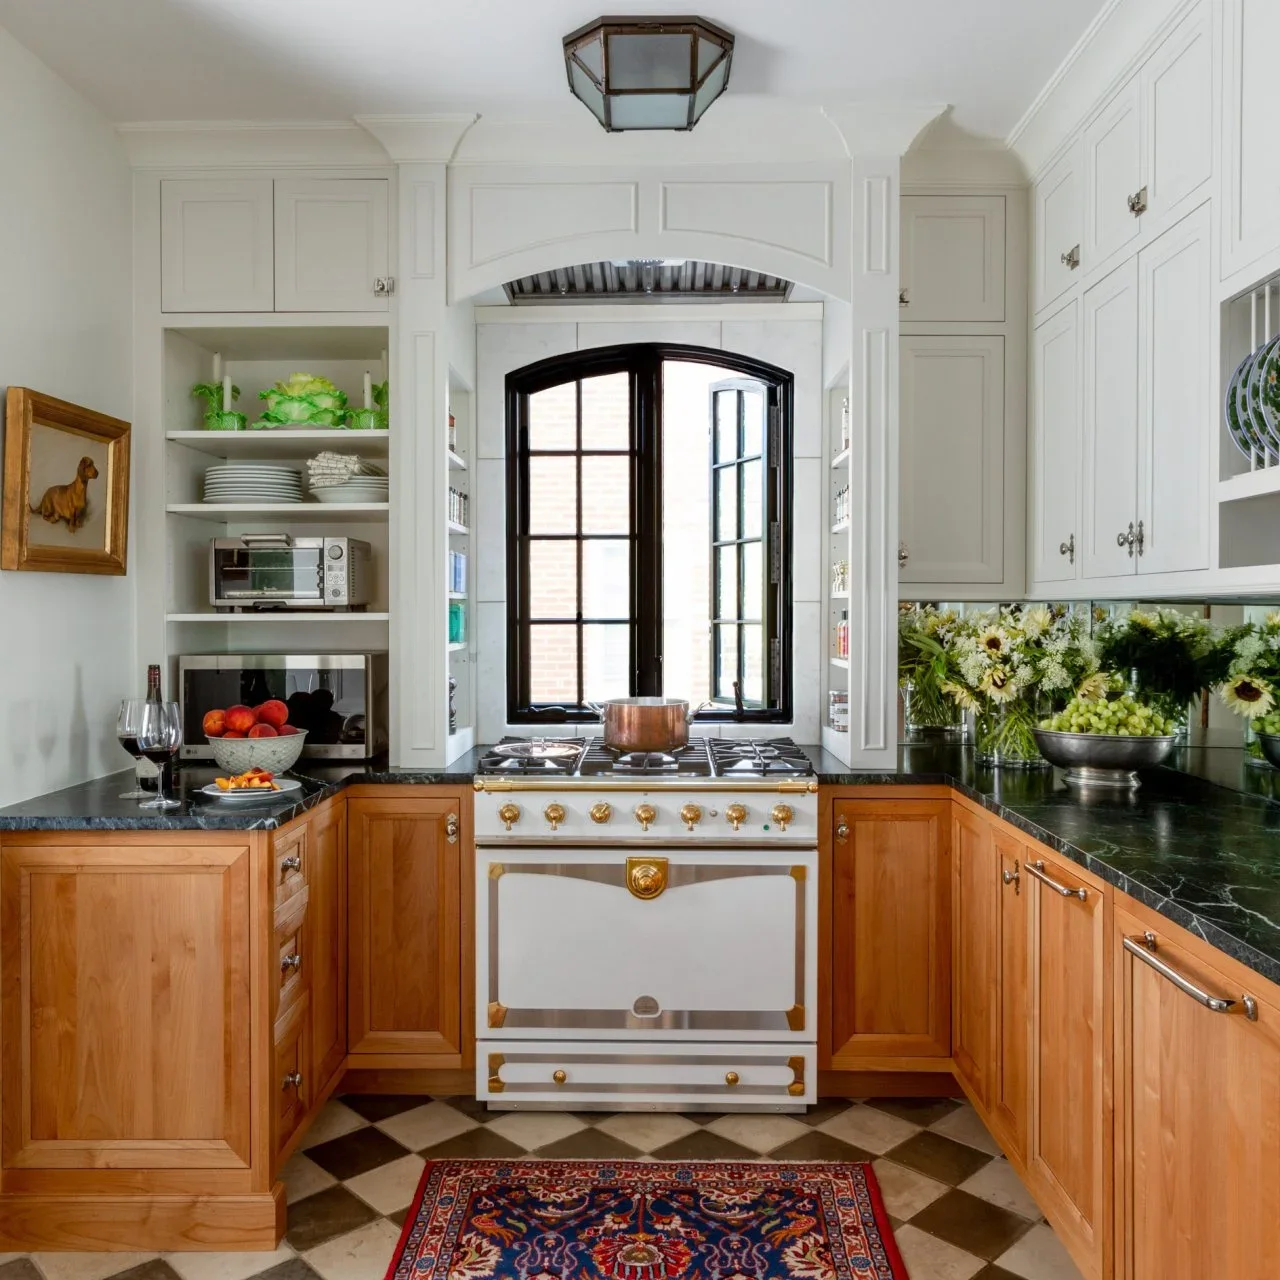
Keep Warm Wood and Change the Surroundings
 SaveSupport Non AI Creator
Image credit: Photo: Janet Mesic Mackie. From: Mark Lavender
Honey-colored lower cupboards gain a different character beside white upper doors and deep green counters. The cream range, dark window frame and checked floor create a layered setting around the existing warmth of the wood. This is a useful reminder that the surrounding finishes influence how a cabinet color reads.
Assess the doors, hinges and cabinet boxes before deciding that all the wood needs replacement. Try new counter, wall and hardware samples beside a cleaned section of the existing finish. If refinishing is needed, ask which preparation suits that surface and test an inconspicuous area before treating every door.
IDEA 05 / 20
Mix Fluted Drawers with Smooth Wood Doors
 SaveSupport Non AI Creator
Image credit: Photo: Sam Frost. From: Lindye Galloway
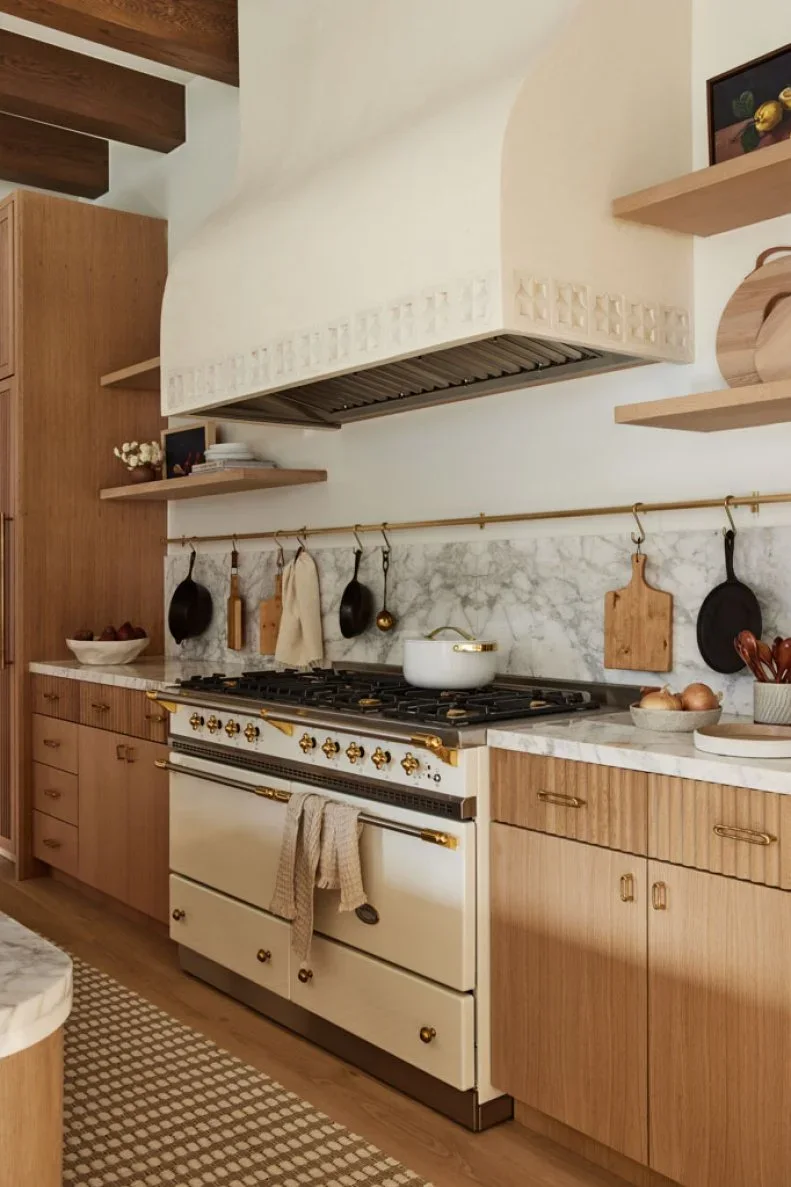
This close view shows fluted drawer fronts beside smooth wood cupboard doors, giving the lower run texture without covering every panel in ridges. The cream range separates the wood into smaller sections. Simple metal pulls and a pale veined counter leave the change in surface texture easy to notice.
Use a finished sample to judge the grooves at the distance you will normally see them. Check that their edges feel comfortable and can be cleaned using the maker’s recommended method. Ask how fluted drawers meet smooth end panels and corners so the texture finishes neatly rather than stopping at an awkward exposed edge.
PART 02
Connect wood with color and furniture
IDEA 06 / 20
Repeat Wood in an Island and a Separate Dresser
 SaveSupport Non AI Creator
Image credit: Photo: Jessica Alexander. From: Natalie Myers
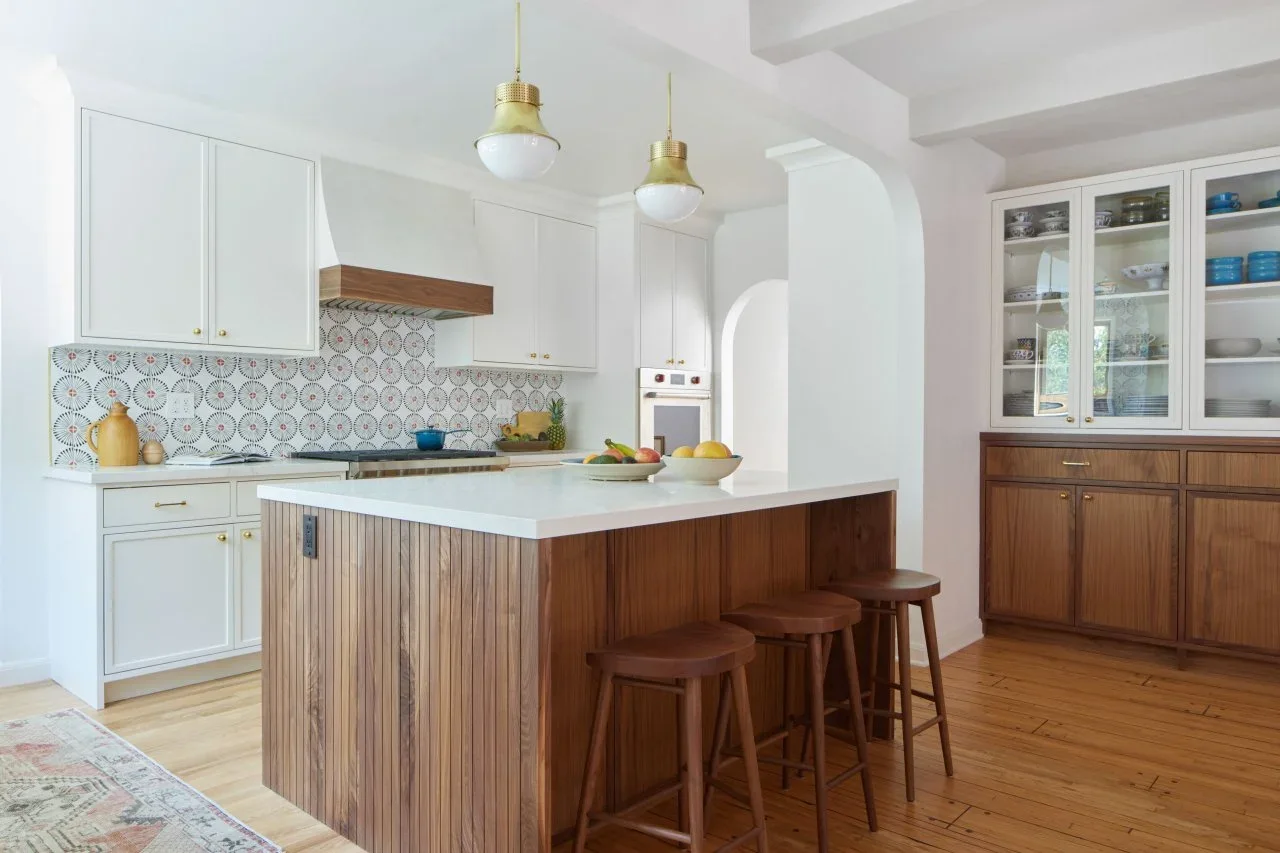
Wood appears on the island and the base of a separate dresser, while the main cooking wall remains white. That repeat carries warmth through the room without turning every cabinet into the same feature. Vertical paneling gives the island a clear rhythm, and the glass-front dresser provides a different, lighter form of storage.
Choose which items belong in the dresser before setting its shelf depth and door arrangement. Daily plates may suit the glass section, while larger serving pieces can stay below. Test island stools with the actual overhang and allow room to pull them out without interfering with the route between the dresser and cooking area.
IDEA 07 / 20
Give Existing Wood a More Playful Setting
 SaveSupport Non AI Creator
Image credit: From: Maestri Studio
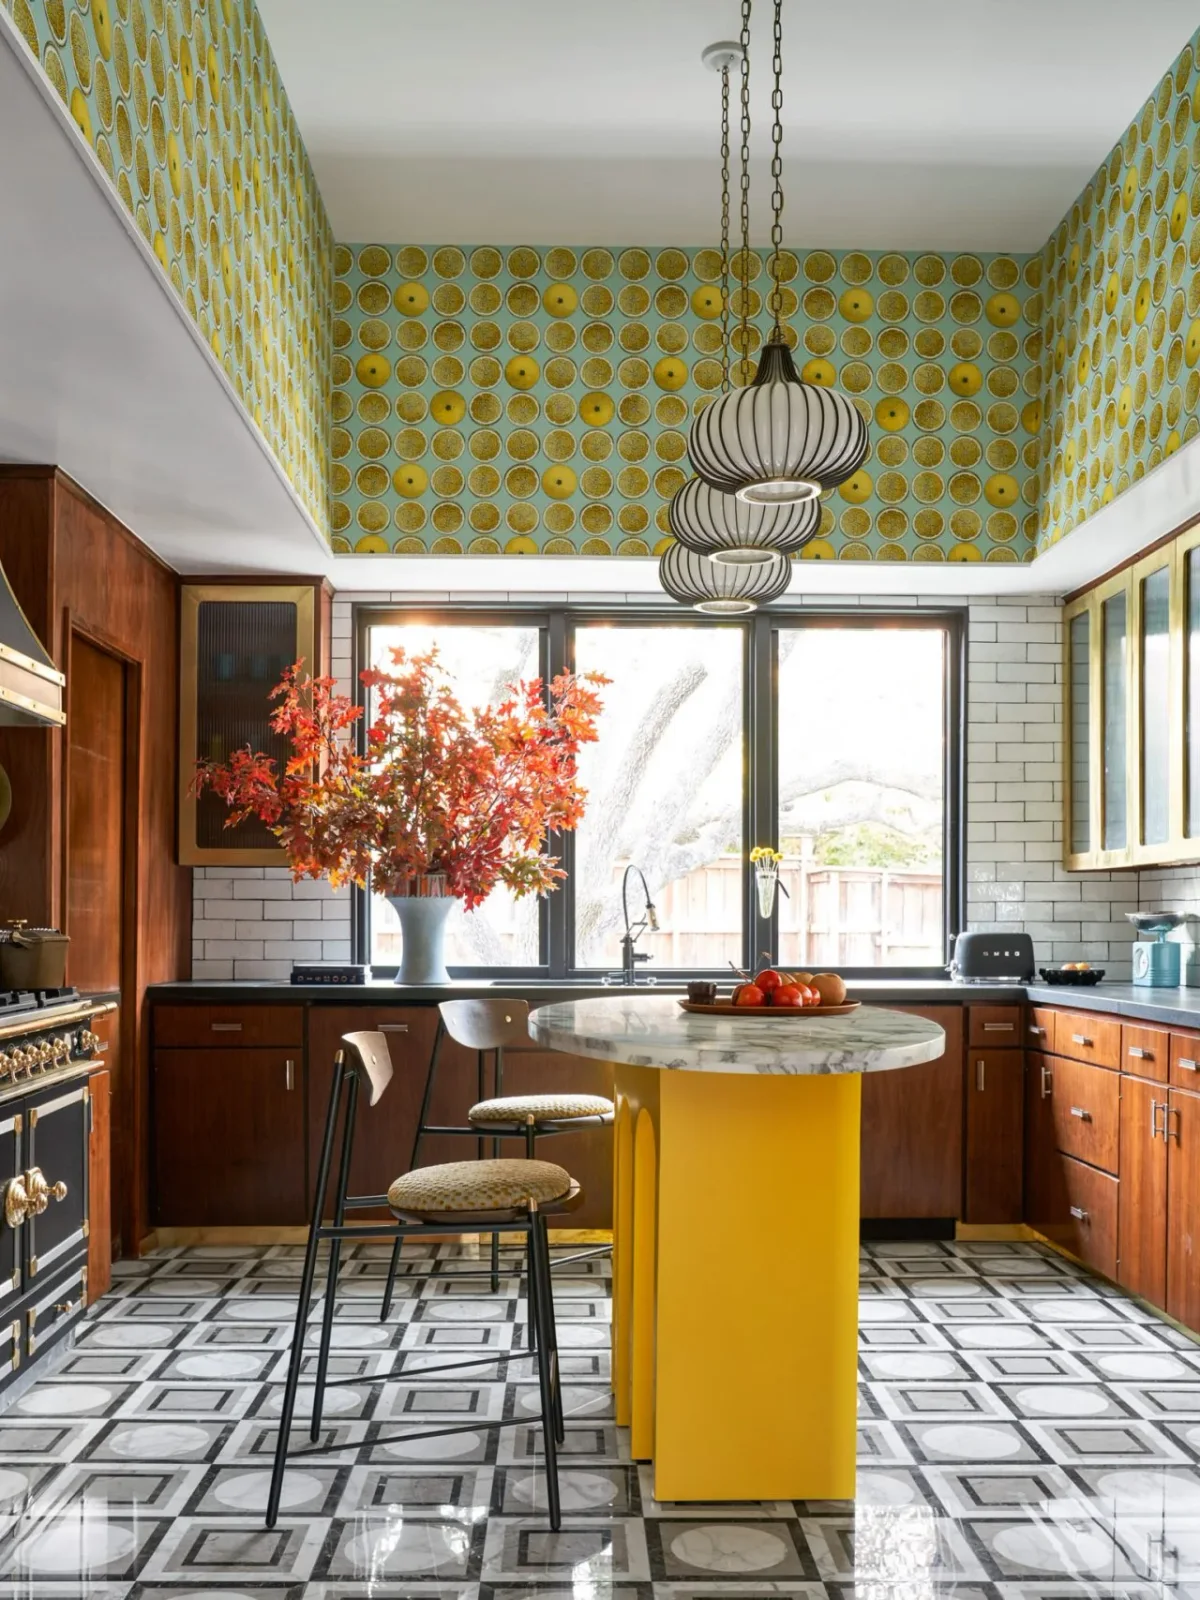
Warm wood cabinets sit comfortably within this much bolder room because the yellow island and patterned upper walls share their sunny character. White tile separates those patterns from the cupboard fronts. The wood becomes one part of a lively palette rather than the only surface expected to provide interest.
Try small changes before assuming a wood kitchen needs a complete replacement. Test wallpaper, paint and textile samples beside the cabinets in your own light. Keep paper and fabric suitable for their location, away from cooking heat and repeated splashes, and leave enough plain surface for the grain and patterns to remain readable.
IDEA 08 / 20
Make an Island and Tall Cupboard Feel Related
 SaveSupport Non AI Creator
Image credit: Photo: Carina Skrobecki. From: Jessica Nelson Design
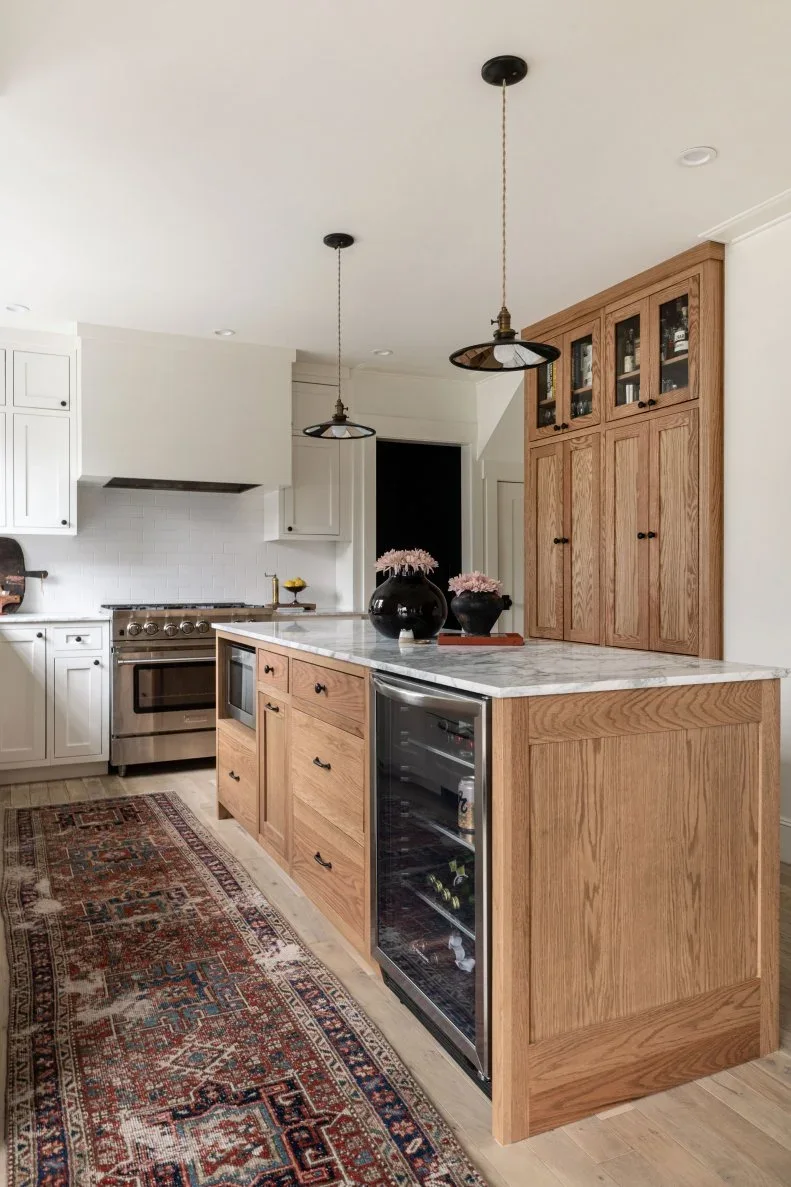
The wood island and tall cupboard share a framed door profile, giving the room two related storage features against the white cooking wall. Glass doors near the top of the tall unit lighten its appearance. The island’s larger drawers provide another scale of wood grain beside the smaller doors and open compartments.
Plan the tall unit and island as one cabinet order so their finish, framing and hardware remain intentional. If you prefer the appearance of a named timber, compare our oak kitchen cabinet ideas with a specified sample. Check appliance ventilation and drawer clearances before placing a drinks refrigerator within a heavily used preparation area.
IDEA 09 / 20
Connect Rich Wood to a Blue Lower Run
 SaveSupport Non AI Creator
Image credit: Photo: Jeff Herr Photography. From: Terracotta Design Build
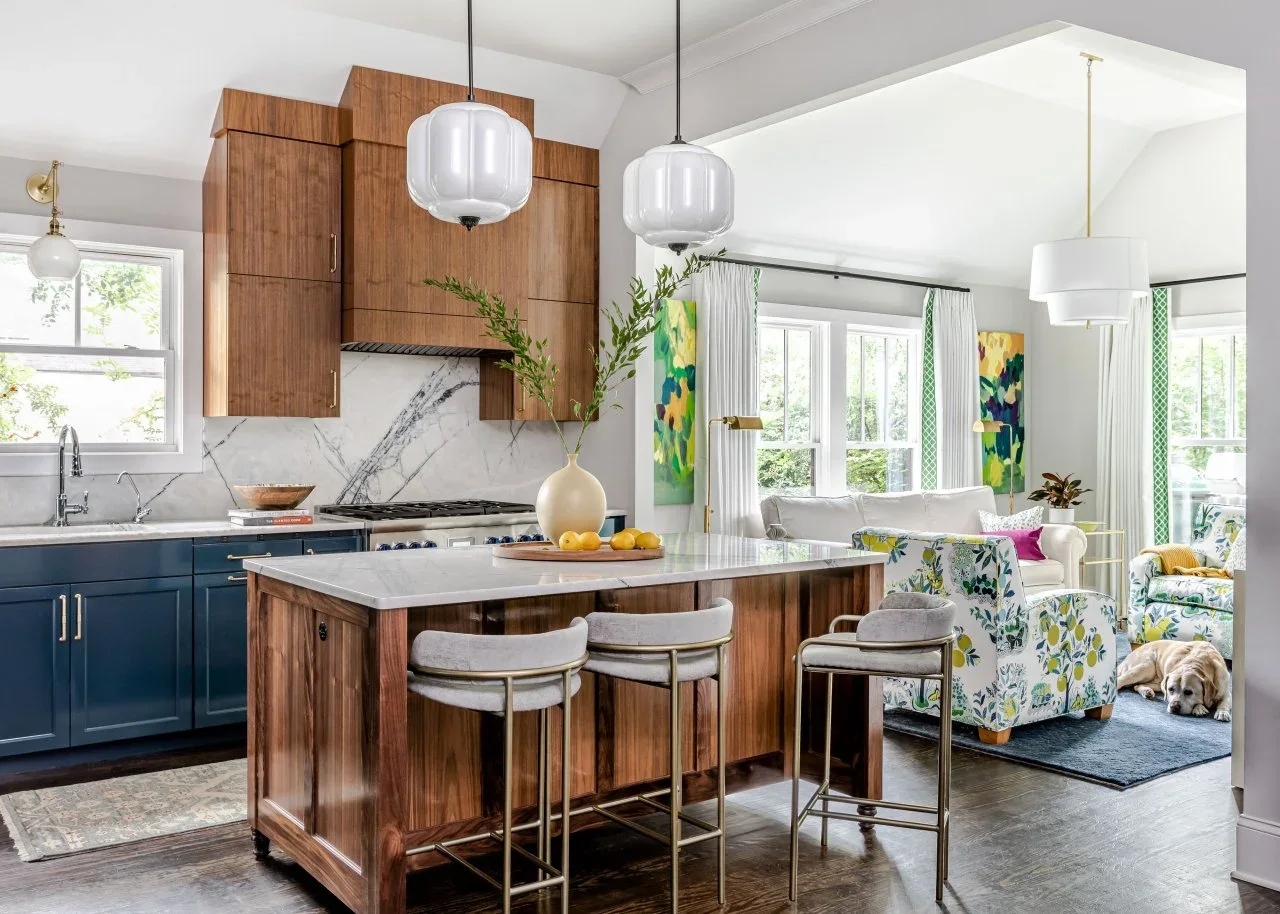
Rich wood surrounds the hood and covers the island, while deep blue lower cupboards add a separate color along the sink wall. Pale counters connect the two finishes. In the adjoining sitting area, colorful upholstery makes the kitchen’s stronger palette feel part of a larger room rather than a completely separate scheme.
Consider the view from neighboring seating when choosing the wood and blue together. A finish that looks calm at close range can dominate a wider open room. Keep the island’s end panels and hardware in the sample review, and leave clear walking space between stools and any armchairs placed beside the kitchen.
IDEA 10 / 20
Use Fabric and Wallpaper to Refresh Warm Cabinets
 SaveSupport Non AI Creator
Image credit: Photo: Marc Mauldin Photography. From: Blessed Little Bungalow
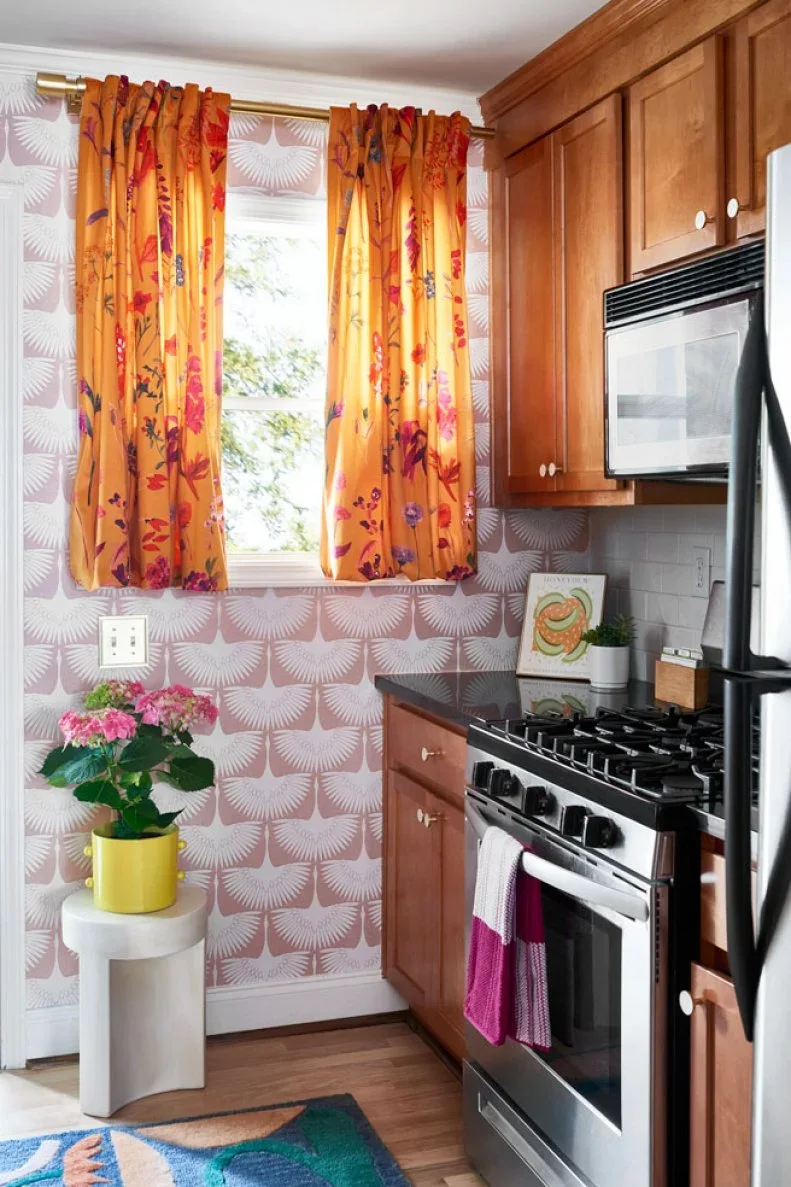
Pink wallpaper and orange floral curtains turn the window end of this wood kitchen into a cheerful focal point. The warm cabinet finish relates to the fabric rather than needing to match it exactly. White knobs and pale tile provide small breaks between the strong wood color, pattern and dark appliance details.
When refreshing a compact kitchen, start with a coordinated sample board that includes the existing doors. Keep curtains clear of cooking equipment and follow fabric care requirements for a room exposed to grease and steam. A washable wall treatment and easy-to-remove textiles will be more practical than delicate finishes beside everyday preparation areas.
PART 03
Plan storage around the working layout
IDEA 11 / 20
Carry the Cabinet Finish into a Walk-In Pantry
 SaveSupport Non AI Creator
Image credit: Photo: Sam Frost. From: Lindye Galloway
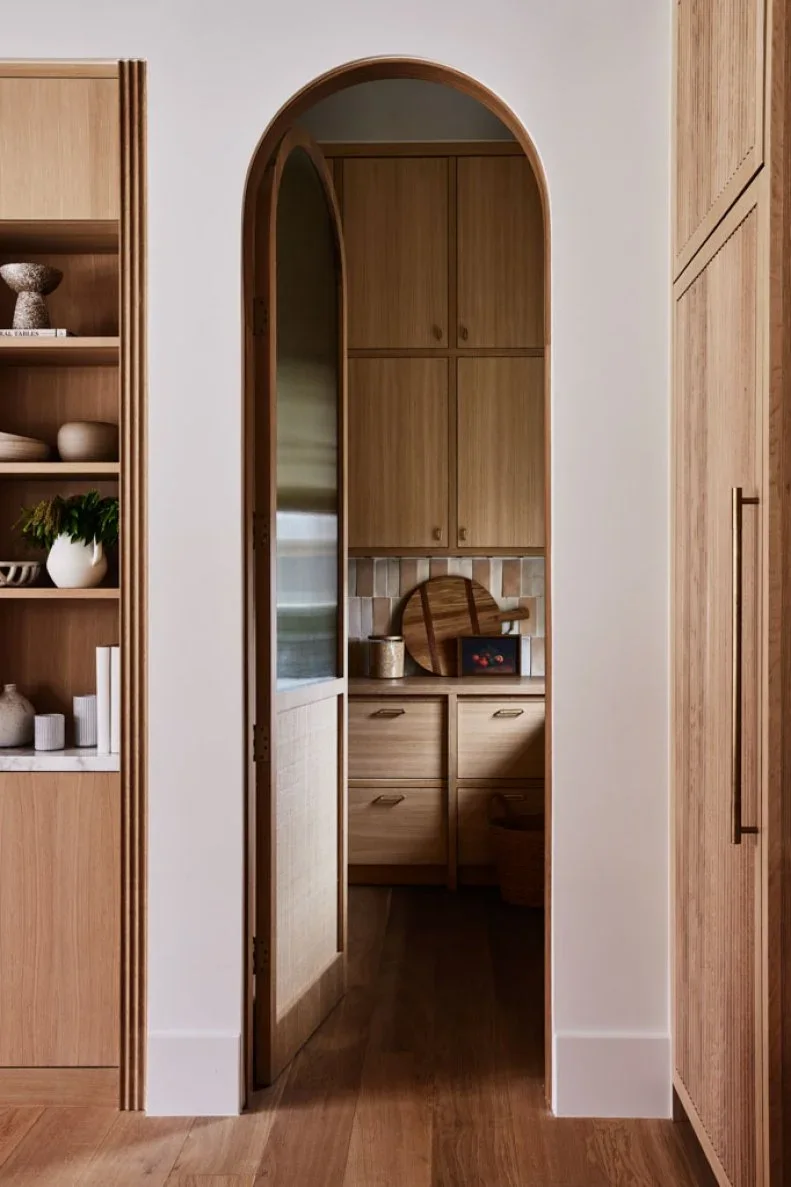
The wood finish continues through this arched opening into a pantry with its own drawers and upper cupboards. The repeated grain makes the smaller room feel connected even when the door is open. A light wall around the arch separates the two storage areas and keeps the opening easy to read.
Plan the pantry contents before copying the cabinet arrangement. Measure small appliances, containers and serving pieces, then decide where drawers will be more useful than shelves. Confirm access to any appliance sockets and ventilation, and keep enough clear counter for the tasks you actually intend to do inside the pantry.
IDEA 12 / 20
Use Wood on a Tall Wall and Open Shelf Frames
 SaveSupport Non AI Creator
Image credit: Photo: Ian Michelman
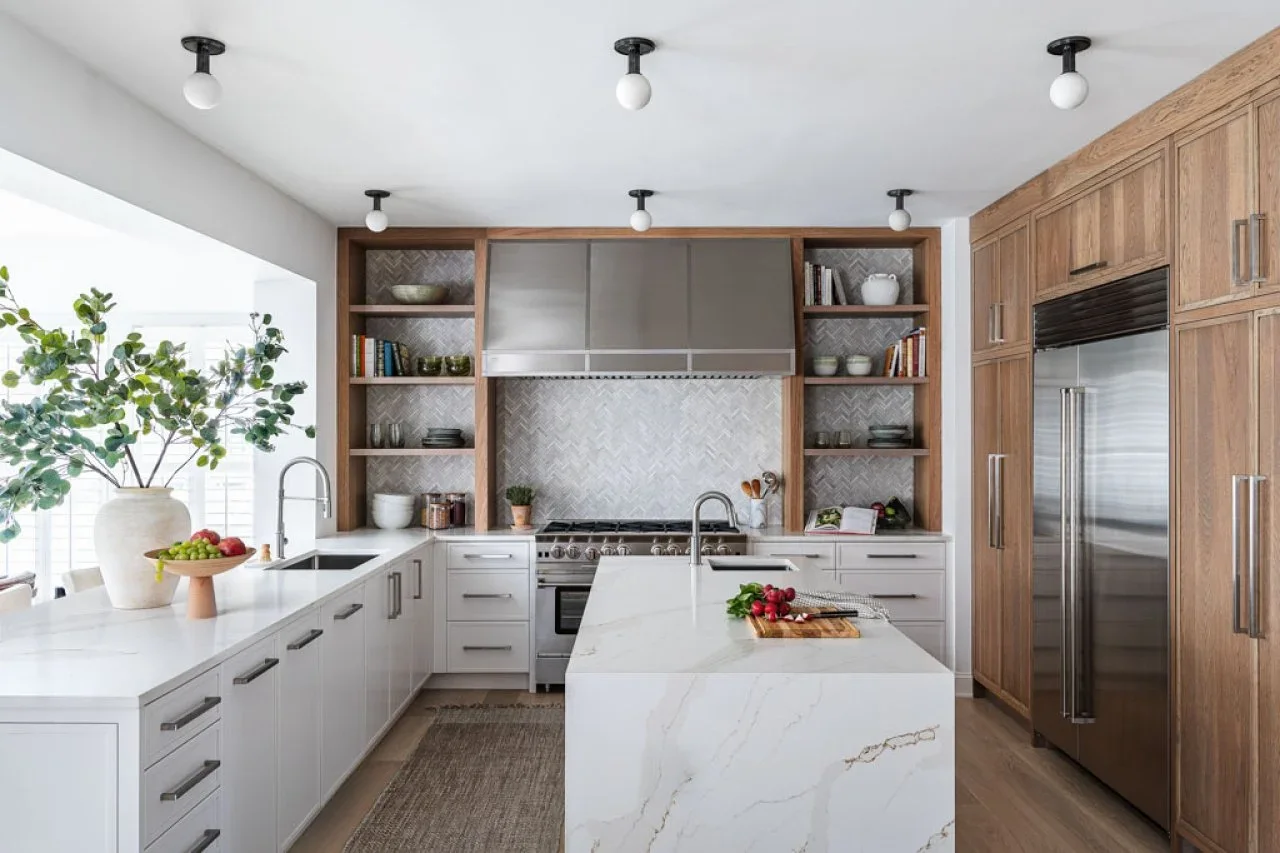
Wood is concentrated on the tall refrigerator wall and the shelf frames beside the hood, while white drawers occupy the main working run. That selective placement adds warmth without making the compact layout feel enclosed. The matching shelf frames connect the appliance wall to the opposite end of the room.
List what belongs on the open shelves before removing upper cupboards from a plan. Daily dishes may earn that accessible space, while occasional items need enclosed storage elsewhere. Check the refrigerator opening, handle projection and nearby drawers with the appliance specification so the tall wood surround does not interfere with full door movement.
IDEA 13 / 20
Repeat Light Wood Around a Pale Island Top
 SaveSupport Non AI Creator
Image credit: Photo: Vanessa Lentine. From: Pure Salt Interiors
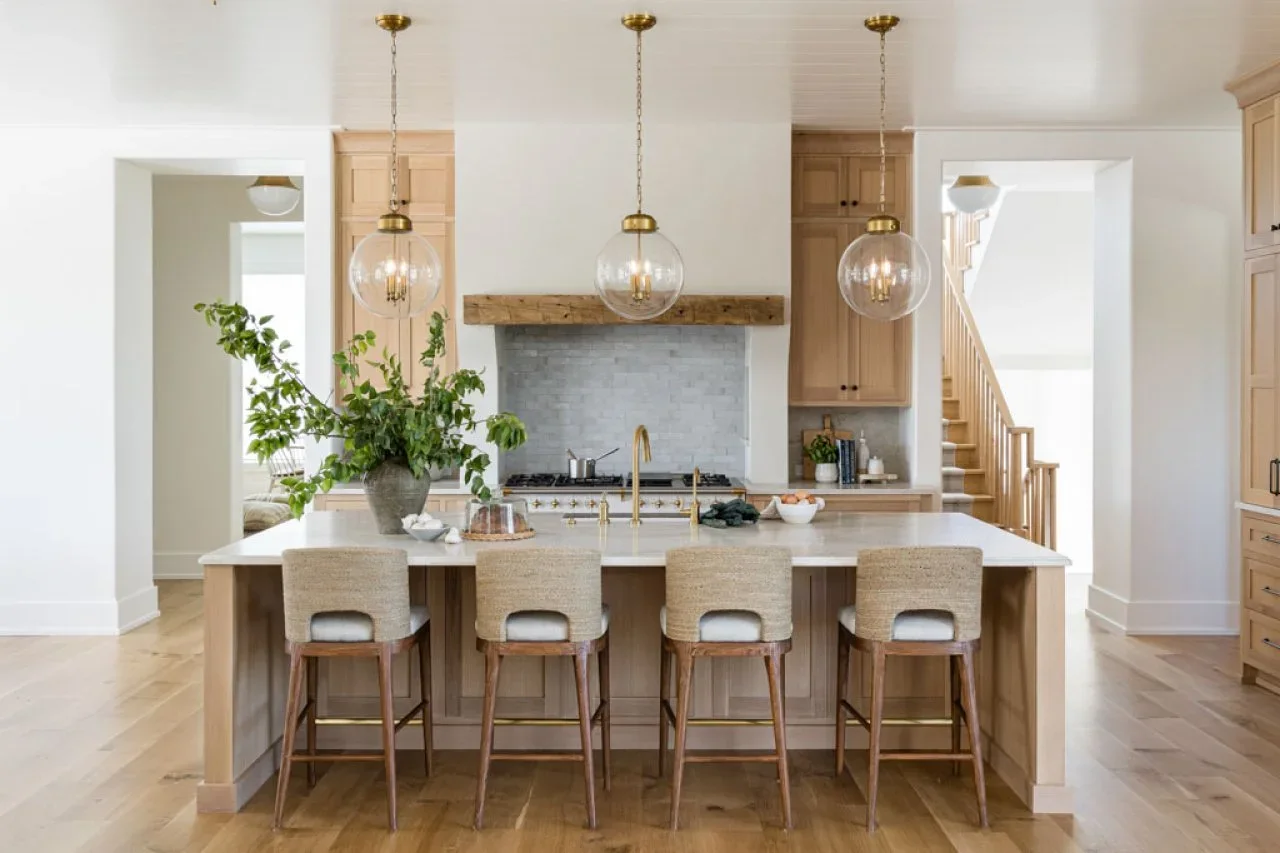
Light wood appears on the island, narrow upper cupboards and the taller cabinet at the room’s edge. The pale island top and broad white hood create breathing space between those sections. A rougher wood band above the range adds texture, showing that related warm finishes can have different surface characters.
Compare the cabinet sample and any decorative beam together before selecting them independently. Check the grain, sheen and undertone under the planned pendant and task lights. Keep hood construction, combustible clearances and ventilation tied to the appliance requirements; the decorative wood detail needs to be part of a properly specified installation.
IDEA 14 / 20
Let Flat Wood Fronts Define an Open Room
 SaveSupport Non AI Creator
Image credit: Photo: David Lauer. From: Design Platform
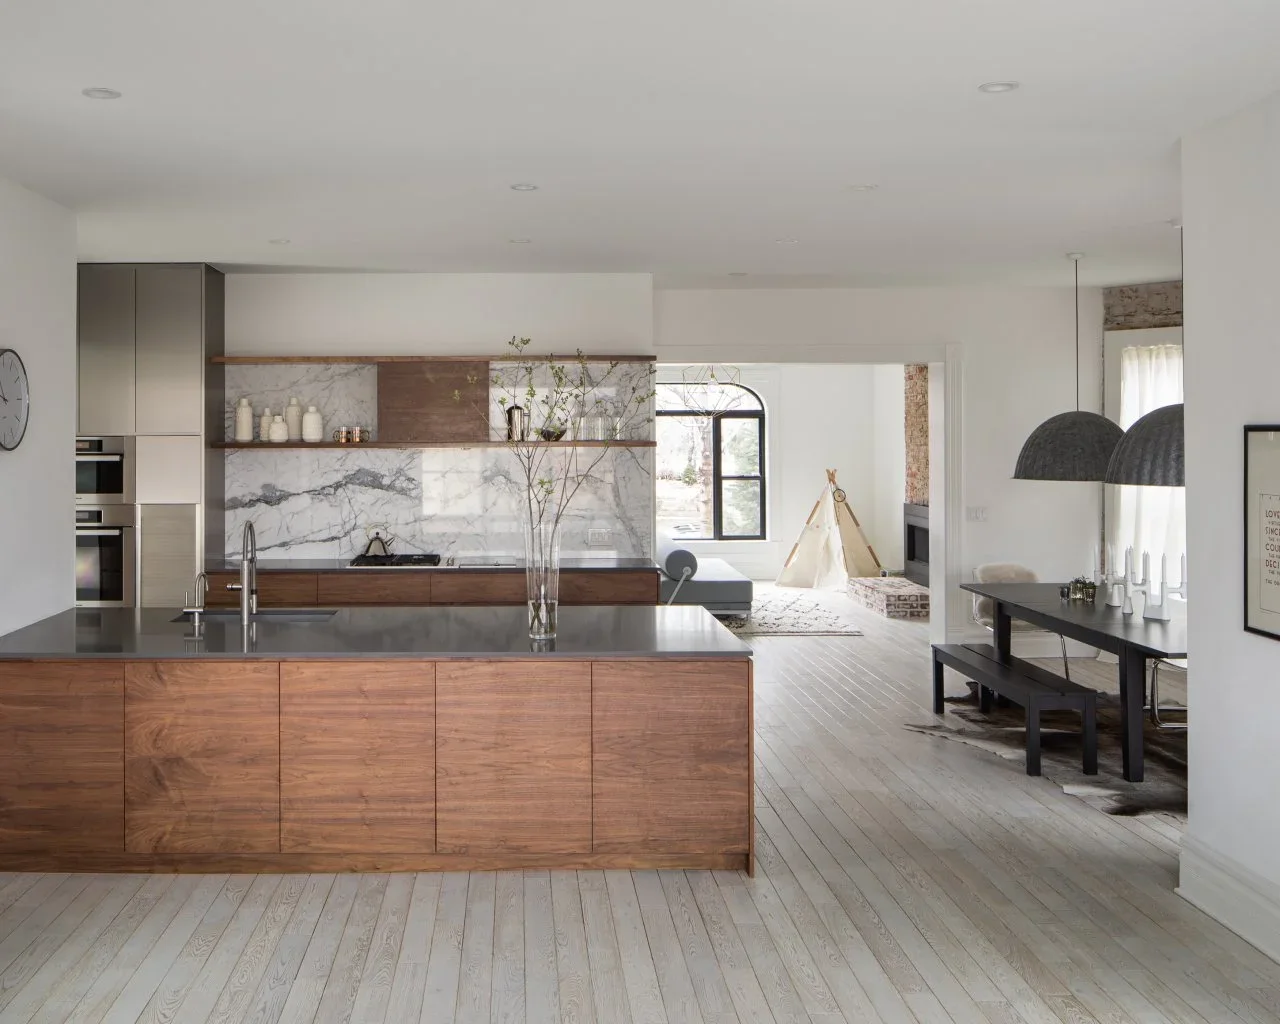
Flat wood fronts give this open kitchen a warm horizontal band beneath its dark counters. The broad backsplash supplies the strongest pattern, while pale floors and walls keep the rest of the room restrained. A simple wood island face suits the longer view from the adjoining dining area without relying on decorative door profiles.
Check how the cabinet grain and joins will appear from both the kitchen and dining table. Ask the maker about veneer matching, exposed sides and edge details before approving the layout. If you are drawn to deeper brown wood, our walnut kitchen cabinet ideas offer other ways to balance grain with strong counter surfaces.
IDEA 15 / 20
Make a Compact Wood Kitchen Feel Light
 SaveSupport Non AI Creator
Image credit: Photo: Vanessa Lentine. From: Pure Salt Interiors
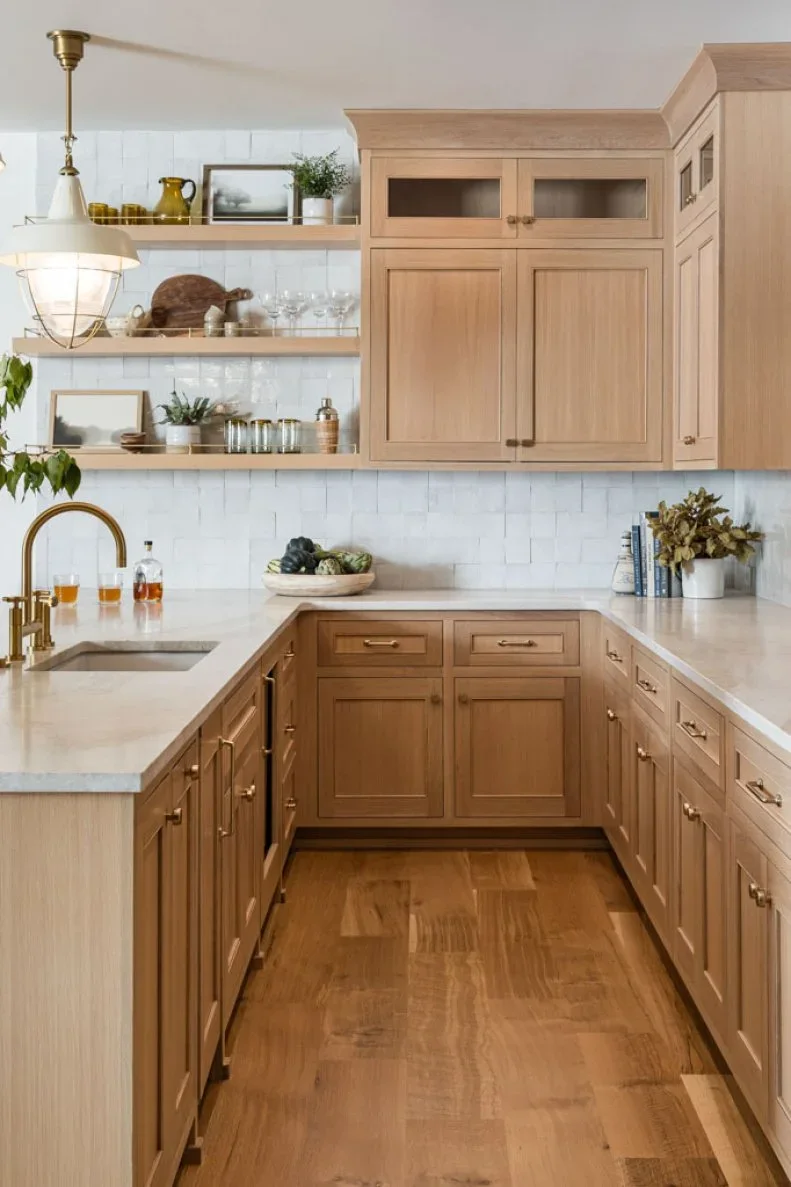
Light wood cupboards wrap the corner of this compact kitchen, while white tile and pale counters keep the surfaces above them bright. Glass-front doors near the top create a small display area without opening every cupboard. Narrow wood shelves by the sink repeat the cabinet finish in a lighter, more accessible form.
Check the inside corner carefully when planning storage: adjacent doors and pulls need clearance, and a deep cupboard should still be reachable. Decide which dishes deserve the open shelves and keep the rest enclosed. Ask how water around the sink will be kept off cabinet edges, then follow the specified drying and cleaning routine.
PART 04
Make the finish fit the whole room
IDEA 16 / 20
Separate Rustic Cabinets from Heavy Ceiling Beams
 SaveSupport Non AI Creator
Image credit: Photo: Troy Thies. From: Martha O'Hara Interiors
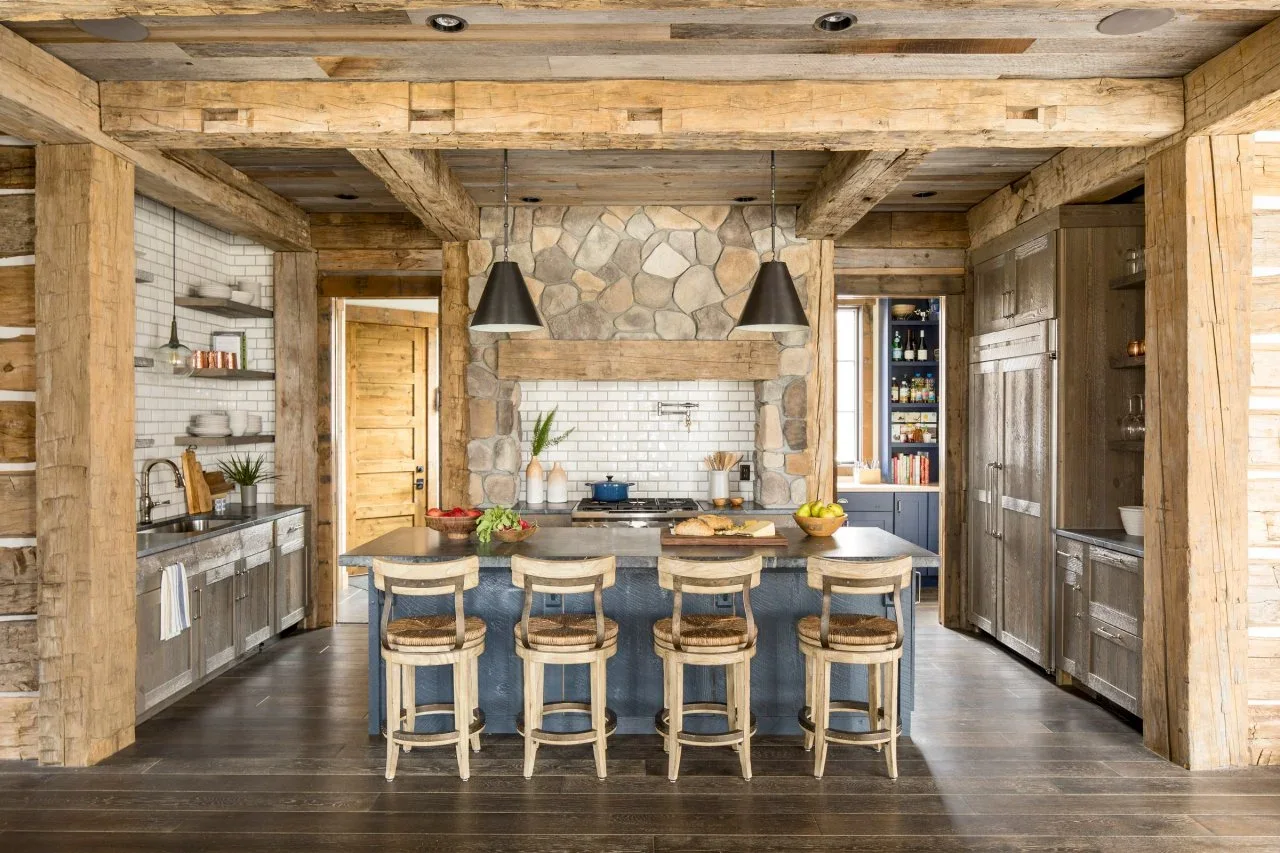
The cabinetry uses a darker, more weathered finish than the large overhead beams, helping the two types of wood remain distinct. A blue island and white backsplash tile interrupt the rustic surfaces. Metal pendants and the pale stone hood surround add further changes in texture without introducing polished, highly decorative cabinet fronts.
Choose rustic doors for the texture you can live with, not just their appearance in a wide room photograph. Ask how rough or distressed areas should be cleaned and whether the finish needs special maintenance. Review lighting at the counters so the darker cupboards and overhead beams do not leave the working areas poorly lit.
IDEA 17 / 20
Carry a Quiet Wood Finish through Built-In Storage
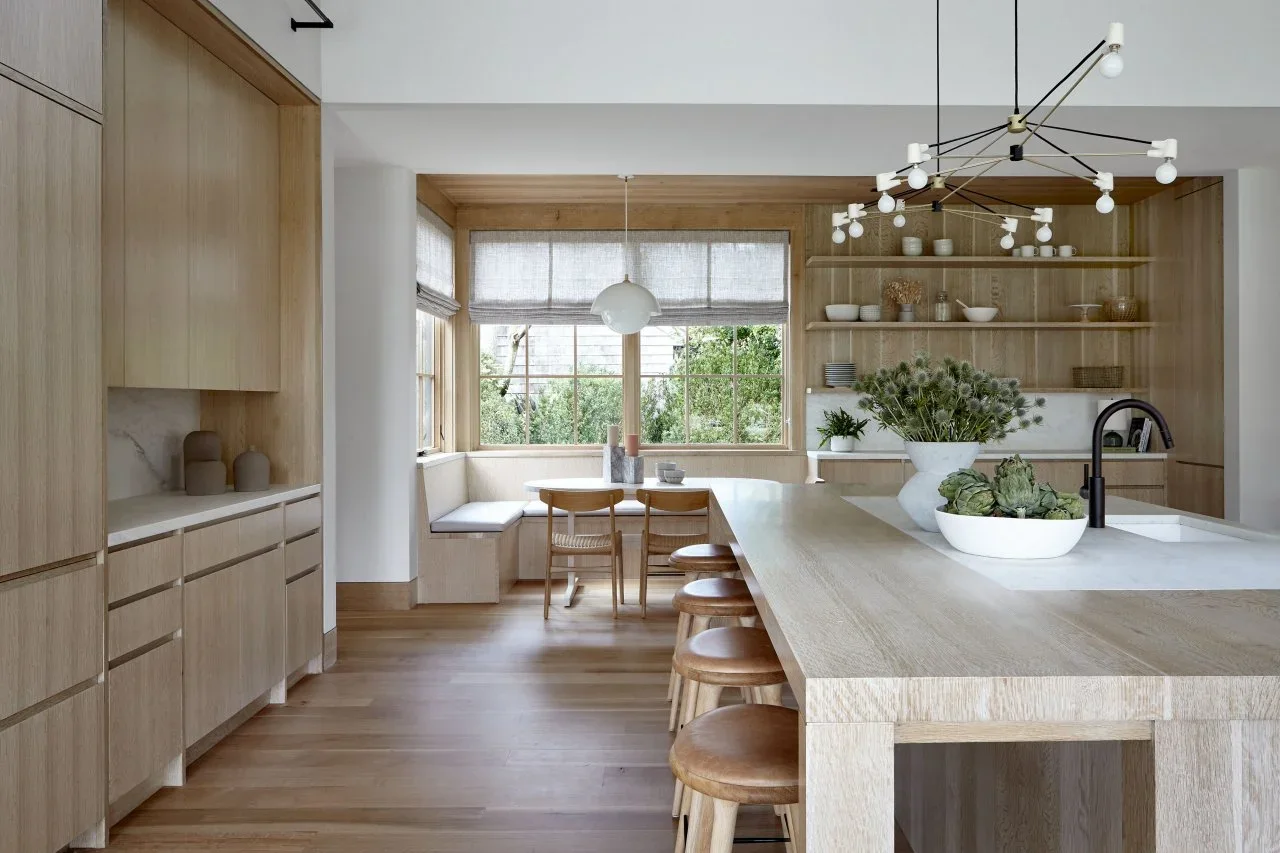 SaveSupport Non AI Creator
Image credit: From: James Merrell Architects
A quiet pale wood finish travels from the flat cupboards into the shelves and window banquette, linking cooking and eating areas. The cabinets provide broad uninterrupted surfaces, while the open shelving adds smaller horizontal lines. The light island top and white wall sections keep the extensive wood from becoming visually uniform.
Decide where the finish should continue and where it should stop before ordering built-ins across an open room. Ask for samples that include doors, drawer edges and bench trim. If comparing pale timber options, our white oak kitchen cabinet ideas can help you assess grain and contrast alongside a real supplier specification.
IDEA 18 / 20
Give a Storage Wall the Character of a Dresser
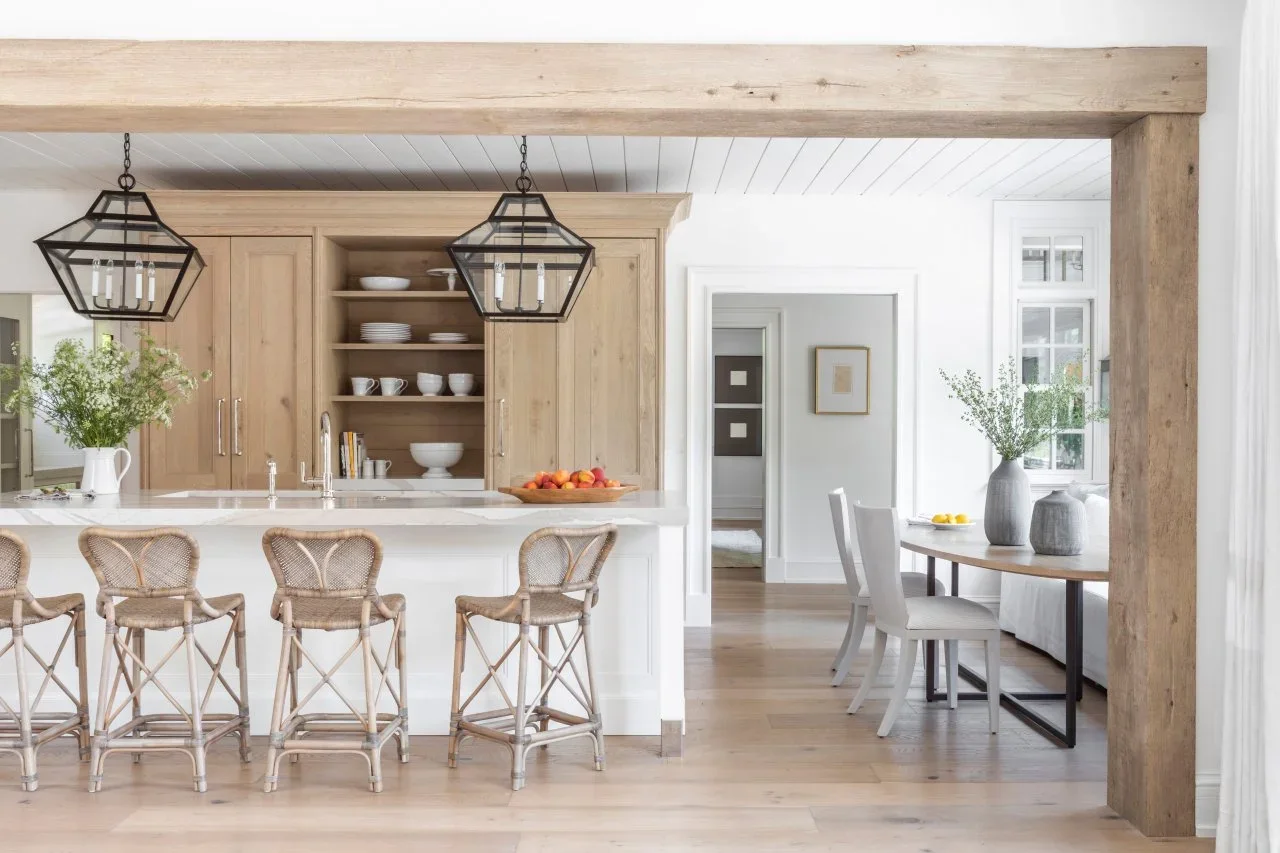 SaveSupport Non AI Creator
Image credit: Photo: Julie Soefer. From: Marie Flanigan Interiors
A pale wood storage wall combines enclosed doors with a central stack of open dish shelves, giving it the character of a large dresser. It stops below the ceiling rather than blending into it. White surrounding walls and the island front let the wood stand out without requiring a darker stain.
Work out the shelf spacing from the dishes you own, including larger bowls and serving platters. Keep the most frequently handled pieces at an easy height and avoid stacks that are difficult to lift safely. Confirm access for cleaning above the unit, especially when a gap below the ceiling becomes a dust-catching ledge.
IDEA 19 / 20
Add Wood through a Furniture-Like Island
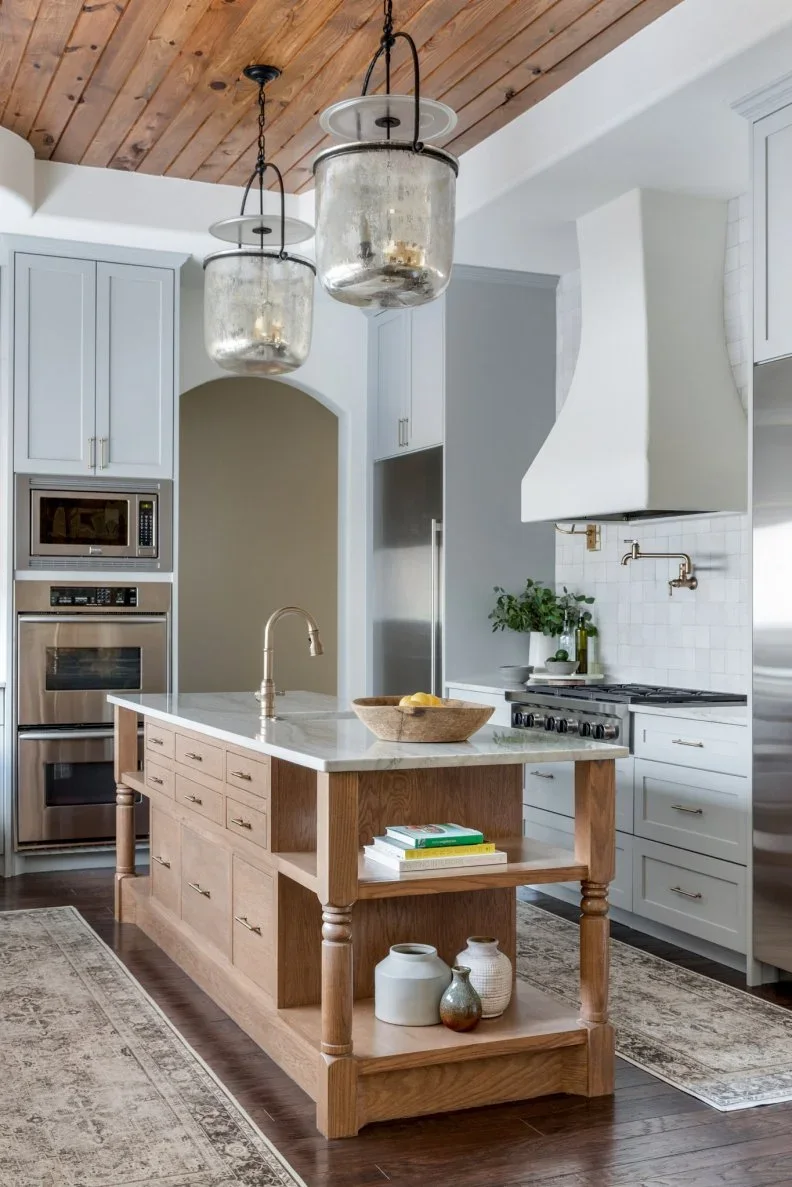 SaveSupport Non AI Creator
Image credit: Photo: Molly Culver. From: Bandd Design
This island introduces wood through drawers, turned legs and open end shelves, while the surrounding cabinets remain painted. Its furniture-like outline makes it feel distinct from the wall units. The wood ceiling repeats the warmth overhead, so the island belongs to the room even without matching every perimeter door.
Check how the open end shelves will be used before choosing the same arrangement. Books and decorative vessels may suit one household, while enclosed storage would be more practical for another. Confirm the island’s support, sink services and appliance needs, and allow comfortable access to the drawers when someone is standing at the sink.
IDEA 20 / 20
Give Two Islands Different Everyday Jobs
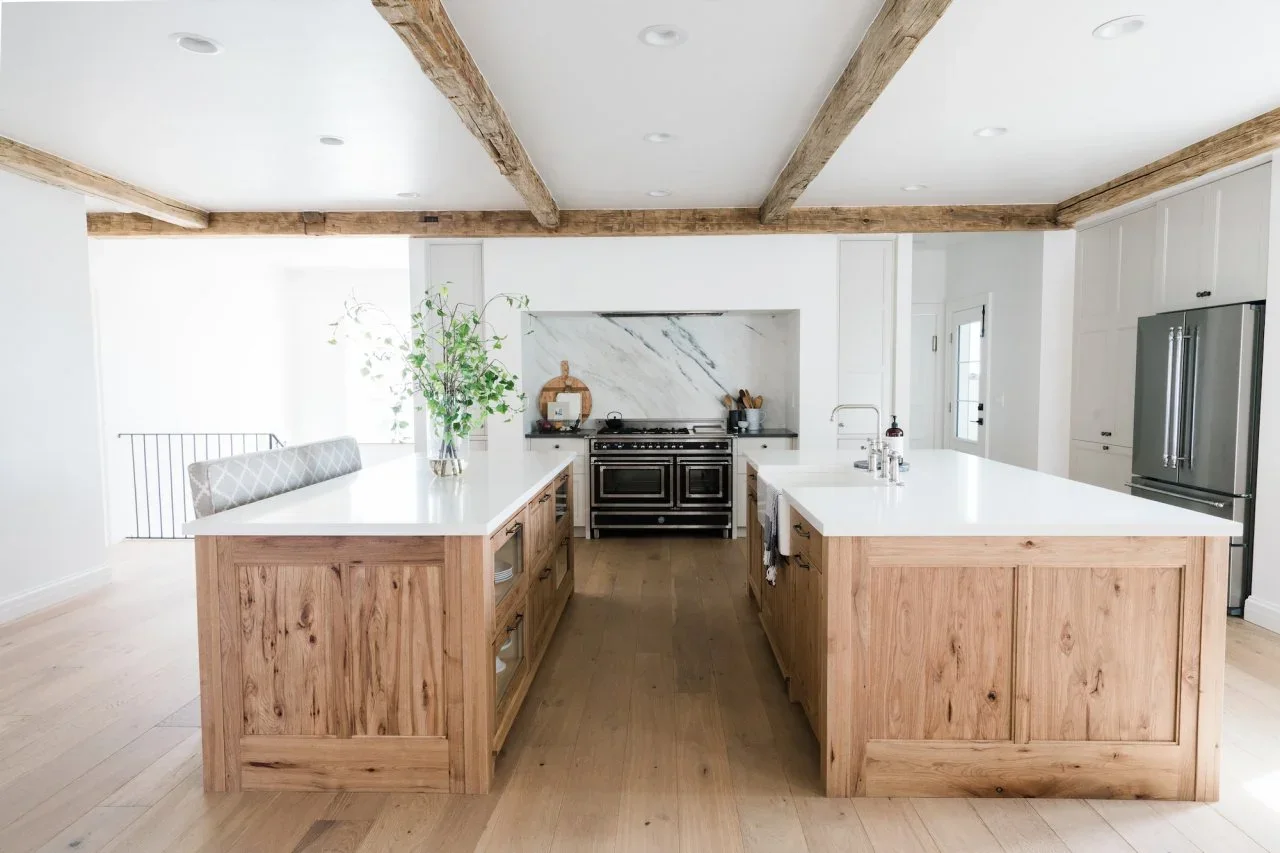 SaveSupport Non AI Creator
Image credit: Photo: Travis J. Photography. From: House of Jade Interiors
Two wood islands create separate working and seating edges in this large kitchen. Their matching knotty fronts connect them visually, while the sink and storage arrangements give each a different role. White perimeter cabinets keep the repeated wood from covering the whole room, and overhead beams echo its more rustic character.
Two islands only help when the room has enough space for their doors, drawers and walking routes. Plan preparation, washing, seating and appliance access before choosing the arrangement. In a smaller room, one well-organized island may serve those tasks better than two surfaces that force everyone through a narrow central passage.
BRING IT ALL TOGETHER
Start with a finished sample and a storage plan
Look at the wood sample upright beside the floor, wall color and counter rather than choosing it on its own. Review the grain direction, sheen, door profiles and visible end panels. Ask the supplier to identify the timber or veneer, substrate and protective finish so you know exactly what the cabinet order includes.
Then check the practical details: drawer contents, cupboard reach, corners, appliance clearances and cleaning requirements. A wood finish can refresh the feel of a room, but the cabinets still need to hold the items you use and open comfortably around the way you cook.