South Florida gardens can be leafy and informal, neatly structured or full of small container displays. These photographed projects show different ways to organize entrances, paths, sitting areas and planting. The useful starting point is the arrangement of the space, rather than buying every plant visible in a picture.
Conditions vary across the region and even within one yard. Check local soil, drainage, sunlight, exposure and the mature size of plants before choosing a palette. A sheltered courtyard and an exposed coastal frontage need different decisions; a lush photograph alone cannot tell you whether a plant is suitable for your own site.
PART 01
Make entrances and routes welcoming
IDEA 01 / 20
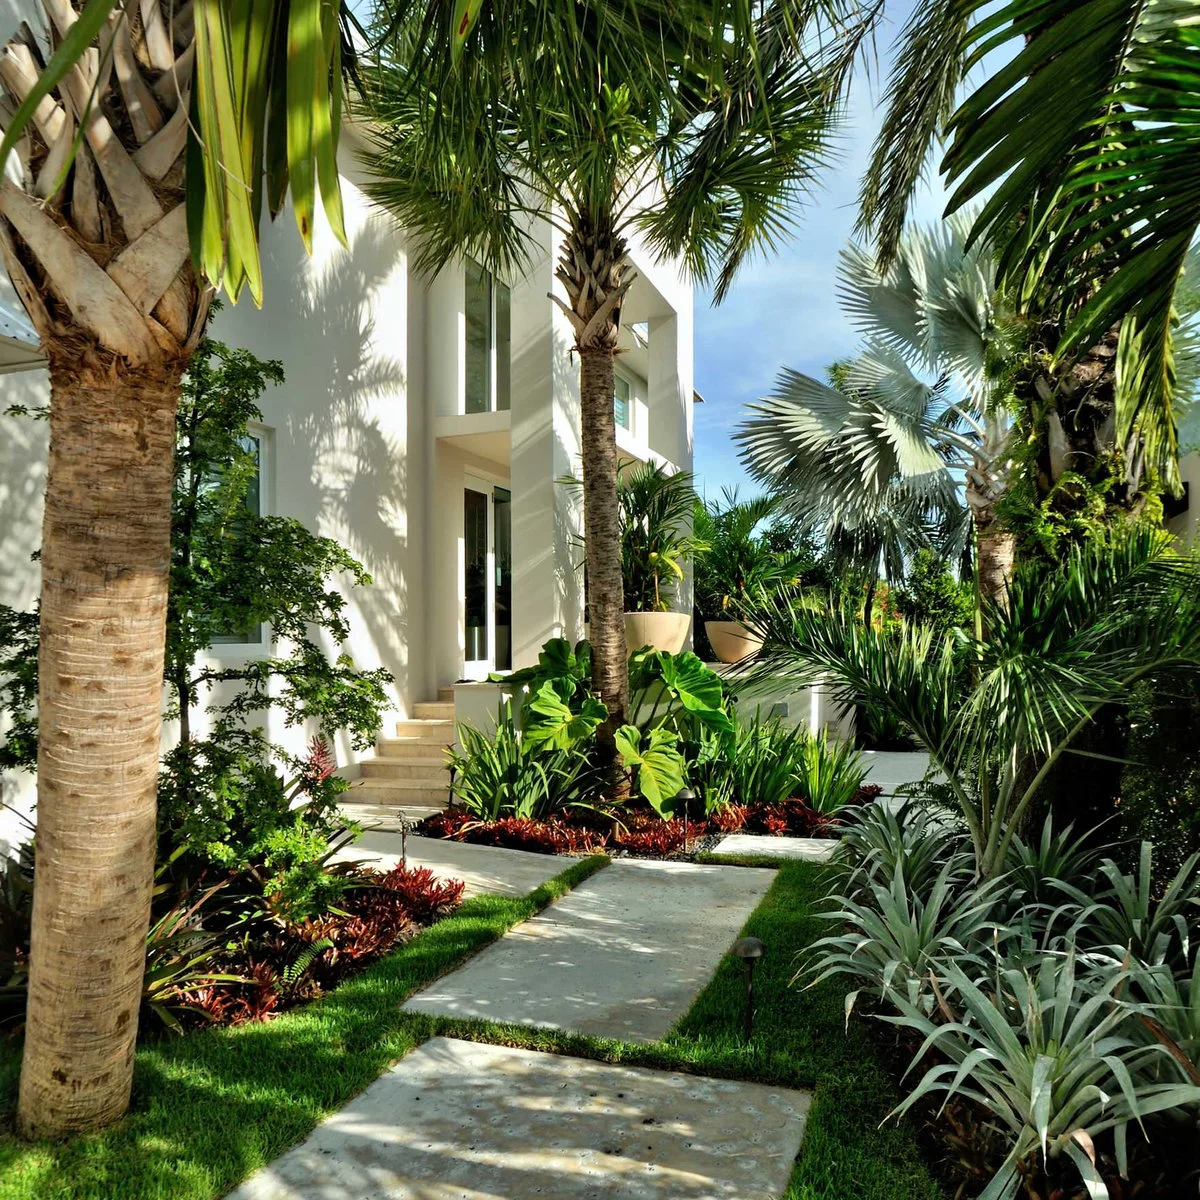
Give Large Leaves a Clear Entrance Route
 SaveSupport Non AI Creator
Image credit: Project: Craig Reynolds Landscape Architecture (via Houzz)
Broad pale slabs lead toward the entrance through several layers of foliage. Tall palm trunks leave the house visible, while red groundcover and silver-blue leaves add contrast near the ground. The planting surrounds the route without turning every part of the garden into the same height.
Start with a comfortable, stable route to the door before choosing the surrounding foliage. Allow for mature leaf spread and avoid placing stiff leaves where people brush past them. Keep planting clear of steps and entry controls so a lush approach remains easy to use when carrying bags or welcoming visitors. Where the approach also needs a boundary, these low front yard fence ideas help compare open views and planted edges.
IDEA 02 / 20
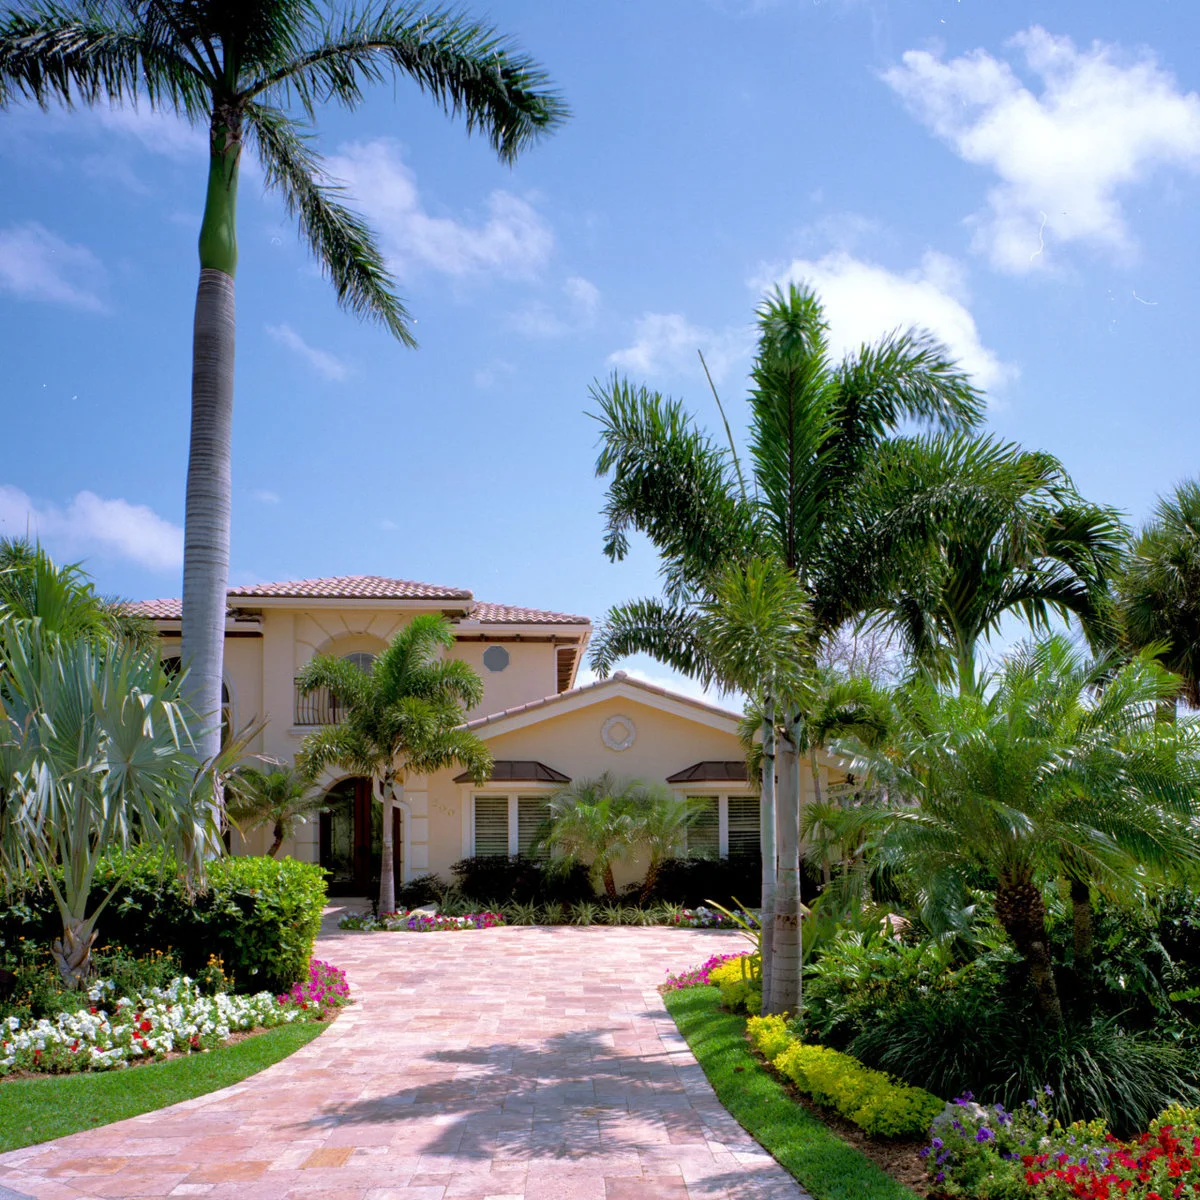
Frame the Drive Without Hiding the Door
 SaveSupport Non AI Creator
Image credit: Project: Botanical Visions (via Houzz)
Palms create a tall frame around the paved arrival area, with lower flowers and foliage along its curved edges. The cream house remains visible beyond the planting. Repeated green layers connect the larger trees to the ground without filling the center of the drive.
These driveway landscaping ideas offer other ways to balance planting with everyday vehicle access. Keep sightlines and turning space clear, and choose plants that fit the beds at maturity. A broad paved entrance can still have a planted edge without putting large pots or projecting leaves where doors and people need to move.
IDEA 03 / 20
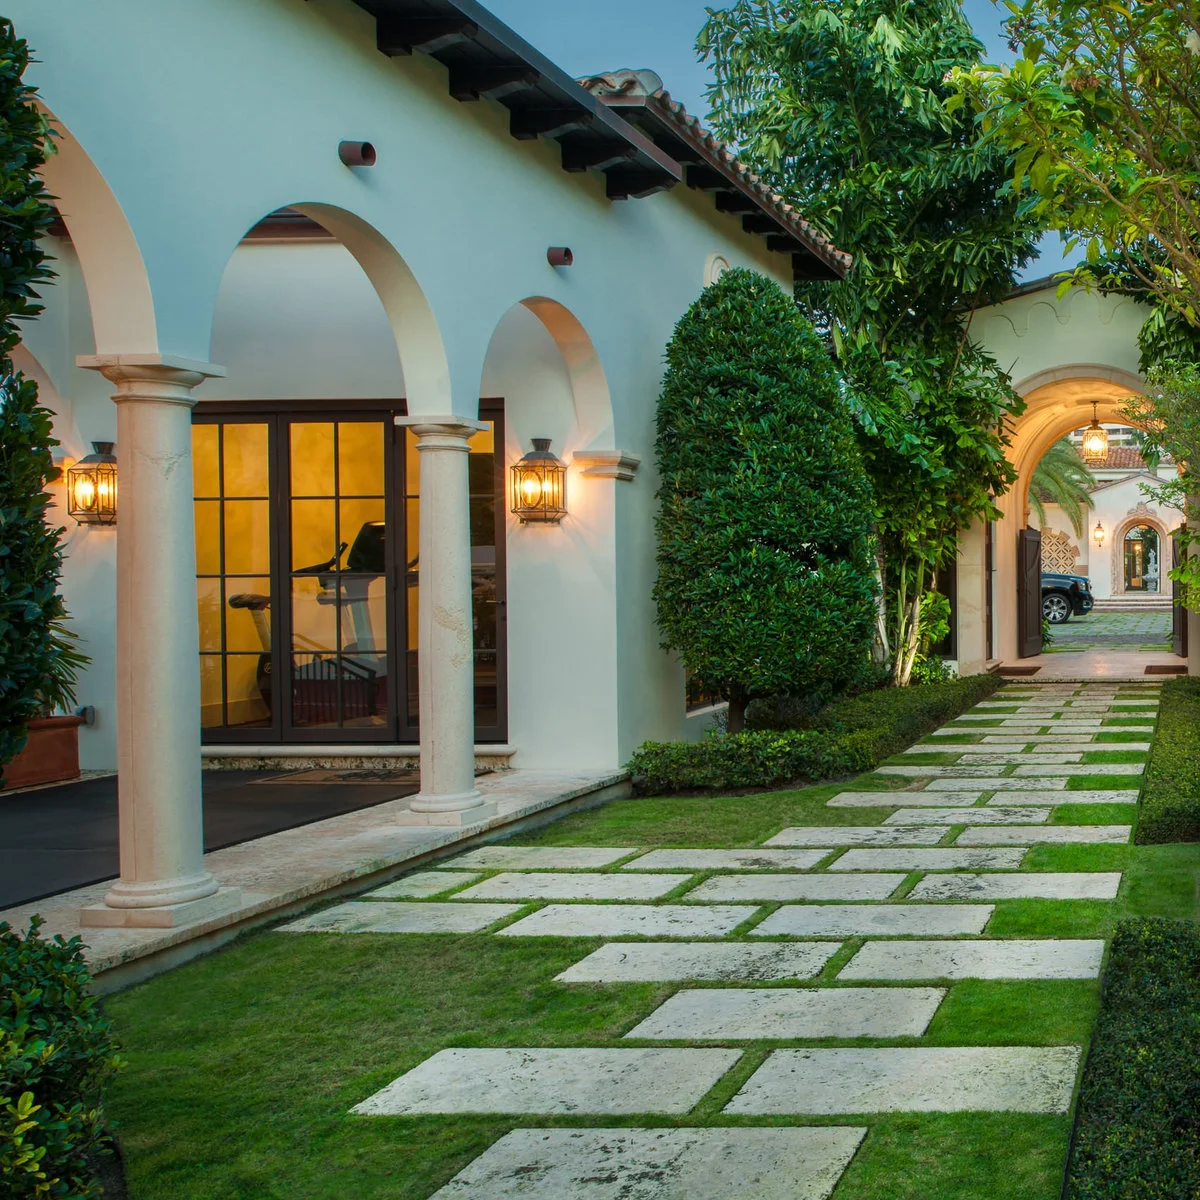
Use a Repeated Paving Rhythm Beside the House
 SaveSupport Non AI Creator
Image credit: Maxwell Mackenzie; landscape: Overmyer Architects
Pale rectangular slabs repeat through the side garden, with green joints softening the long route. Clipped shrubs echo the strong arches of the house, while taller foliage rises above the lower planting. The path has a clear direction rather than disappearing into a densely planted border.
Think about how the joints will be maintained and how the route feels under normal footwear before choosing a similar surface. Keep shrubs far enough from the slabs that growth does not narrow the passage. A repeated paving pattern works best when it remains level and usable after the planting matures.
IDEA 04 / 20
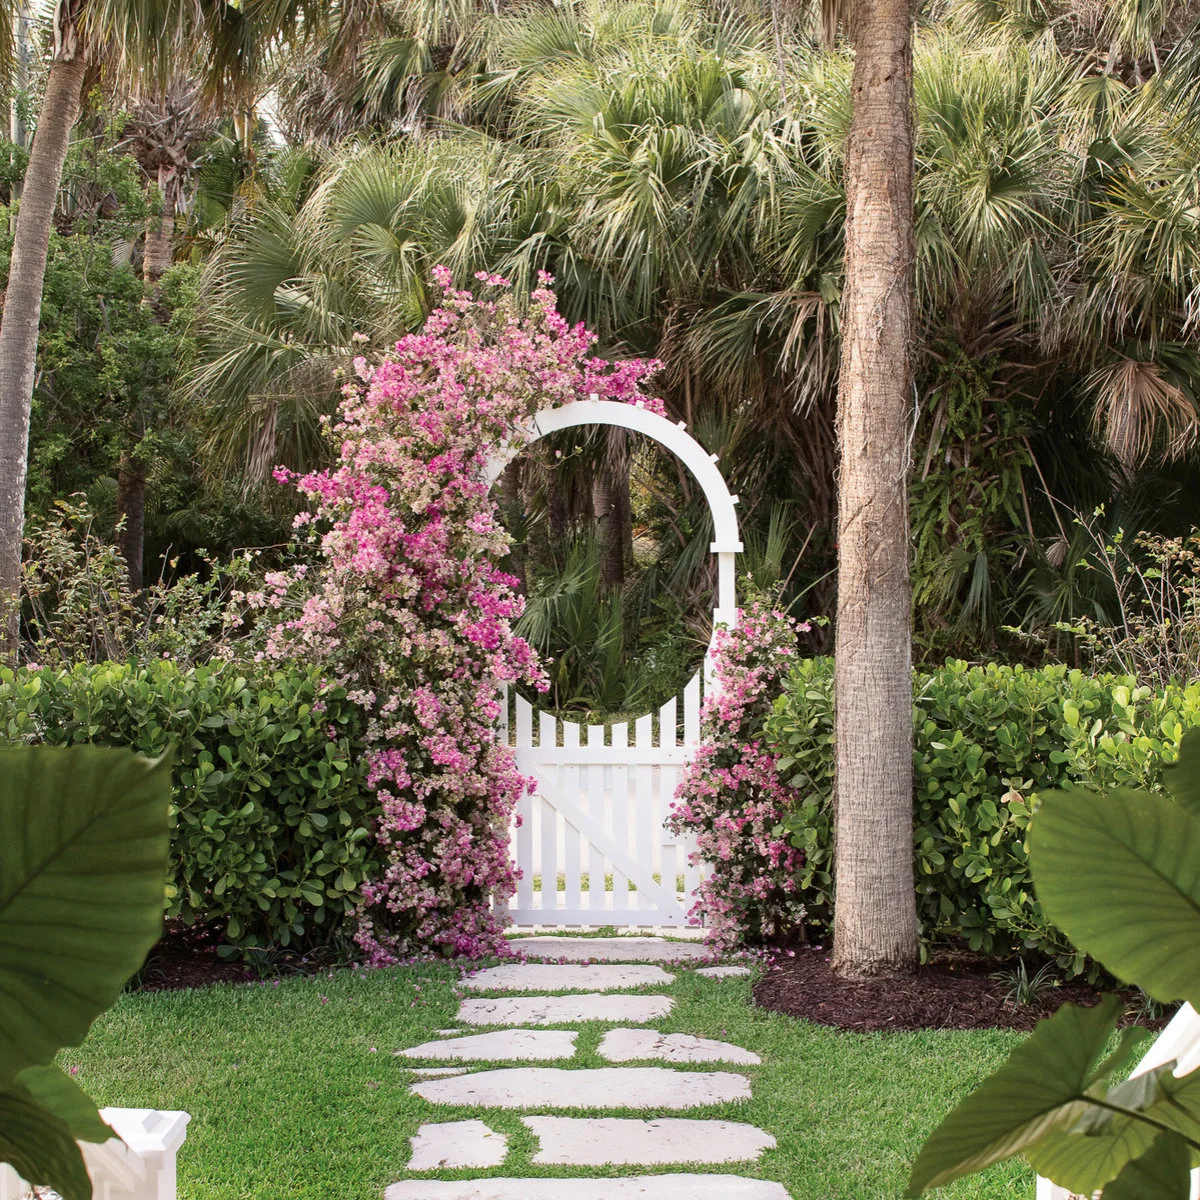
Make a Garden Gate the Focal Point
 SaveSupport Non AI Creator
Image credit: Project: Pineapples, Palms, Etc. (via Houzz)
The white gate and rounded arbor stand out against the palms and dark green hedge. Pink flowers climb around the opening, and pale stepping stones lead toward it through the lawn. The entrance is easy to recognize even though the surrounding garden is full of foliage.
Choose a climber that suits the support and local conditions, and leave access to its fixings. Keep growth clear of hinges, latches and the opening above the path. Plan for pruning and fallen flowers so the welcoming feature remains a working gate rather than a passage that becomes progressively harder to use.
IDEA 05 / 20
Curve a Small Walk Through Layered Beds
 SaveSupport Non AI Creator
Image credit: Project: SK 11 Group, Inc - Home of M.O.S & SKY LUX (via Houzz)
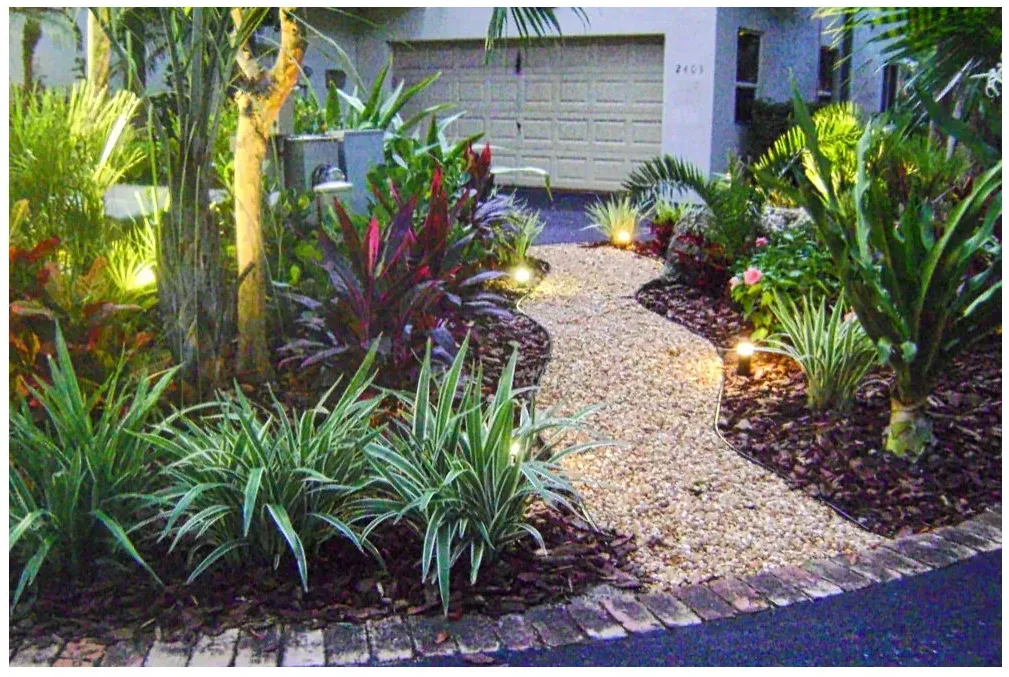
The pale gravel route bends between two planted beds instead of cutting straight through the center. Striped low leaves mark its edge, with red foliage and palms providing taller layers. Small lights sit within the planting, leaving the walk itself visually clear.
Choose a surface that is practical for the people using the entrance and contain loose material so it does not spread onto other paving. Leave access to the lights and their connections. Keep mature foliage away from the route, especially where the curve makes it difficult to see a low projecting leaf.
PART 02
Build depth with foliage and clear edges
IDEA 06 / 20
Use Leaf Color to Create a Layered Border
 SaveSupport Non AI Creator
Image credit: Project: Knoll Landscape Design Miami (via Houzz)
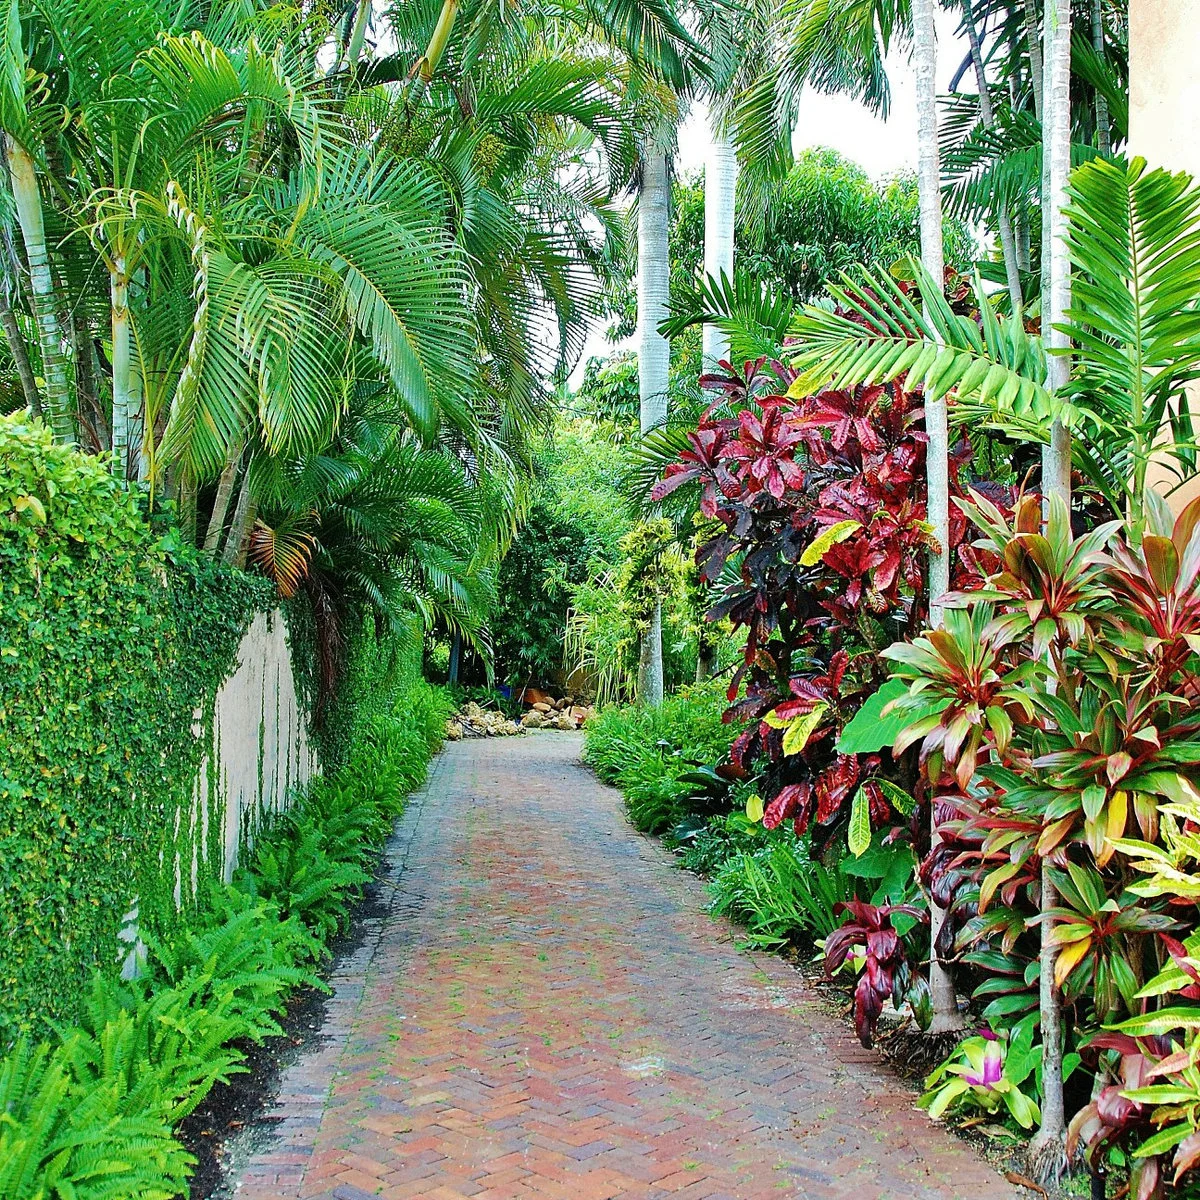
Red and yellow leaves give this narrow garden much of its color, with palms forming a higher canopy. Lower ferns soften the opposite side of the brick path. The contrast comes from repeated foliage groups rather than a line of separate flowering pots along the route.
Borrow the balance of heights and colors before selecting individual plants. Check each plant’s needs locally and group those that can share the same conditions. Keep the lower layer from spilling across the path, and leave enough room to remove fallen fronds without having to trample smaller plants.
IDEA 07 / 20
Bring Structure to a Leafy Garden with Curved Beds
 SaveSupport Non AI Creator
Image credit: Project: Knoll Landscape Design Miami (via Houzz)
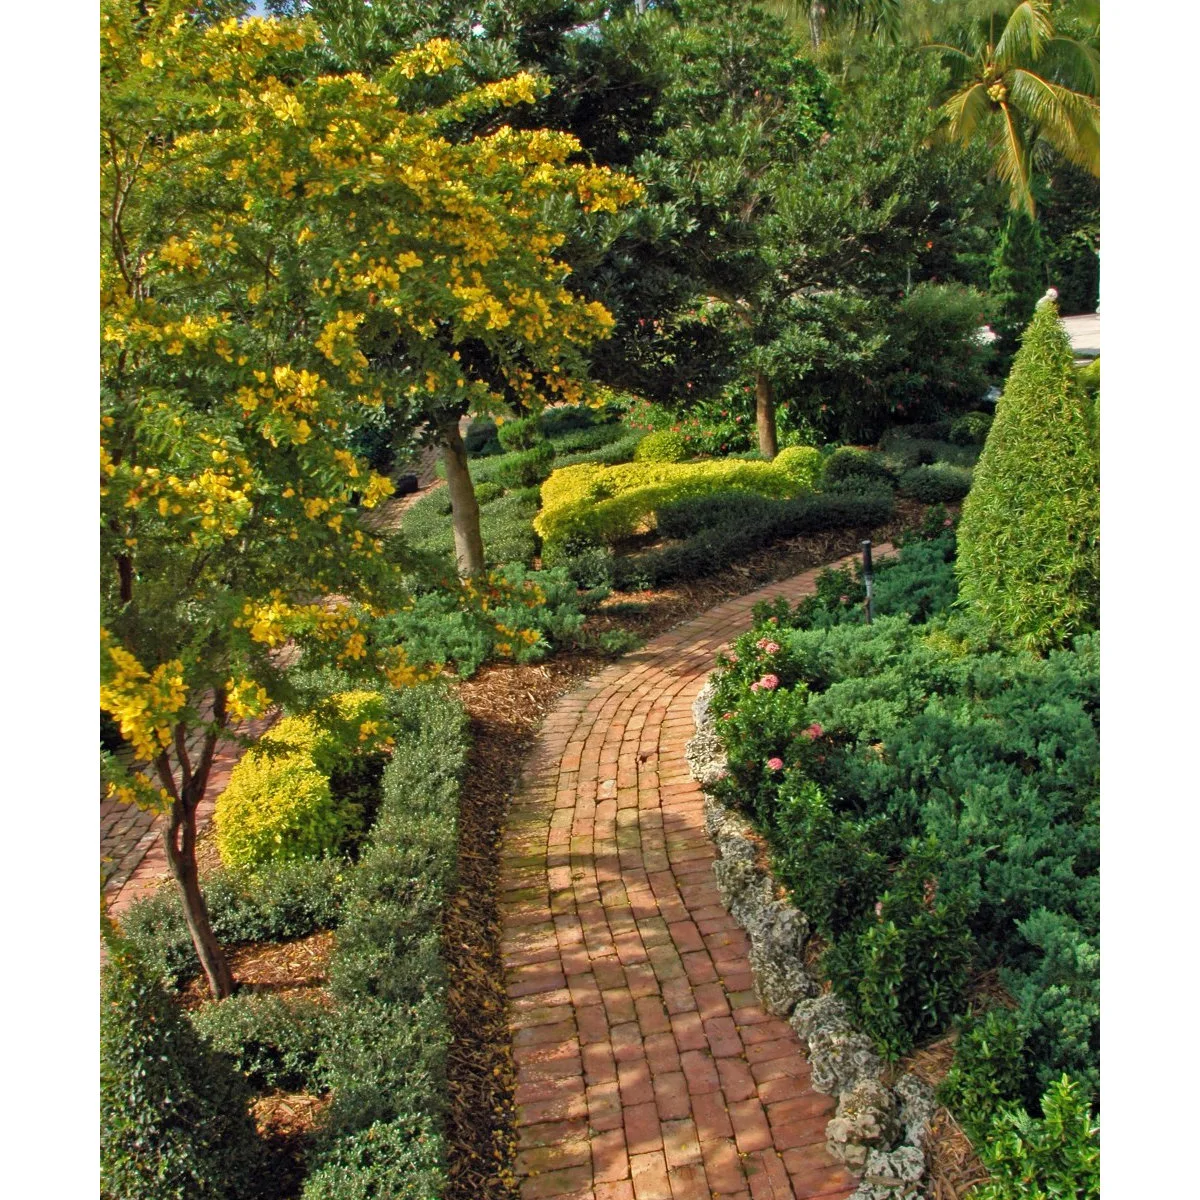
Curved bed edges guide the brick path between rounded shrubs and taller clipped shapes. Yellow-green foliage repeats near the ground and connects with the yellow flowers overhead. The garden feels structured without relying on straight lines through every part of the planting.
Clipped outlines come with a maintenance commitment, so choose only as much shaping as you want to keep. Let the route determine the bed edge instead of narrowing the path to fit more shrubs. Check the mature size of the larger plants so regular pruning is a choice rather than a necessity.
IDEA 08 / 20
Keep a Simple Lawn Edge Against a Dense Background
 SaveSupport Non AI Creator
Image credit: Gabriela Fojt; landscape: Studio Sprout
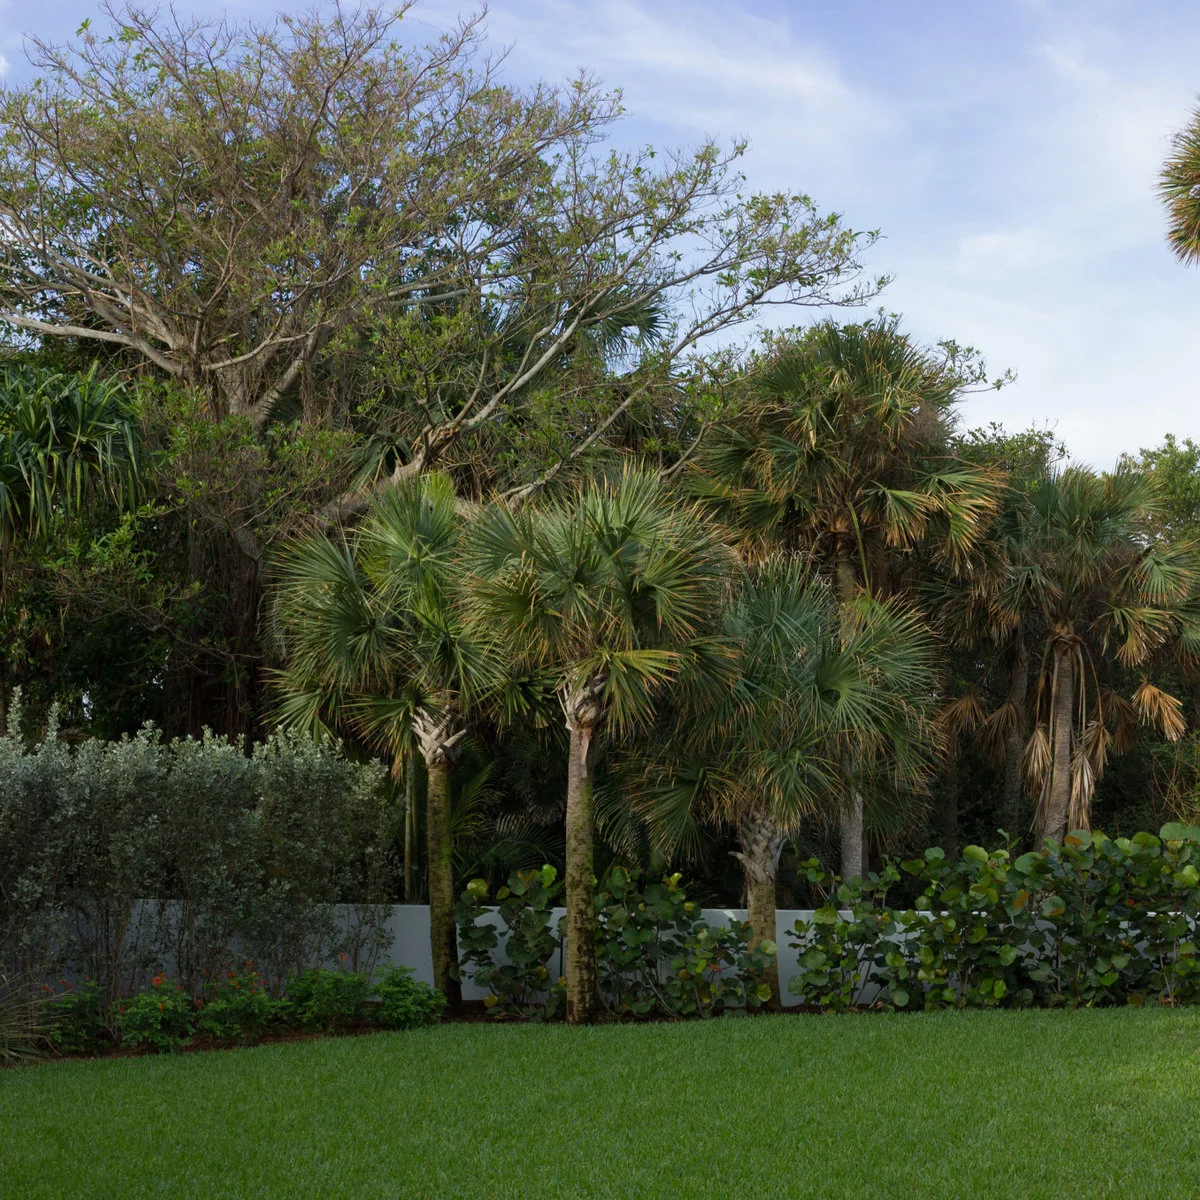
A simple lawn edge meets a layered background of palms, taller trees and broad leaves. The planting has different heights, but the open grass gives the foreground a quieter surface. The boundary creates depth without dividing the lawn into several small planted islands.
Decide how much lawn is useful for your household before extending the bed. Keep access for maintaining the boundary and inspecting mature trees, and avoid piling new soil against trunks. A full background needs room to develop; selecting plants for their eventual size is more useful than filling every visible gap immediately.
IDEA 09 / 20
Repeat Color Along One Broad Front Bed
 SaveSupport Non AI Creator
Image credit: Landscape design: Pamela Crawford
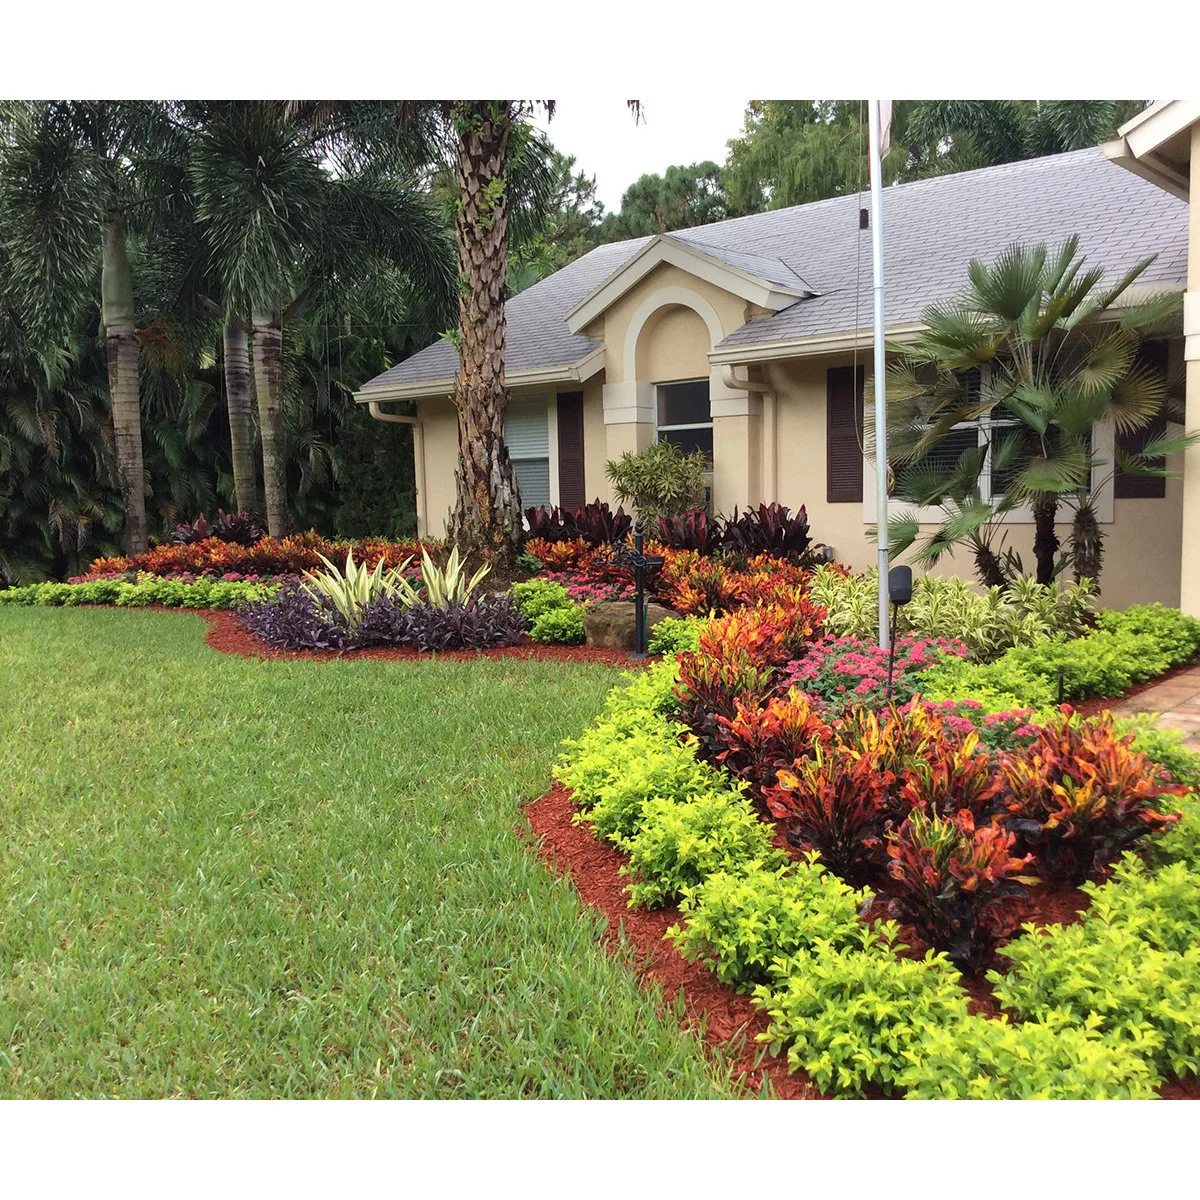
The curved bed carries repeated bands of yellow-green and orange-red foliage around the front lawn. Taller dark leaves sit closer to the house, with palms providing the highest layer. The repeated colors make a full bed easier to read from the entrance and street.
These low-maintenance landscaping ideas can help you decide which parts of a planting scheme suit your routine. Repeated color does not mean every plant needs identical care. Keep mulch away from trunks and crowns, and plan enough access to reach plants at the back without repeatedly stepping through the front border.
IDEA 10 / 20
Balance Strong Rosettes with Softer Planting
 SaveSupport Non AI Creator
Image credit: Allen Rokach; landscape design: Pamela Crawford
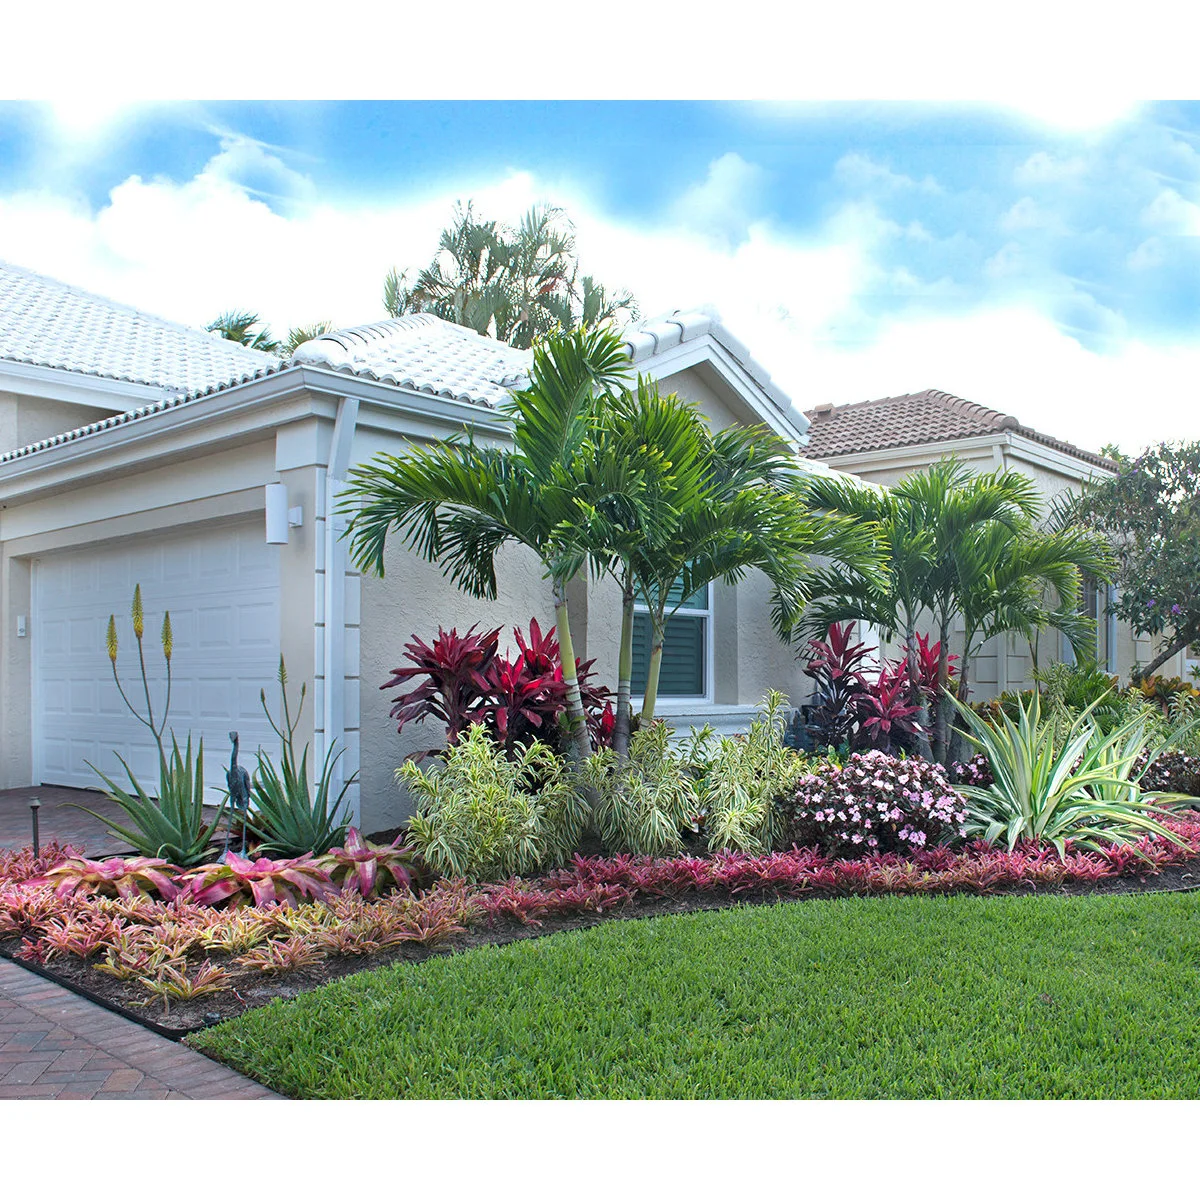
Large striped rosettes form the strongest shapes in this front bed, surrounded by smaller pink flowers and red-toned foliage. Small palms raise the composition above the lower border. The pale house provides a quiet background so the different leaf forms remain easy to distinguish.
Check how large a rosette becomes and whether its leaf edges are suitable near the intended route. Leave enough room for maintenance rather than packing plants tightly around it. Choose the surrounding palette for compatible growing conditions, and allow a little visual breathing room around the strongest shapes.
PART 03
Leave room to enjoy the garden
IDEA 11 / 20
Let a Path Reveal a Shaded Sitting Area
 SaveSupport Non AI Creator
Image credit: Project: Craig Reynolds Landscape Architecture (via Houzz)
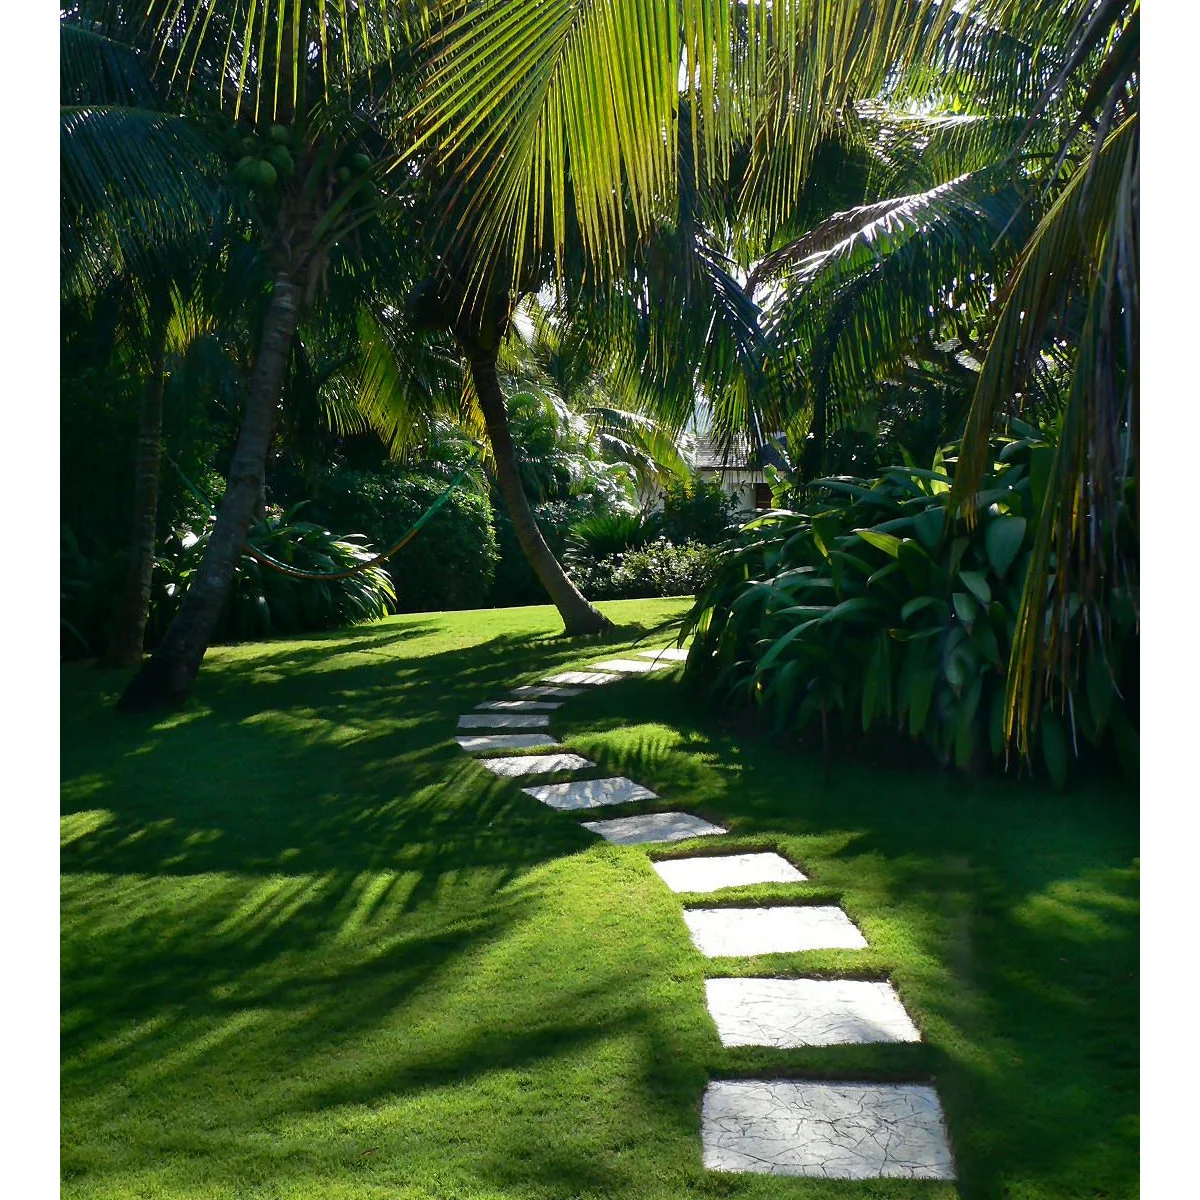
Pale stepping stones curve through the grass under a leafy canopy, leading toward a sheltered garden area. Taller foliage forms the background while the center stays relatively open. The partial glimpse of a hammock suggests a place to pause without filling the route with furniture.
Plan the destination as carefully as the path: it needs a suitable stable position and a comfortable approach. Check stepping distances against how people actually walk, and choose planting that will not close the route. If adding a hammock, use purpose-made supports or professional advice appropriate to the installation rather than assuming any nearby trunk will do.
IDEA 12 / 20
Leave a Small Clearing for Chairs
 SaveSupport Non AI Creator
Image credit: Tamara Alvarez; landscape: Craig Reynolds Landscape Architecture
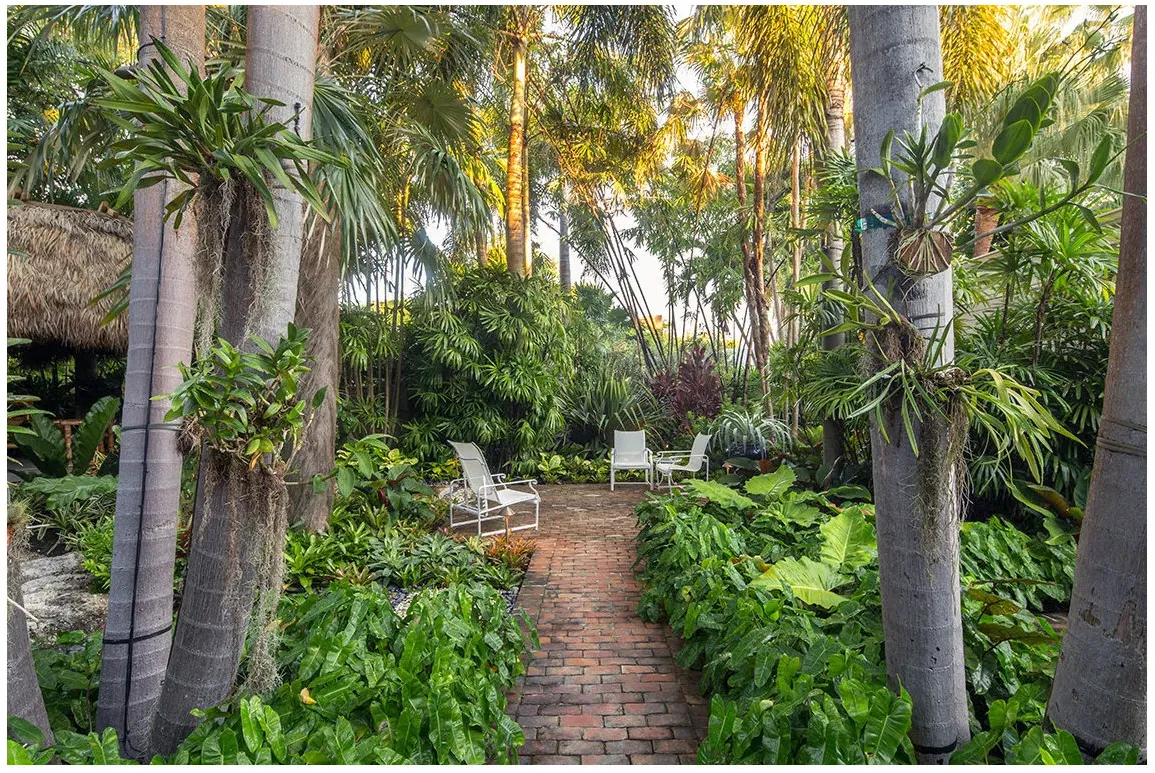
The brick path widens into a small clearing with several white chairs. Tall palm trunks and broad leaves surround the space without occupying its center. The light-colored seating stands out against the green background and makes the destination visible from the approach.
Leave space behind occupied chairs and keep the path usable when people are seated. Choose outdoor furniture you can clean and move when needed, and plan somewhere suitable to store it in severe weather. A planted enclosure should still leave access for removing fallen leaves and maintaining the surrounding trees.
IDEA 13 / 20
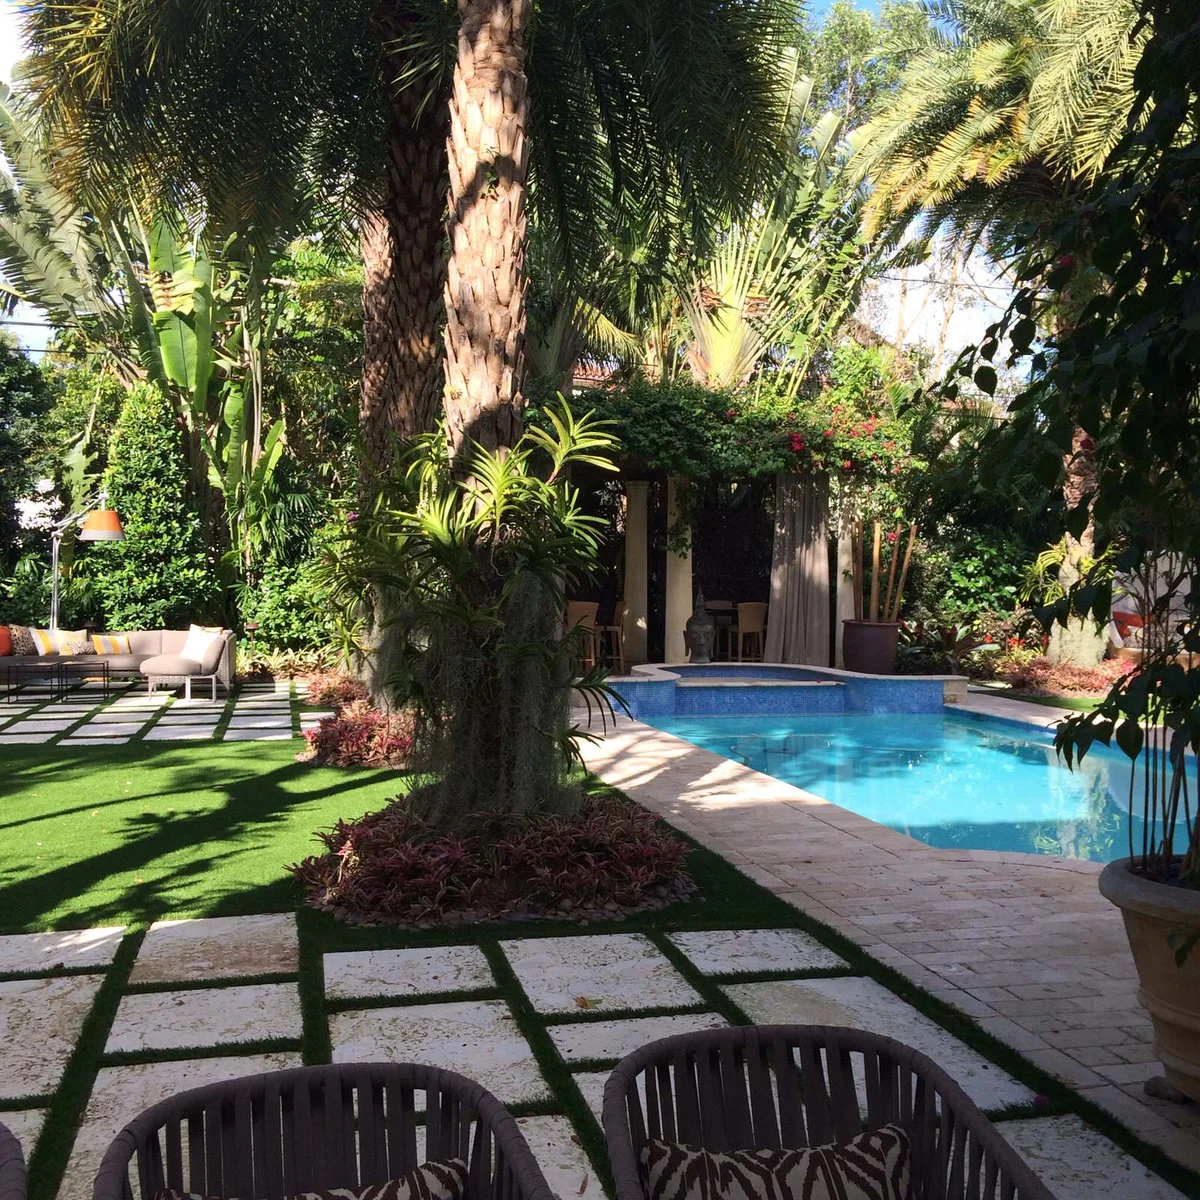
Keep Poolside Planting in Defined Areas
 SaveSupport Non AI Creator
Image credit: Project: Landscaping by Steve Blaum (via Houzz)
The pool and sitting areas are linked by pale paving, with green joints repeating across the courtyard. Palms stand in distinct planted areas rather than emerging randomly from the walking surface. The foliage forms a backdrop to the furniture while the main routes remain visible.
Plan pool access, barriers and circulation with the appropriate professionals before adding planting. Keep leaves and containers away from the immediate walking edge, and preserve access to equipment. Choose plants with their mature spread and cleanup needs in mind, rather than assuming a tropical appearance means they belong beside water.
IDEA 14 / 20
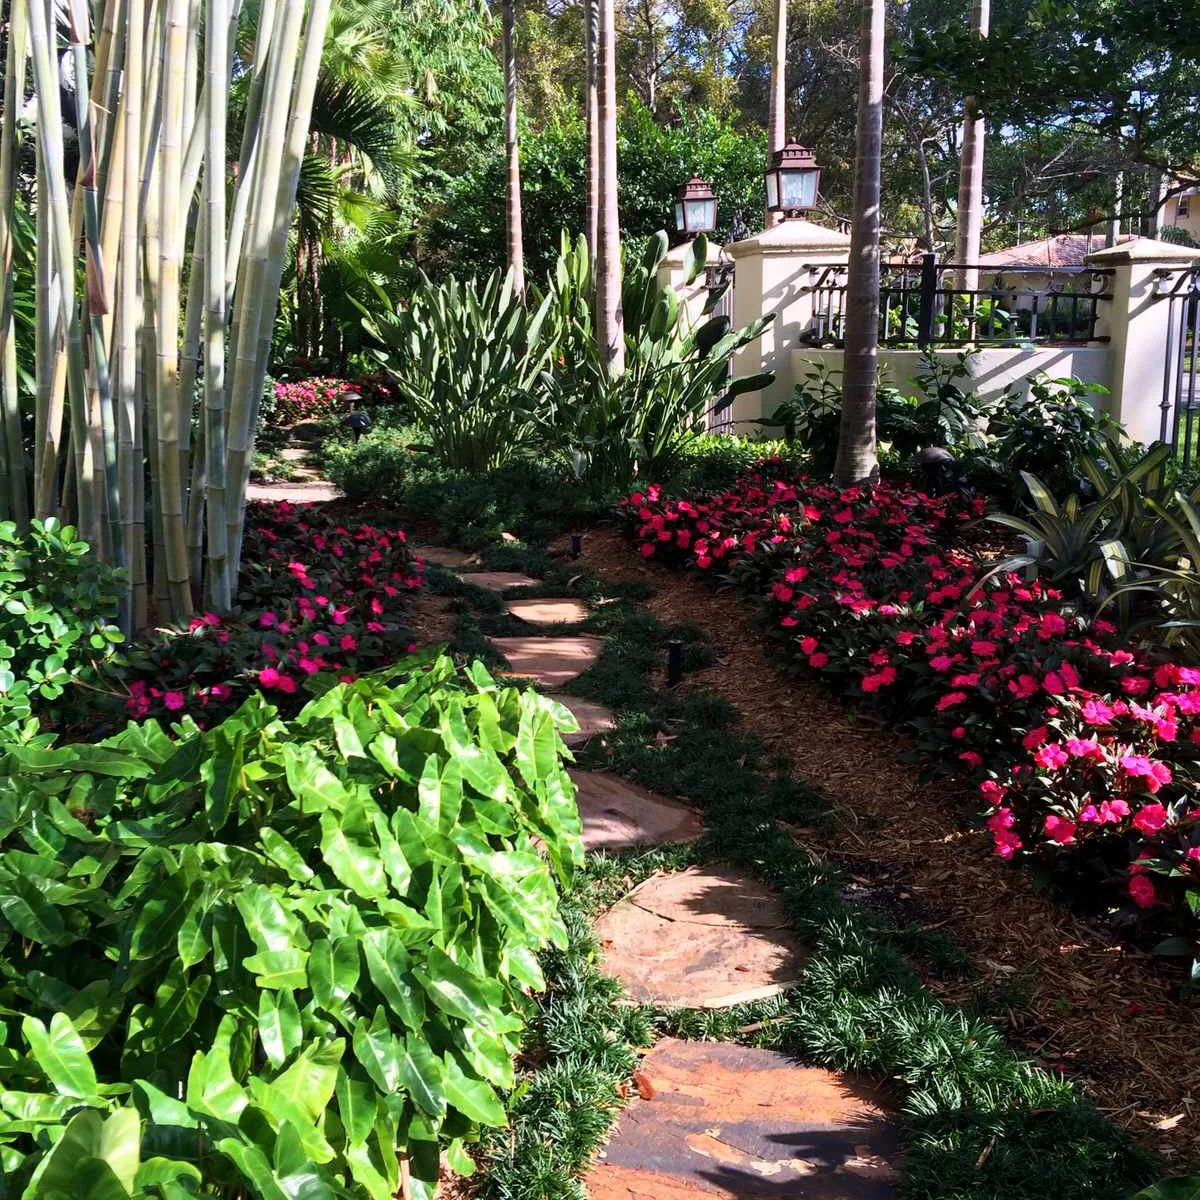
Add a Narrow Planted Route Beside the Boundary
 SaveSupport Non AI Creator
Image credit: Project: Landscaping by Steve Blaum (via Houzz)
A narrow route winds between red flowers and broad leaves beside the boundary wall. Upright stems create height while the lower planting softens the edges of the stepping stones. The wall and railings remain visible enough to give the garden a clear outer limit.
Keep this kind of path for the use it can comfortably support; a narrow garden route may not suit moving bins or bulky equipment. Choose plants that leave the stones clear at maturity. Allow access to the boundary for painting, repairs and pruning instead of treating the back of the bed as permanently unreachable.
IDEA 15 / 20
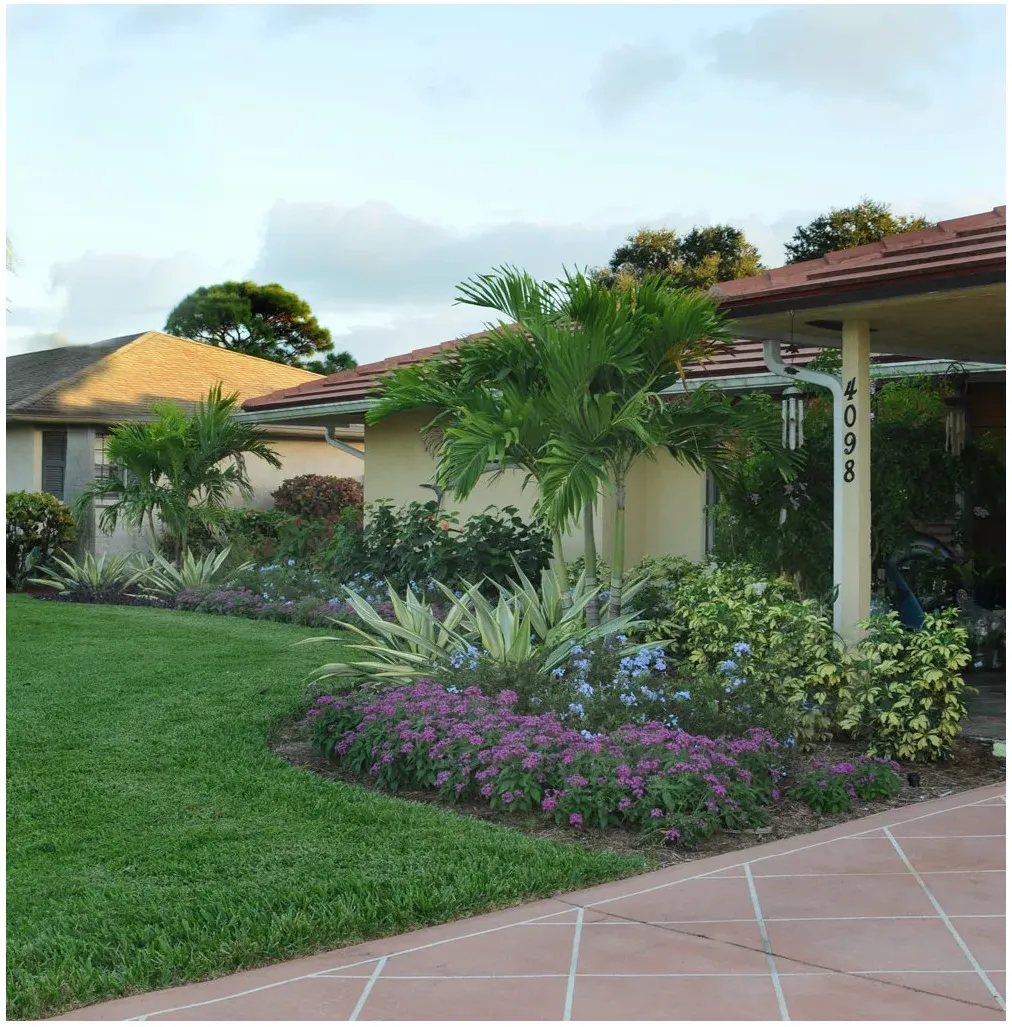
Keep Planting in Scale with a Low House
 SaveSupport Non AI Creator
Image credit: Landscape design: Pamela Crawford
Small palms and mixed flowering plants create several levels around this low house. The curved lawn edge gives the bed one clear outline. Purple and blue flowers sit at the front, with larger pale-striped leaves and shrubs connecting them to the wall behind.
These small cottage garden ideas offer more ways to combine flowers with a readable layout. Keep windows and the covered entrance clear as the plants grow. Choose a manageable number of repeated groups, and check access for caring for the middle of the bed before placing another plant along its front edge.
PART 04
Use containers for a smaller change
IDEA 16 / 20
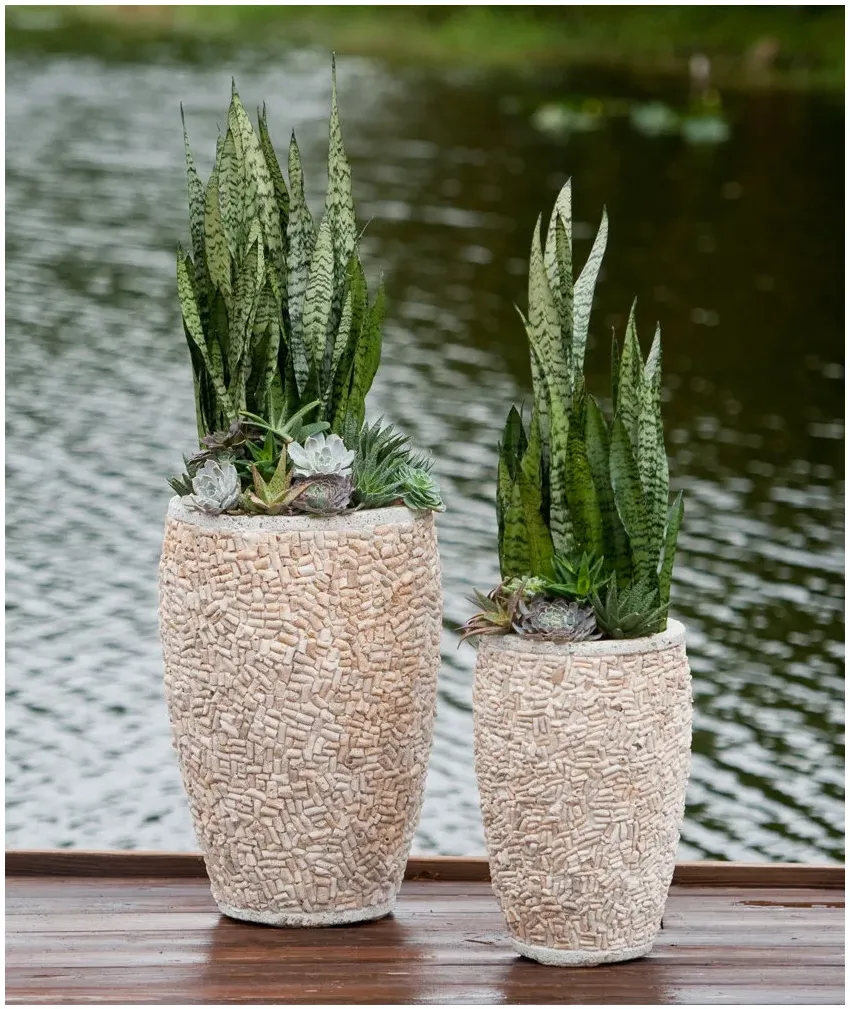
Use a Pair of Containers for Upright Foliage
 SaveSupport Non AI Creator
Image credit: Joe McBroom; container design: Pamela Crawford
Two related containers repeat the same pale texture at different heights. Upright patterned leaves provide the main silhouette, with smaller rosettes and trailing shapes around the base. The restrained green palette lets the container texture remain part of the display rather than competing with many bright flowers.
Choose stable containers with appropriate drainage and plants whose growing needs are compatible. Check their suitability locally, including whether they should be contained or avoided. Leave enough room to inspect and clean behind the pots, and position them away from an exposed edge where wind or accidental contact could tip them.
IDEA 17 / 20
Use One Colorful Pot Beside a Seating Area
 SaveSupport Non AI Creator
Image credit: Pamela Crawford
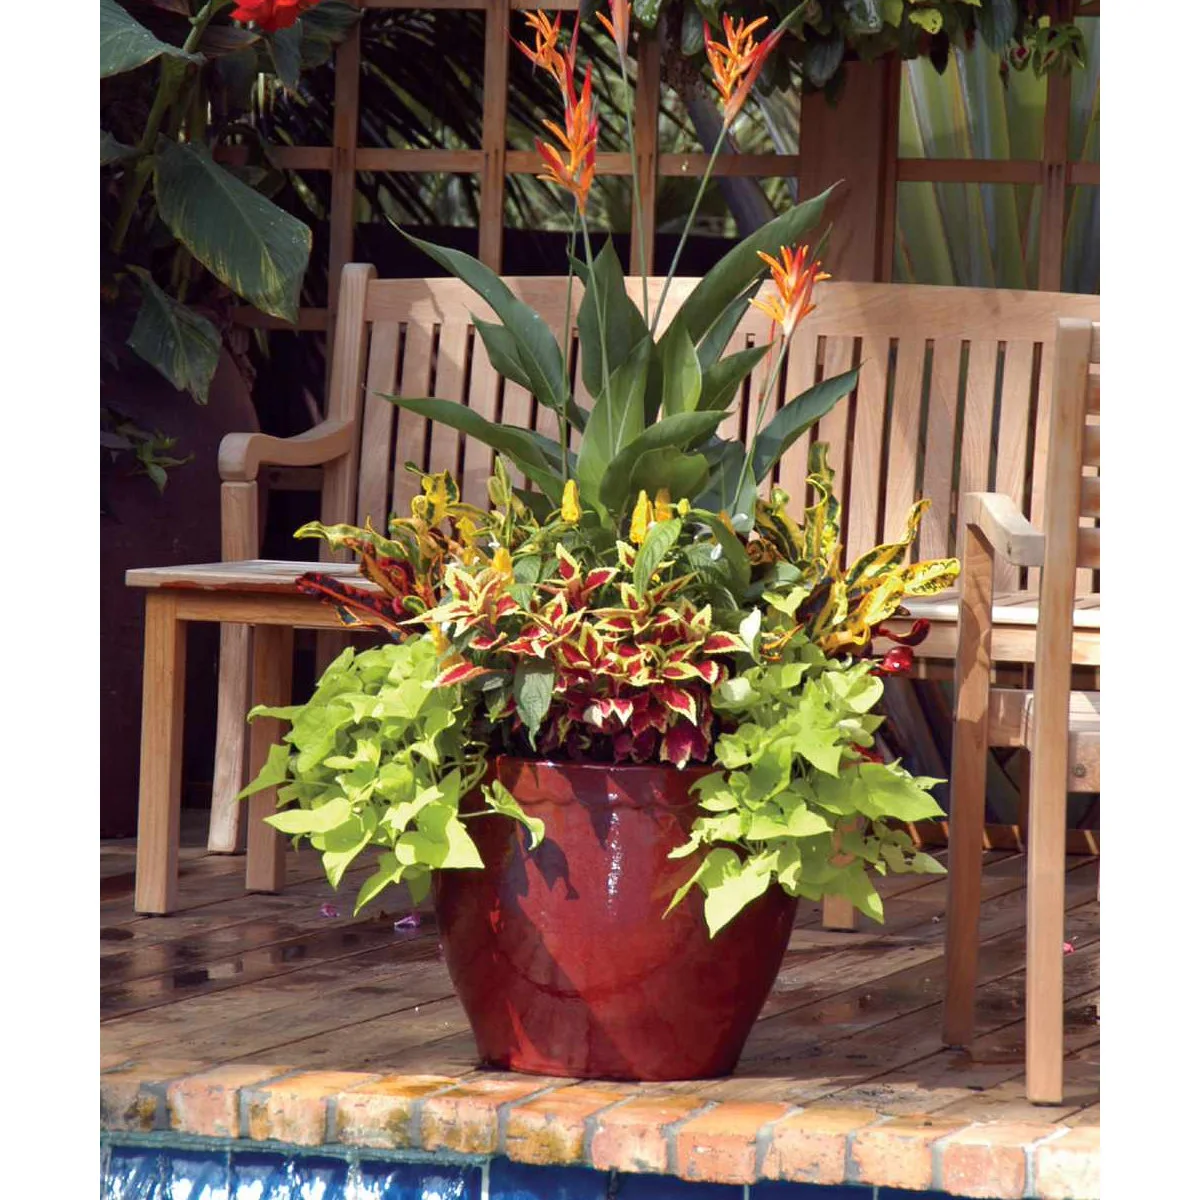
The red pot echoes the warm tones of the tall orange flowers, while trailing yellow-green foliage softens its rim. Wood seating gives the arrangement a clear setting rather than leaving the planter as an isolated object. Different leaf heights create a small layered garden within one container.
Keep the planter outside the space needed to sit down and move the chair. Choose plants for the container’s actual light and drainage, and leave access for watering without splashing the seating. A large mixed pot can be a focal point, but it still needs periodic editing as vigorous plants spread.
IDEA 18 / 20
Group Related Pots in Different Sizes
 SaveSupport Non AI Creator
Image credit: Joe McBroom; container design: Pamela Crawford
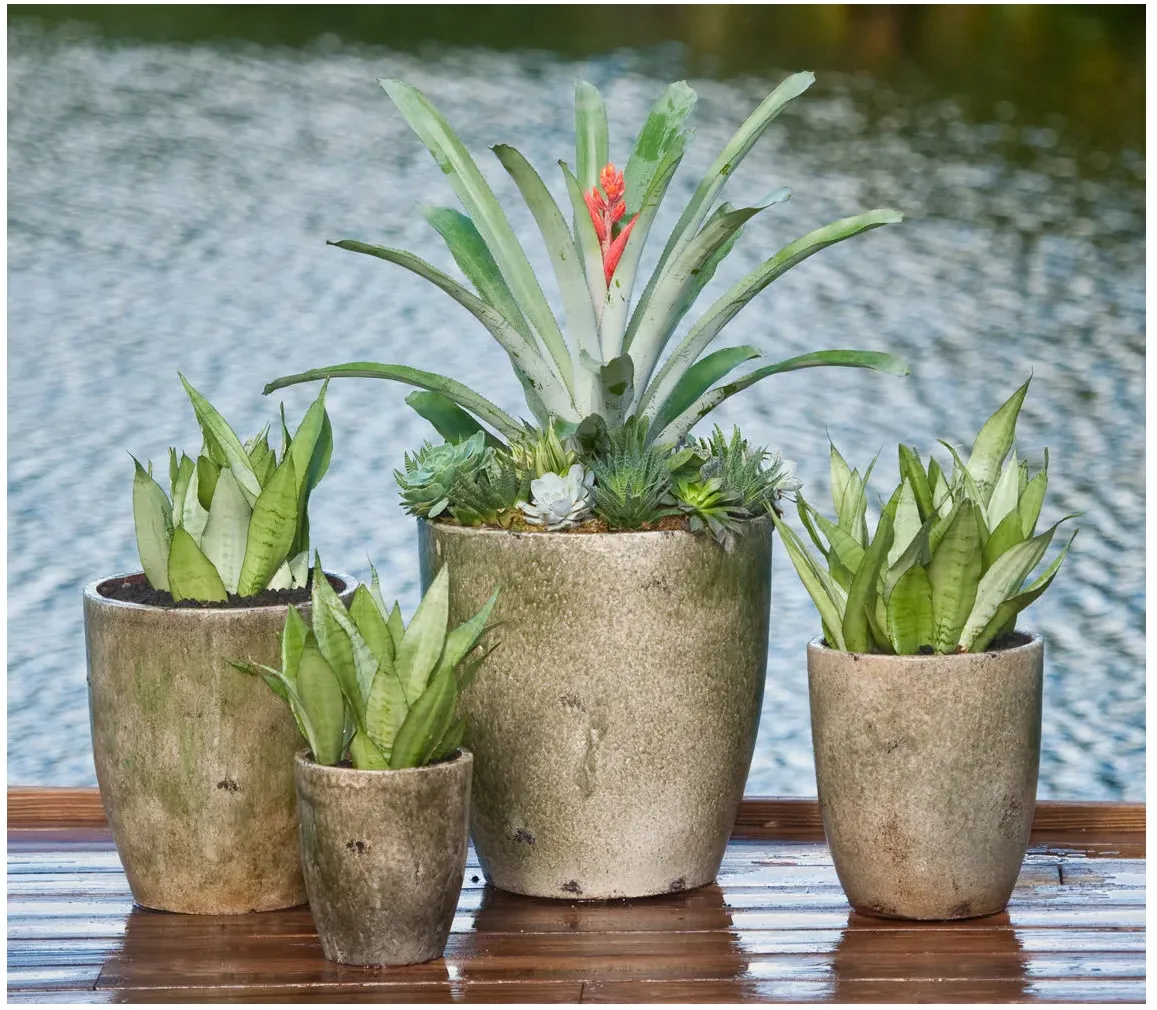
Four containers use the same warm surface color while varying in height and width. The tallest plant gives the group a center, with shorter upright leaves repeating around it. Small rosettes fill the largest pot without making every container equally dense or equally tall.
Arrange the empty pots first so you can judge the space needed around the group. Check drainage and access to each plant before filling them. Leave enough separation to clean and inspect the containers, and avoid assuming that a visually matching collection will all need watering at the same frequency.
IDEA 19 / 20
Use Trailing Foliage to Soften a Tall Container
 SaveSupport Non AI Creator
Image credit: Pamela Crawford
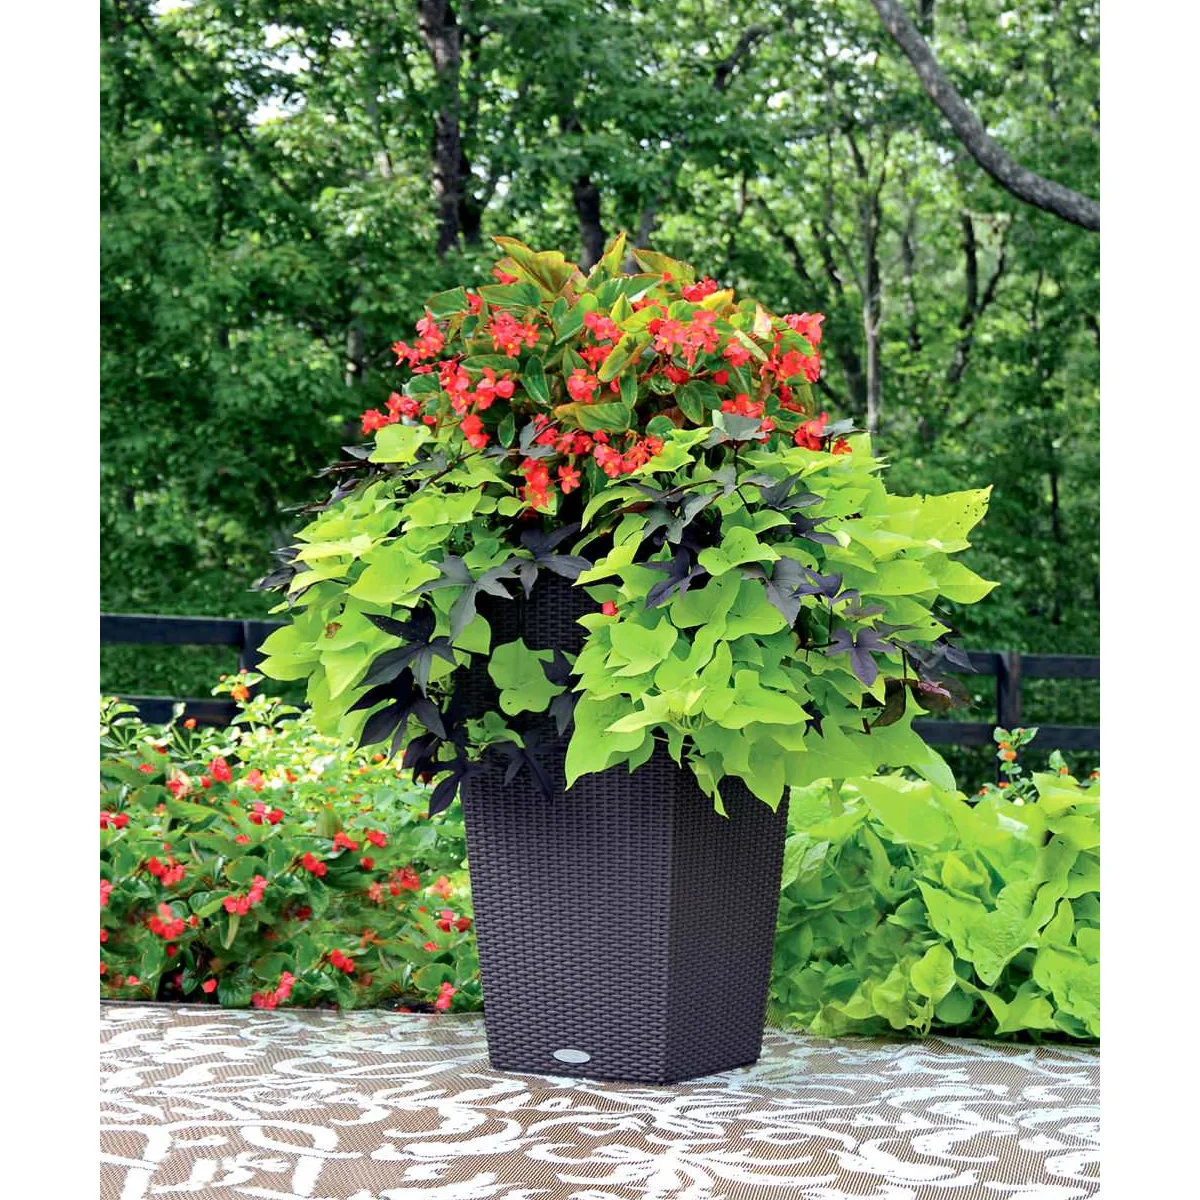
Red flowers rise above a generous layer of trailing leaves, with yellow-green and dark purple creating most of the contrast. The tall dark container remains visible beneath the foliage. A patterned outdoor rug gives the display a furnished setting rather than making it part of a deep planted bed.
Place a heavy container on a suitable stable surface and consider how drainage will affect the rug beneath it. Keep trailing growth from reaching the walking route. Check whether the plants need different trimming or replacement schedules, and make the display a size you can water and move or secure when necessary.
IDEA 20 / 20
Repeat Tall Pots Against a Leafy Background
 SaveSupport Non AI Creator
Image credit: Landscape design: Pamela Crawford
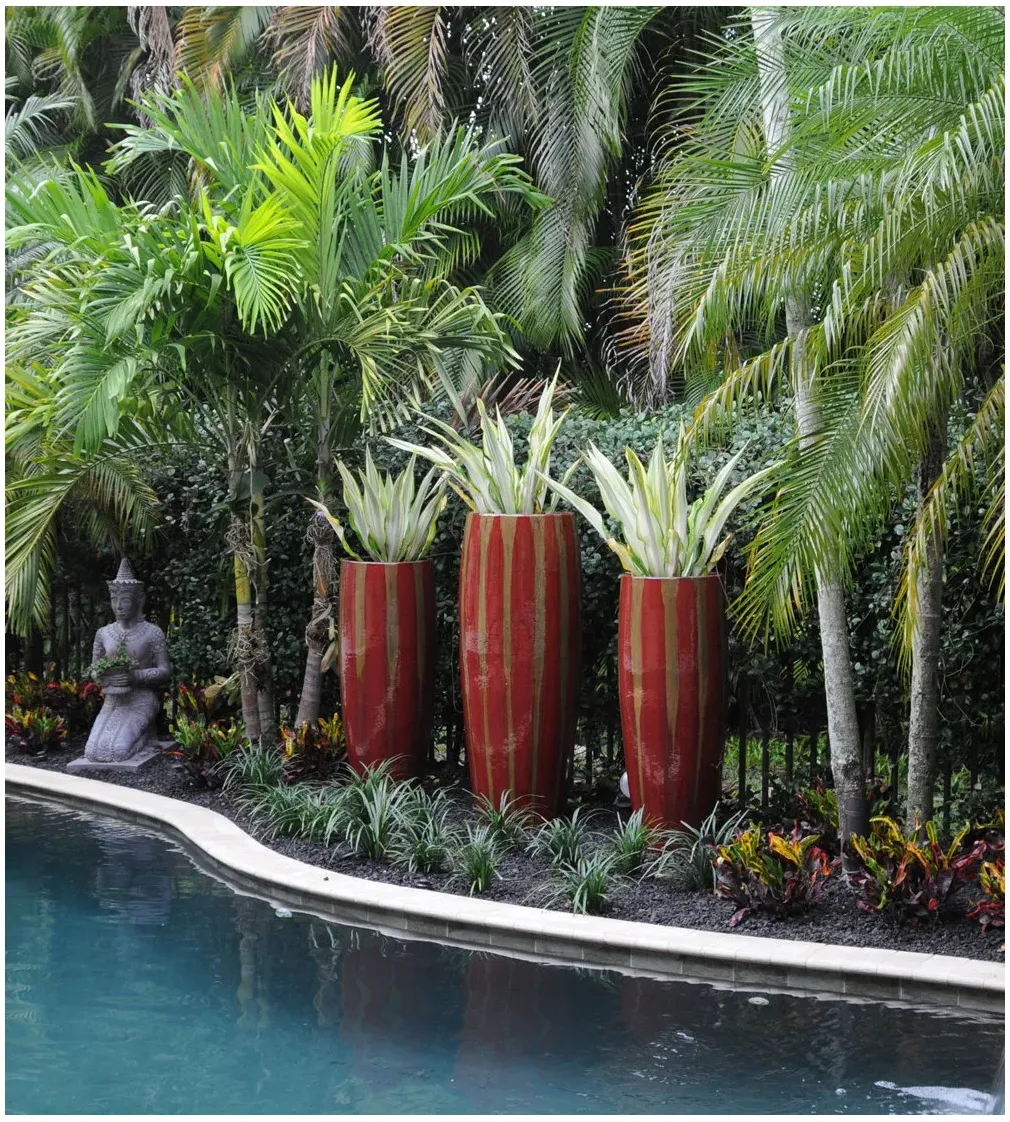
Three tall red-and-gold pots stand out against the dense green background. Their repeated upright leaves keep the display consistent, while lower planting softens the ground beneath them. The pool edge supplies a clear foreground and separates the planted border from the water.
Keep containers away from the circulation space around a pool and include them in the site’s safety and storm-preparation planning. Check their stability when filled and how you will reach them for care. Repeating a few large pieces can be more readable than adding many small ornaments throughout a narrow border.
BRING IT ALL TOGETHER
Borrow the layout before the plant list
Choose one part of the yard to improve first: the walk to the door, a shaded place to sit or a bed that is difficult to maintain. Draw the routes and furniture positions before adding plant groups. This makes it easier to see where foliage is useful and where open space matters more.
Ask a local nursery or extension service about suitable, non-invasive plants for the exact growing conditions. Check mature dimensions, establishment care and any salt or wind exposure. Keep access for maintaining drains, windows and equipment, and plan how containers and other movable objects will be secured or stored when severe weather is expected.