A useful pantry makes it easy to see what you have and put it back after cooking. Start with the food, equipment and shopping habits it needs to accommodate, then choose shelves and containers around those needs.
These rooms and cupboards show several approaches, from a tall cabinet to a separate walk-in space. Focus on reachable storage, clear categories and surfaces you can clean. A pantry does not need matching packaging or a large room to work well.
PART 01
Choose a Layout You Can Use
IDEA 01 / 20
Make One Tall Cupboard the Pantry
 SaveSupport Non AI Creator
Image credit: Project: Sicora Design/Build (via Houzz)
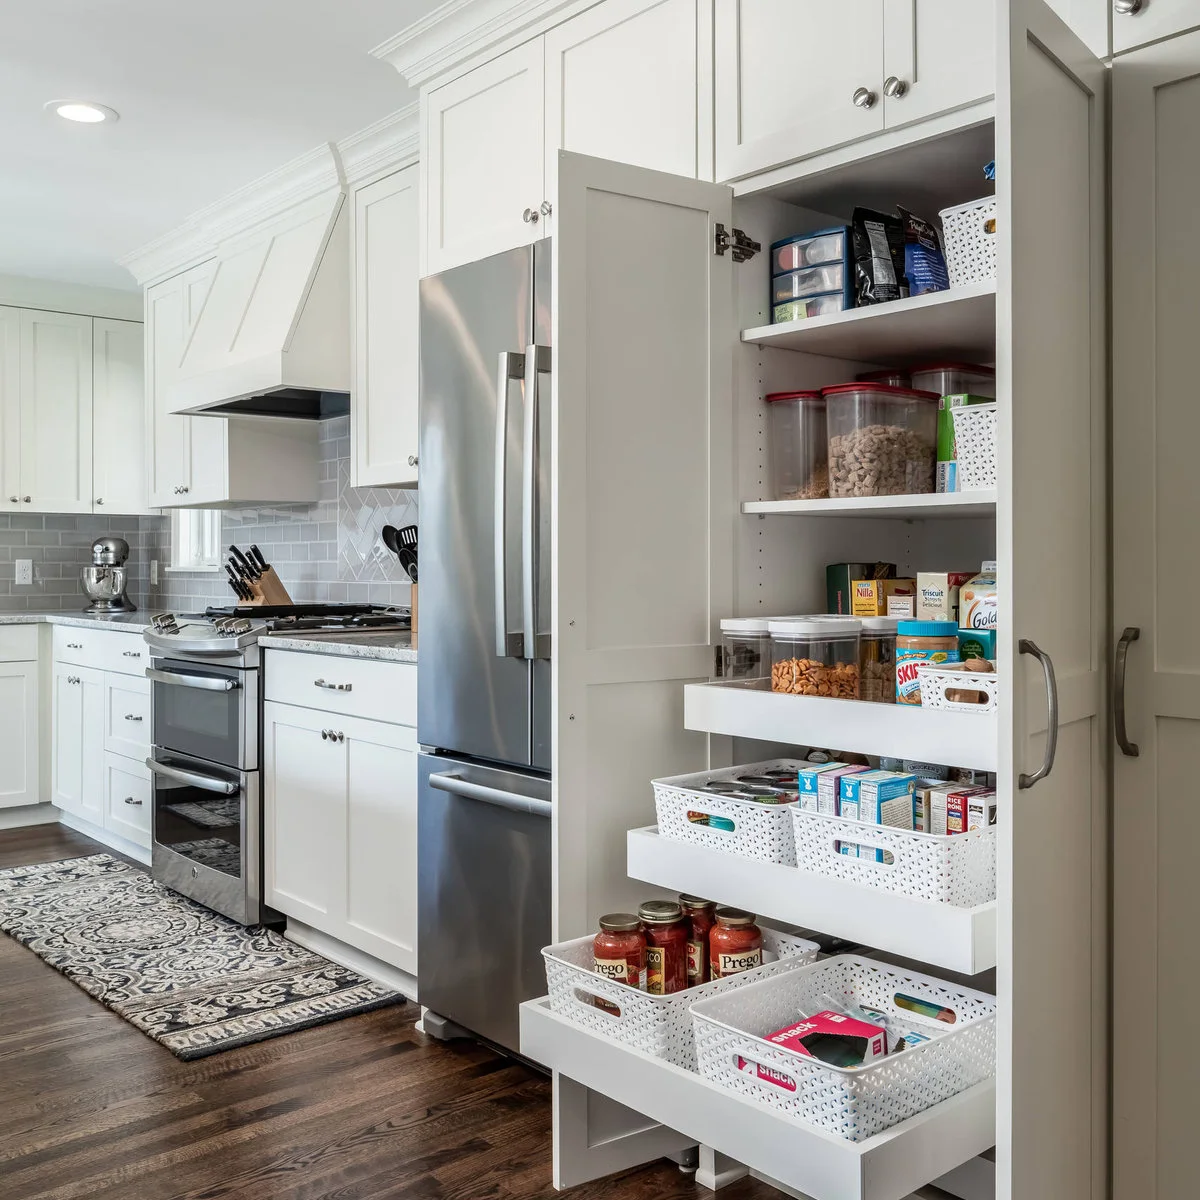
A tall white cupboard beside the refrigerator holds dry goods on fixed shelves and pull-out trays. Small baskets group packets and cartons, while clear containers make some contents visible. Keeping the pantry within the fitted kitchen avoids dedicating a separate room to food storage.
Check the cupboard doors and trays with the refrigerator open before choosing the position. Measure the products you buy regularly so tall packages fit without wasted gaps. Good kitchen cabinet organization begins with reachable categories, not buying a complete set of containers before knowing the shelf dimensions. These above-fridge cabinet ideas explore ways to use the high cupboard area while keeping appliance access and the manufacturer’s ventilation requirements in mind.
IDEA 02 / 20
Keep Shelves Modest in a Narrow Pantry
 SaveSupport Non AI Creator
Image credit: Project: Warmington & North (via Houzz)
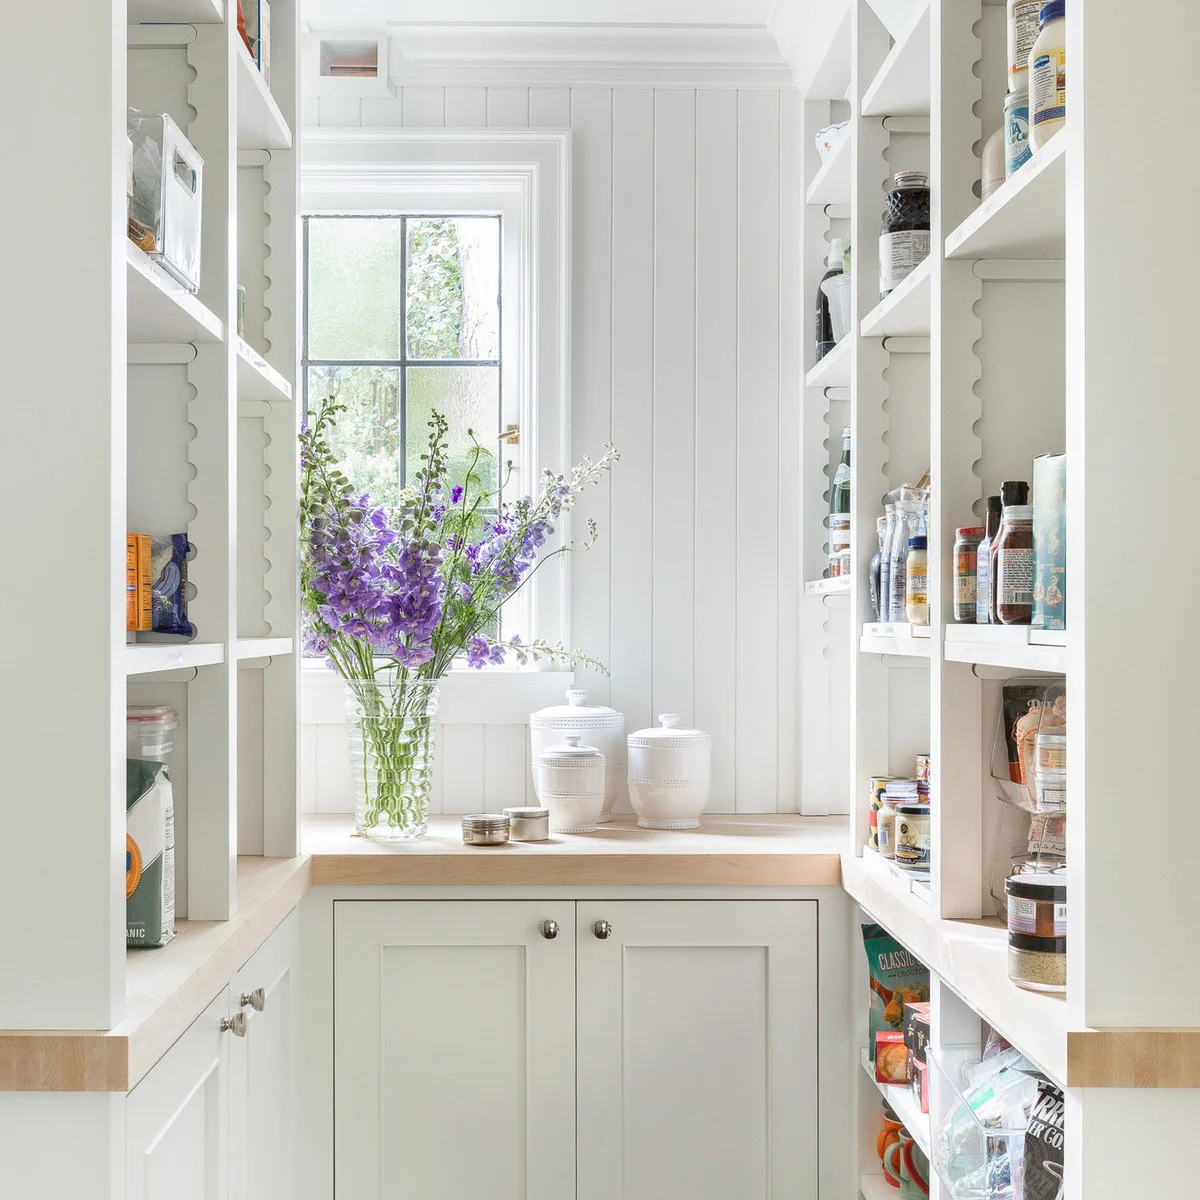
Open shelves line both sides of this narrow pantry, with a short counter beneath the window at the end. The modest shelf depth keeps jars and packets close to the front. Pale finishes and daylight make the stored items easier to distinguish without extra decorative layers.
Choose shelf depth around what needs storing and the width left for standing comfortably. Deeper is not always more useful if food disappears behind other packages. Keep items out of direct sunlight where their storage instructions require it, and leave the window accessible for cleaning and ventilation.
IDEA 03 / 20
Give a Walk-In Pantry a Clear Center
 SaveSupport Non AI Creator
Image credit: Project: Atwood Custom Homes (via Houzz)
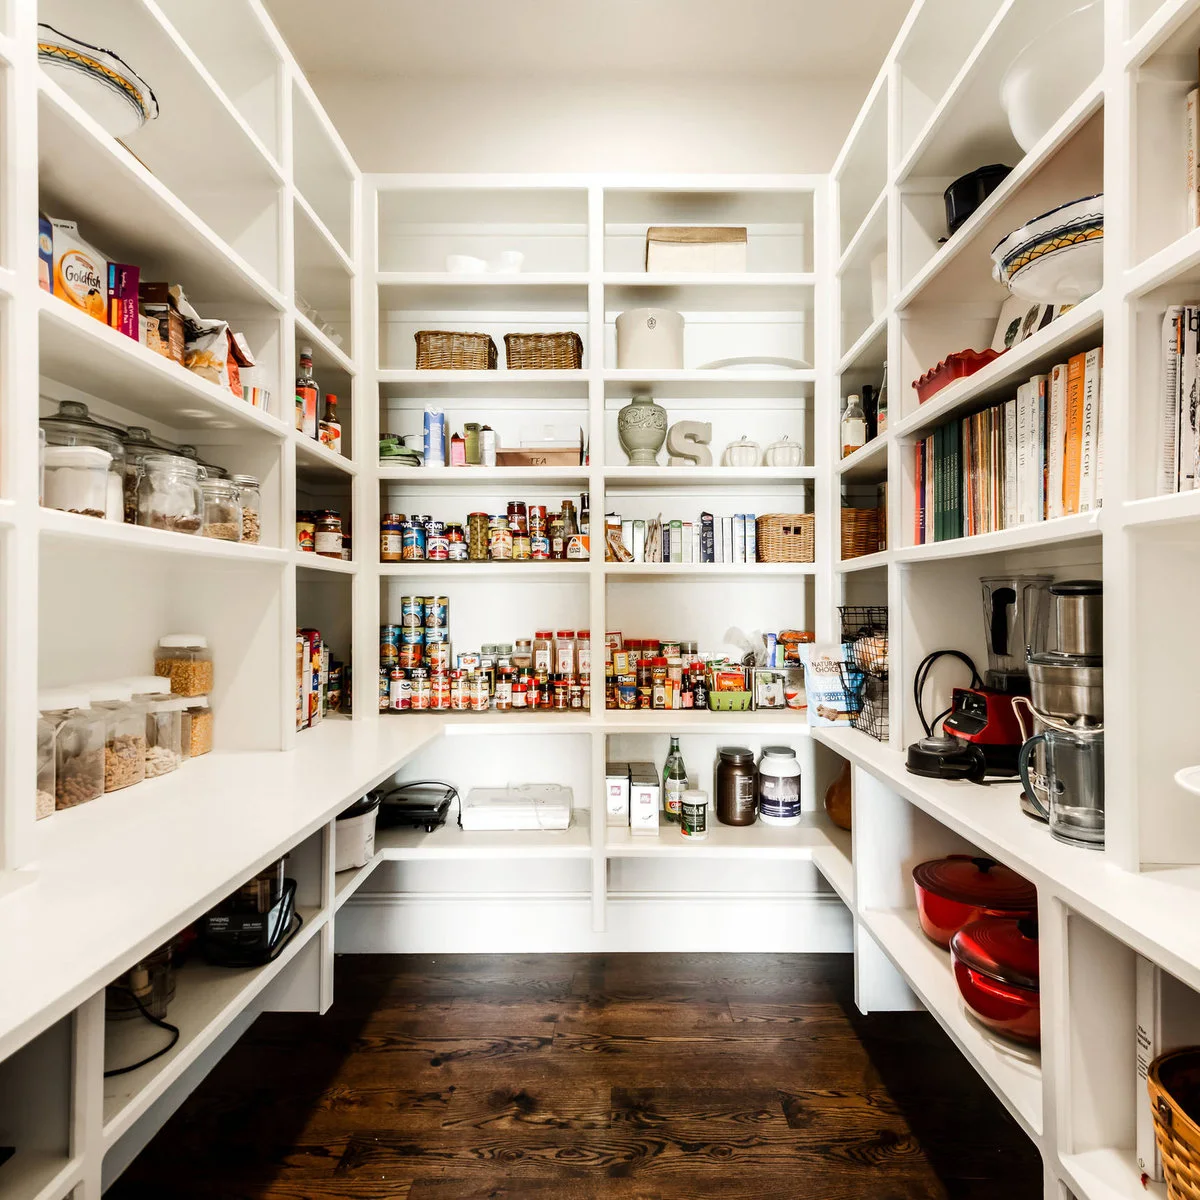
White open shelving wraps around this walk-in pantry, with a clear floor through the center. Food occupies several middle shelves, while appliances and larger cookware sit lower. The layout keeps different categories visible without filling the standing space with freestanding storage or extra baskets.
Preserve a useful route before adding another cabinet or trolley. Try loading the shelves on paper with actual categories and leave room for changing groceries. Keep heavy equipment at a manageable lifting height, and do not turn a clear counter into permanent overflow for items that need proper shelf space.
IDEA 04 / 20
Compare Several Narrow Pull-Out Sections
 SaveSupport Non AI Creator
Image credit: Project: Wilkes Architects - Princeton Design Guild (via Houzz)
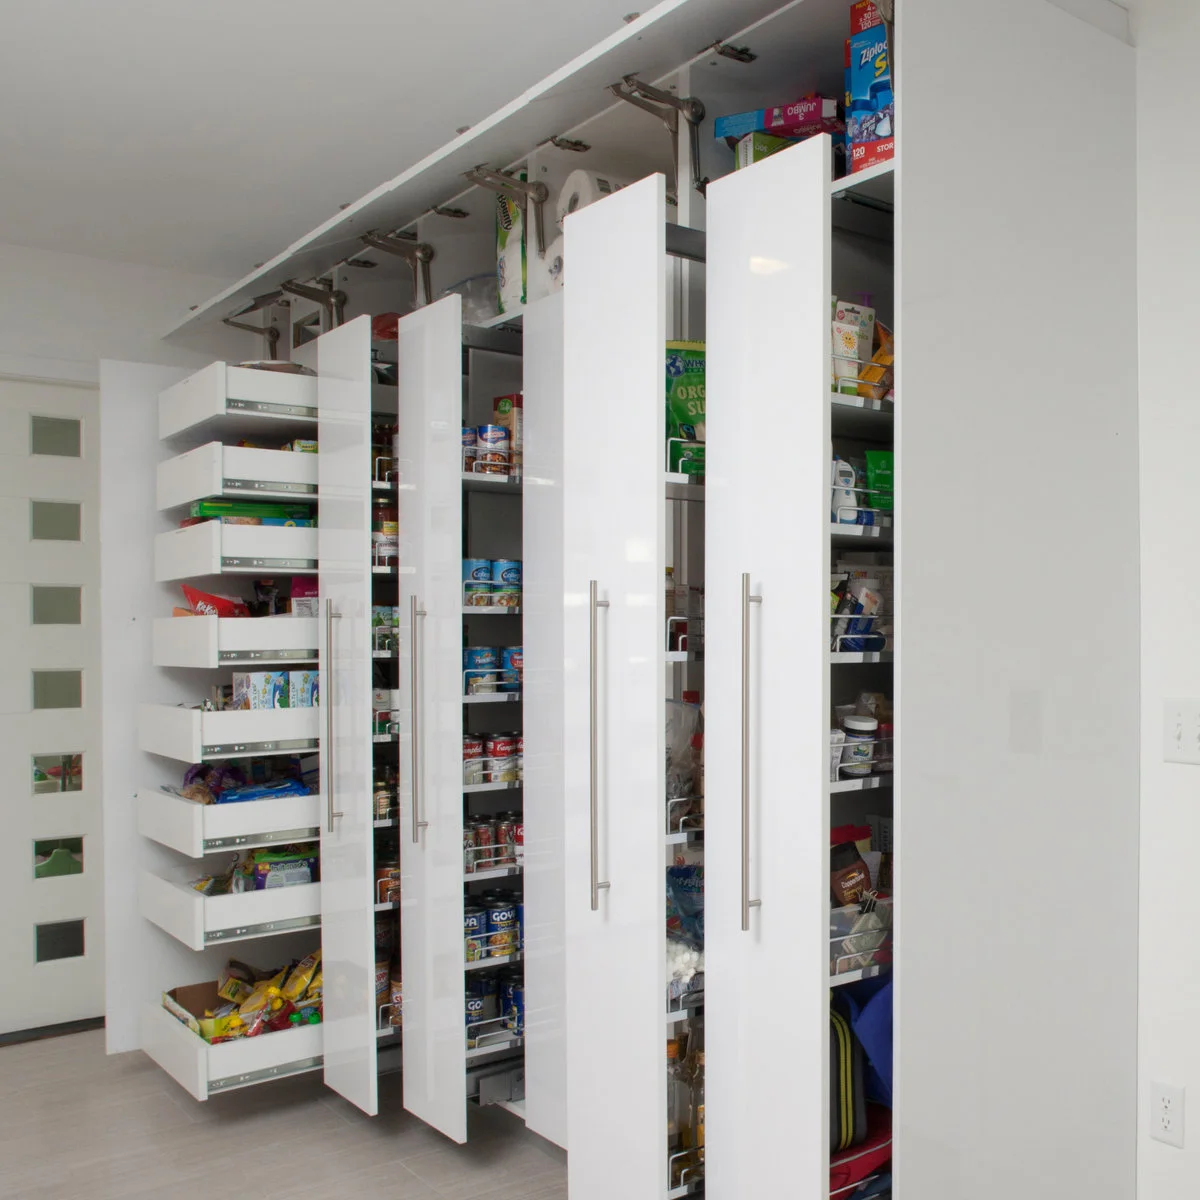
Several narrow pull-out sections bring the contents of these tall white cabinets into view. A bank of individual drawers occupies one side, while taller sections hold varied packages. The photograph shows the storage open together, making the mechanisms easier to compare than closed cabinet fronts would.
Price the fittings and installation as well as the cabinet boxes. Tall loaded pull-outs need suitable hardware, fixing and usable clearance in front. In daily use, open only what you need and keep the route clear; the fully extended arrangement shown is for viewing the storage, not moving through the kitchen.
IDEA 05 / 20
Mix Food and Equipment in Defined Sections
 SaveSupport Non AI Creator
Image credit: Project: A Closet Case (via Houzz)
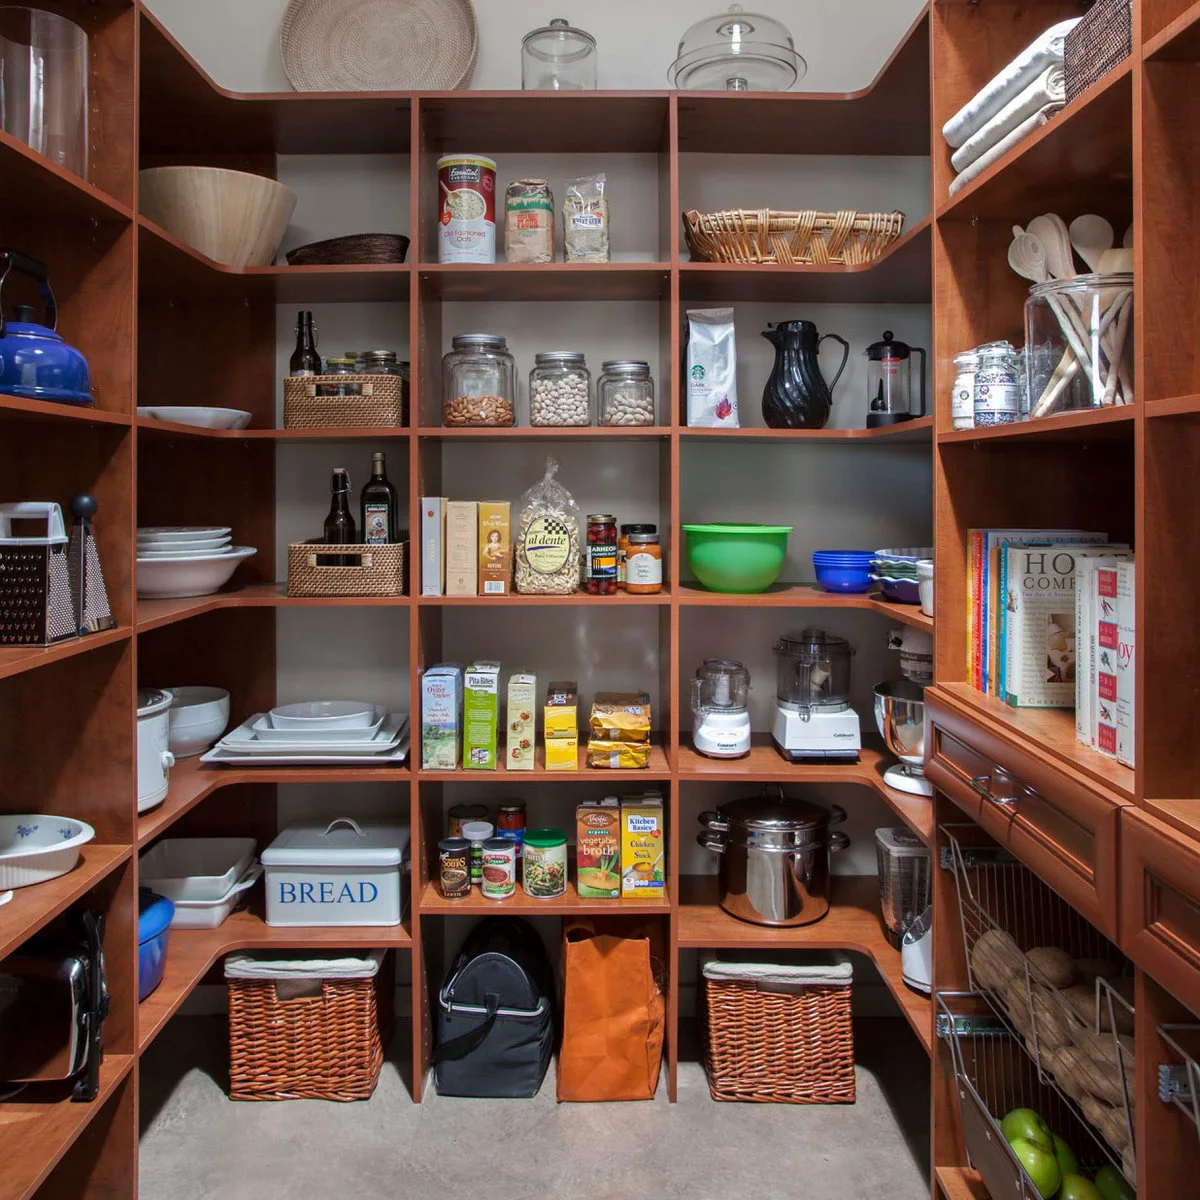
Warm wood shelves divide this pantry into clear vertical bays. Jars and packaged food sit beside separate spaces for cookware, small appliances and baskets. The range of shelf heights shows how a mixed pantry can hold practical kitchen equipment without treating every compartment as identical.
List the largest items before setting the shelf spacing, then group smaller packages where they stay visible. Keep equipment clean and dry before returning it to storage. Leave the front edges clear enough to lift items safely, and avoid stacking a heavy appliance above objects you use every day.
PART 02
Bring Deep Storage Within Reach
IDEA 06 / 20
Use Door Racks for Shallow Packages
 SaveSupport Non AI Creator
Image credit: Project: KitchenLab Interiors (via Houzz)
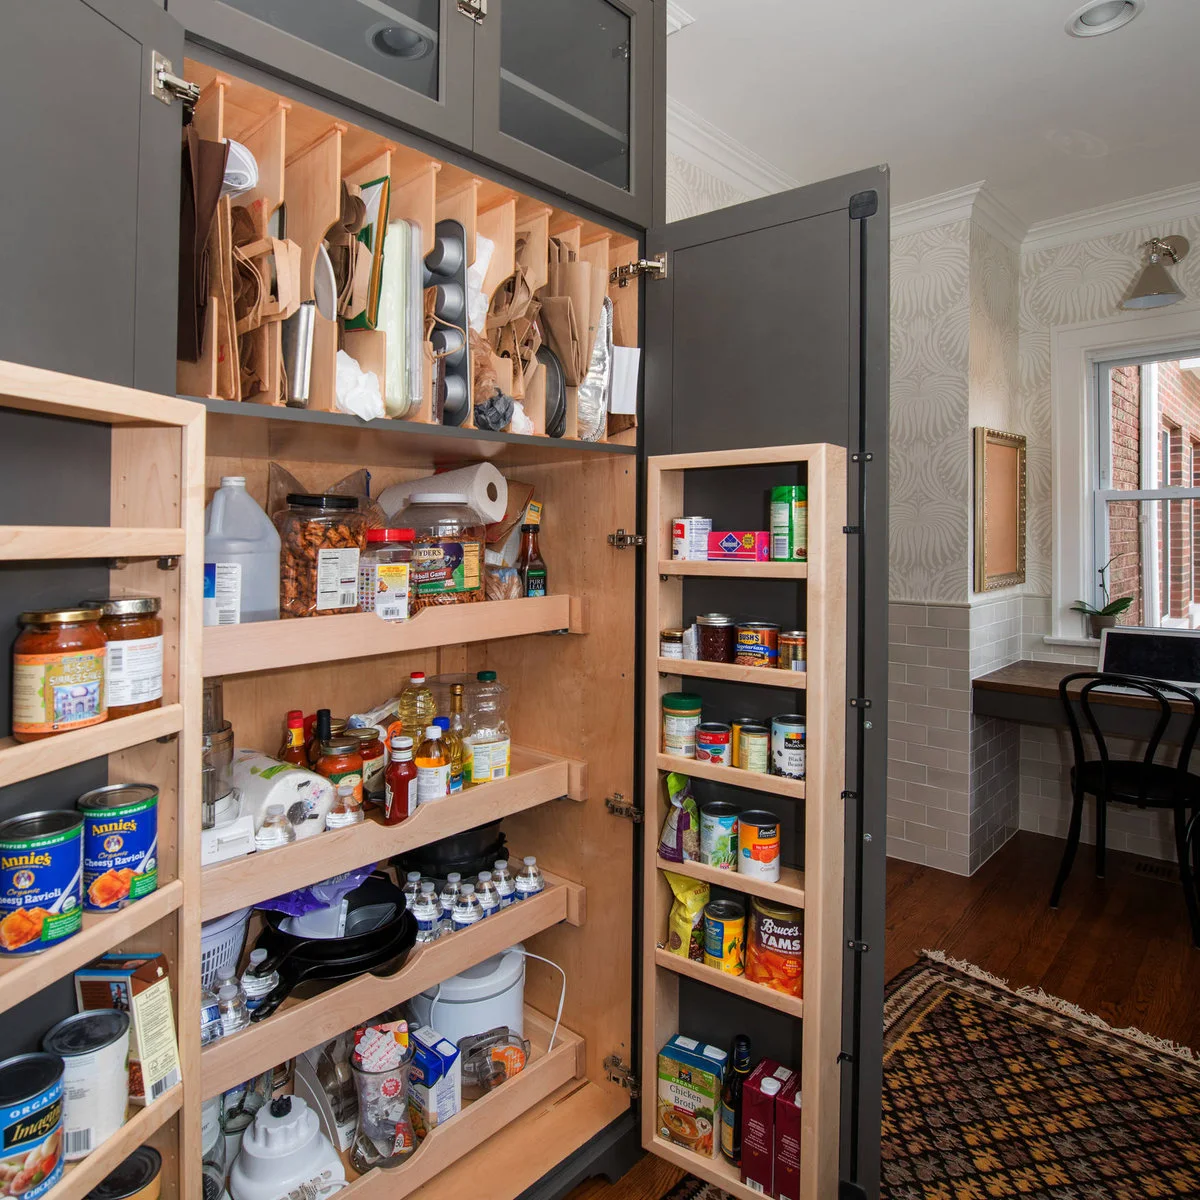
Shallow door racks hold cans and small packages around this deeper pantry cupboard. Vertical dividers at the top separate trays and baking pieces, while wider shelves accommodate larger supplies. Different depths let the cupboard hold more varied items without relying on one deep pile.
Confirm that the door racks clear the interior shelves when closed and that the hinges suit the added load. Keep food and household chemicals in separate appropriate storage, even if a busy pantry photograph includes miscellaneous supplies. Assign each rack a category so small items do not disappear behind larger containers.
IDEA 07 / 20
Bring the Lower Shelves Forward
 SaveSupport Non AI Creator
Image credit: Project: Don Foote Contracting (via Houzz)
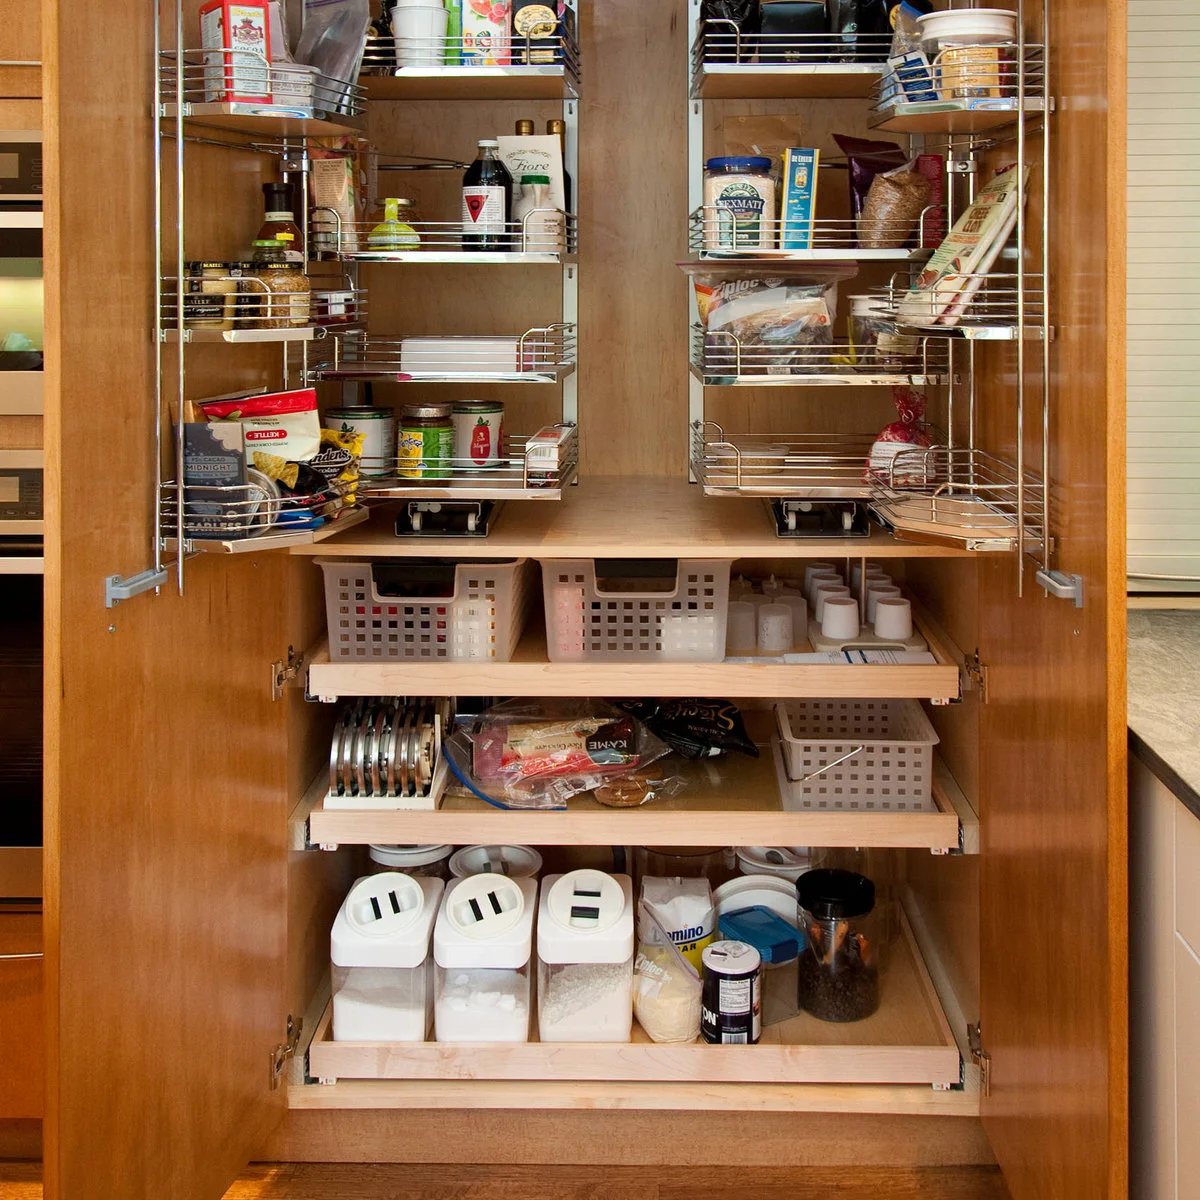
Lower pull-out trays bring containers, baskets and lids toward the front of this wood pantry cupboard. Wire racks above provide shallower storage for packages and bottles. The combination uses several kinds of fittings rather than assuming one mechanism will suit everything in the cupboard.
Check the space required for each fitting to move and for a person to stand in front. Put the heavier contents on appropriately rated lower trays and keep small packages contained. Before retrofitting, measure the door opening and hinges as well as the internal cabinet width.
IDEA 08 / 20
Keep Paperwork Beside the Food Storage
 SaveSupport Non AI Creator
Image credit: Project: Jenna Burger Design (via Houzz)
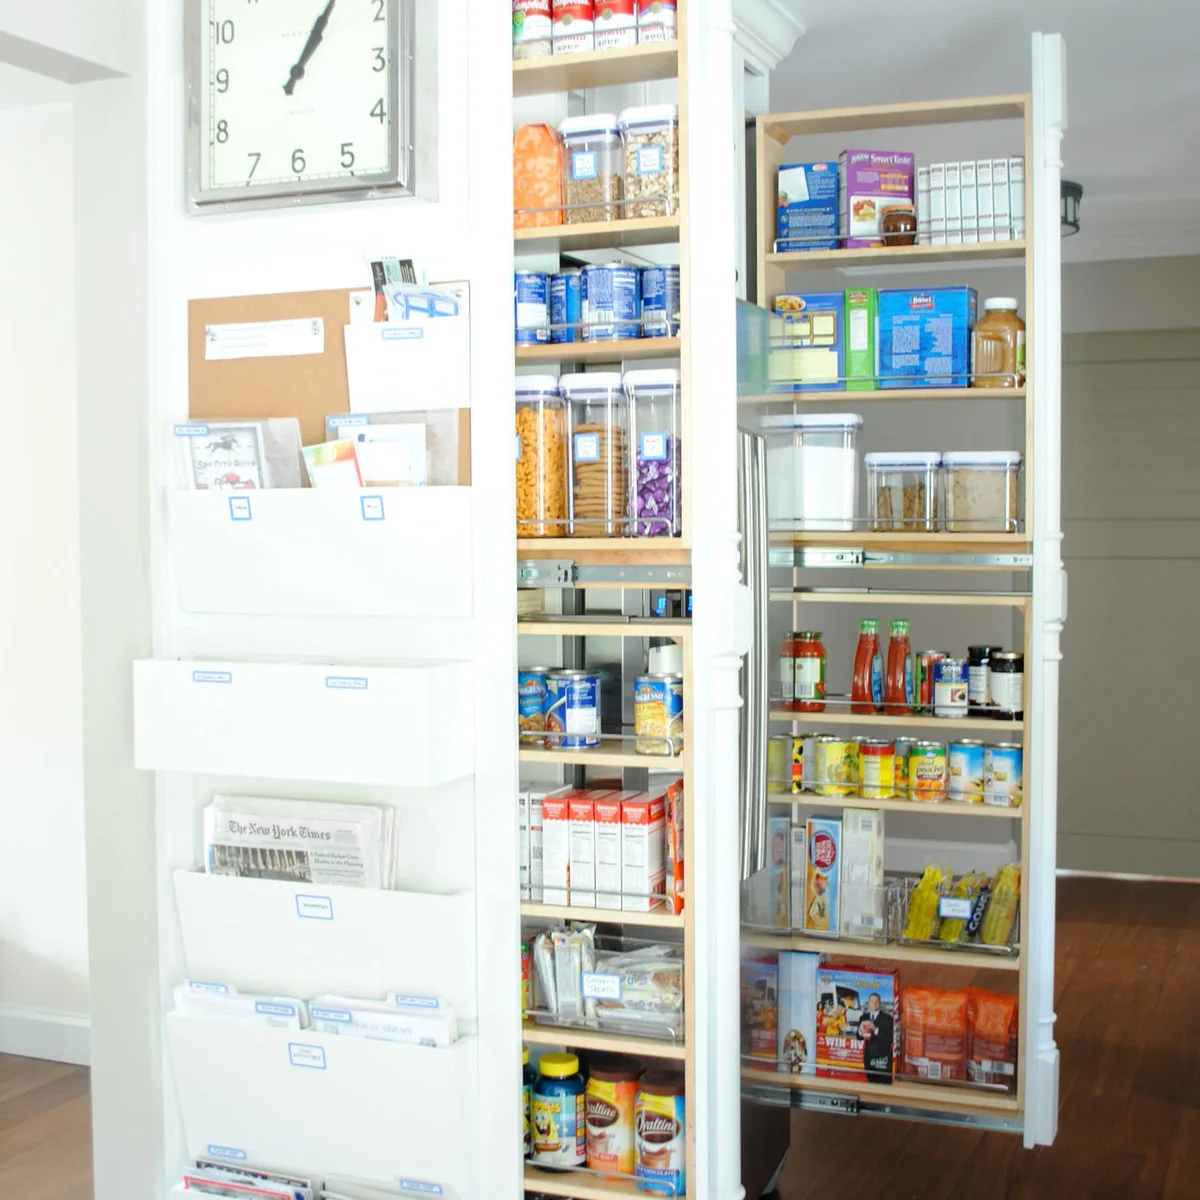
A tall pull-out pantry stands beside wall-mounted pockets for papers and household information. Clear containers and packaged goods remain visible on the extended shelves. Keeping the papers on the adjacent wall gives them a separate home instead of letting them spread across the food-storage surfaces.
Use a nearby list or note pocket if it supports your shopping routine, but keep paperwork clear of moving cabinet parts. Check the fully extended pantry’s path before adding wall accessories. A useful grocery list should be easy to update without making the food itself harder to reach.
IDEA 09 / 20
Use a Swing-Out Rack for Small Staples
 SaveSupport Non AI Creator
Image credit: Project: DWR Construction (Doing What's Right Construction) (via Houzz)
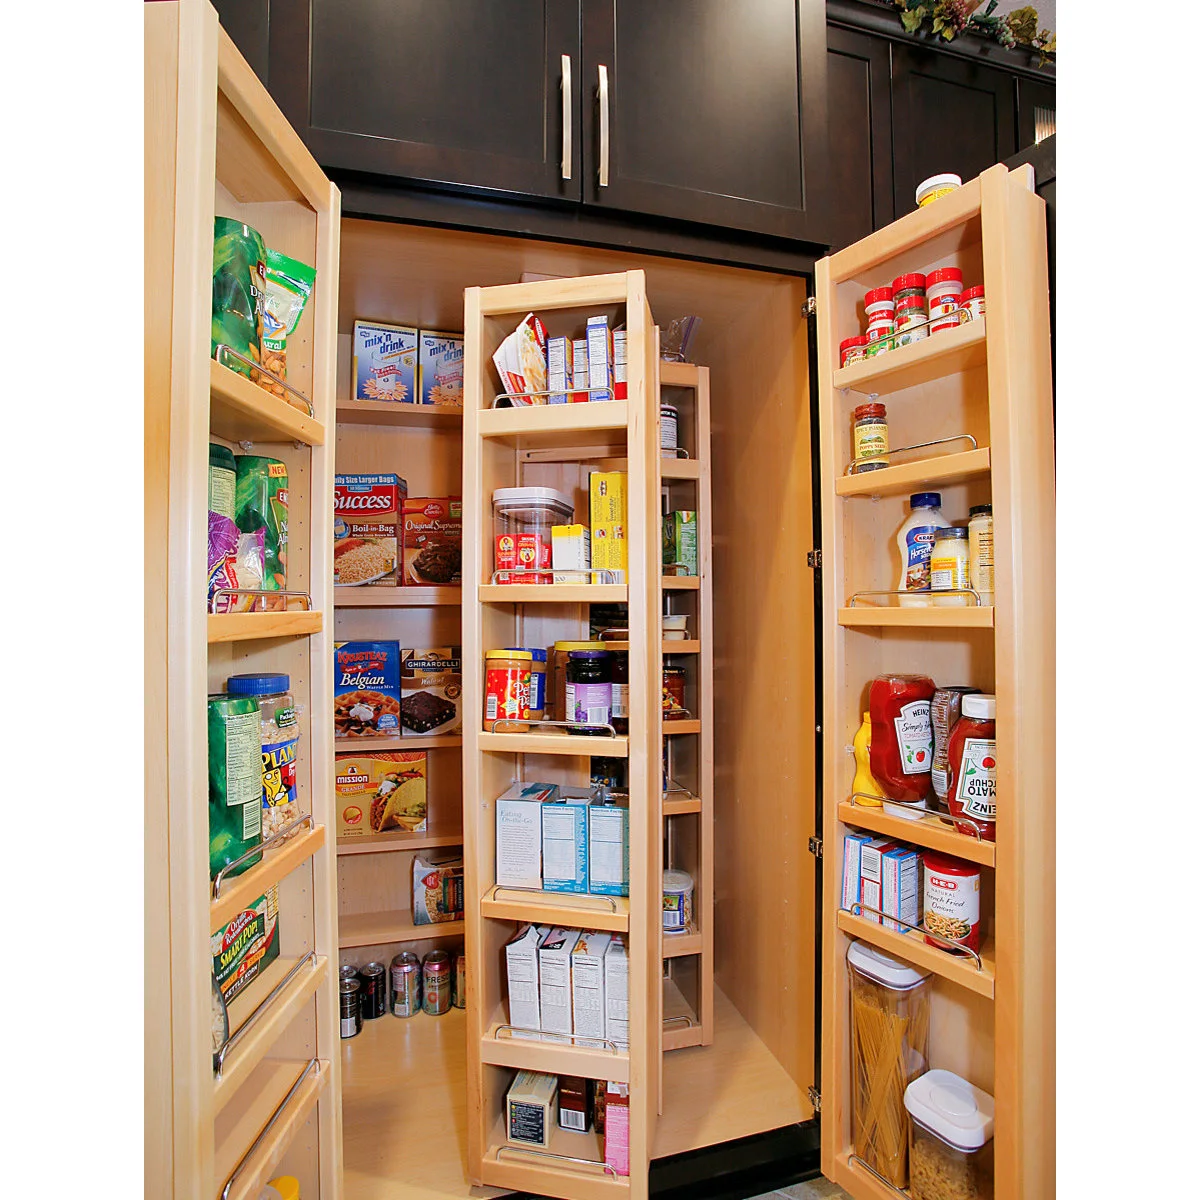
A narrow central rack swings forward inside this pantry cupboard, with additional shelves on the doors and at the back. Small jars, cans and boxes occupy the shallower sections. The arrangement brings several rows into view while leaving deeper storage for packages behind them.
Try the mechanism loaded before committing to a similar fitting where possible. Check capacity, hinge movement and how far it projects into the room. Keep categories consistent across the racks, and resist filling every gap if that makes it difficult to close the doors or see the back shelf.
IDEA 10 / 20
Match Pull-Out Depths to Different Contents
 SaveSupport Non AI Creator
Image credit: Project: ShelfGenie of Central & Coastal VA (via Houzz)
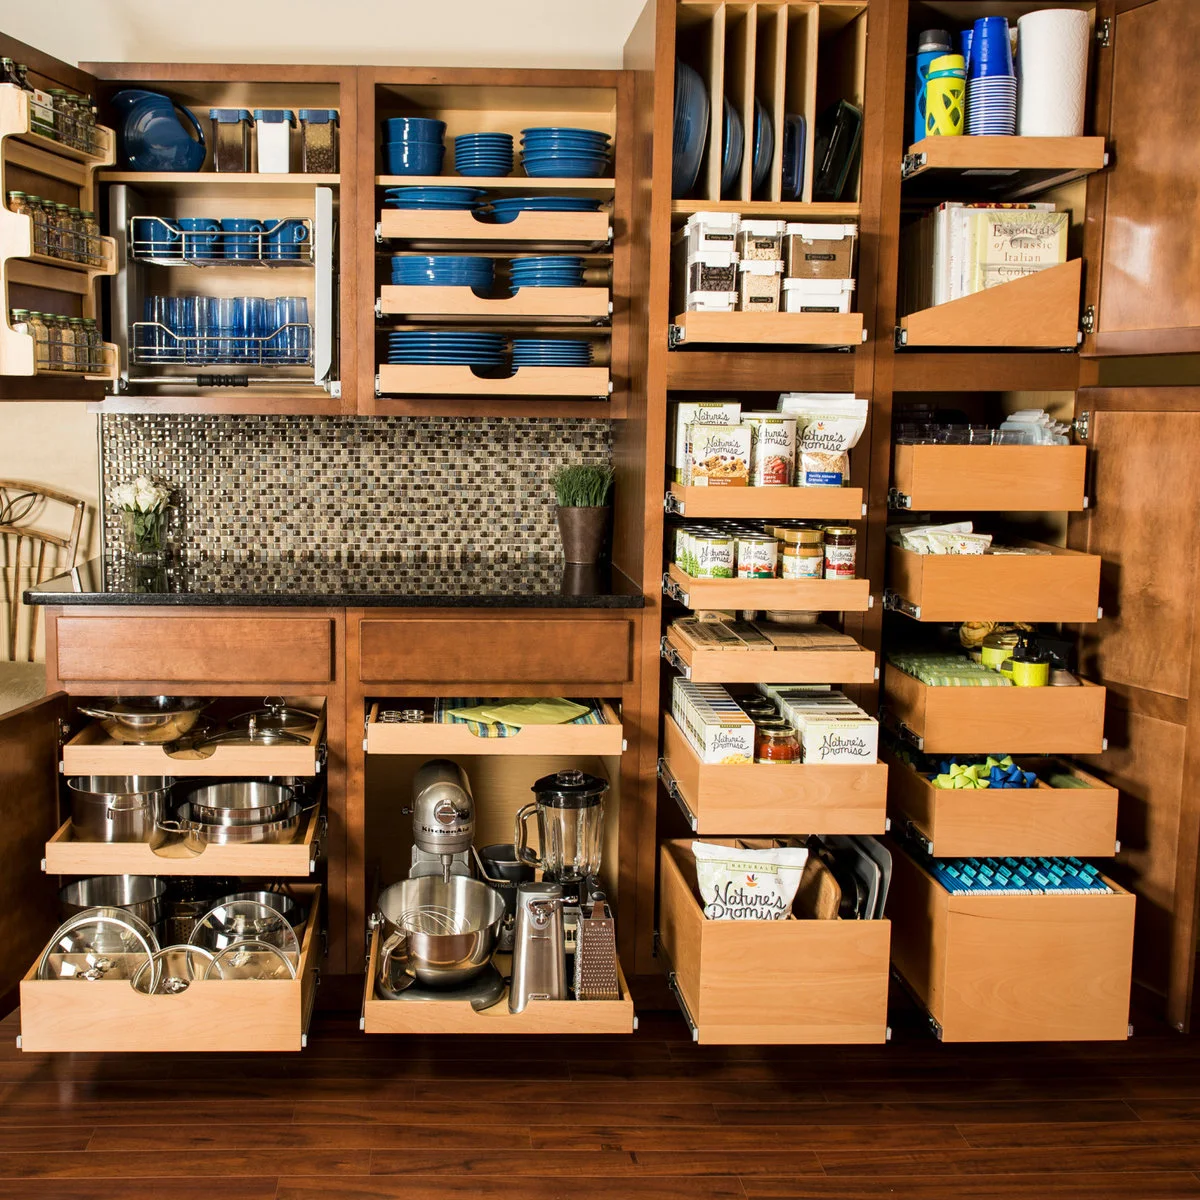
A mix of pull-out shelves holds food packets, dishes and small appliances in this wood cabinetry. Taller trays contain bulkier items, while shallower sections keep smaller packages upright. Vertical tray storage occupies the upper part of the pantry instead of leaving the space as one tall shelf.
Choose fittings around real contents and the weight each shelf must carry. Shallow trays suit smaller packages, while larger equipment needs enough lifting clearance. Keep appliance cords contained when stored, and follow the manufacturer’s instructions before operating any equipment on a shelf or inside a cupboard.
PART 03
Make the Contents Easy to Find
IDEA 11 / 20
Label Baskets by the Way You Shop
 SaveSupport Non AI Creator
Image credit: Project: Neat Method San Diego (via Houzz)
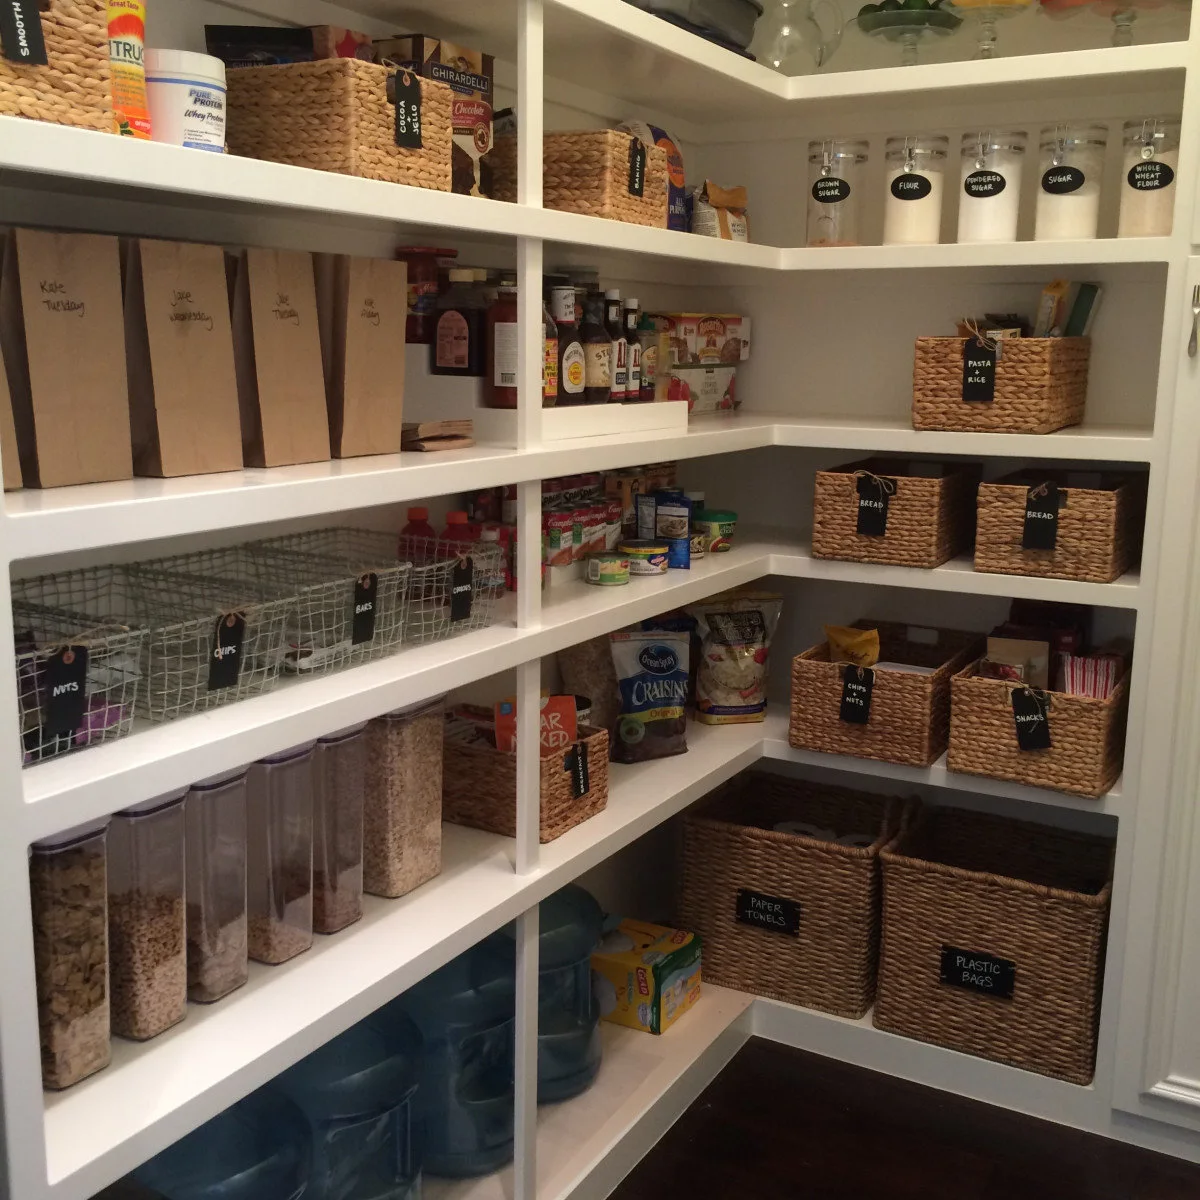
Labeled baskets and wire bins divide snacks, baking supplies and household paper goods on these white shelves. Clear containers keep some dry foods visible, while packaged items remain in baskets. The labels identify broad categories rather than requiring every individual packet to have a separate spot.
Use category names the household understands and leave space for changing purchases. Keep original ingredient, allergen and date information when decanting food into containers. Avoid topping up old contents indefinitely; rotate supplies and clean the container appropriately before adding a fresh batch.
IDEA 12 / 20
Keep Containers and Cookbooks in Separate Bays
 SaveSupport Non AI Creator
Image credit: Project: Neat Method San Diego (via Houzz)
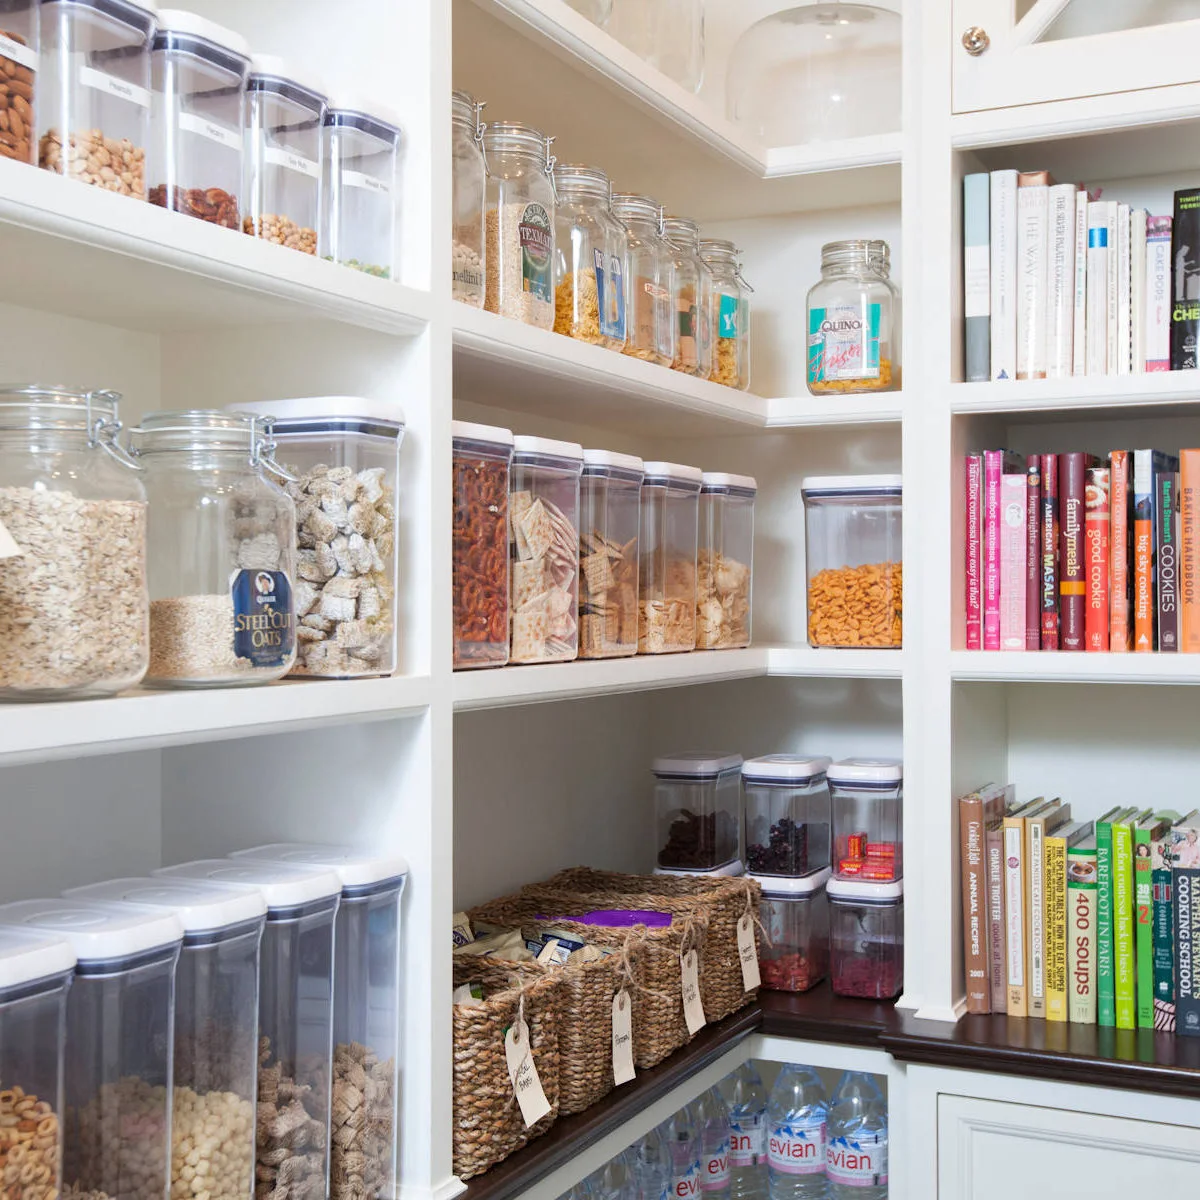
Clear containers line the left shelves of this white pantry, while cookbooks occupy a separate column on the right. Woven baskets hold smaller packets on the counter. The division lets food and books share the room without mixing paper into each container group.
Choose containers that fit the shelf depth and open comfortably beneath the shelf above. Keep the original food information and use labels where similar ingredients could be confused. Books need a dry, clean location; leave space to remove them without knocking nearby jars or packets.
IDEA 13 / 20
Raise Small Spice Jars Into View
 SaveSupport Non AI Creator
Image credit: Project: Total Organizing Solutions (via Houzz)
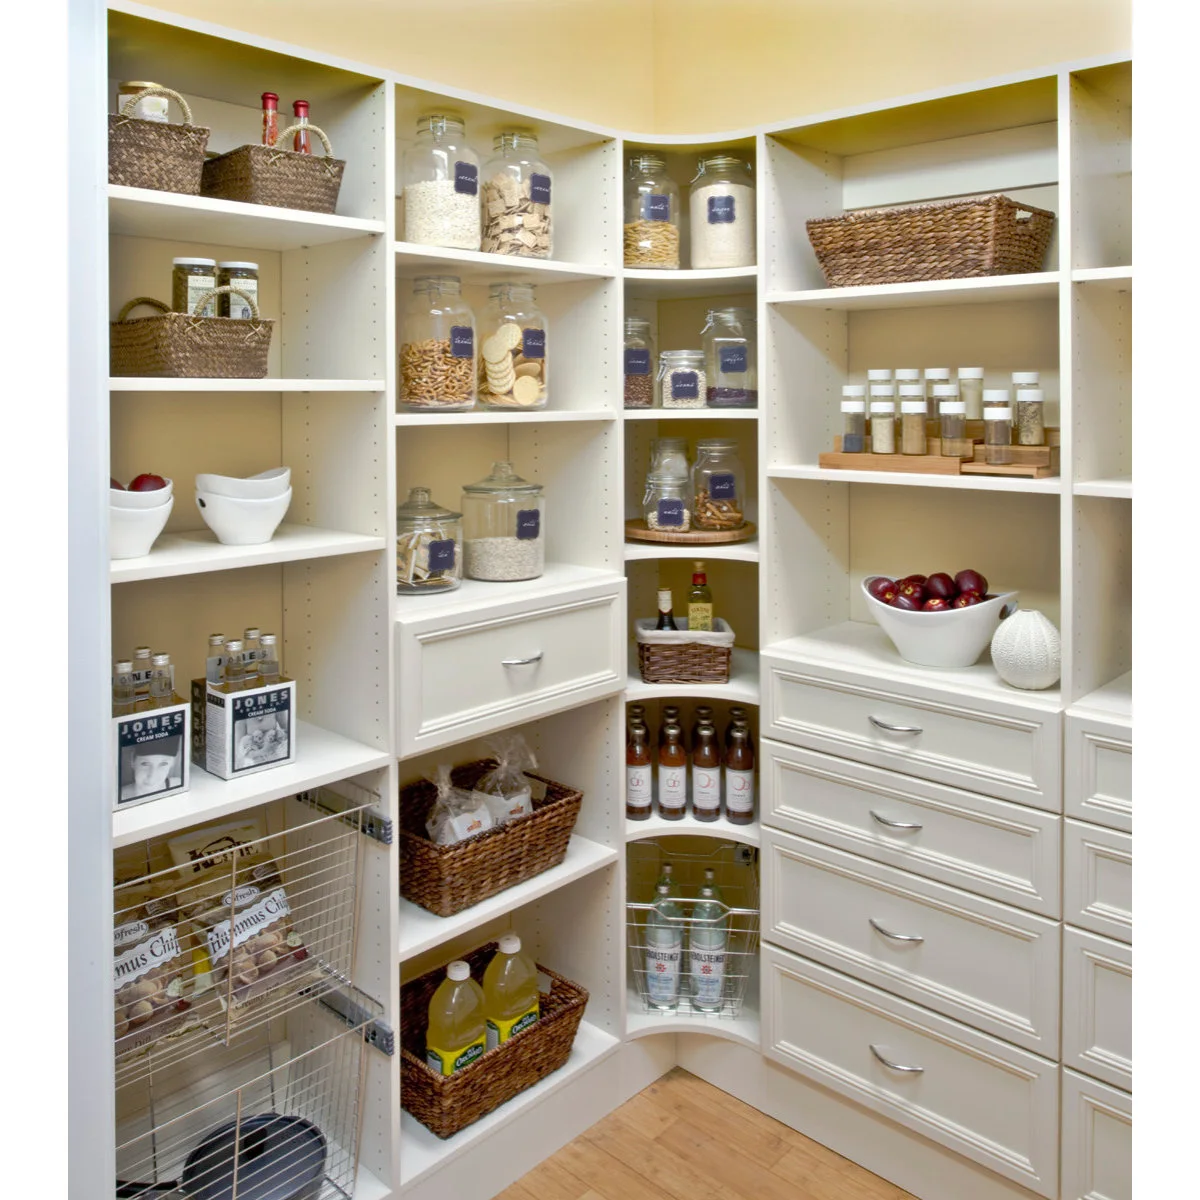
A stepped rack raises small spice jars on one shelf of this white pantry. Labeled jars and baskets occupy neighboring sections, while drawers provide enclosed storage below. The shallow tiers make the back row easier to see without giving each jar a separate hanging organizer.
Measure the rack with the jars on it before adjusting shelf height. Keep spices away from unsuitable heat or direct light and follow their storage guidance. Use a modest collection you can rotate; a clearly arranged shelf is less useful if rarely used jars remain there indefinitely.
IDEA 14 / 20
Keep Everyday Packages in Their Own Compartments
 SaveSupport Non AI Creator
Image credit: Project: Cabinet Designers, Inc (via Houzz)
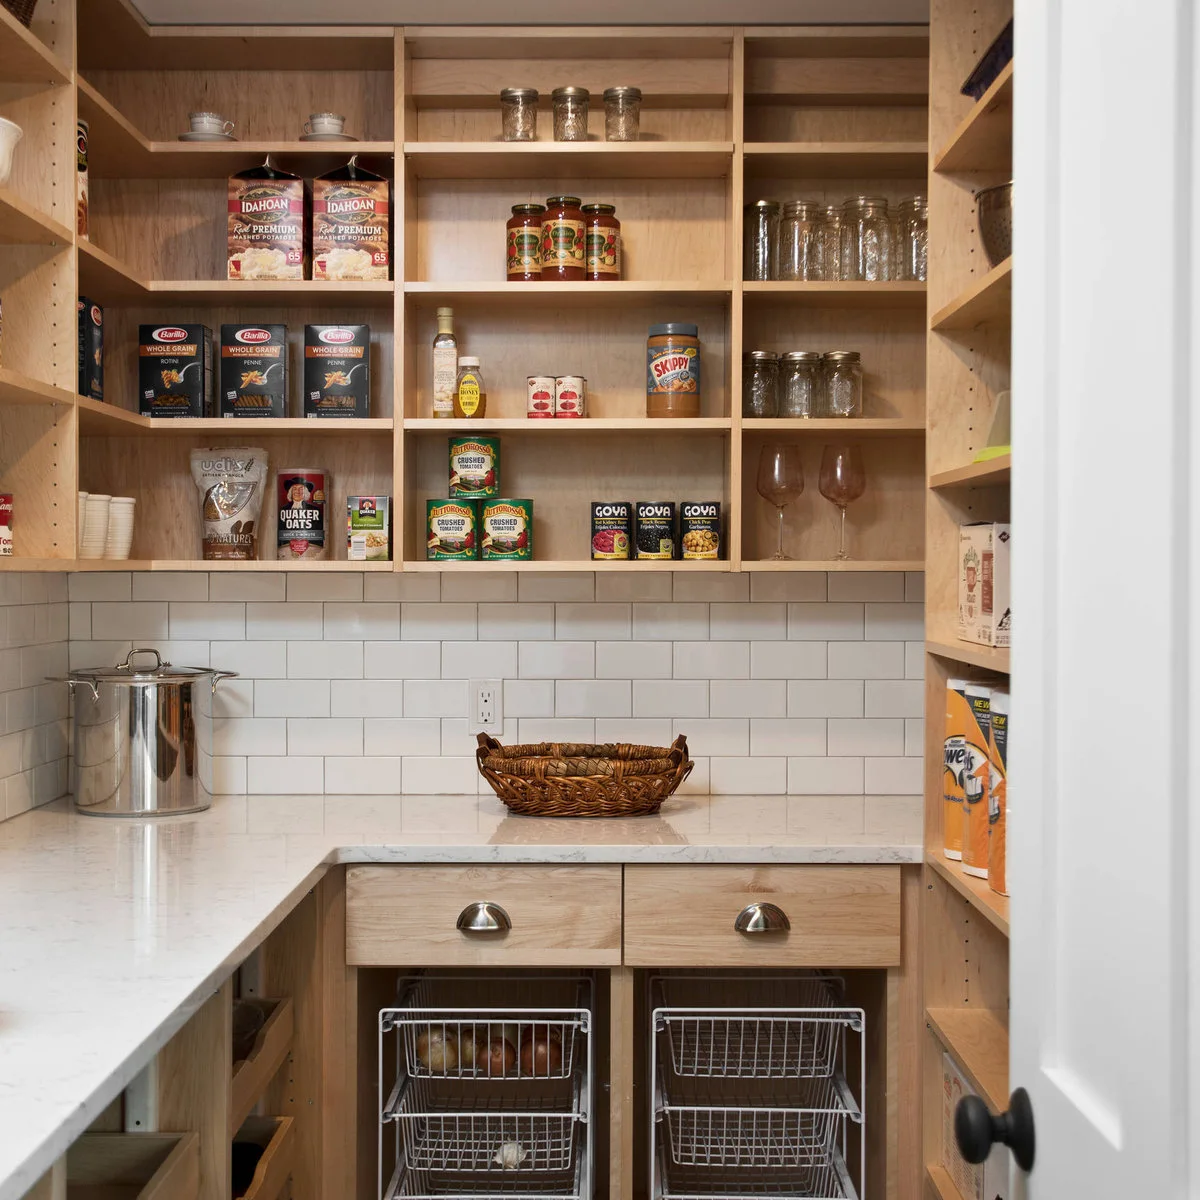
Open wood compartments hold boxes, jars and a few pieces of glassware above this pantry counter. Wire baskets fit below two shallow drawers. The visible packages show that a useful pantry can work with original food containers rather than requiring everything to be transferred into matching jars.
Set shelf heights around the boxes and bottles you actually buy. Keep heavier items lower and check basket weight before pulling it out. Preserve a section of counter for putting down groceries, so sorting a delivery does not require balancing bags or stacking items in the doorway.
IDEA 15 / 20
Use Vertical Dividers for Trays
 SaveSupport Non AI Creator
Image credit: Project: Diamante Storage Solutions (via Houzz)
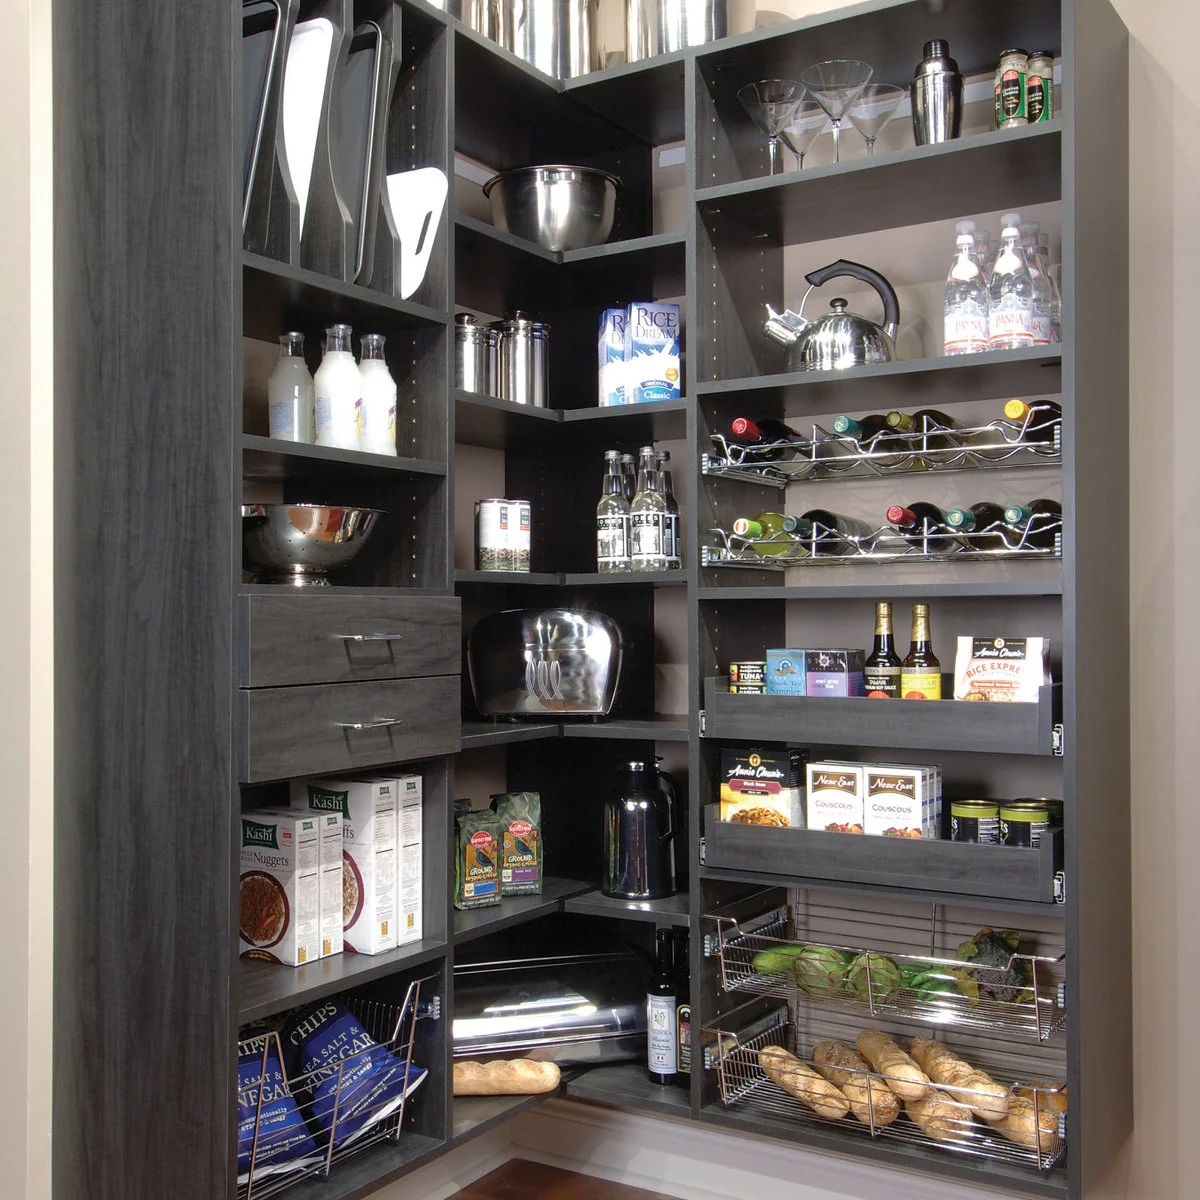
Vertical dividers hold baking trays and boards at the top left of this dark pantry. Food packages and small appliances occupy separate shelves, while wire baskets sit below. The varied compartments give flat equipment a home without burying it beneath a stack of heavy cookware.
Place everyday trays at a comfortable reach rather than copying a high position automatically. Measure the tallest board and check that it can be lifted out without hitting the shelf above. Keep small food packets contained separately so they do not slide into the tray slots.
PART 04
Leave Room for Everyday Tasks
IDEA 16 / 20
Leave a Landing Area Beneath Open Shelves
 SaveSupport Non AI Creator
Image credit: Project: Von Fitz Design (via Houzz)
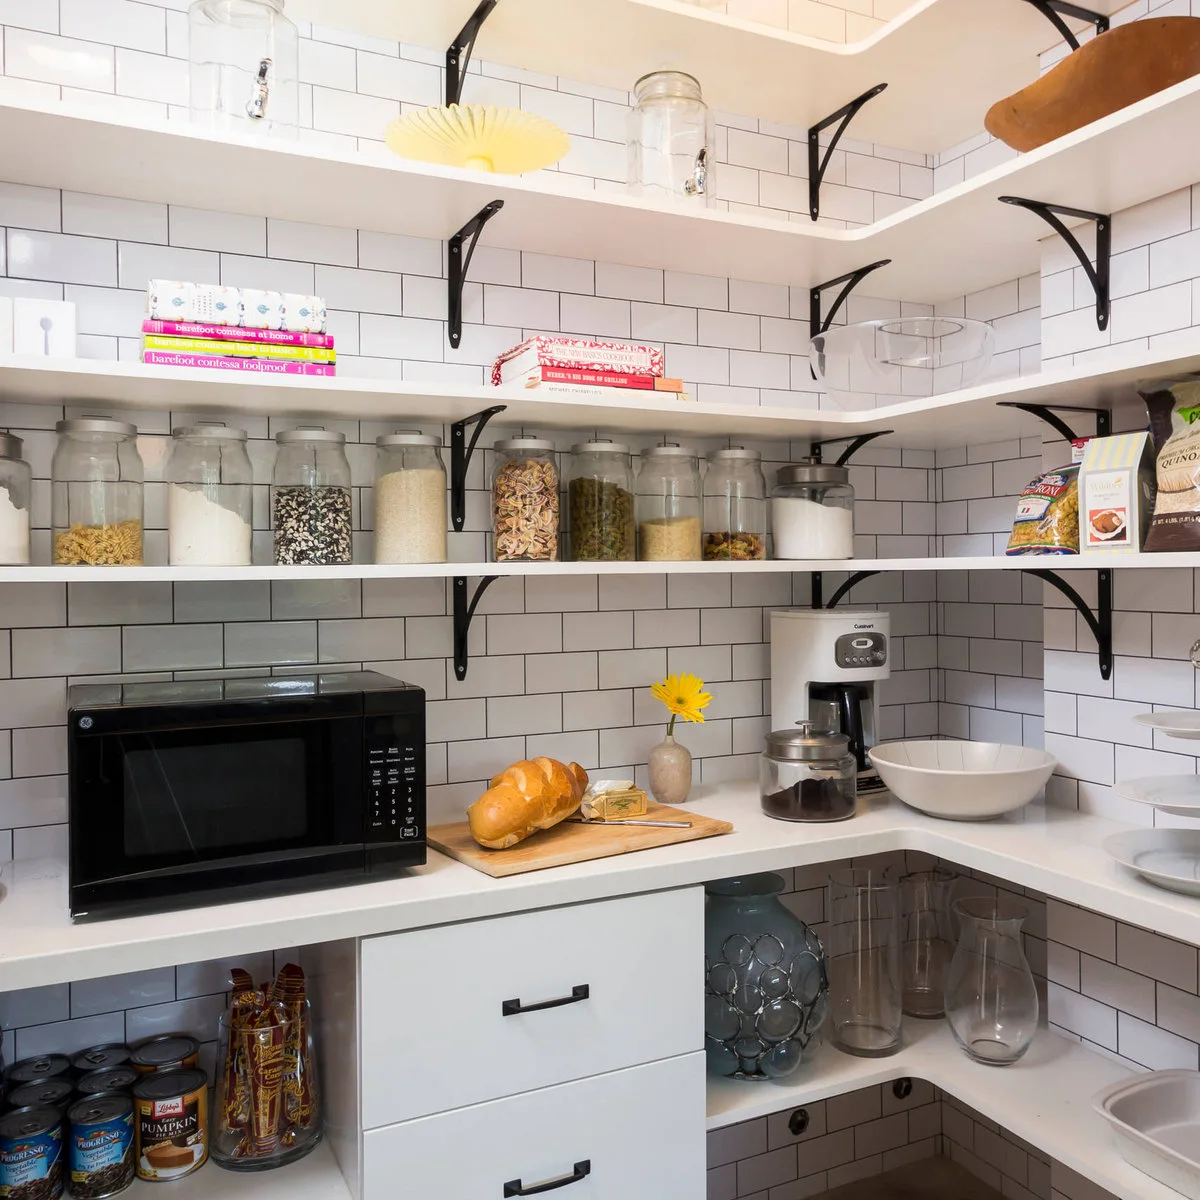
Open shelves hold jars and serving pieces above this white pantry counter. A microwave and coffee maker occupy part of the worktop, with drawers and open storage underneath. The counter offers a place to set down items without taking food preparation back into the main kitchen.
Keep a genuinely clear landing patch rather than filling the remaining surface with display objects. Confirm the appliances’ ventilation and electrical requirements before using them beneath shelves. Check that steam and heat will not damage stored items, and leave enough access to wipe the counter and corners.
IDEA 17 / 20
Group Coffee Supplies Within a Pantry
 SaveSupport Non AI Creator
Image credit: Project: Ourso Designs (via Houzz)
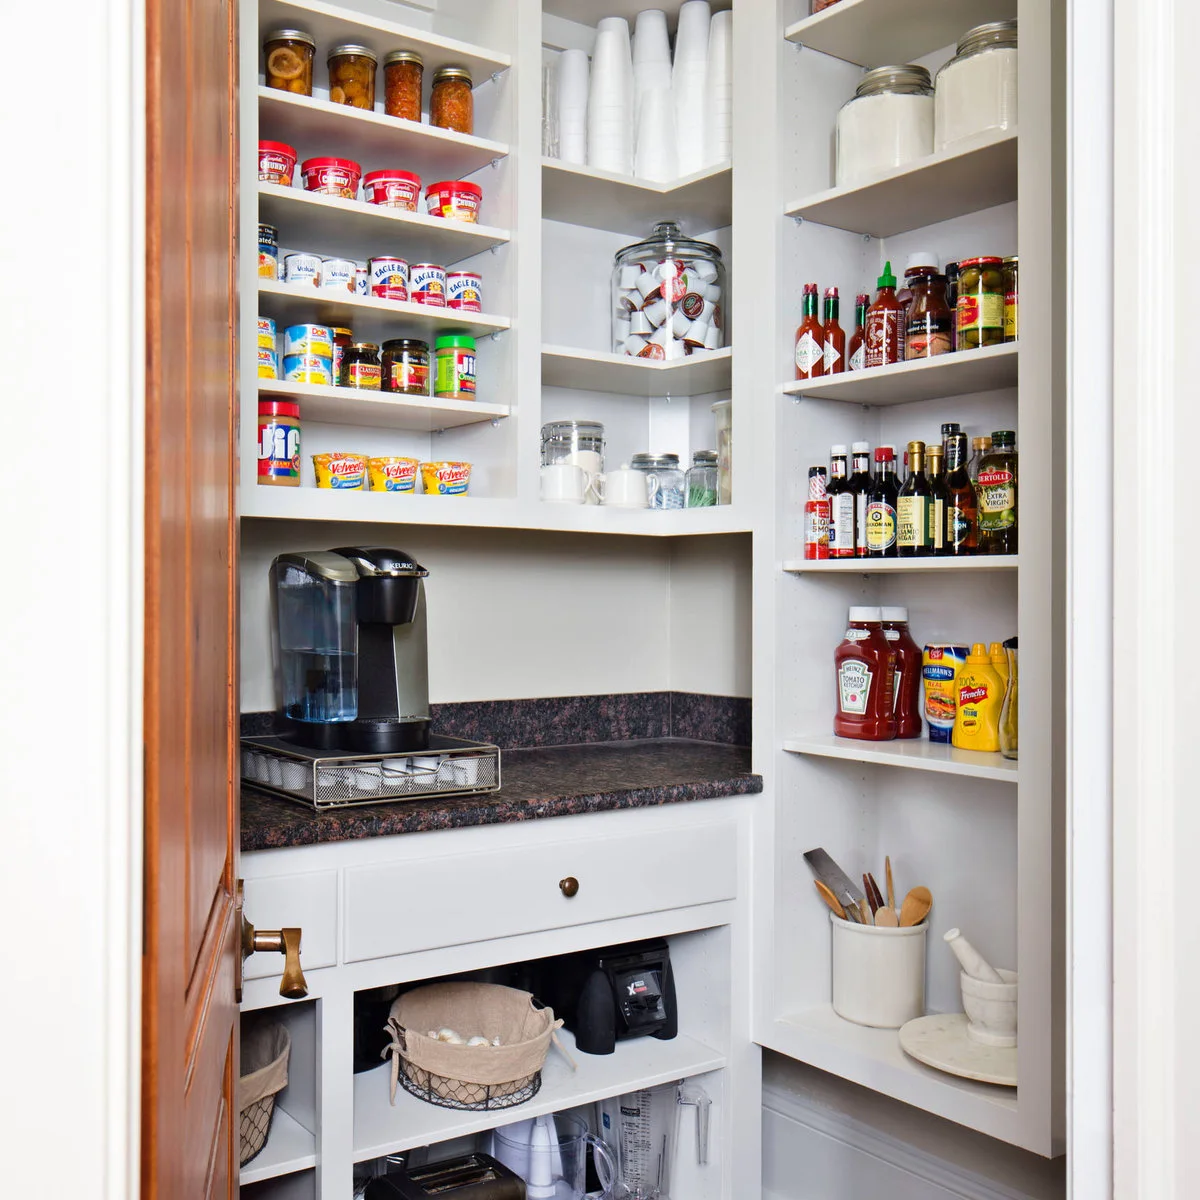
A coffee maker occupies the short counter in this small pantry, with supplies on nearby corner shelves. Packaged food and larger jars fill the side shelves while equipment sits below. The arrangement gives a frequently used routine a defined place within broader food storage.
Keep the coffee supplies together and leave access to refill the machine and remove its water container. A coffee bar can share a pantry, but appliances still need the clearance and electrical setup their instructions require. Do not crowd the shelves with spare cups that make everyday ingredients harder to reach.
IDEA 18 / 20
Give Bulky Equipment a Lower Home
 SaveSupport Non AI Creator
Image credit: Project: Stephen Alexander Homes & Neighborhoods (via Houzz)
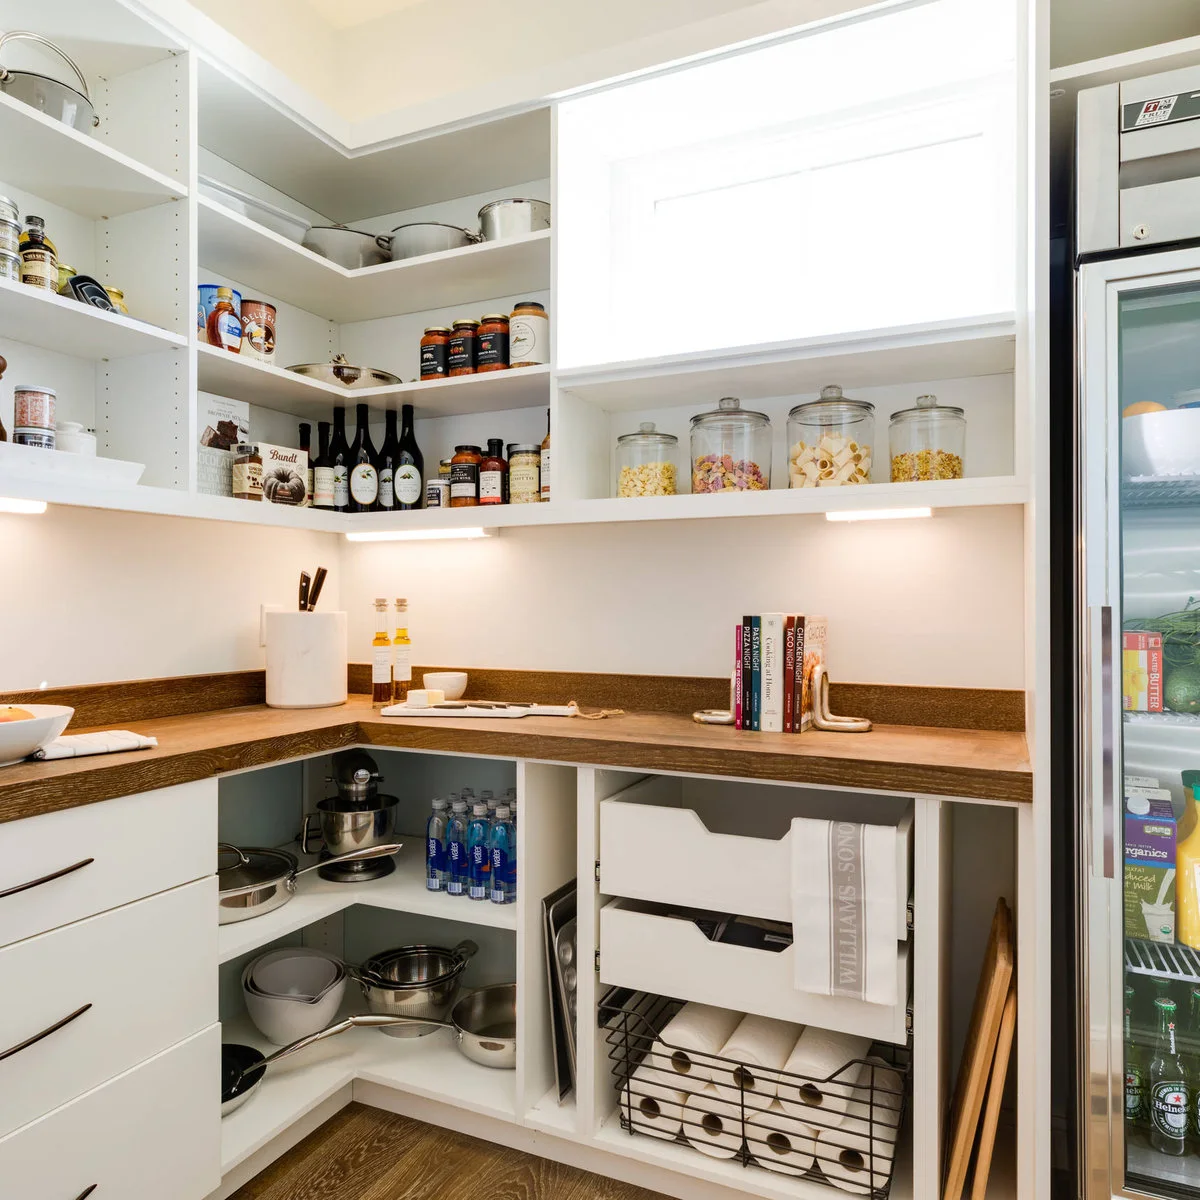
Pans, bowls and a mixer occupy the lower open shelves in this white pantry. Jars and packaged food sit higher, while a wood counter separates the two storage levels. Under-shelf lights make the worktop visible without requiring the entire pantry to be brightly illuminated from one ceiling fitting.
Store heavy equipment where it can be lifted comfortably, not automatically on the floor or highest shelf. Choose a wipeable surface around food storage and keep cords tidy. If a lower corner is awkward, compare suitable kitchen corner cabinet fittings with a simpler shelf before buying a mechanism.
IDEA 19 / 20
Reserve High Storage for Light Infrequent Items
 SaveSupport Non AI Creator
Image credit: Project: Old Hillsboro Building Company (via Houzz)
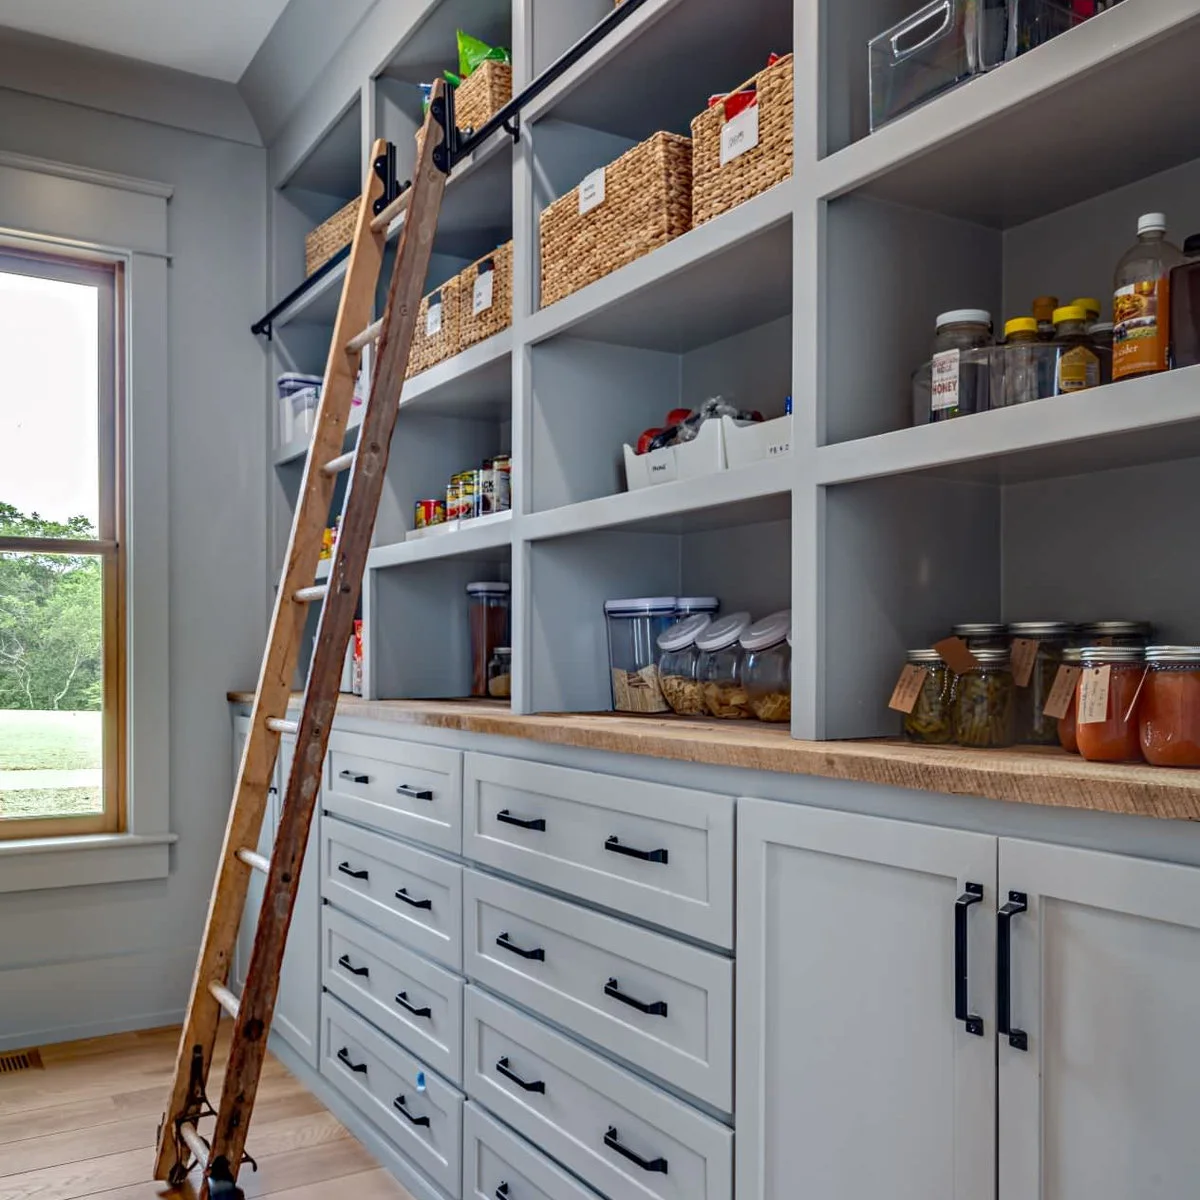
Labeled woven baskets occupy the high shelves of this gray pantry, with jars and everyday supplies lower down. A rail-mounted wood ladder provides access to the upper area. The counter and drawers give frequently handled objects a home closer to a normal standing reach.
Plan high storage around items that are light and used infrequently. A ladder needs a suitable rated system, safe installation and a clear place to stand and park. If climbing is inconvenient for your household, keep daily supplies lower and treat the upper shelves as optional capacity.
IDEA 20 / 20
Plan Empty Shelves Before Filling Them
 SaveSupport Non AI Creator
Image credit: Project: DK Homes (via Houzz)
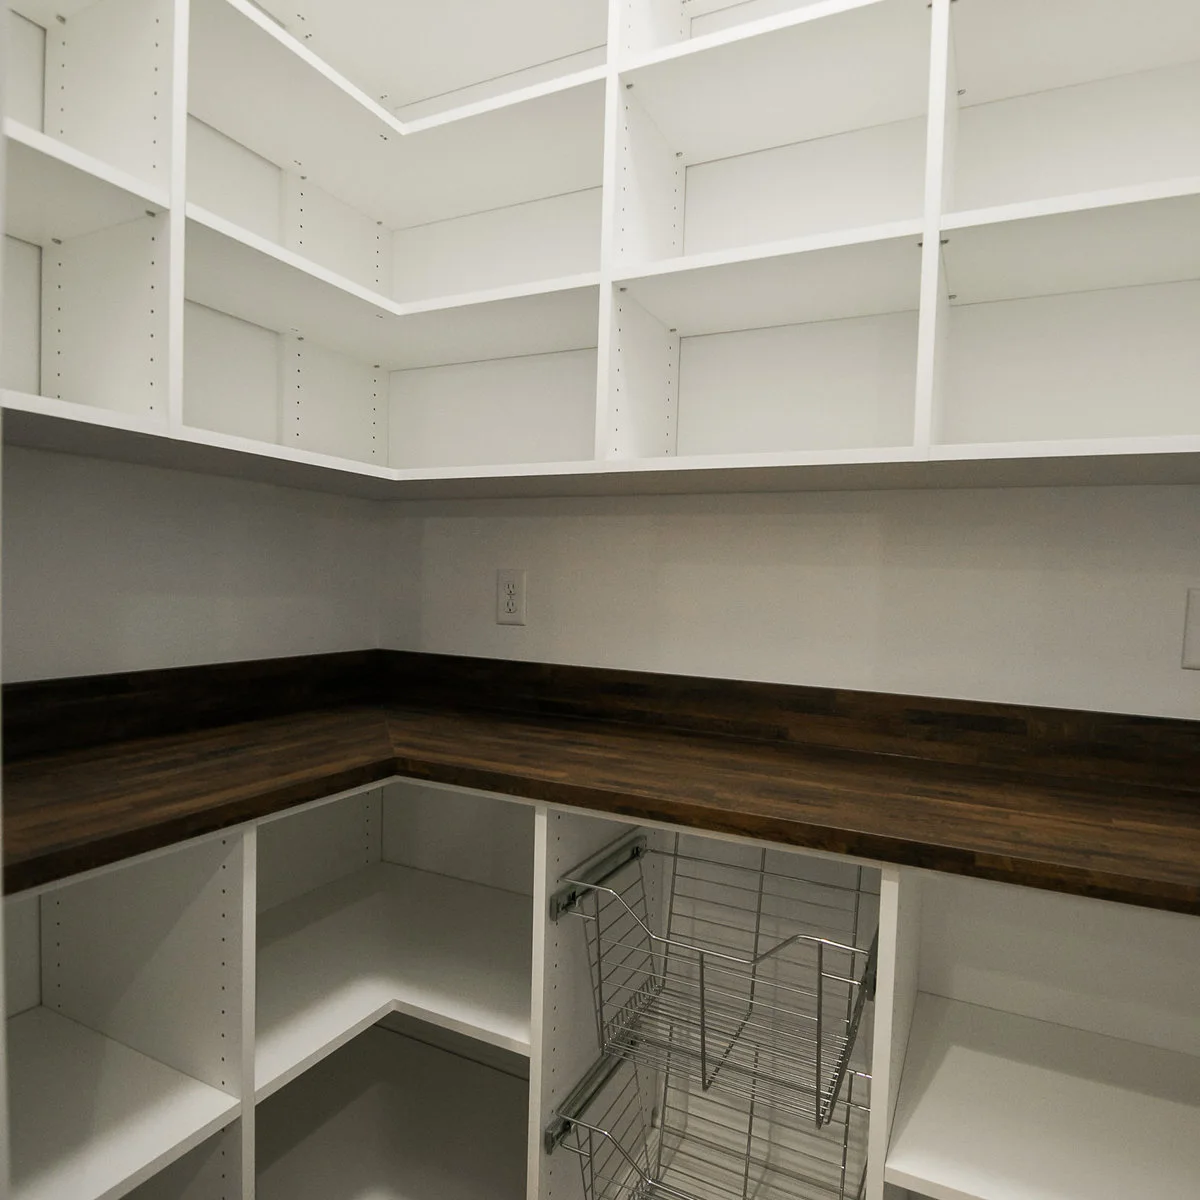
This unfilled pantry makes its basic layout easy to see: white upper shelves, a dark wood counter and a tall wire basket below. Adjustable shelf holes remain visible along the sides. Without packages in place, the different shelf heights and counter depth are easier to compare.
Use an empty-shelf stage to test actual containers and equipment before buying organizers. Leave headroom to lift jars and room for hands beside baskets. A little unassigned capacity helps the pantry absorb changing groceries; filling every shelf tightly at the start usually makes daily upkeep harder.
BRING IT ALL TOGETHER
Organize Around What Comes Home Each Week
Measure shelves, group the supplies you actually use and give the most frequently handled items an easy reach. Keep original food information, choose only the organizers that solve a specific problem and leave a clear place to put down groceries.
Review the arrangement after several shopping trips. Move categories that are awkward to reach, reduce deep hidden rows and keep the floor clear. A pantry works best when anyone in the household can find an item and return it without rearranging everything around it.