Good cabinet organization makes a familiar task easier: finding a lid, putting away dishes or seeing what to buy. Start with the contents and the way you cook before adding a collection of containers.
These kitchens show systems inside cupboards as well as larger pantries. Borrow the principle that fits your space, whether that means moving heavy plates down, grouping breakfast supplies or giving narrow bottles their own rack.
PART 01
Give Each Cupboard a Job
IDEA 01 / 20
Give Drinks and Dry Goods Separate Levels
 SaveSupport Non AI Creator
Image credit: Martin Moore
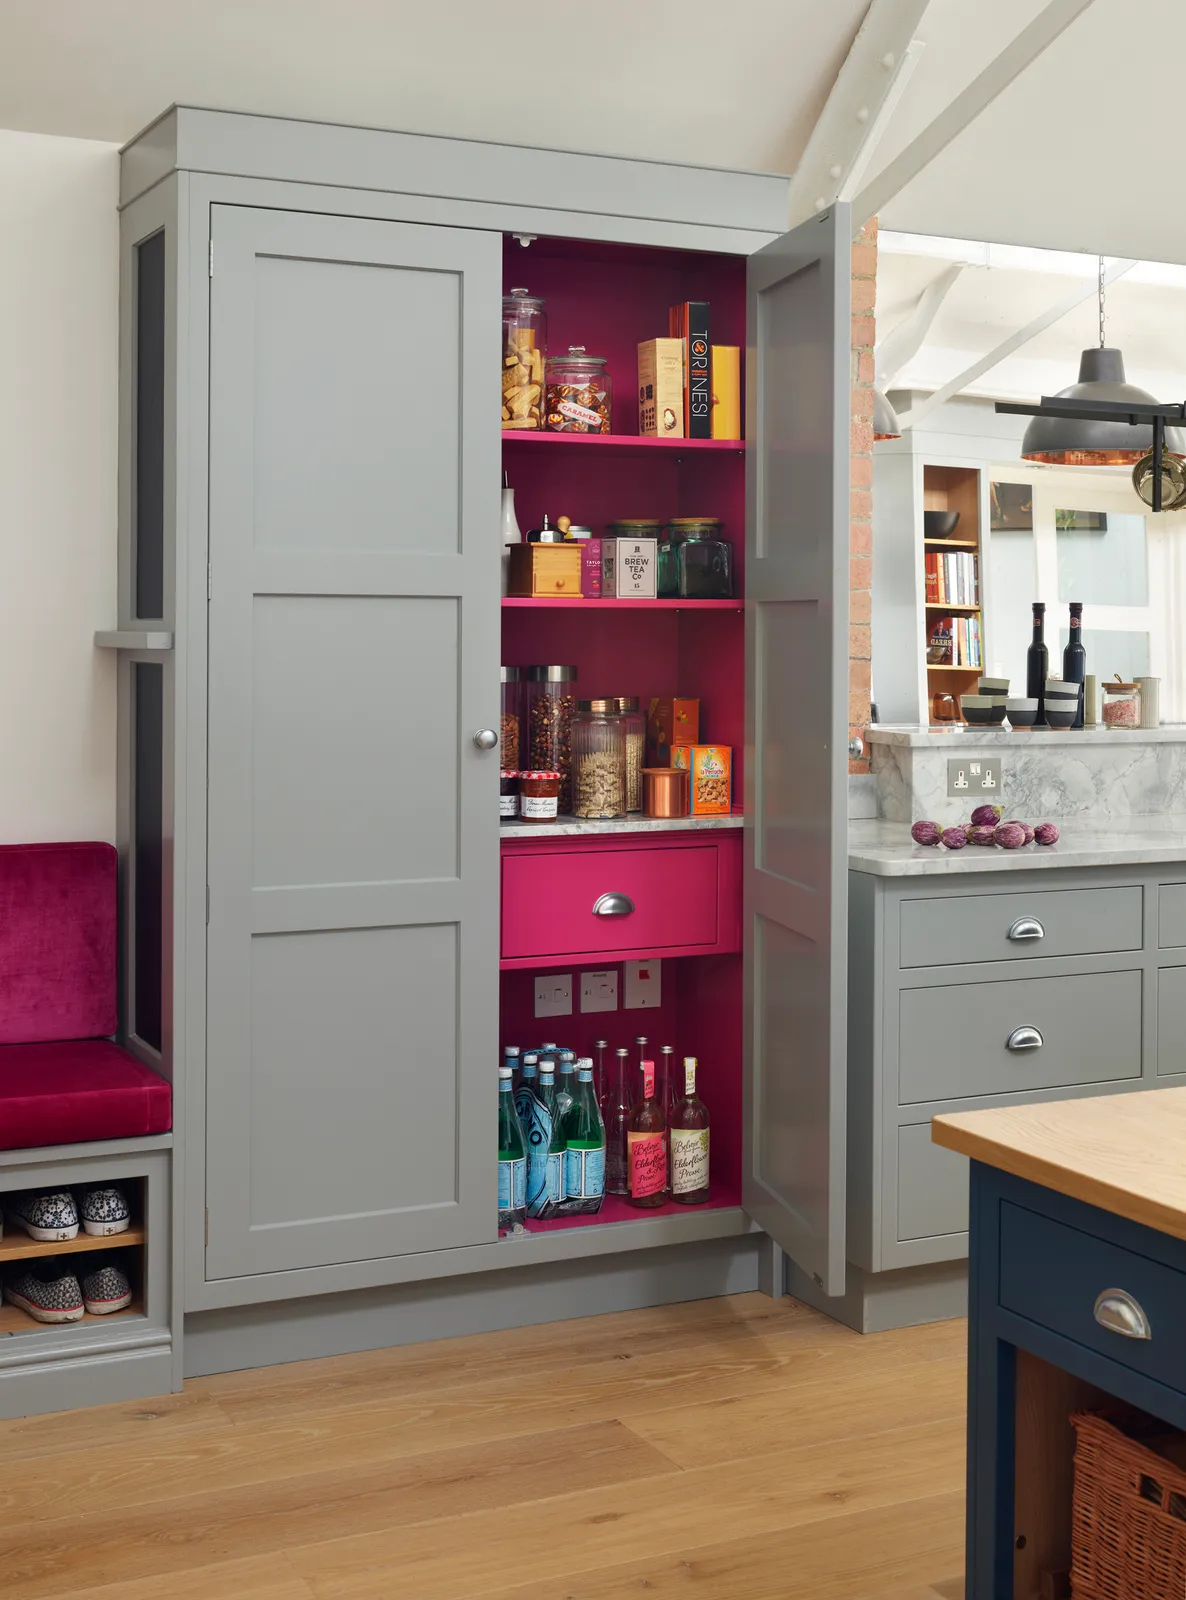
The pink interior makes the shelves of this gray larder easy to distinguish. Jars and packets occupy the upper levels, a drawer separates the middle and heavier bottles stand below. Keeping different categories on different levels reduces the need to search through unrelated supplies.
Put the items you reach for most at a comfortable height rather than copying the shelf order exactly. Keep bottles upright and within the shelf load limit. A drawer between categories can hold small accessories, but reserve enough room above it to remove tall jars without tilting them.
IDEA 02 / 20
Use Door Racks for Small Containers
 SaveSupport Non AI Creator
Image credit: Olive Barr
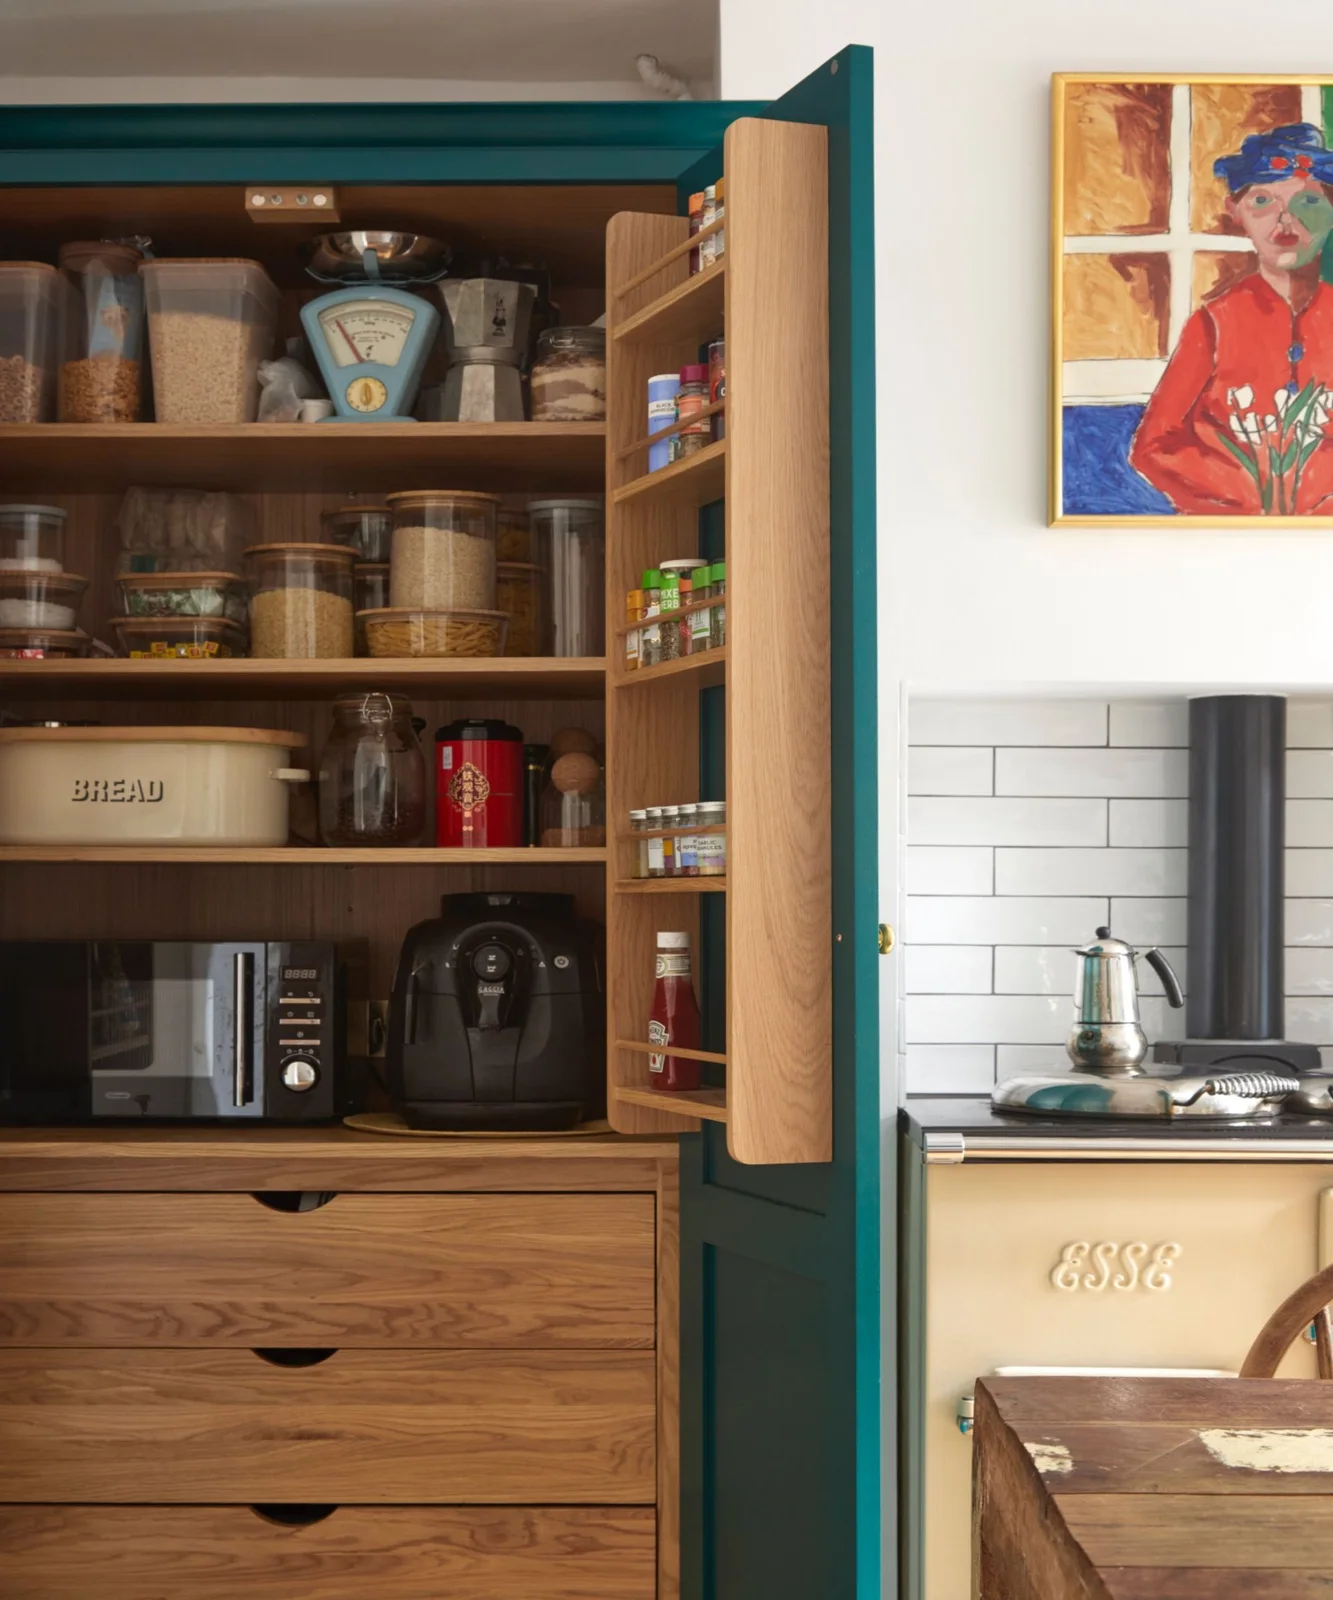
Shallow racks on the open green door hold small jars and bottles, leaving the interior shelves for larger containers. The inner cupboard mixes food storage with a scale and appliances. Wide drawers below provide another place for items that would be awkward to stack on the shelves.
Door storage needs clearance when the cupboard closes, including the tallest bottle cap. Check hinge capacity before adding a loaded rack. If you store appliances inside, use them only with the ventilation and clearances their instructions require; the closed cupboard is a storage location, not automatic permission to operate them there.
IDEA 03 / 20
Match Shelf Heights to Bowls and Glasses
 SaveSupport Non AI Creator
Image credit: Chimney Brick, Little Greene
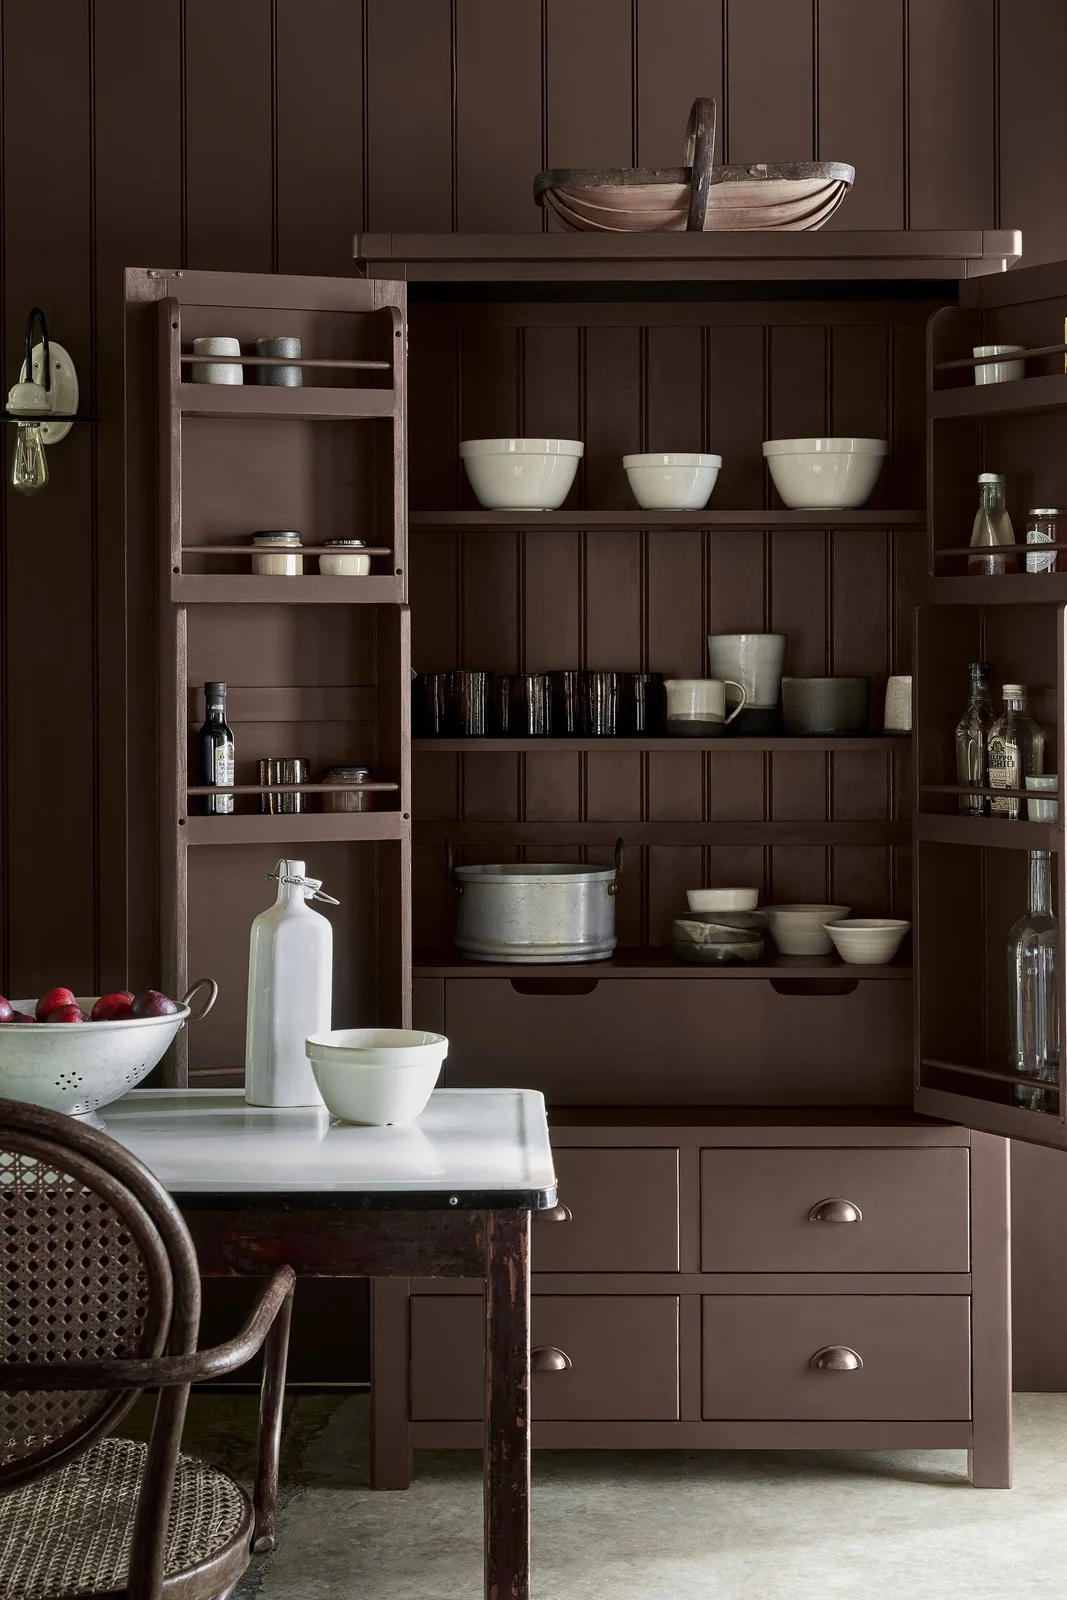
Bowls sit on the upper shelf of this brown cupboard, glasses and mugs occupy the middle and larger mixing pieces sit lower. Shallow door racks contain small jars and bottles. The arrangement uses several storage depths instead of pushing little containers behind larger tableware.
Count the dishes you actually use before setting shelf heights. Leave enough space above a stack to grip it safely and keep heavy pieces within an easy reach. If a shelf looks crowded, move occasional serving pieces elsewhere rather than increasing stack height until it becomes awkward.
IDEA 04 / 20
Store Table Linens with Serving Dishes
 SaveSupport Non AI Creator
Image credit: Martin Moore
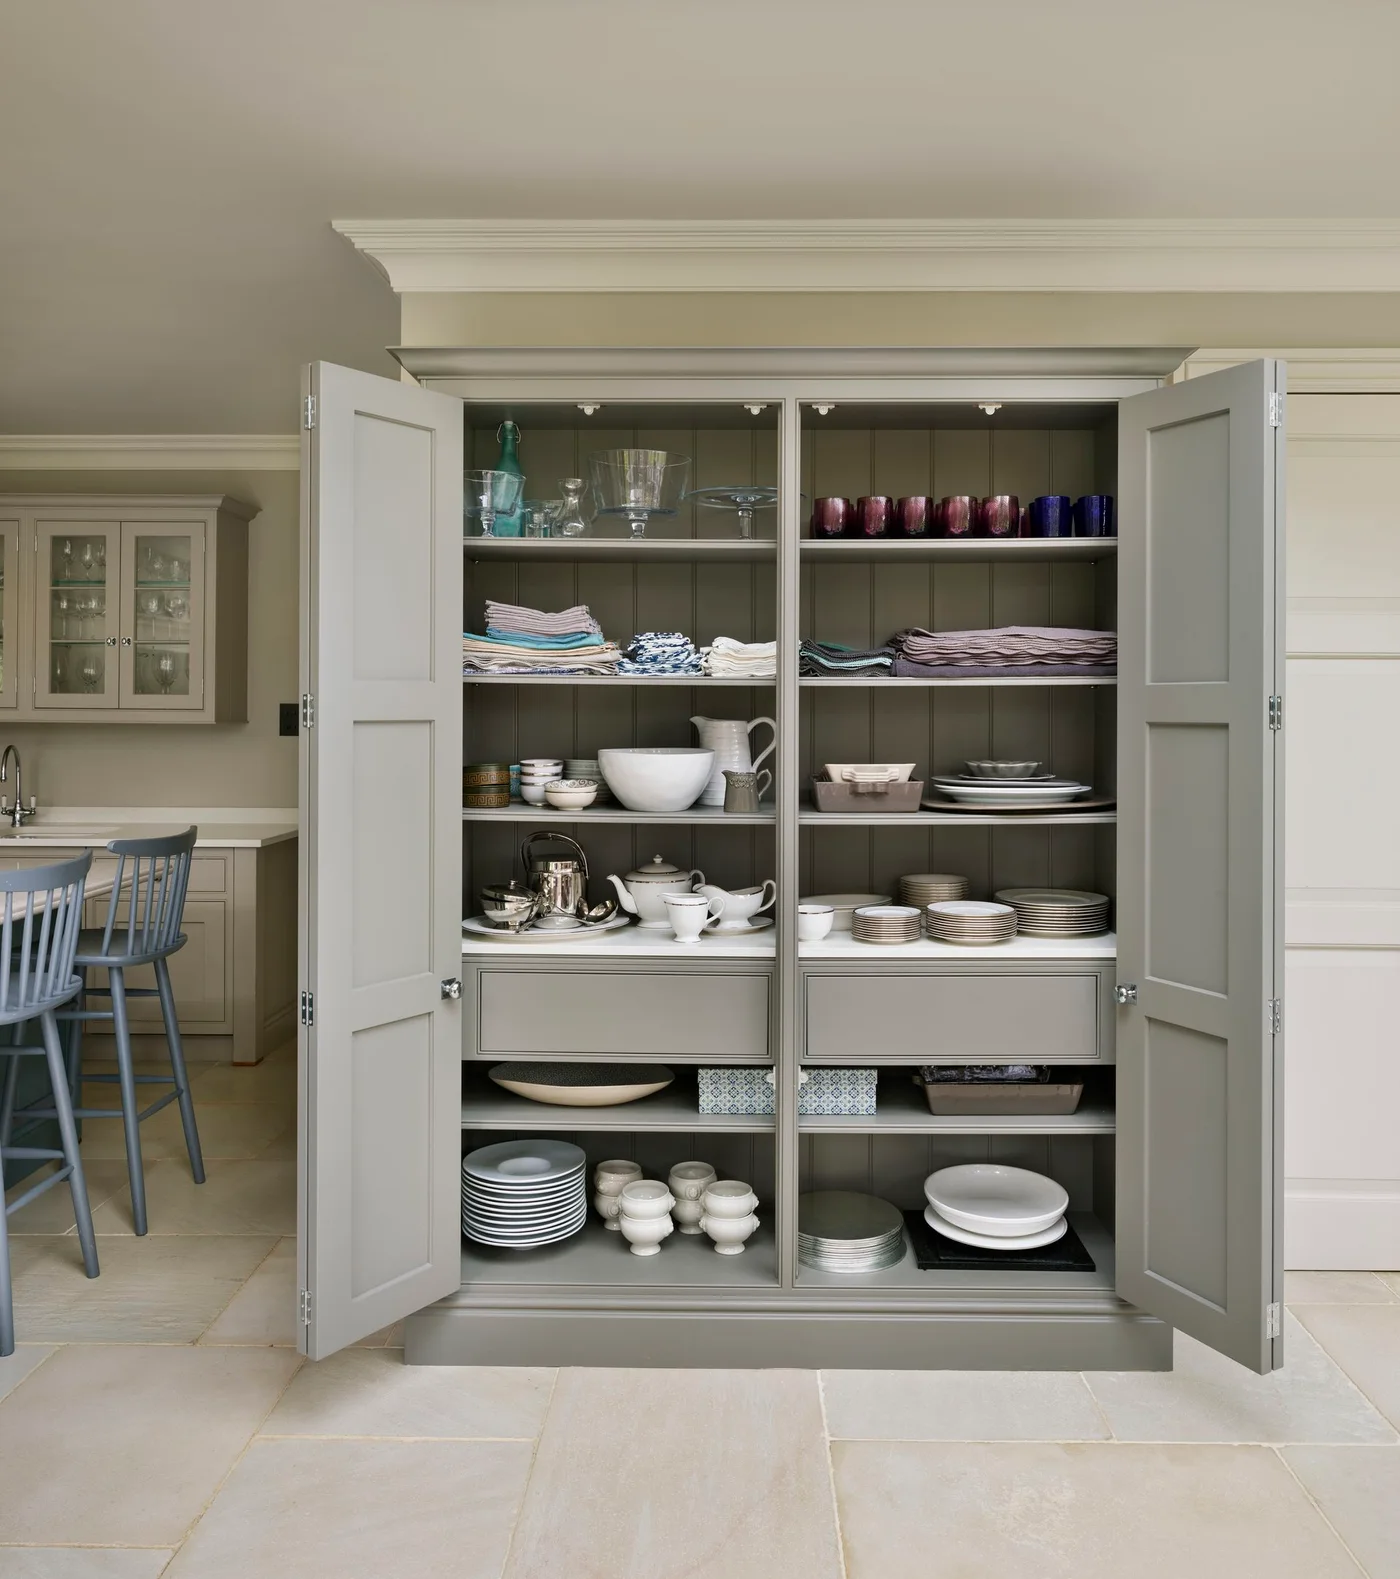
Folded linens share this tall cupboard with glasses and serving dishes. The central shelves put related pieces together for setting a table, while drawers divide the upper and lower storage. Different dish sizes have their own short stacks rather than one tall mixed pile.
Organize around a task when several items are always used together. Keep placemats or napkins clean and fully dry before returning them beside tableware. Move your heaviest daily plates to the easiest level even if that changes the photographed arrangement; convenience matters more than preserving a symmetrical display.
IDEA 05 / 20
Make a Narrow Cupboard a Drinks Zone
 SaveSupport Non AI Creator
Image credit: Future Publishing Ltd Photograph: Malcolm Menzies
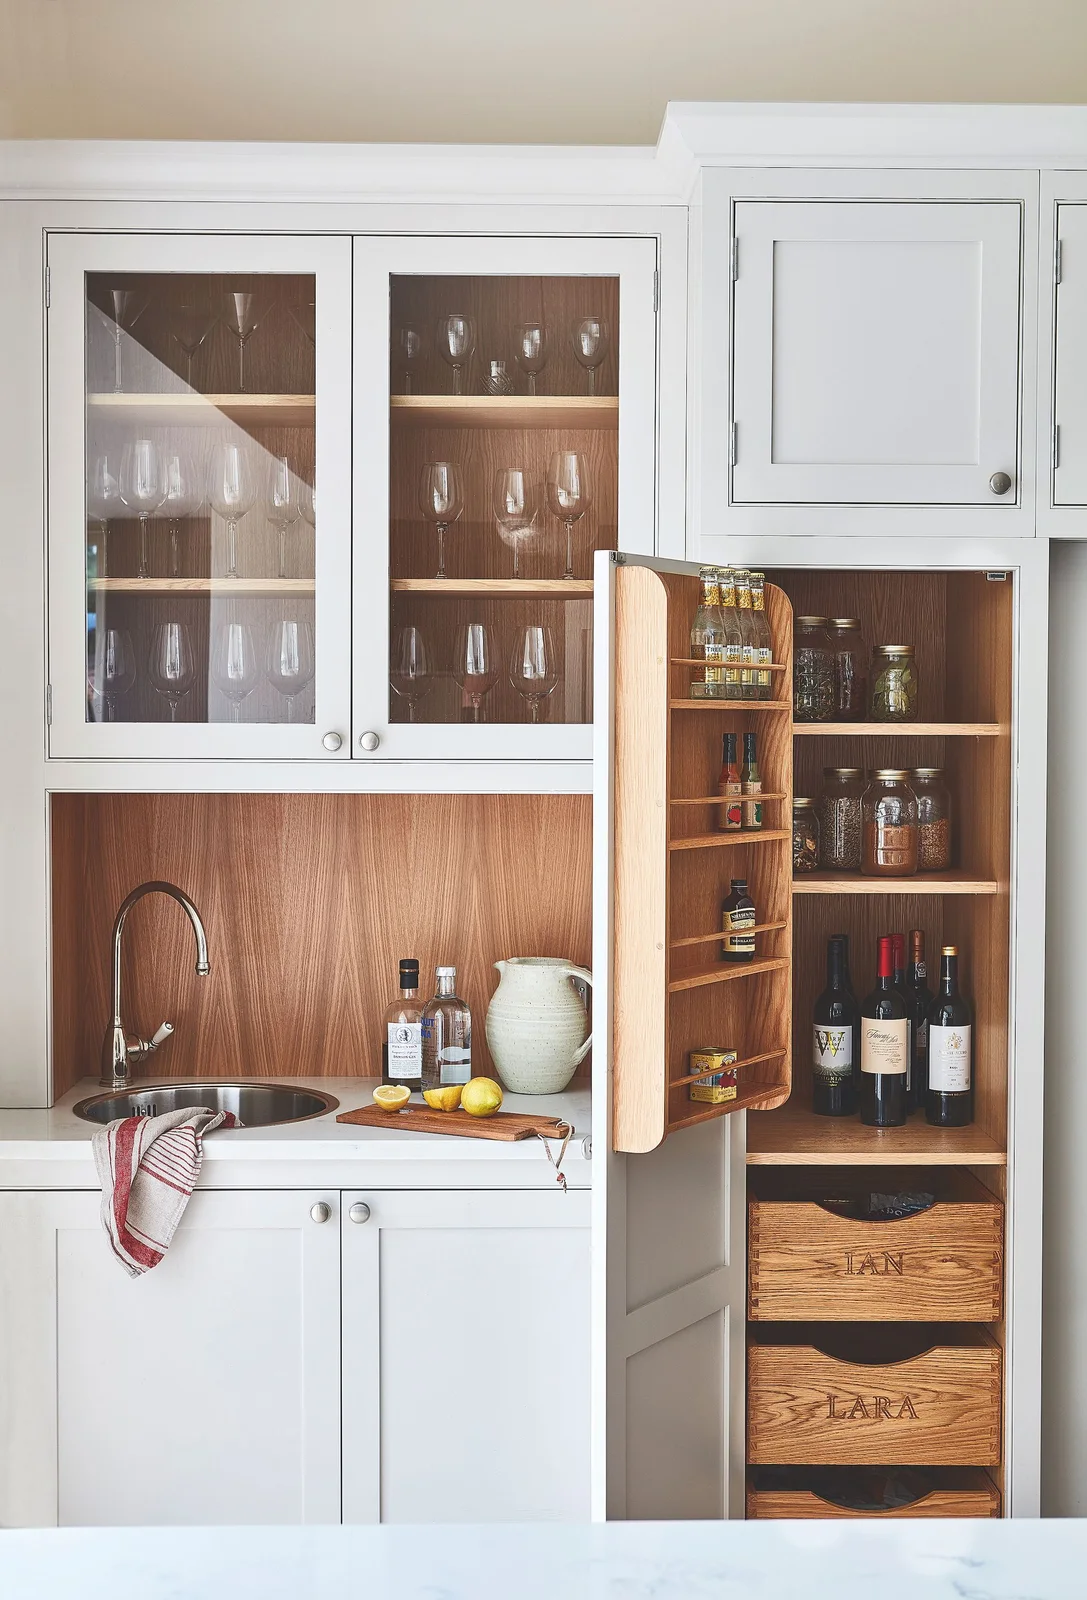
Bottles, jars and small drinks supplies fit into the narrow cupboard beside this sink. Racks inside the door use shallow space, while two drawers below contain smaller items. Glasses are stored in the adjoining glazed cupboard, putting several parts of the same routine close together.
Keep tall bottles where they can be lifted straight out and avoid overloading a narrow door. Test the swing against the sink area and adjacent cupboards. Use a removable tray beneath sticky bottles so wiping up a small leak does not require emptying the entire cabinet.
PART 02
Arrange for a Comfortable Reach
IDEA 06 / 20
Use Clear Jars Where Labels Face Forward
 SaveSupport Non AI Creator
Image credit: Harvey Jones
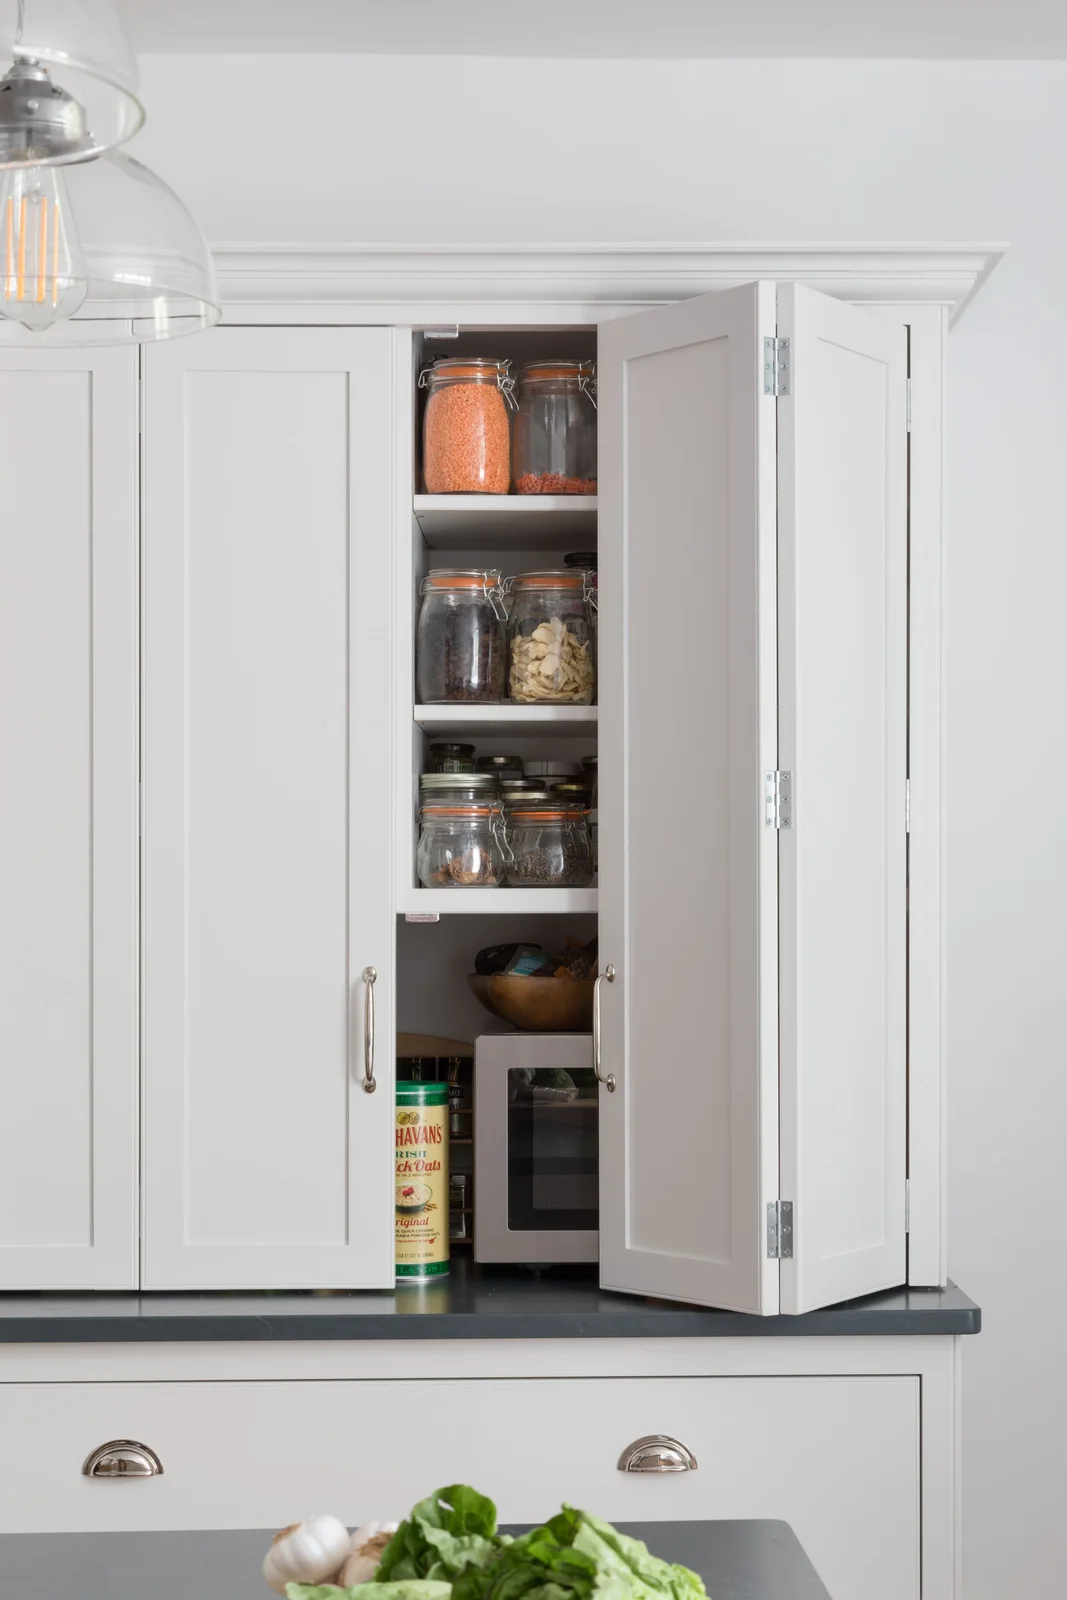
Clear jars of lentils, pasta and other dry ingredients occupy the shelves behind these folding doors. The shallow arrangement makes contents visible at a glance. The lower level has a larger opening, allowing taller objects to sit below the smaller jars without wasting the full cupboard height.
Decant only foods you use often enough to maintain the system. Add contents, allergen information where relevant and the original date to each container rather than relying on appearance. Keep new food separate from older remnants until the container is empty, clean and fully dry.
IDEA 07 / 20
Sort Glassware by Shape
 SaveSupport Non AI Creator
Image credit: Future / Paul Raeside
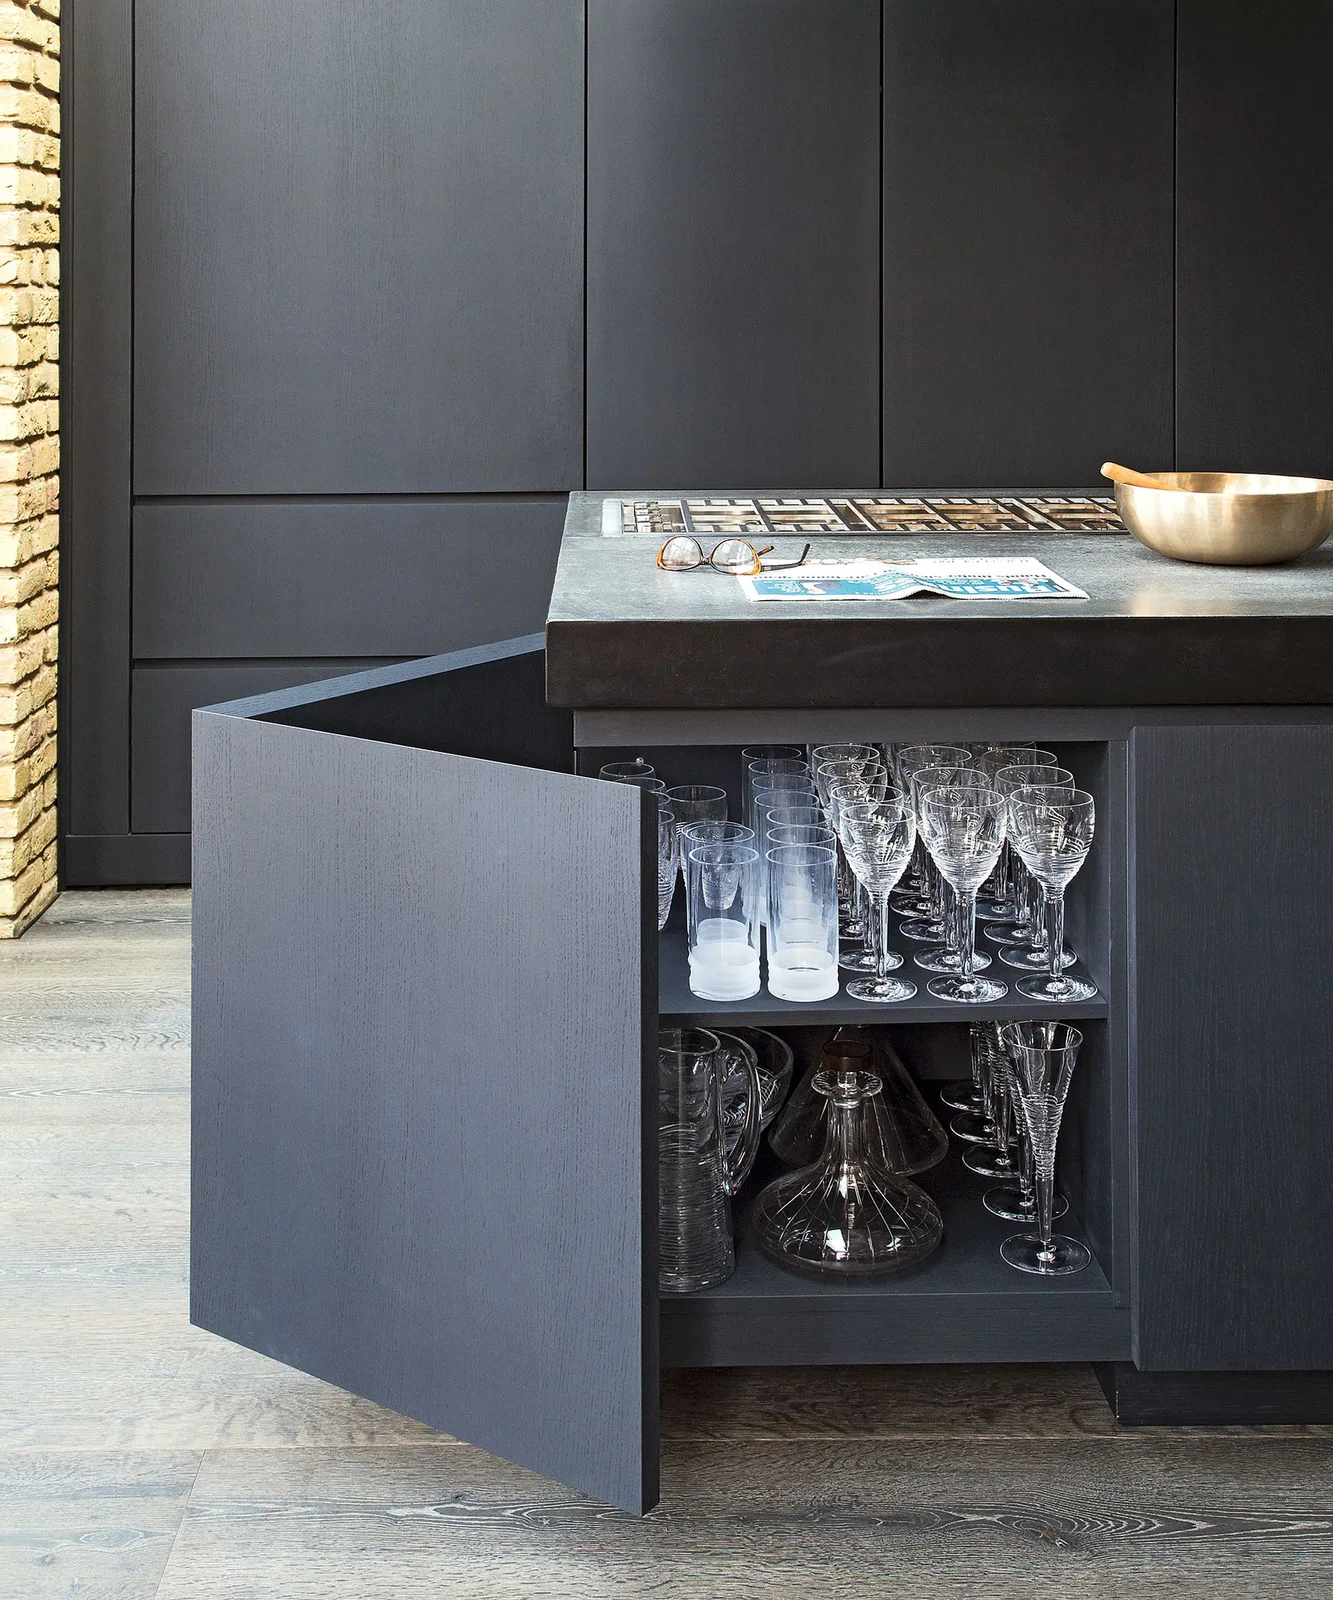
Glasses stand in rows inside this dark base cupboard, with larger glass pieces below. Similar shapes stay together, so the opening reveals what is available without moving a mixture of unrelated items. The adjustable shelf allows different heights to fit within the same cabinet.
Do not pack stems so tightly that removing one catches its neighbors. Keep frequently used glasses near the front and give fragile pieces enough headroom to lift cleanly. Check the shelf rating before filling a wide cabinet with glassware; a visually light collection can still be heavy.
IDEA 08 / 20
Give Slim Bottles a Pull-Out
 SaveSupport Non AI Creator
Image credit: Martin Moore
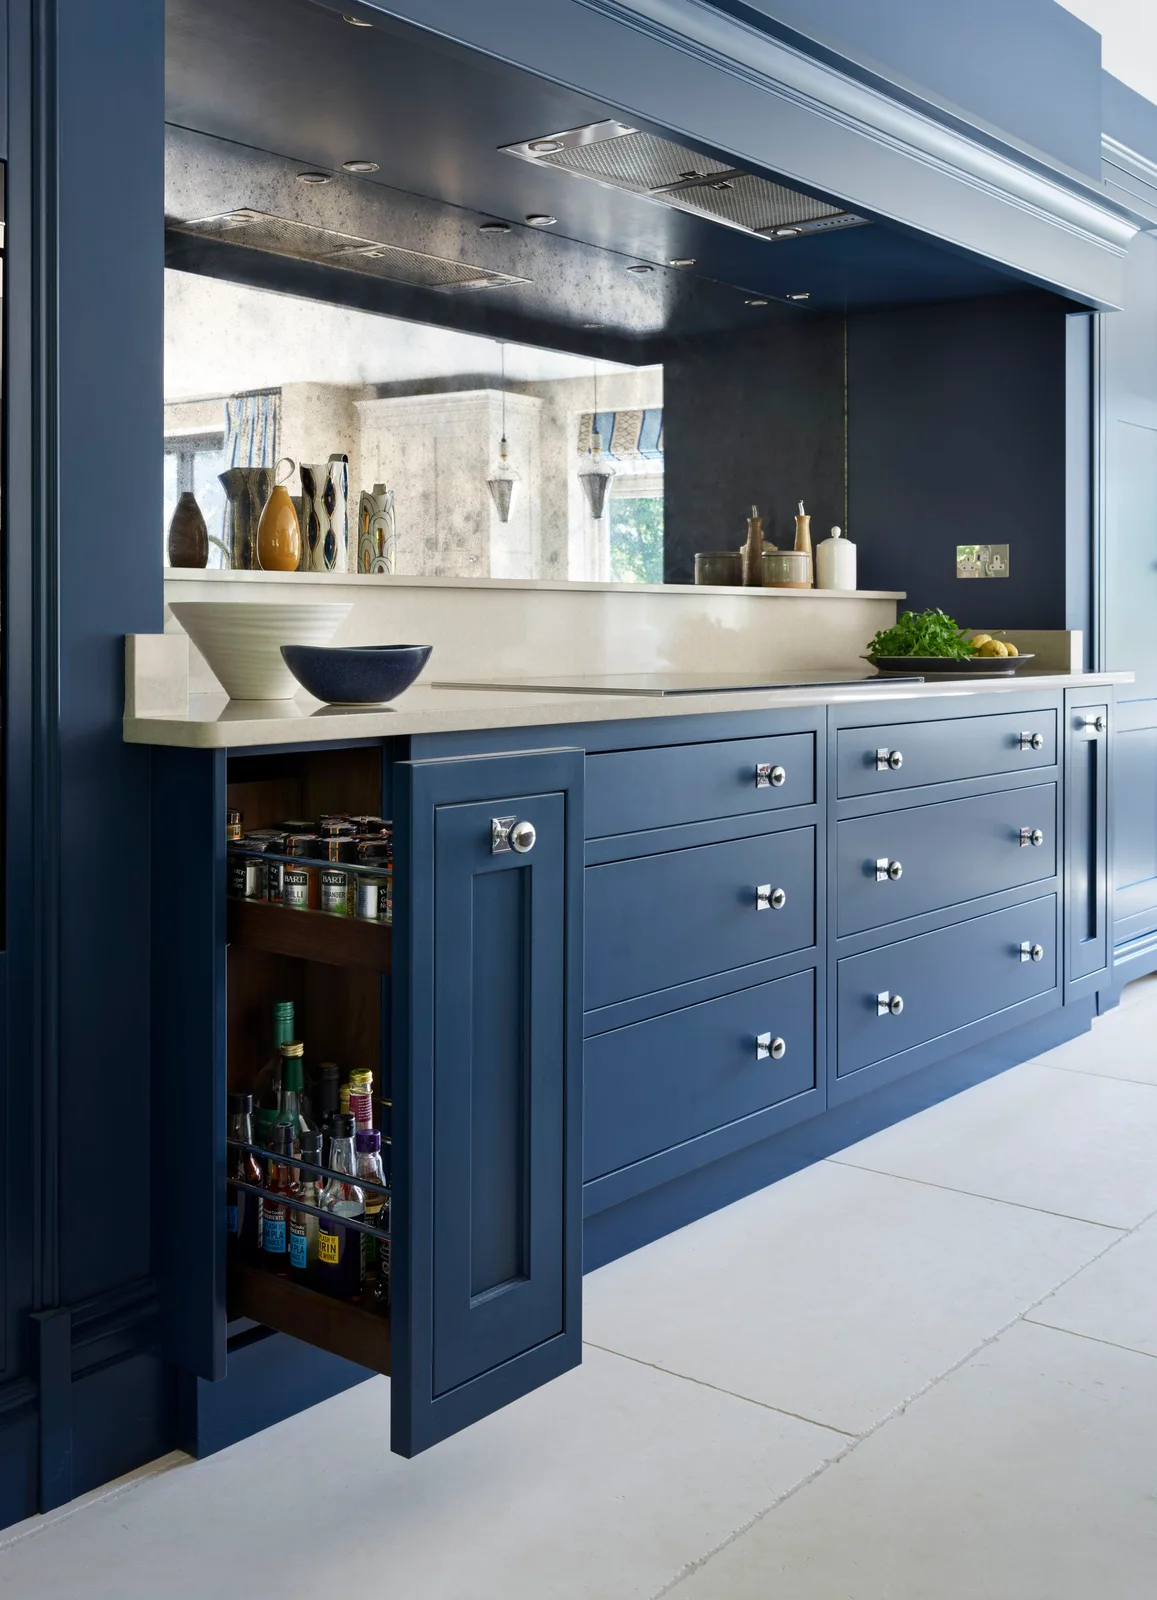
A narrow pull-out beside the cooking area brings small spice jars and taller bottles into view. Two different storage levels use the height of the base cabinet. Broad drawers alongside it can serve larger utensils and cookware without mixing everything in the same deep cupboard.
Measure your actual bottles and jars before selecting a fitting. A pull-out is most useful when you can read labels from the side and remove an item without lifting a second shelf. Keep heat-sensitive ingredients away from sustained cooking heat, even when the storage is convenient.
IDEA 09 / 20
Separate Pantry Food from Display Dishes
 SaveSupport Non AI Creator
Image credit: Tom Howley
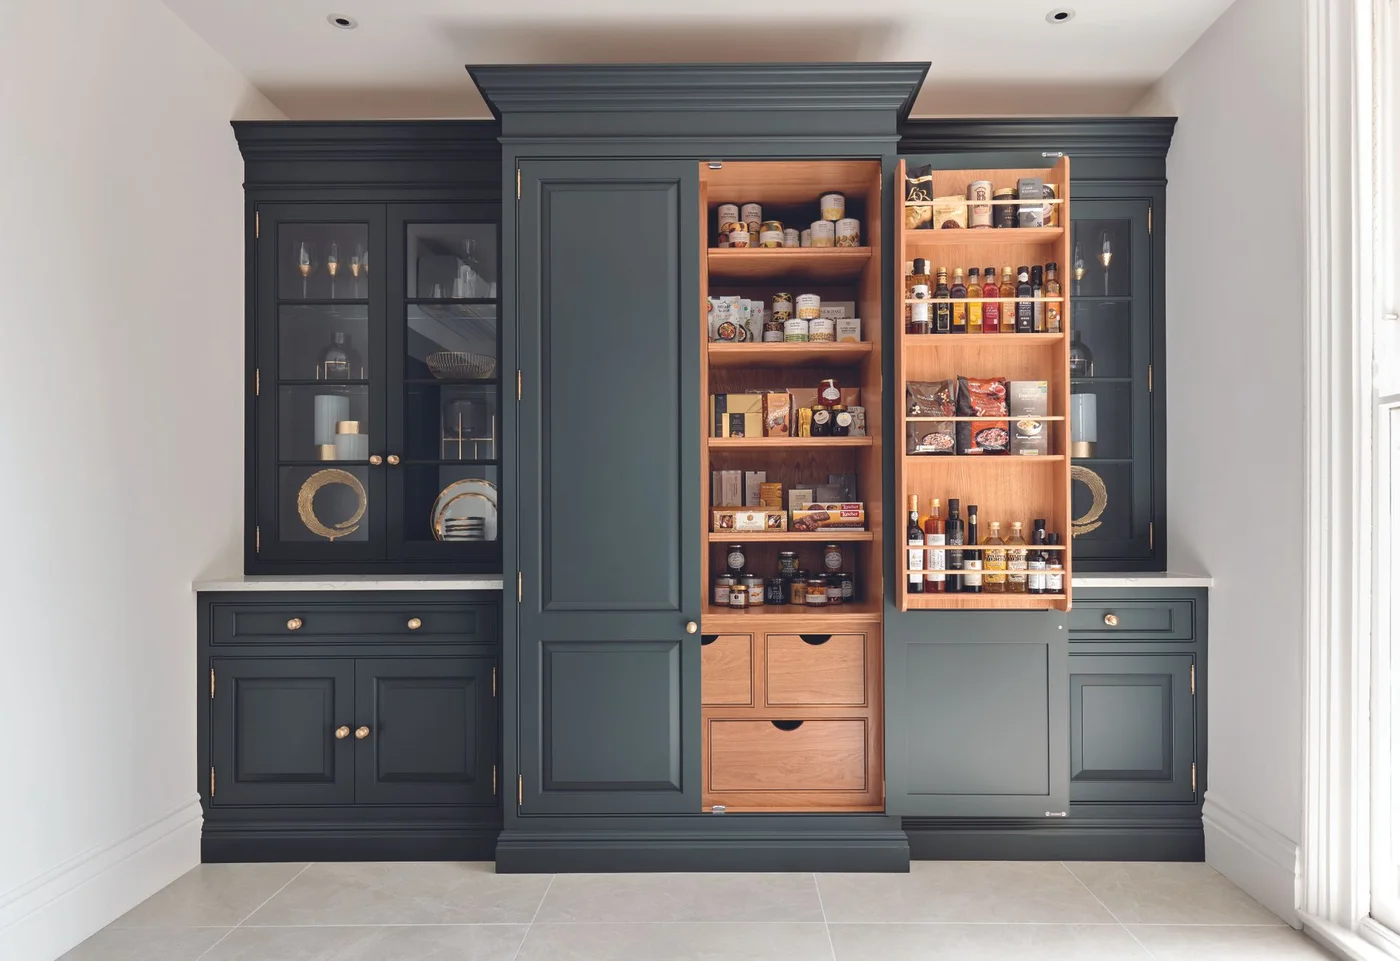
A food larder occupies the center of this dark blue cabinet wall, flanked by glazed cupboards for dishes. Small bottles and packets fit in the open door racks, with tins and jars on the inner shelves. Drawers at the bottom offer a separate zone for loose items.
Use visible storage for pieces you enjoy seeing and closed storage for mixed packaging. Keep frequently used ingredients together by meal or task rather than by container color. Inspect the depth behind the door rack when closing it, leaving a gap so bottles cannot strike the inner shelves.
IDEA 10 / 20
Keep Everyday Dishes Together
 SaveSupport Non AI Creator
Image credit: deVOL Kitchens
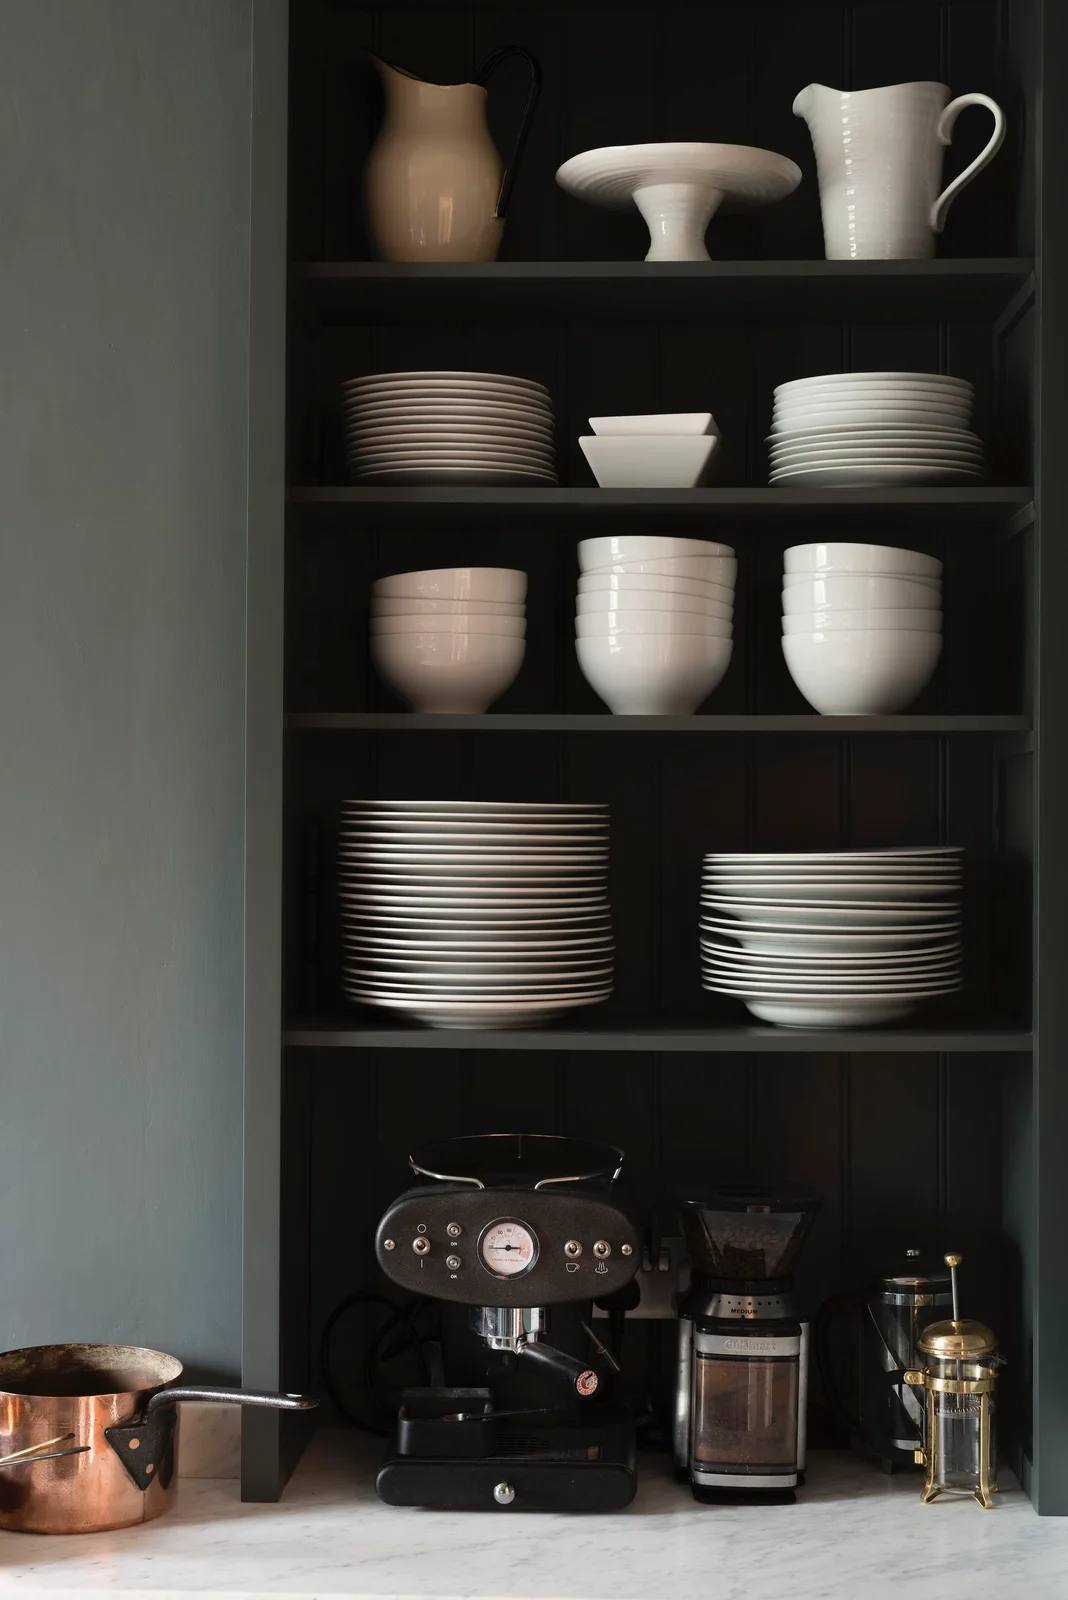
Plates and bowls form separate stacks inside this dark countertop cupboard, with jugs and a cake stand above. A coffee machine and grinder sit on the counter below. Repeating a small range of dishes makes the arrangement easy to scan without requiring every piece to match perfectly.
Keep daily bowls and plates at the level you can reach with both hands. Occasional tall serving pieces can go higher if safely accessible. Do not let attractive stacks become too heavy to handle; two shorter groups often work better than a single impressive tower.
PART 03
Make Pantry Contents Visible
IDEA 11 / 20
Keep Preparation Tools Near Dry Ingredients
 SaveSupport Non AI Creator
Image credit: Future PLC
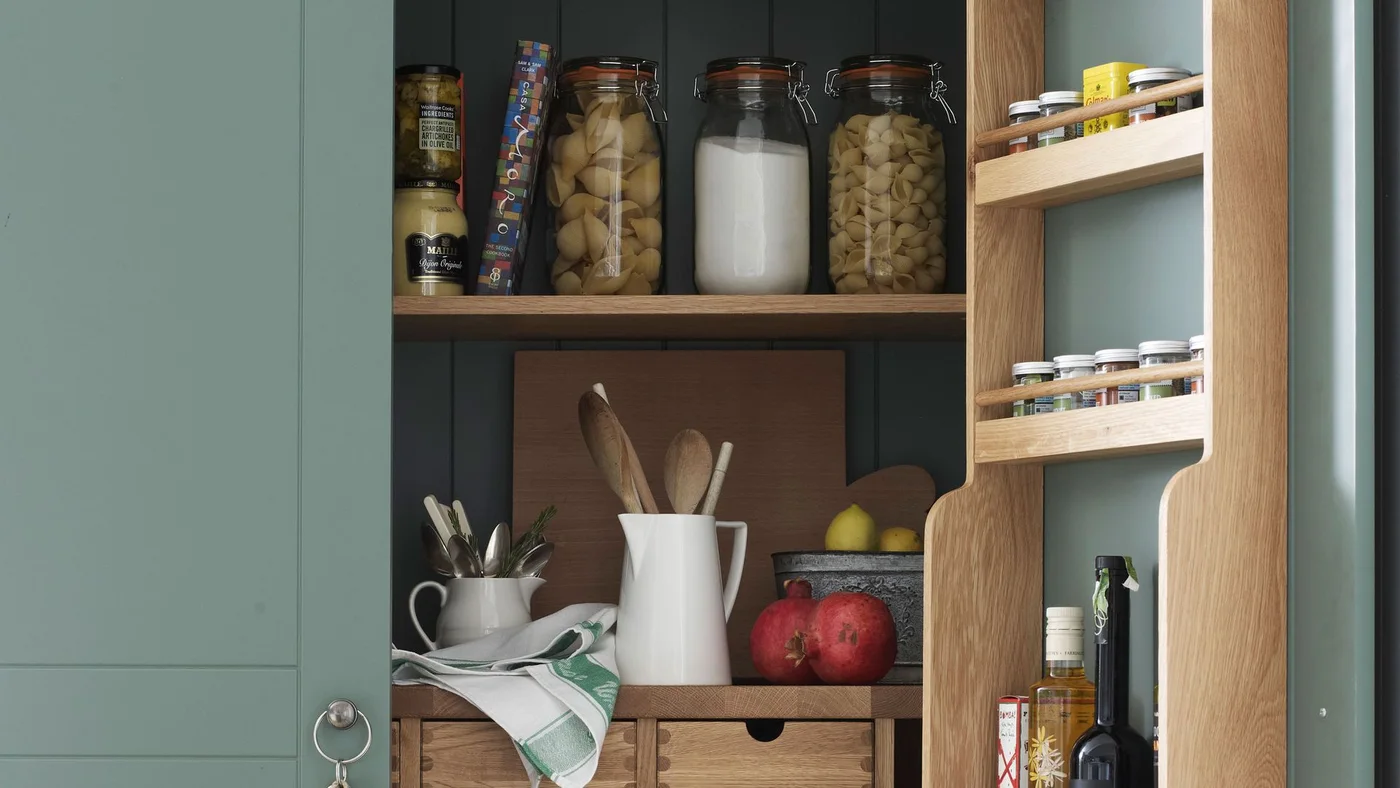
White jugs hold cooking utensils in this green cupboard, with boards behind them and clear jars on the shelf above. Door racks contain small spice jars and bottles. The grouping brings several preparation essentials together while preserving a distinct place for each shape.
Only put clean, dry boards and utensils into an enclosed cupboard. Leave space to grasp long handles without catching the shelf above. Keep oils and spices in conditions recommended on their packaging, and check the door swing so narrow racks do not knock against tools inside.
IDEA 12 / 20
Use Containers That Fit the Shelf
 SaveSupport Non AI Creator
Image credit: Project: NEAT Method Santa Barbara (via Houzz)
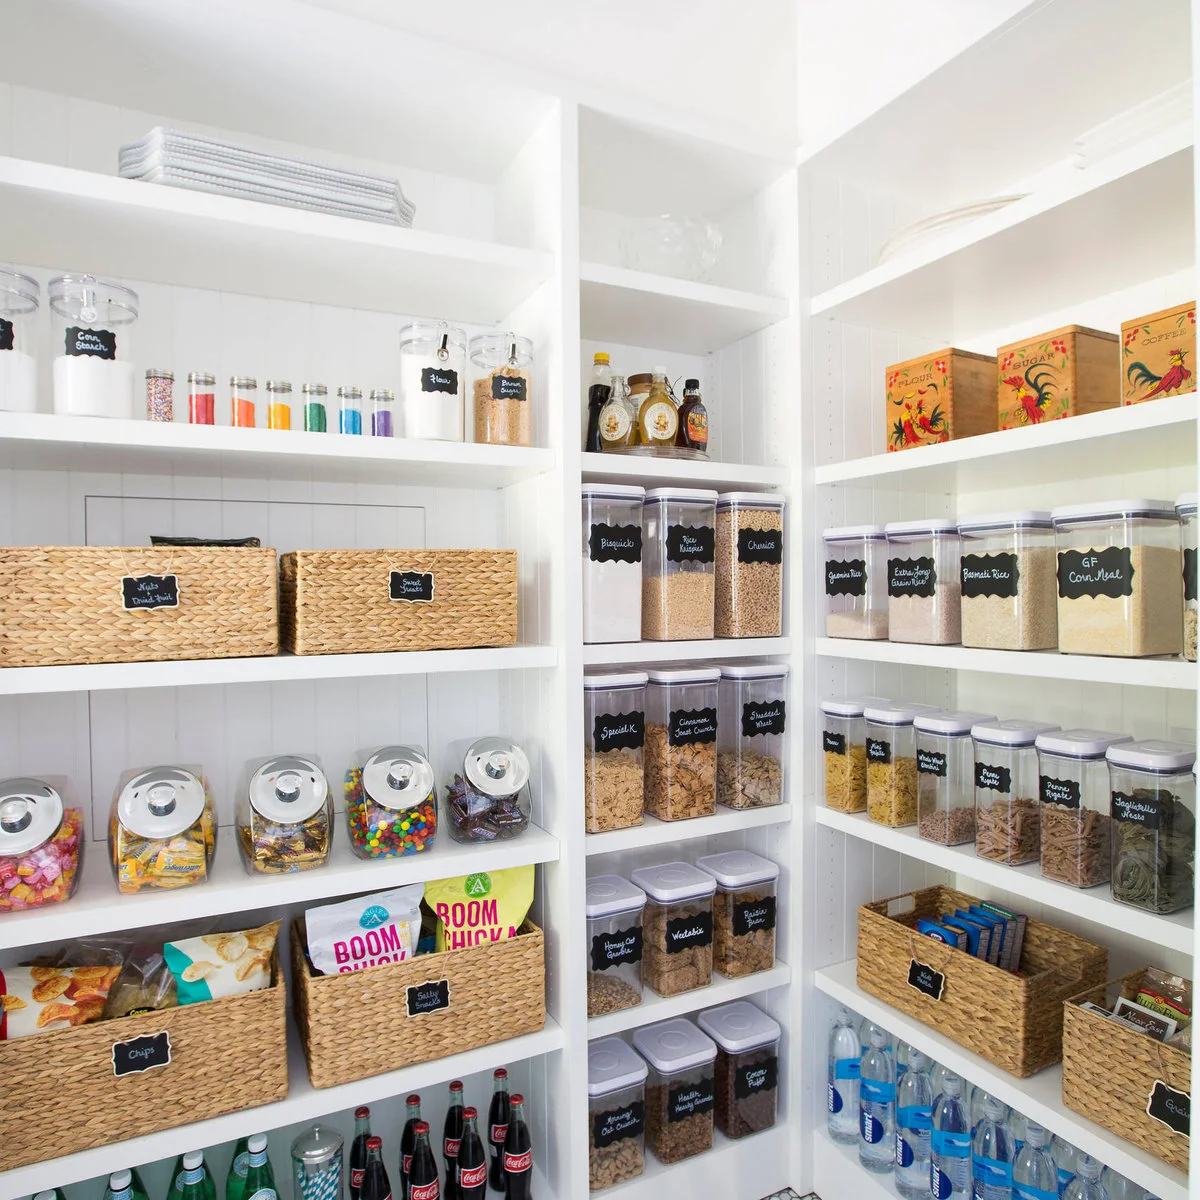
Rectangular containers line these white shelves, with woven baskets gathering loose snack packages. Each category occupies a defined stretch rather than spilling across several levels. Transparent sides make the remaining quantity visible, while labels help distinguish ingredients that could otherwise look similar.
Measure shelf depth, height and the clear door opening before buying a matching set. Choose food-safe containers with closures suited to the contents. Keep dates and cooking instructions from the original packaging, and allow enough space above each lid to lift the container without dragging it along the shelf.
IDEA 13 / 20
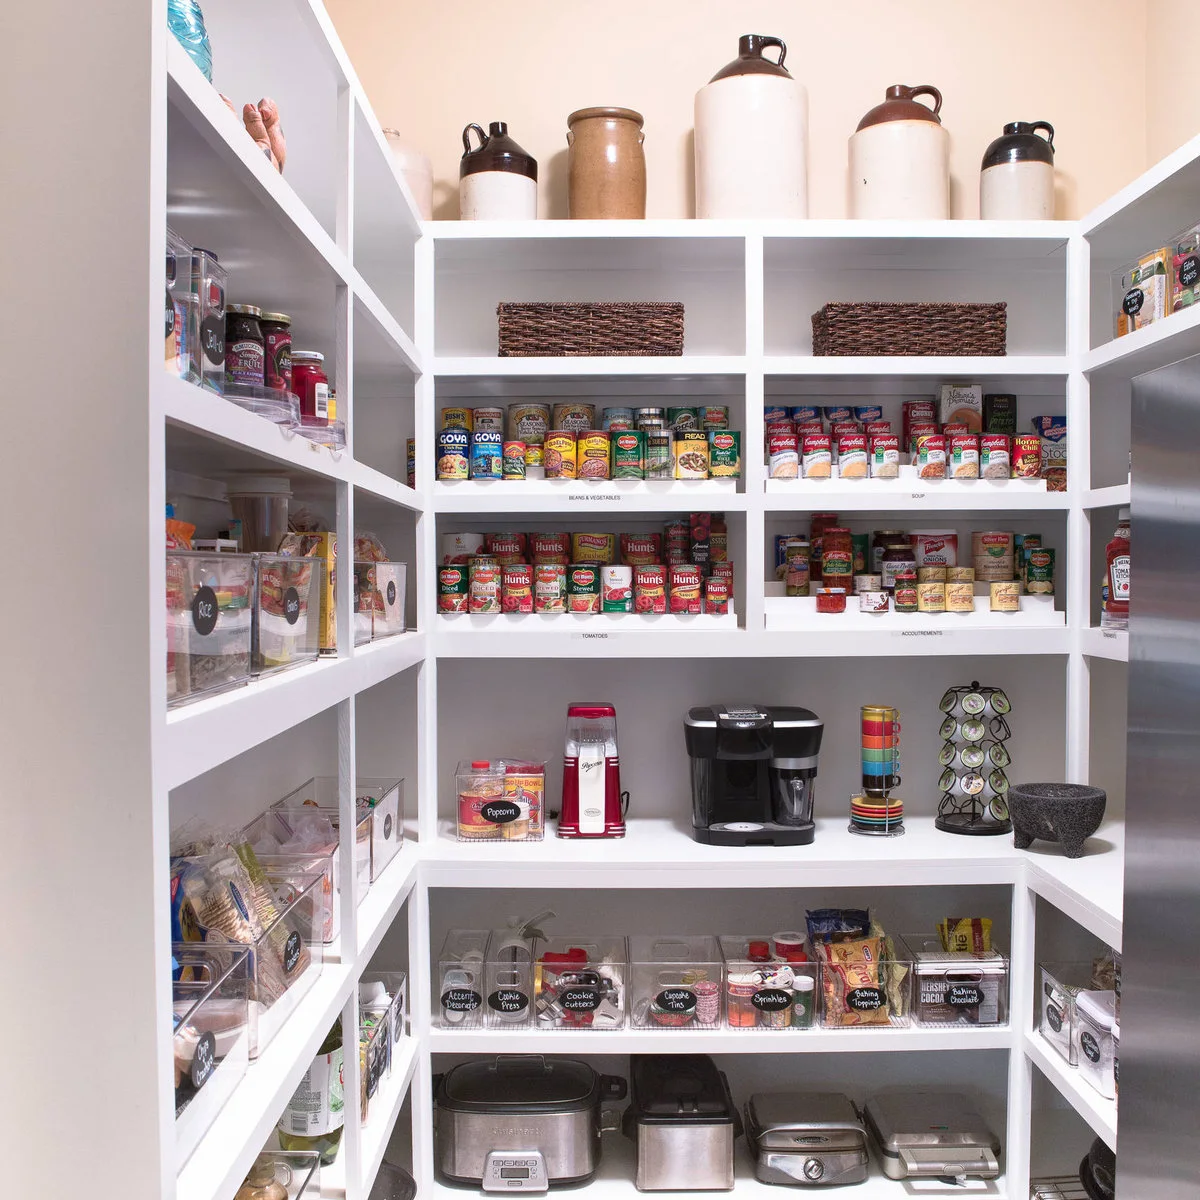
Organize Cans with Shelf Labels
 SaveSupport Non AI Creator
Image credit: Project: Abundance Organizing (via Houzz)
Cans stay in their original packaging on labeled shelves in this pantry, while clear bins gather smaller packets below. A counter separates food storage from appliances on the lowest shelf. The arrangement shows that order does not require decanting everything into matching jars.
Put newer cans behind older ones and keep a small space for products that need using soon. Choose bins light enough to lift when full. Shelf labels should name categories you actually buy; overly narrow labels create extra sorting work when your grocery list changes.
IDEA 14 / 20
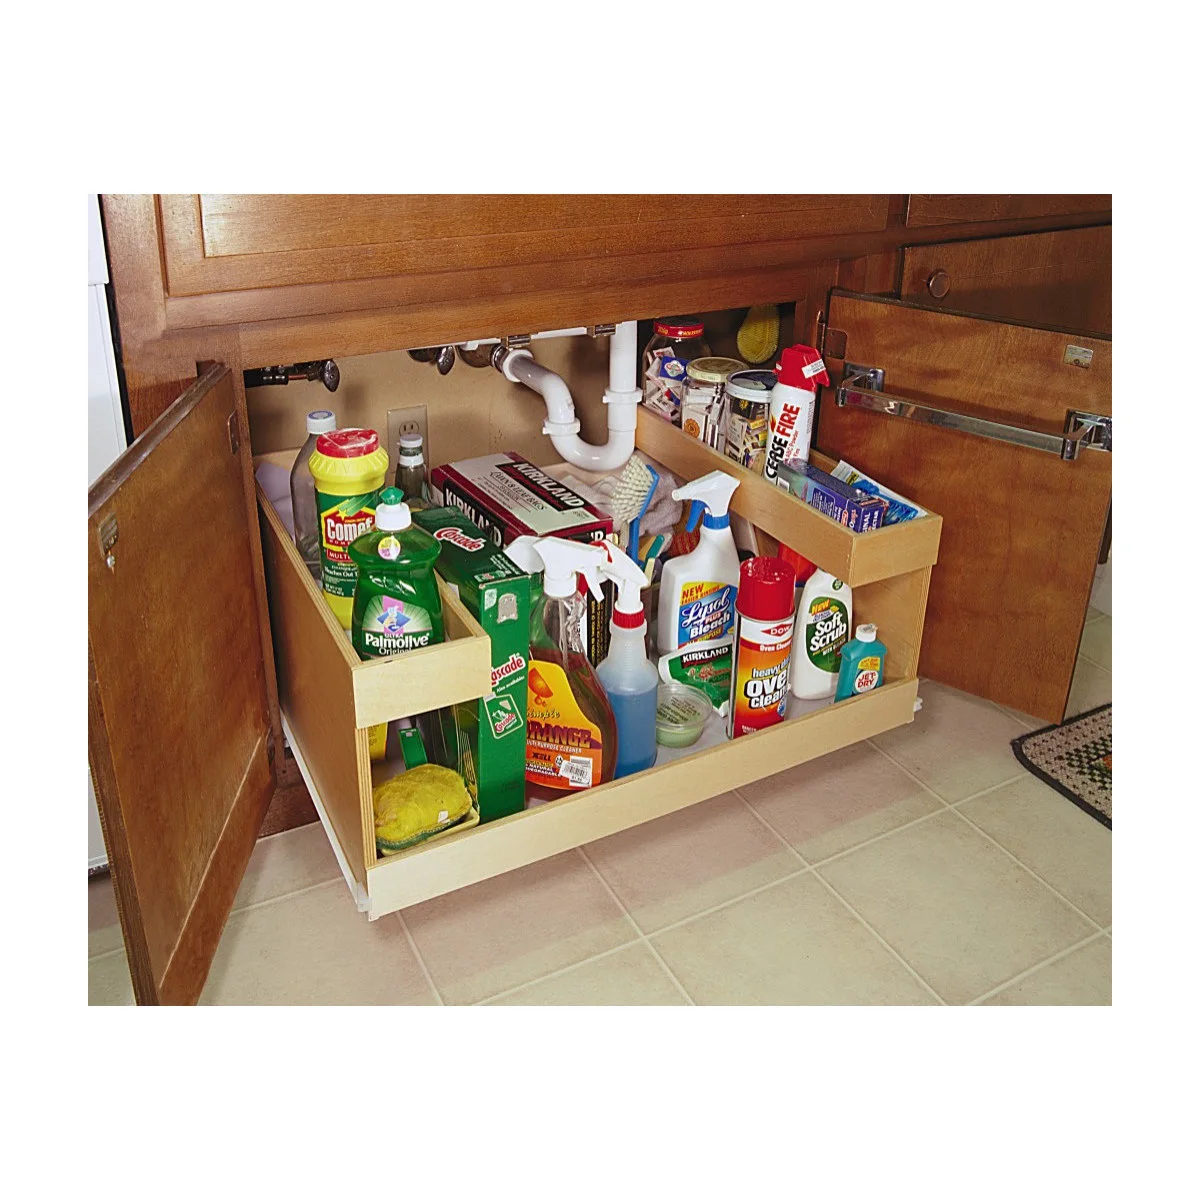
Work Around the Sink Plumbing
 SaveSupport Non AI Creator
Image credit: Project: Shelf Confident (via Houzz)
The pull-out in this under-sink cupboard has a stepped shape that works around the drainpipe. Bottles and small cleaning tools occupy separate sections, bringing the back of the cabinet forward. The plumbing remains visible above the storage instead of being hidden behind a permanent stack.
Keep cleaning products in their original labeled containers and secure them from children or pets where needed. Use a removable leak-resistant liner and leave valves accessible. Do not copy a crowded arrangement so closely that tall spray heads catch the pipes or prevent the tray from closing.
IDEA 15 / 20
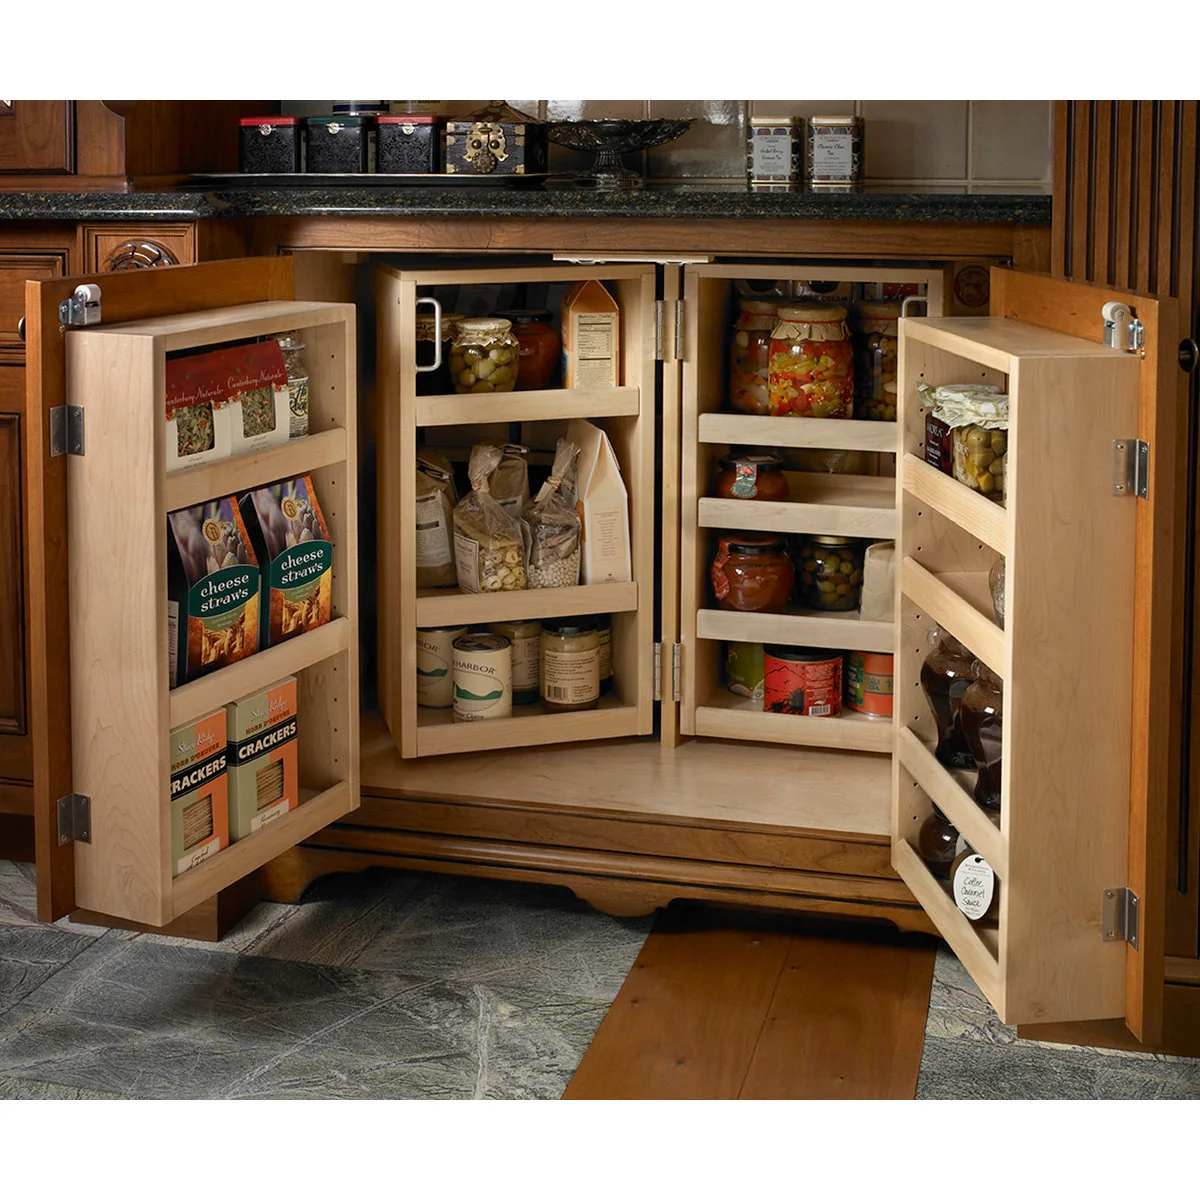
Bring Inner Pantry Shelves Toward You
 SaveSupport Non AI Creator
Source: www.houzz.com
Shallow door racks and hinged inner shelves divide this base pantry into several visible layers. Crackers and narrow containers fit near the front, while jars occupy the deeper sections. Opening the inner fittings exposes storage that would be difficult to reach at the back of a conventional cupboard.
Test the whole movement with your usual containers before committing to a fitting. Swing-out systems take space in front of the cabinet and can reduce the size of objects that fit inside. Follow the load limits, placing heavier jars where the fitting is designed to support them.
PART 04
Choose Fittings for the Contents
IDEA 16 / 20
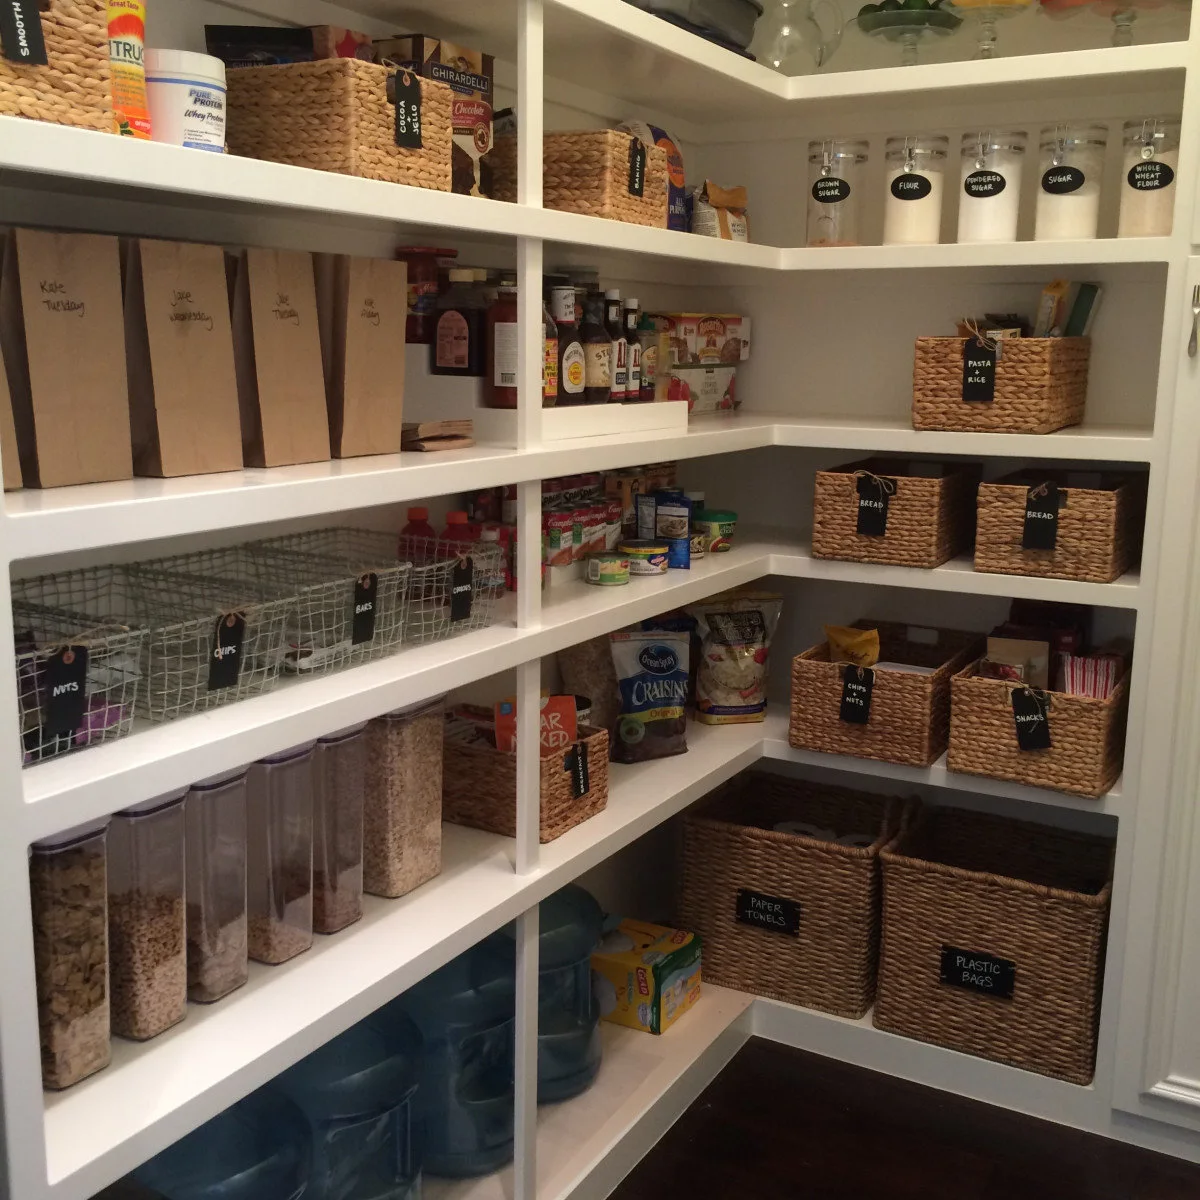
Give Loose Packets Their Own Baskets
 SaveSupport Non AI Creator
Image credit: Project: Neat Method San Diego (via Houzz)
Woven and wire baskets divide packets into categories on these pantry shelves. Cereal containers line a lower level, and labeled jars gather baking ingredients above. The different container types suit different contents rather than forcing chips, paper goods and flour into the same storage format.
Use open baskets for packets that do not need decanting, keeping the original seals and dates intact. Leave handles facing the aisle and avoid packing baskets too tightly to remove. Keep heavy water containers low as pictured, checking that the supporting shelf can carry the weight.
IDEA 17 / 20
Separate Cleaning Equipment from Food
 SaveSupport Non AI Creator
Image credit: Project: LEICHT New York (via Houzz)
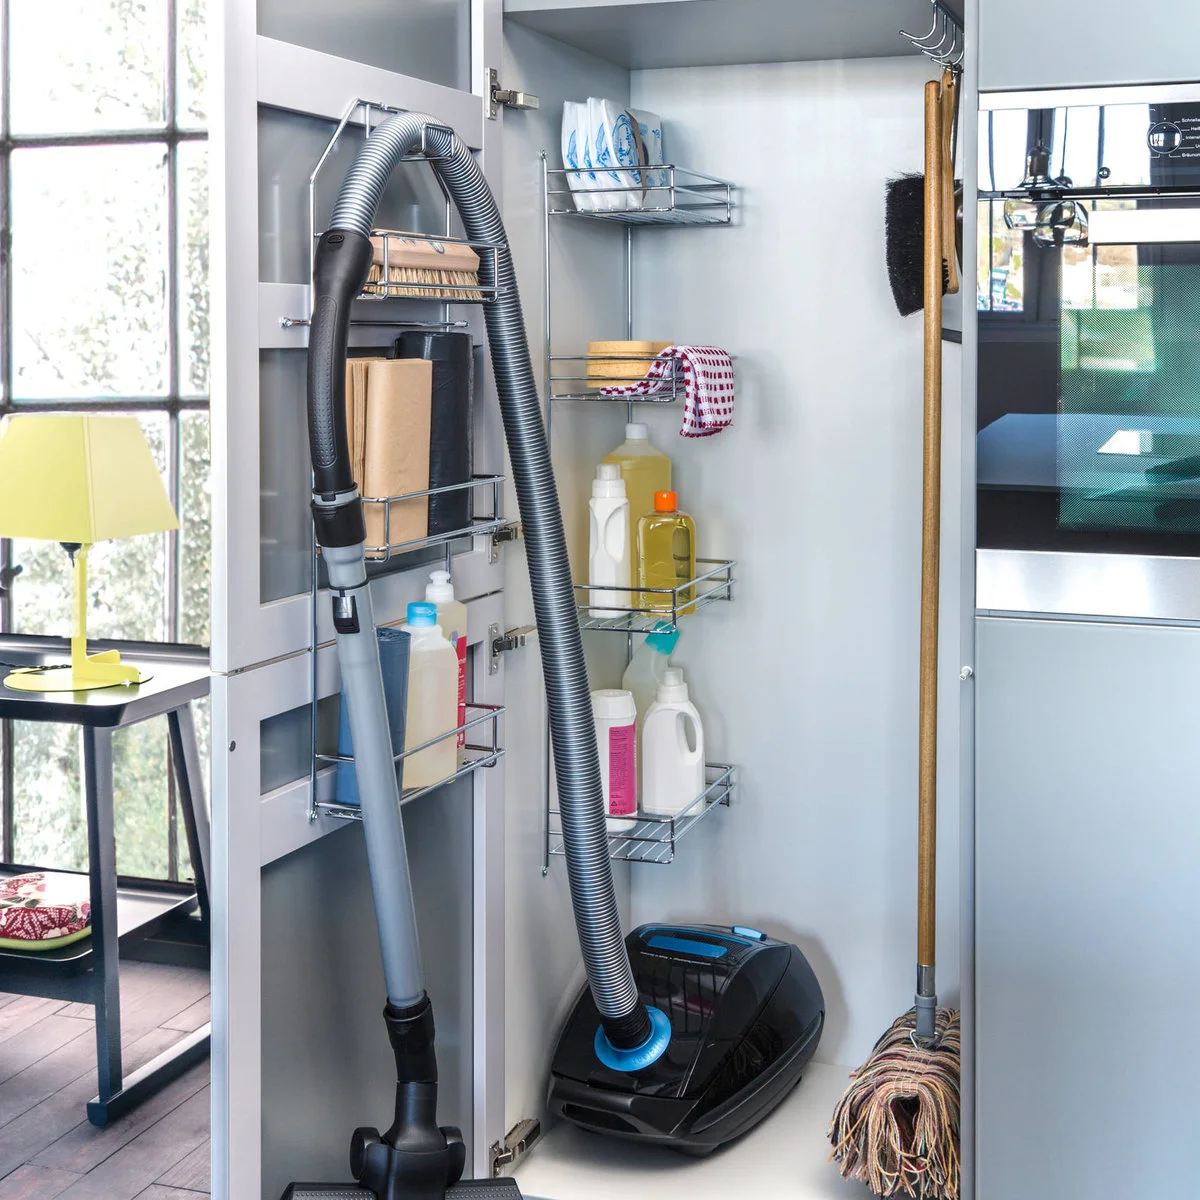
A tall utility cupboard gives the vacuum, hose and mop a place away from food shelves. Wire racks use the inside of the door for smaller supplies, while long handles hang vertically. The arrangement makes use of height that would be wasted in a conventional shelf stack.
Allow cleaning tools to dry before putting them into a closed cupboard and keep chemicals in their original packaging. Door racks must not pinch the vacuum hose or prevent closure. If children can reach the contents, choose a suitable lock rather than assuming a tall door makes them inaccessible.
IDEA 18 / 20
Keep Pantry Packaging Visible
 SaveSupport Non AI Creator
Image credit: Project: Wood-Mode Fine Custom Cabinetry (via Houzz)
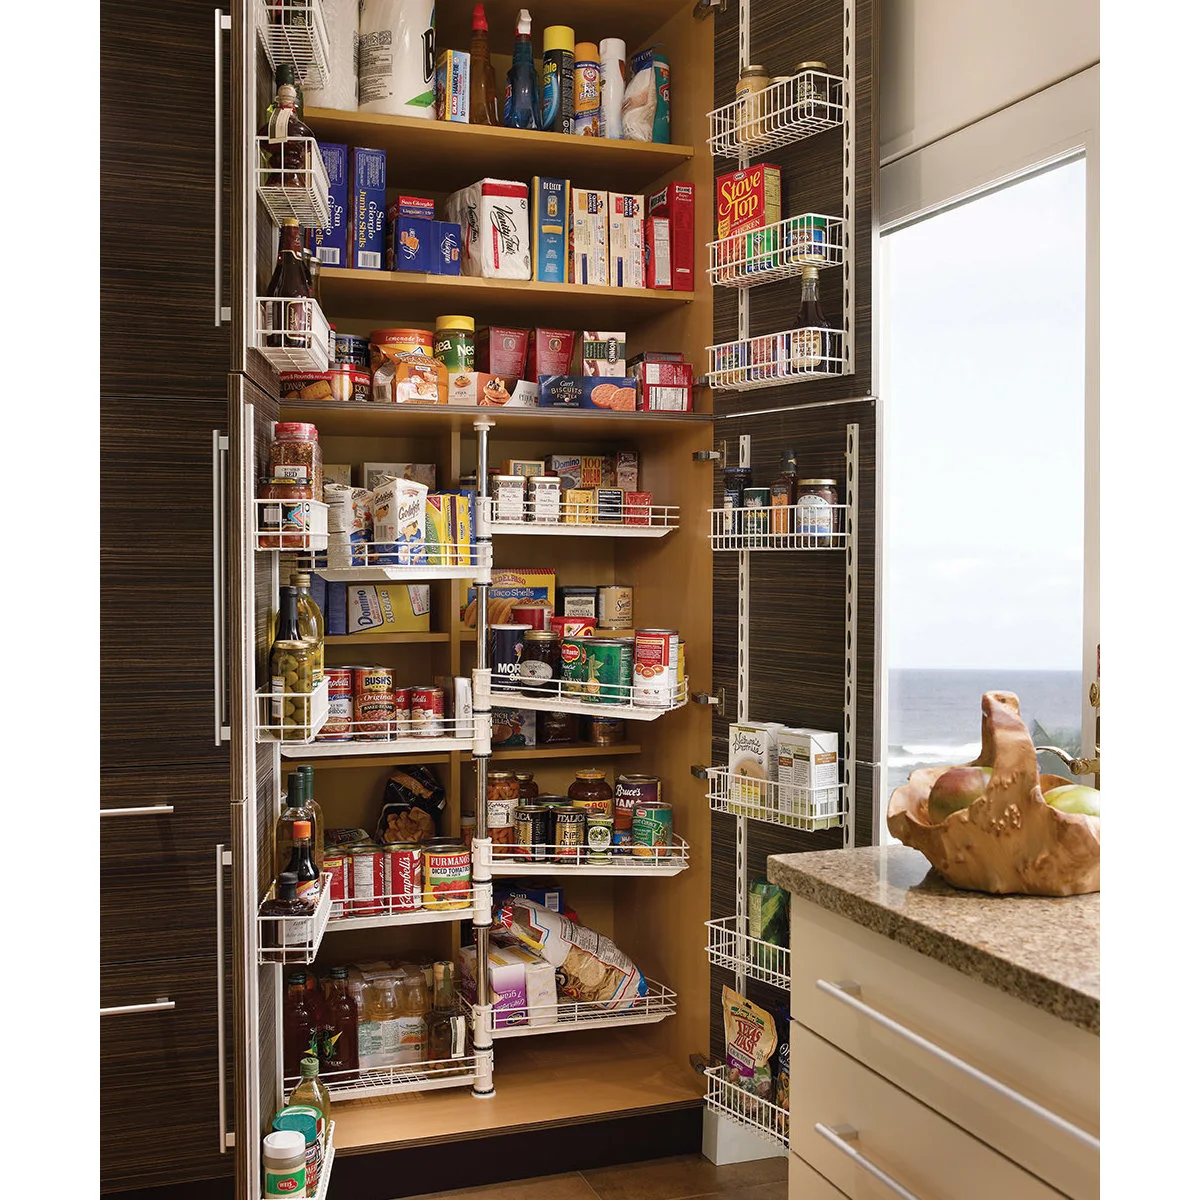
Wire racks on both doors keep narrow packets visible, while inner baskets create more reachable layers in this tall pantry. Larger boxes stay on fixed shelves above. The open fittings make it easier to see contents than a row of containers hidden behind a deep solid front.
Choose a system based on your largest regular grocery items, including tall cereal boxes and wider bags. Check moving clearances with the doors fully open. A rotating fitting is useful only if you can turn it without catching packages on the shelves or pushing fragile containers over.
IDEA 19 / 20
Use a Swing-Out Rack for Spices
 SaveSupport Non AI Creator
Image credit: Project: Wood-Mode Fine Custom Cabinetry (via Houzz)
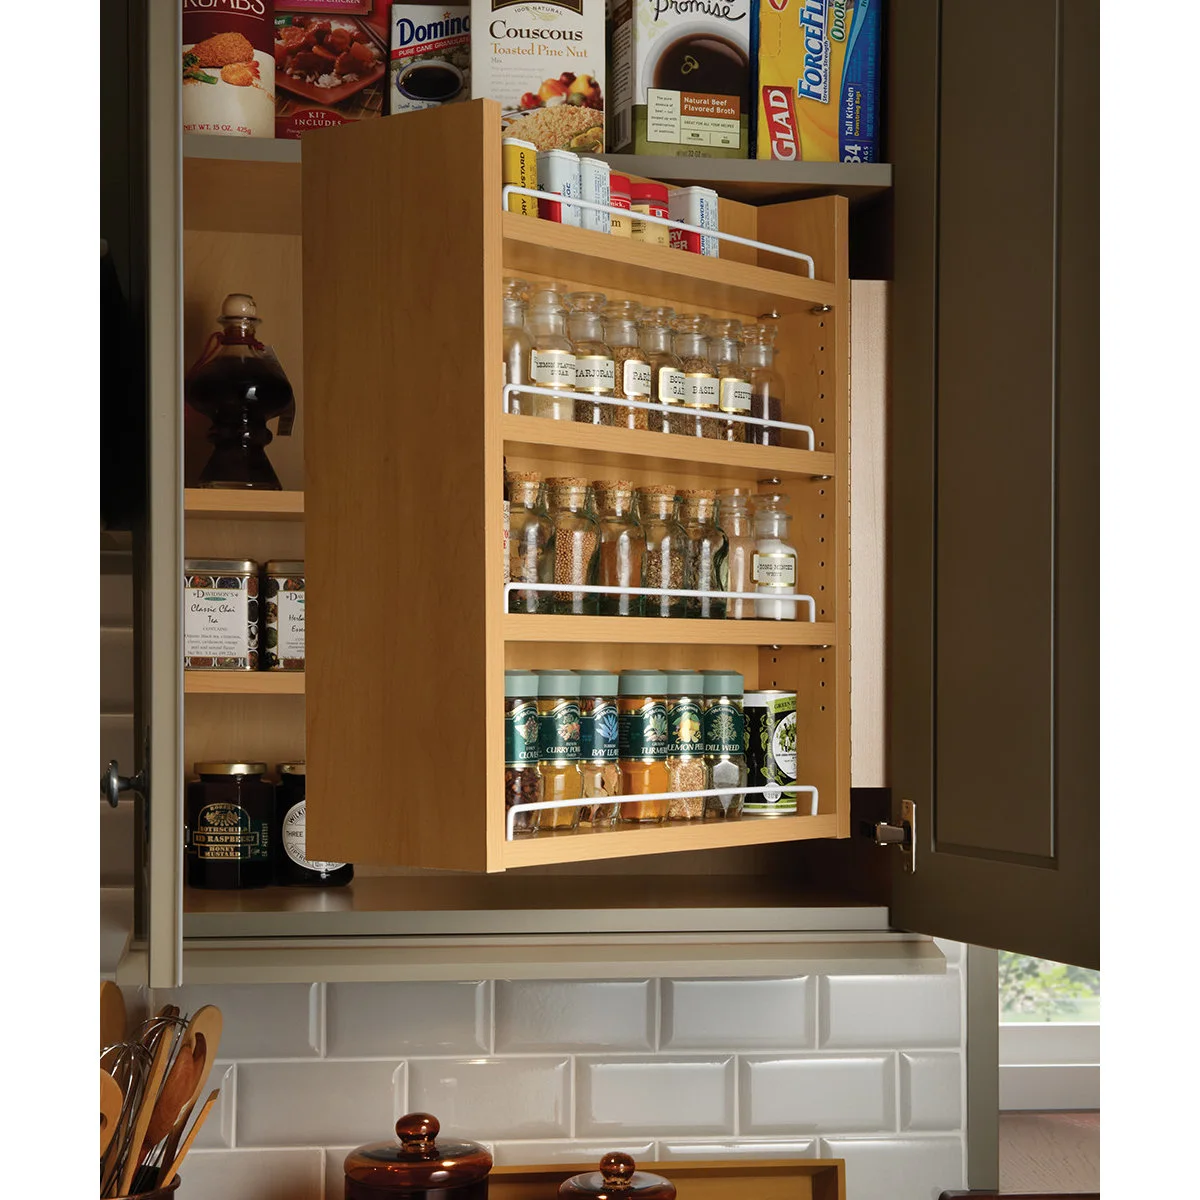
A shallow wooden spice rack swings forward from this upper cupboard, revealing small jars in several rows. Taller packets and bottles remain on the fixed shelves behind it. The rack uses the front section for narrow containers that would otherwise disappear among larger pantry items.
Keep the row labels facing the direction from which you read them. Confirm that the rack can swing without hitting the neighboring door or light fitting. Use the upper levels for lighter jars you can reach safely, and review older spices instead of simply making room for more.
IDEA 20 / 20
Give Lower Pantry Storage Drawers
 SaveSupport Non AI Creator
Image credit: Project: Paul N. Brow, Architect, LLC (via Houzz)
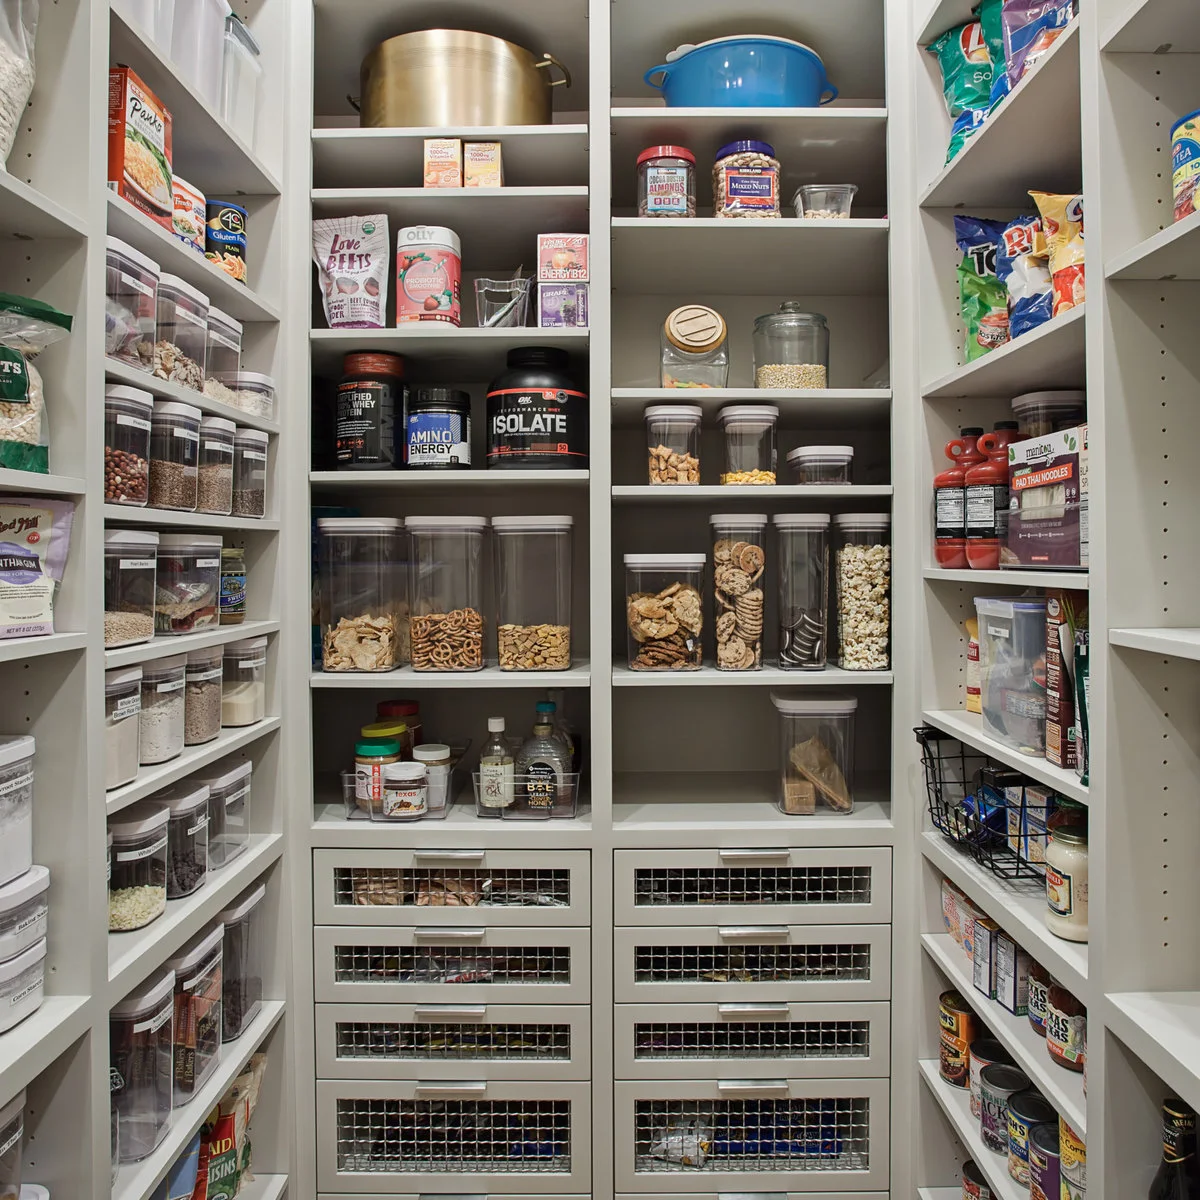
Clear containers and original food packages occupy adjustable shelves in this pantry, with wire-front drawers below. The drawer bank gives smaller packets a place apart from the shelf rows. Larger cooking pots sit high in the photograph, showing why storage layout still needs to suit the user’s reach.
Keep heavy pots lower if lifting them from an upper shelf would be awkward. Use drawers for categories that are difficult to keep upright, leaving enough room to see their contents from above. Adjustable shelves help when your usual container sizes change, but check their supports after moving them.
BRING IT ALL TOGETHER
Buy Organizers After Sorting
Empty one cabinet, group its contents by use and measure the items that need to return. That makes the choice between a shelf, basket, divider or fitted pull-out much clearer.
Keep enough spare space to put things back easily. A system that requires perfect stacking after every meal is harder to maintain than one that allows normal daily use.