A useful garage workshop starts with the work you actually do. Repairing a bicycle, assembling furniture and maintaining a motorcycle need different floor space and different storage. List the tools and projects first, then mark their working areas before filling every wall with cabinets.
These garage and home-workshop photographs show arrangements to adapt, including compact repair benches and larger woodworking spaces. A photograph cannot establish machine clearance, structural capacity or extraction performance. Use equipment instructions and qualified help for those decisions, while borrowing the placement and organization ideas that suit your room.
PART 01
Give the work its own space
IDEA 01 / 20
Separate a Large Project from the Wall Bench
 SaveSupport Non AI Creator
Image credit: Project: Martin Gaissert Fotografie (via Houzz)
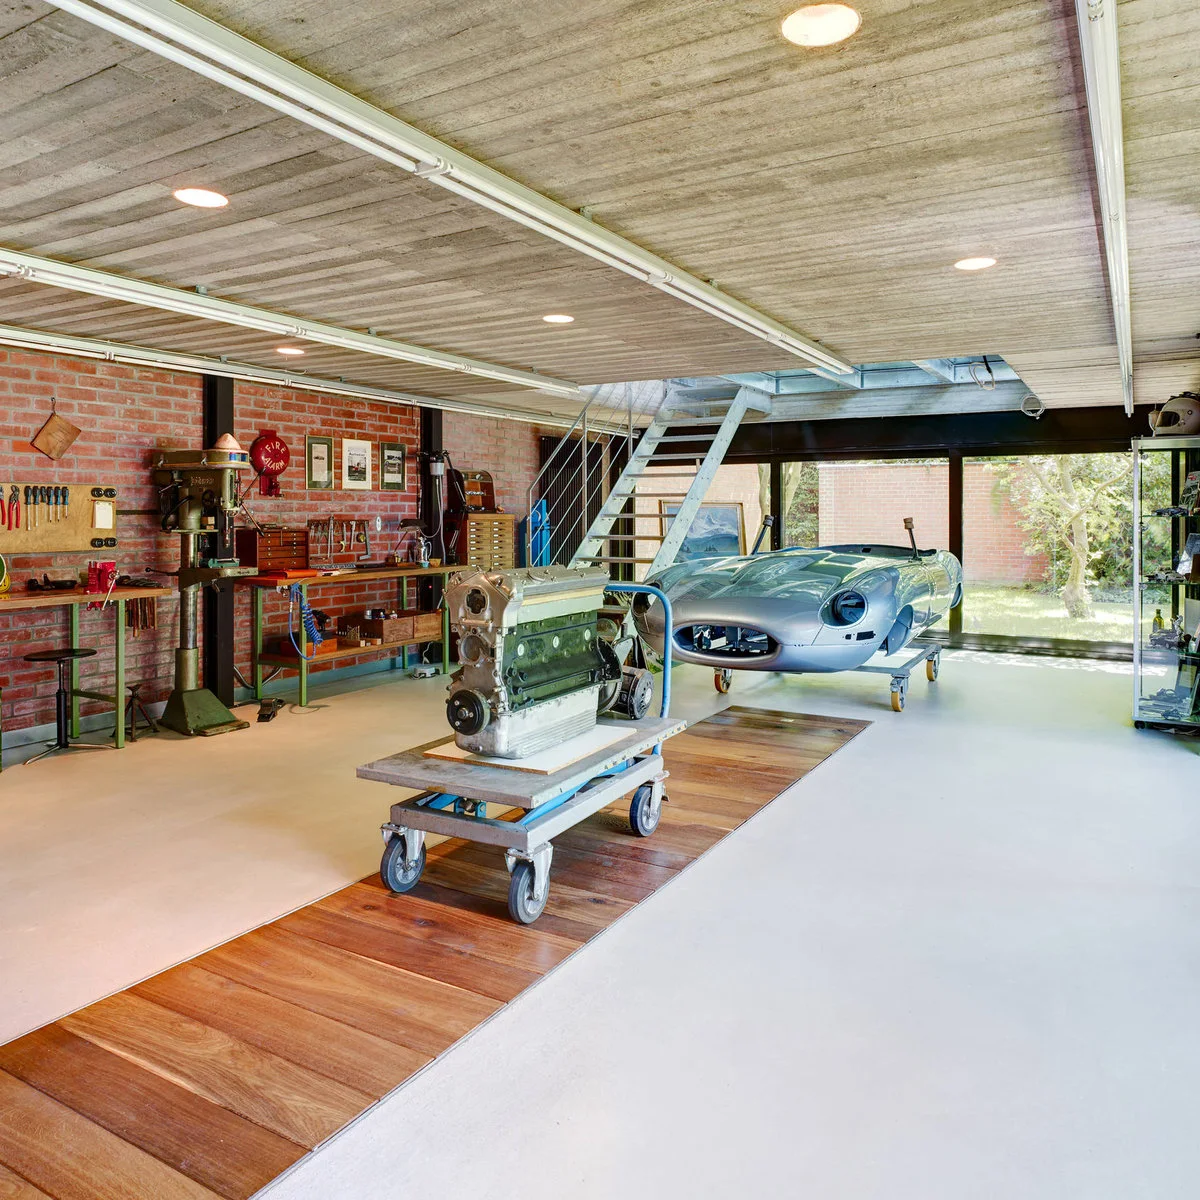
The car body and engine occupy separate wheeled supports in the open floor, while a long bench follows the brick wall. Tools remain around the edge instead of surrounding the project on every side. The arrangement distinguishes storage, bench work and a larger central assembly area.
Draw the full project footprint before deciding where fixed cabinets belong. Include access around each side and a route to the main door. Heavy assemblies need correctly rated supports and handling equipment; borrow the separation of zones here rather than assuming a pictured trolley will suit a different load.
IDEA 02 / 20
Leave Working Room Around a Bicycle Stand
 SaveSupport Non AI Creator
Image credit: Project: User (via Houzz)
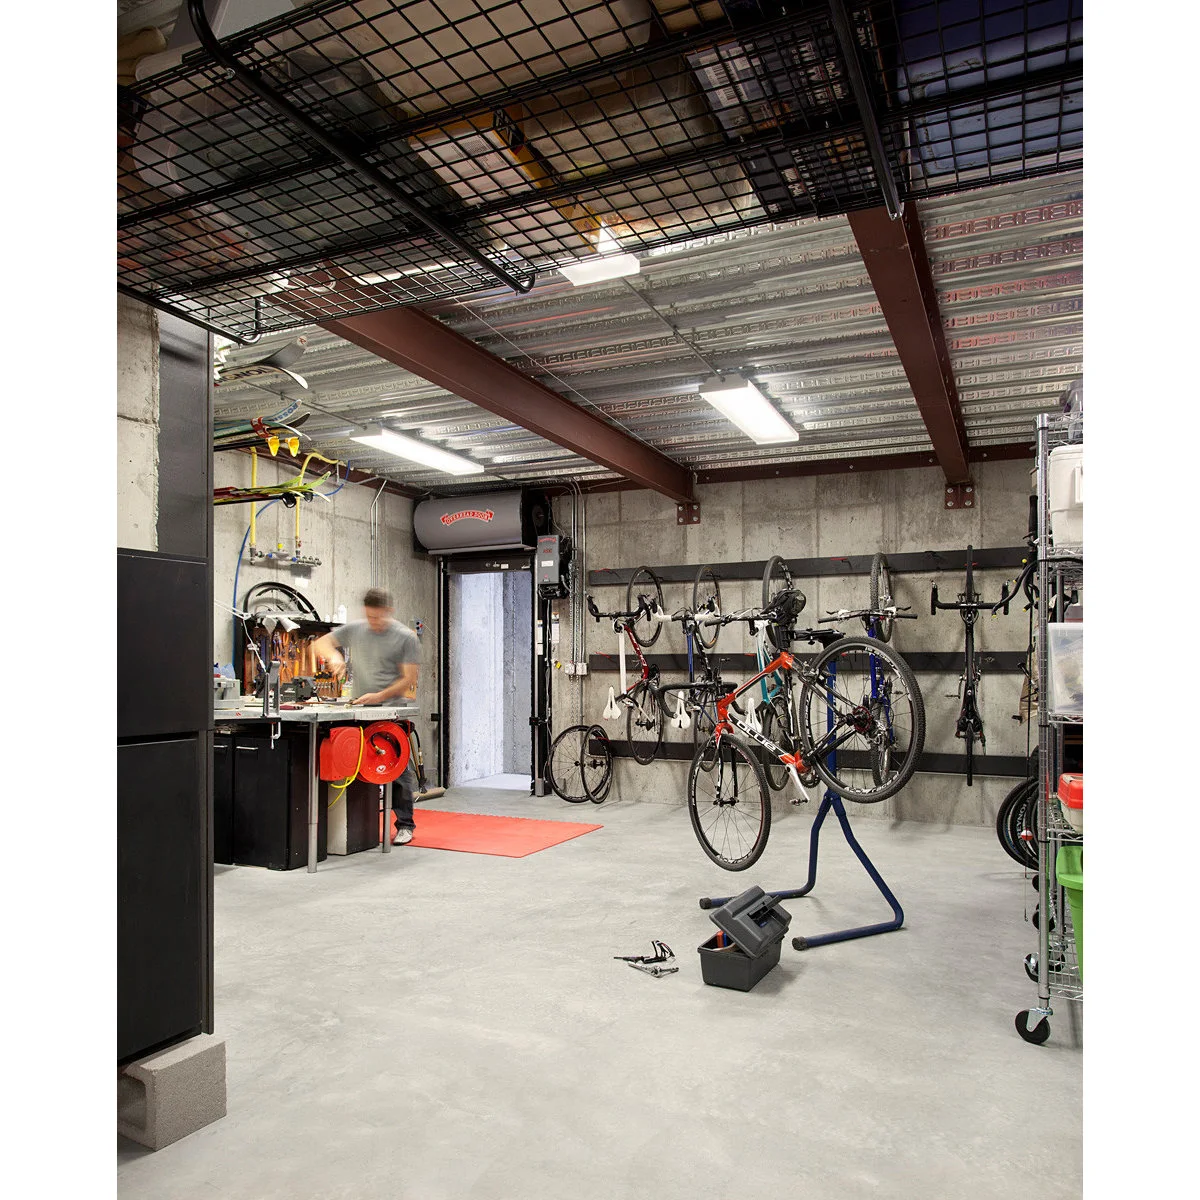
Stored bicycles hang on the wall, leaving the central repair stand accessible from more than one side. A compact bench sits nearby for tools and smaller parts. The open floor separates the bike being worked on from the bikes waiting in storage.
Test the stand with the bike and wheels in their normal working positions before setting storage around it. Keep small parts in a tray rather than on the floor. Leave a clear path to the entrance so moving a bicycle does not require shifting several boxes or stepping over loose tools.
IDEA 03 / 20
Face the Repair Area Toward the Open Yard
 SaveSupport Non AI Creator
Image credit: Project: chadbourne + doss architects (via Houzz)
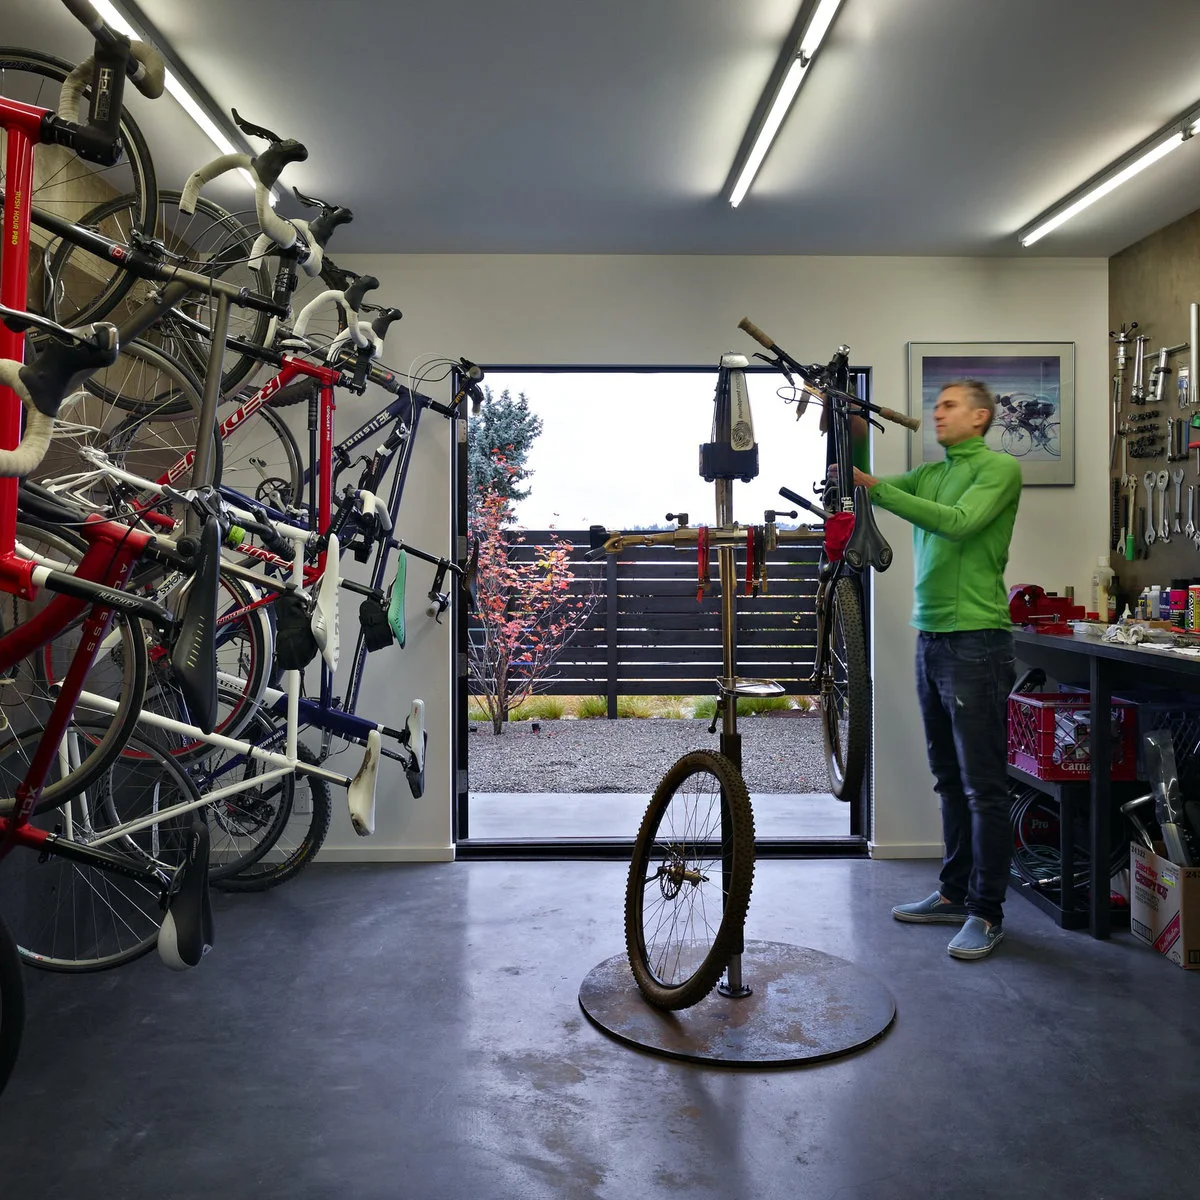
Vertical bike storage occupies one side of the room, with a tool bench on the other. A repair stand sits between them near the open doorway. The outside work yard extends the view, while the wall-mounted tools keep smaller equipment close to the main repair position.
Plan the interior layout so it still works when the exterior door is closed. Keep room around the stand for turning handlebars and removing wheels. Locate the tools you use most within a comfortable reach, and check that a parked bicycle will not block access to drawers or the way out.
IDEA 04 / 20
Give Motorcycles Defined Floor Positions
 SaveSupport Non AI Creator
Image credit: Project: Angela Flournoy (via Houzz)
Yellow floor outlines make the motorcycle positions easy to read against the darker flooring. The workbench and hand tools occupy the back wall, keeping the central area available for the bikes. The wall display adds personal detail above the practical tool storage.
Mark out working positions with removable tape before choosing a permanent floor treatment. Include room for the bike’s stand, your body position and access to the bench. Floor markings are only useful if the clearances fit the actual work; they cannot compensate for a bay that is too crowded.
IDEA 05 / 20
Keep the Main Floor Flexible in a Large Garage
 SaveSupport Non AI Creator
Image credit: Project: Living Stone Design + Build (via Houzz)
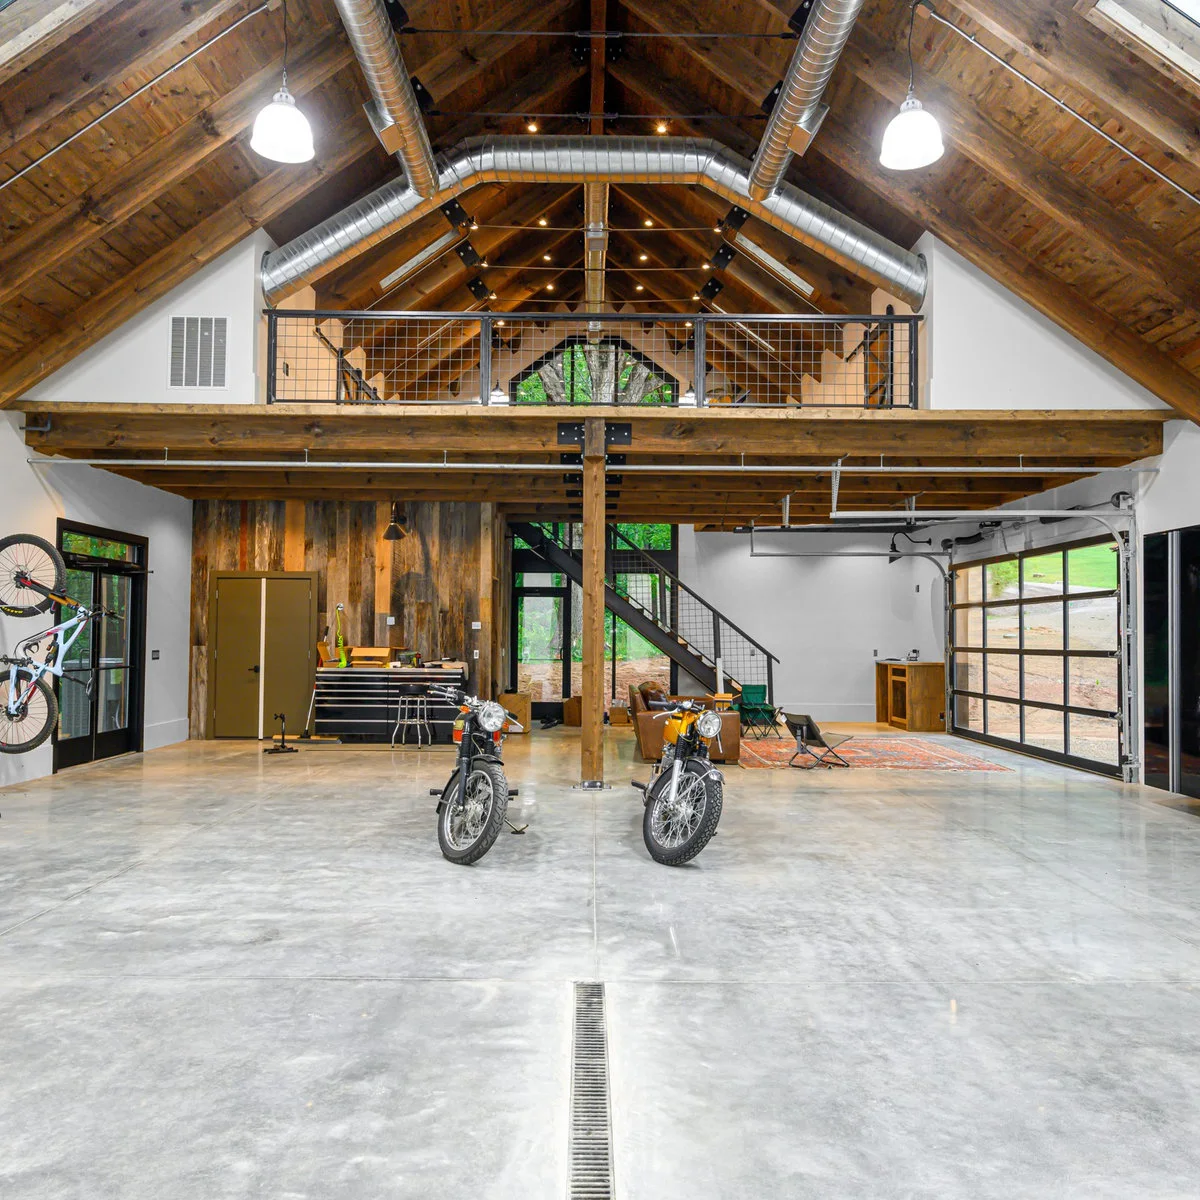
Most of the floor remains open between the motorcycles and the garage doors. A tool chest occupies the back wall, while a small seating area sits off to the side. The arrangement leaves the middle available for moving equipment instead of fixing a large bench in its center.
Resist filling open space simply because it is available. Keep the route to the doors and stairs distinct from temporary project areas. If an arrival zone shares the garage, these garage mudroom ideas can help separate coats and outdoor belongings from the tools and materials used at the bench.
PART 02
Build a usable bench arrangement
IDEA 06 / 20
Group Small Machines Around a Corner Bench
 SaveSupport Non AI Creator
Image credit: Project: Custom Timber Frames (via Houzz)
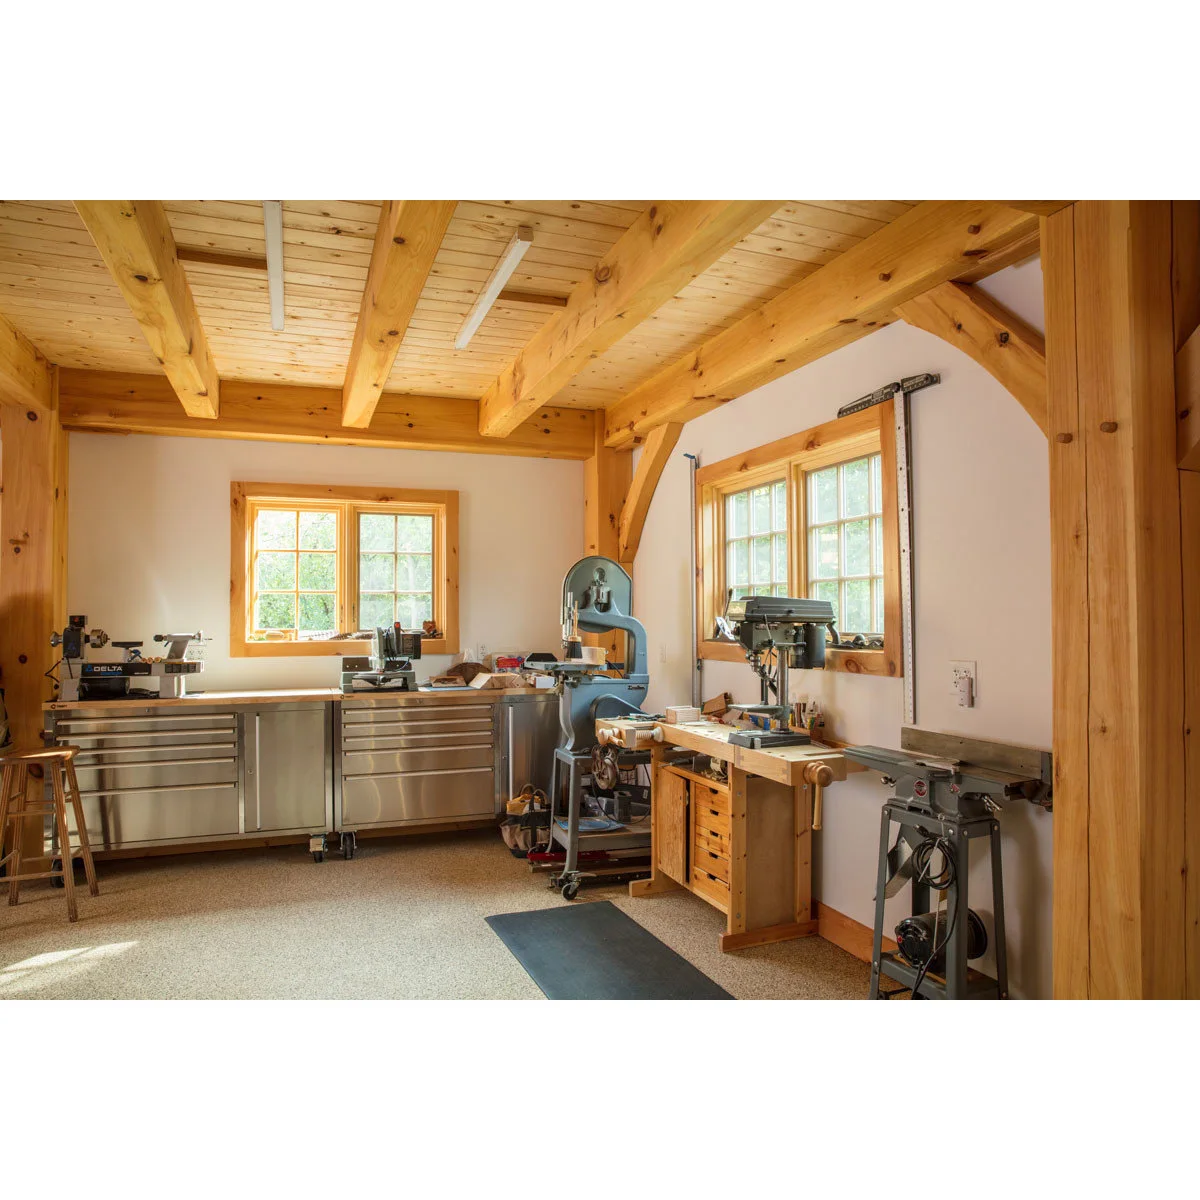
Drawer cabinets run beneath the window, with a wooden bench on the adjoining wall. Small machines occupy the corner and neighboring surfaces rather than being scattered around the room. The windows bring light across the work area, while the central floor remains separate from the storage edges.
Start by recording each machine’s footprint and the working clearances in its instructions. Check how material enters and leaves the tool before committing to a corner position. Keep hand-assembly space available too, so a bench does not become unusable whenever a machine is left on its surface.
IDEA 07 / 20
Put a Compact Bench Between Taller Cabinets
 SaveSupport Non AI Creator
Image credit: Project: Closets by Design Louisville (via Houzz)
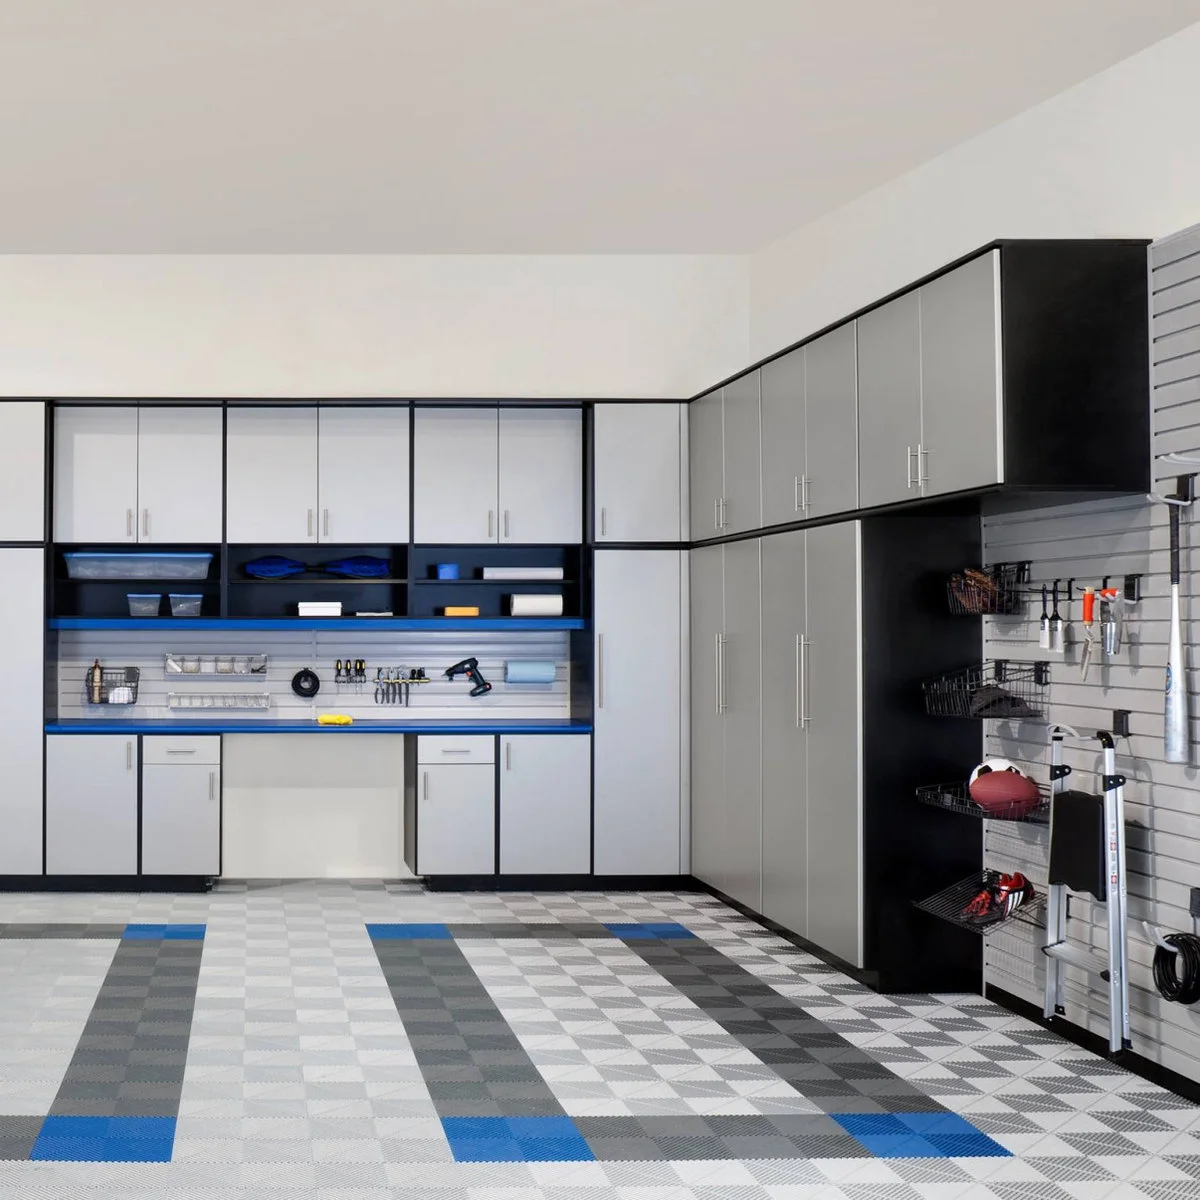
The compact workbench sits within a larger cabinet arrangement, with an open knee space and tools on the wall above. Taller cabinets keep bulkier storage to the side. Blue edges distinguish the working surface from the surrounding silver and dark cabinet outlines.
Decide whether the bench is mainly for seated repairs or standing work before choosing its height. Include enough space beneath the top for the way you will use it. Check that nearby cabinet doors can open without requiring the stool or a project to be moved every time.
IDEA 08 / 20
Check a Bench Against the Open Garage Door
 SaveSupport Non AI Creator
Image credit: Project: Perfect Fit Organizing (via Houzz)
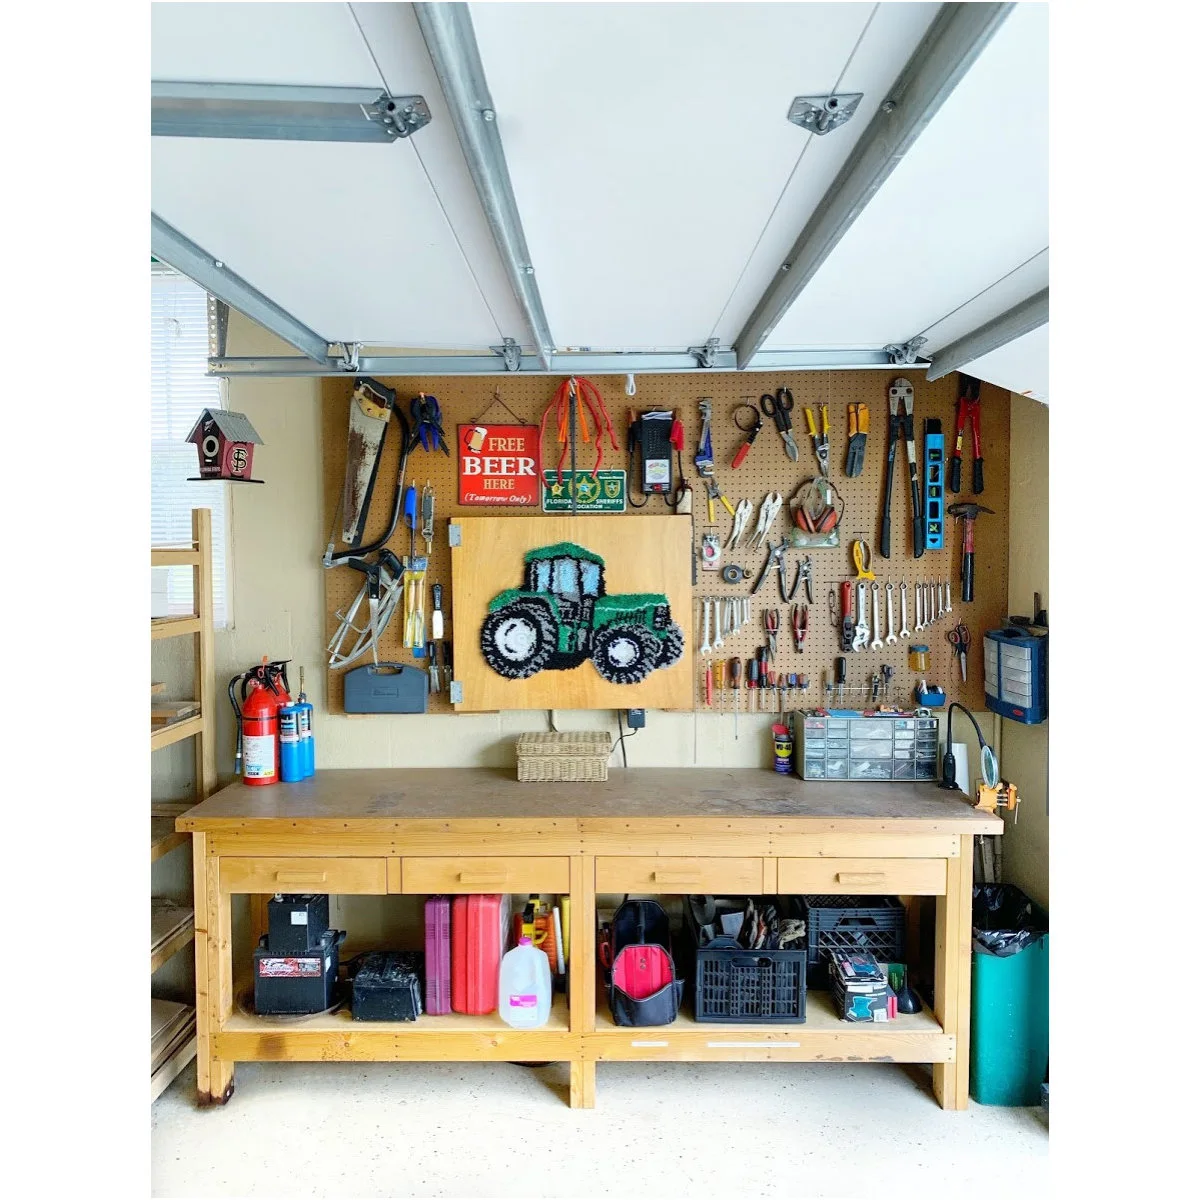
The wooden bench combines shallow drawers with a broad open shelf for larger tool cases and containers. A pegboard keeps hand tools visible above it. The open overhead garage door shows why the bench’s position needs to be planned with the door mechanism as well as the floor.
Test the full movement of the door before adding wall storage or tall objects above a bench. Keep all equipment clear of its tracks and moving parts. Choose lower storage that can be cleaned easily, and return loose cases to their compartments so the standing area stays usable. If the garage also serves as the household entrance, garage mudroom ideas show ways to keep coats and shoes outside the bench’s working clearance.
IDEA 09 / 20
Light the Working Surface Beneath Wall Cabinets
 SaveSupport Non AI Creator
Image credit: Project: Tailored Living / Premier Garage of Naperville (via Houzz)
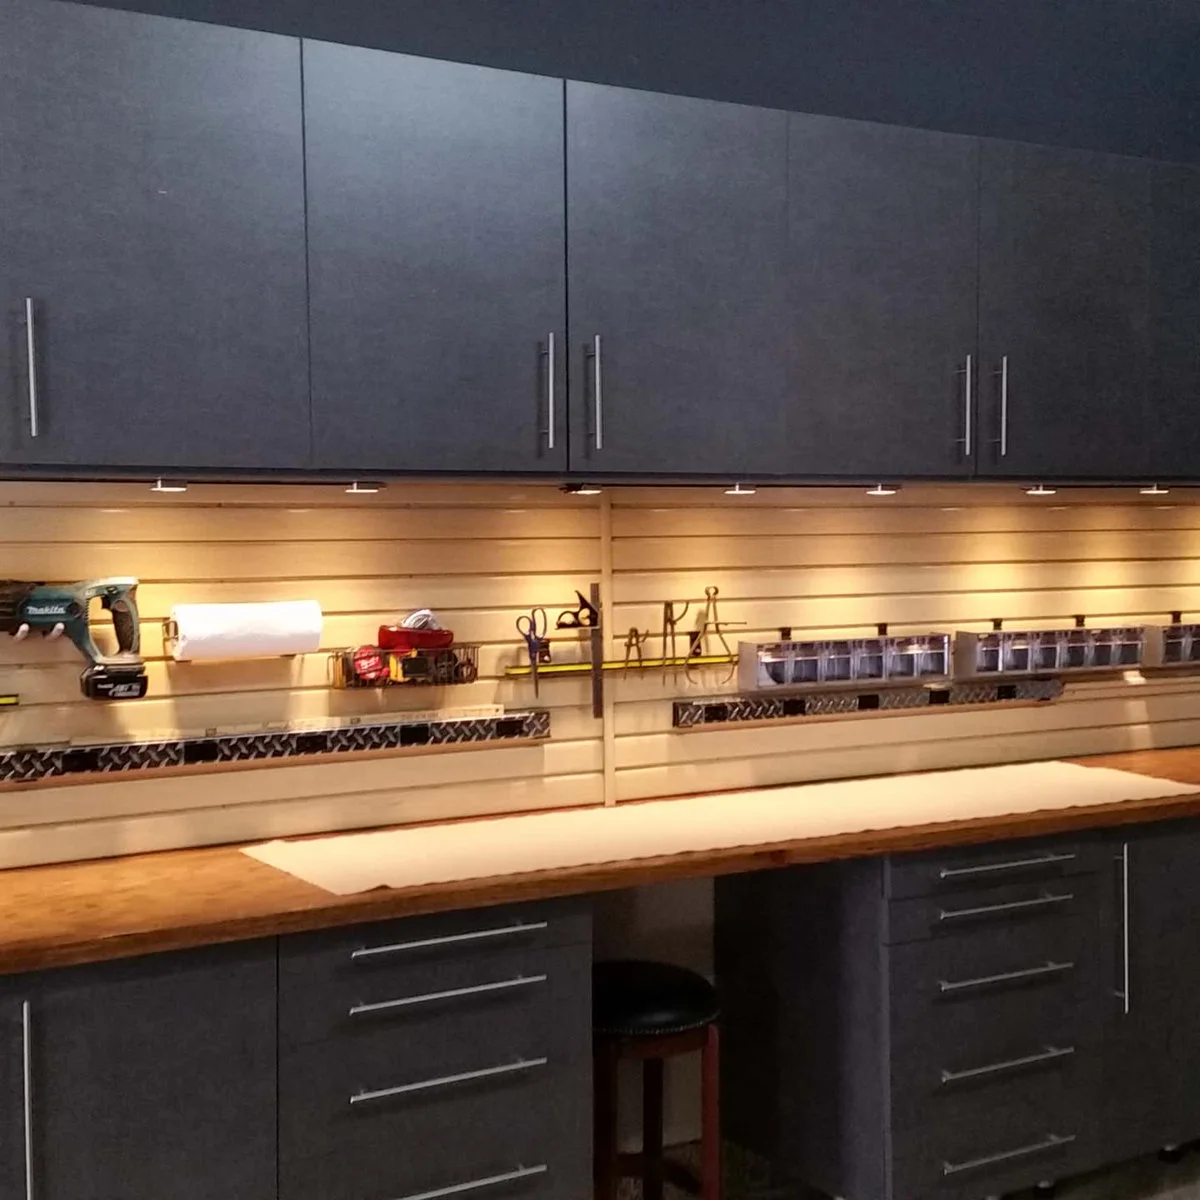
Light beneath the upper cabinets reaches the worktop and the small tools hanging above it. Dark drawer units frame an open seated position below. The pale wall panel makes the tool outlines easier to distinguish from the deeper cabinet fronts around the work area.
Test the light from your normal working position, with your hands and a typical project on the bench. Upper cabinets can cast shadows if lighting is placed only behind you. Have fixed electrical work installed appropriately, and avoid trailing temporary cords across the route between the bench and the door.
IDEA 10 / 20
Keep Hand Tools Within View of the Bench
 SaveSupport Non AI Creator
Image credit: Project: Angela Flournoy (via Houzz)
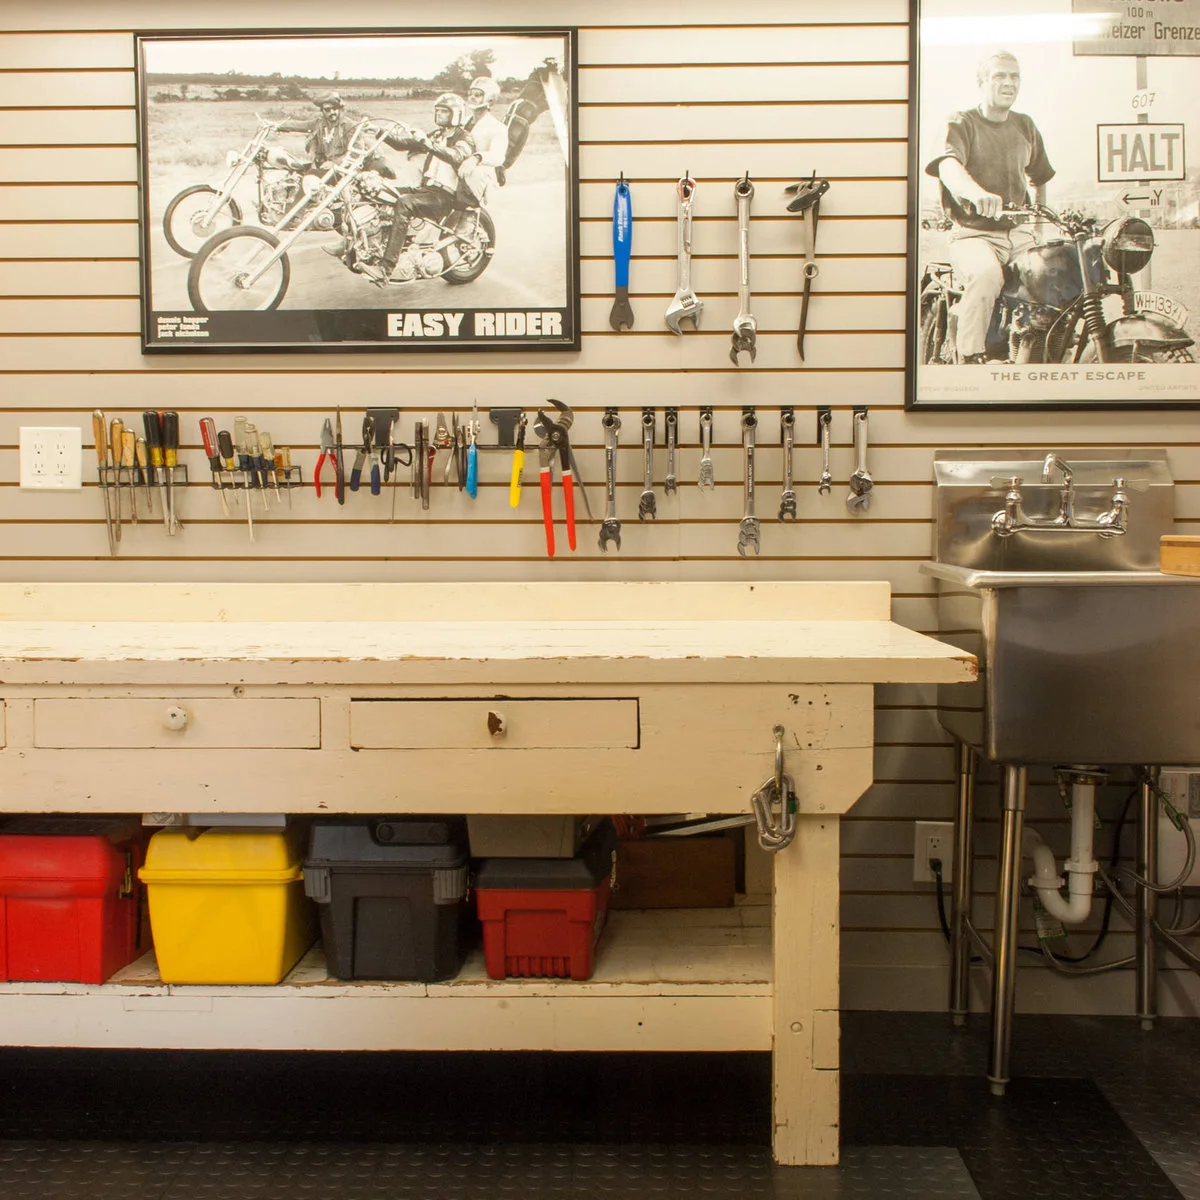
Hand tools hang in a clear row above the white workbench, with larger pieces higher up and smaller tools near the working surface. Colored boxes use the lower shelf. A utility sink sits beside the bench, giving this part of the room another defined task.
Arrange the tools by how you use them rather than by appearance alone. Leave enough space to lift each tool off its hook without knocking its neighbor. Choose containers that can be labeled and moved easily, and keep the bench surface available for work rather than using it as another permanent shelf.
PART 03
Put storage close to its task
IDEA 11 / 20
Use a Pegboard for a Mixed Hand-Tool Collection
 SaveSupport Non AI Creator
Image credit: Project: LTB Designs (via Houzz)
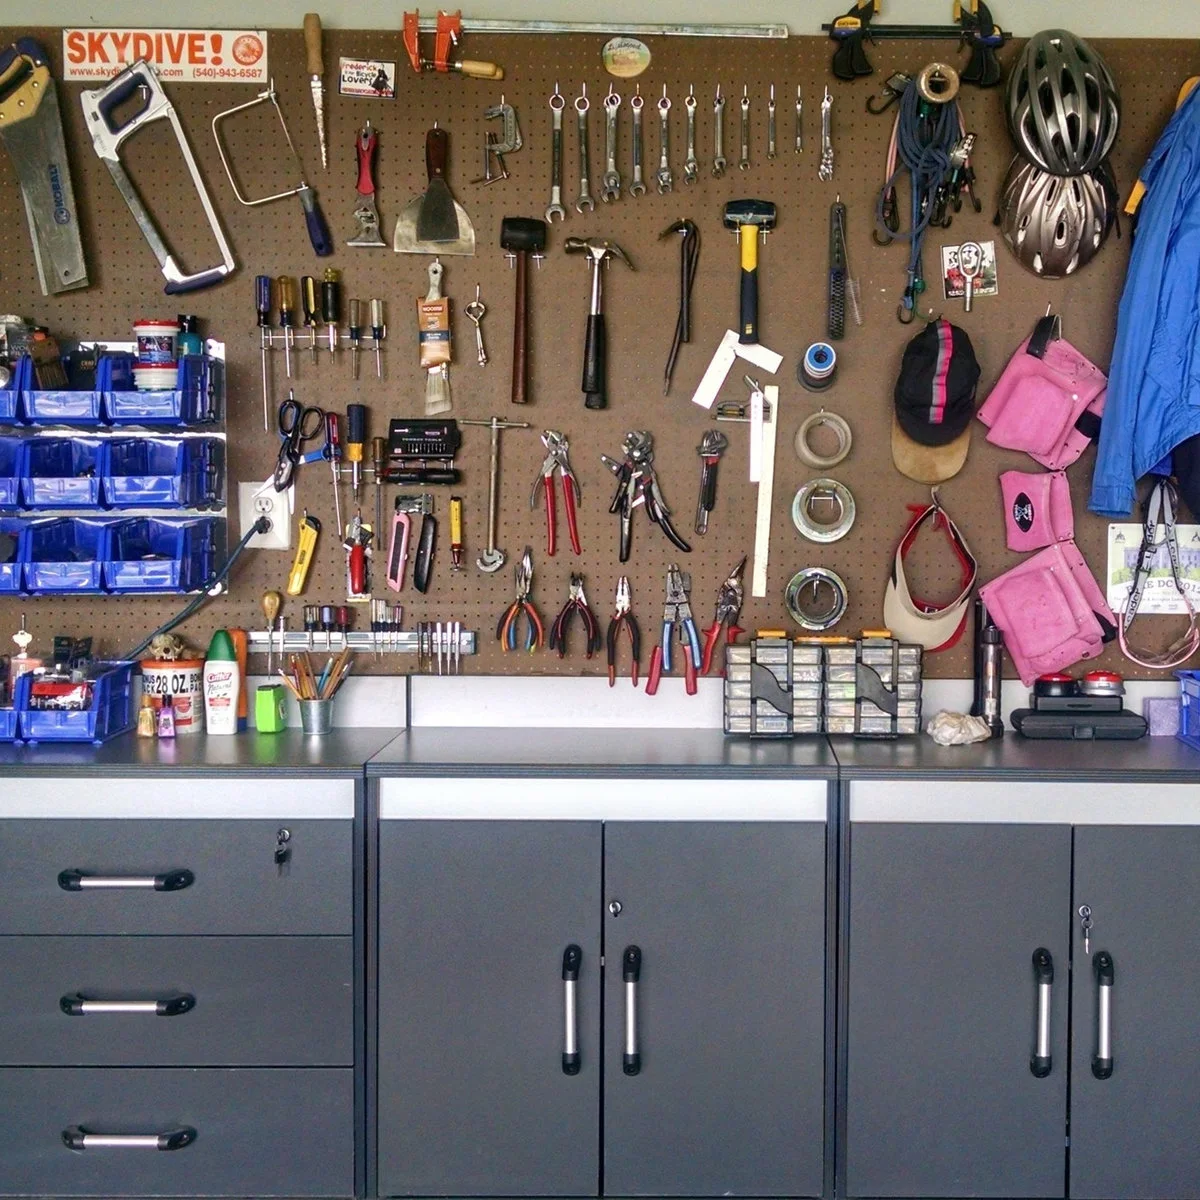
A brown pegboard holds a mixed collection of saws, wrenches, hammers and smaller hand tools above the bench. Blue bins provide a separate place for loose items. The dark lower cabinets keep some storage enclosed, while the wall makes the frequently used pieces easy to locate.
Lay the tools out before positioning hooks, allowing room for their handles and for your hand to remove them. Use suitable fixings for the board and its intended load. Keep personal accessories in a separate section if they would otherwise cover tool positions or make the working surface harder to clear.
IDEA 12 / 20
Give Small Tools Shallow Drawers
 SaveSupport Non AI Creator
Image credit: Project: Interior Door and Closet Company (via Houzz)
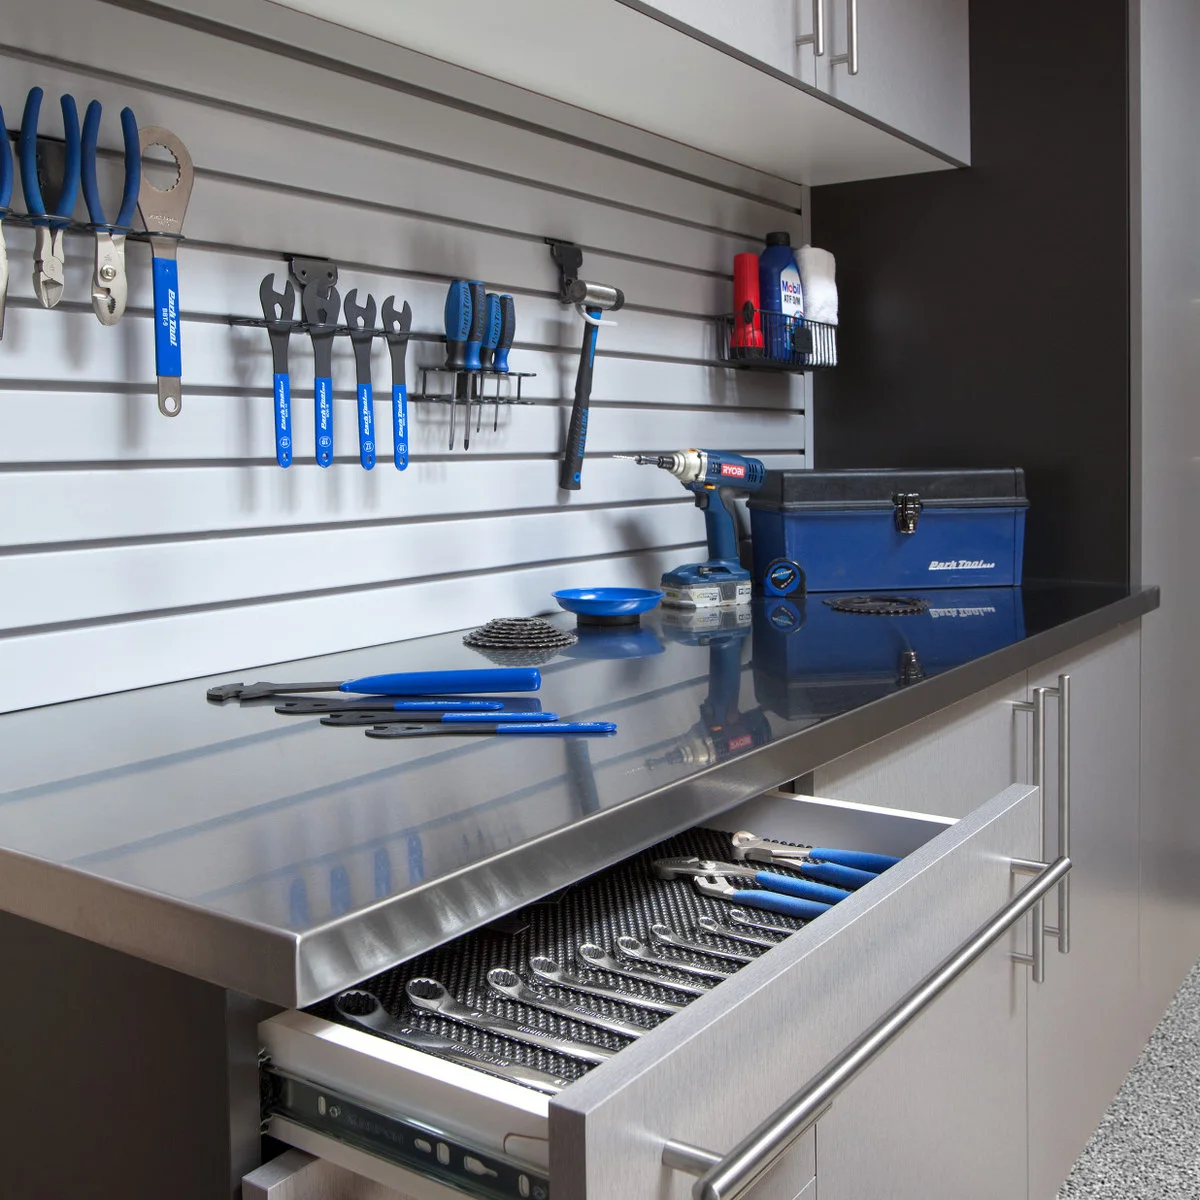
The shallow drawer spreads the tools in one visible layer rather than stacking them deeply. More frequently used pieces hang on the slat wall above the worktop. The metal surface and plain cabinet fronts give the small tool collection a clear, uncluttered setting.
Measure your actual tools before choosing drawer depths or inserts. A shallow drawer can make smaller pieces easier to find, but only if long handles and bulky items still have somewhere suitable to go. Check the full drawer extension against the space where you stand while working. For smaller mixed supplies, our junk drawer organization ideas compare trays and category-based compartments you can adapt to a shallow tool drawer.
IDEA 13 / 20
Keep a Mobile Tool Chest Beside Fixed Storage
 SaveSupport Non AI Creator
Image credit: Project: Encore Garage (via Houzz)
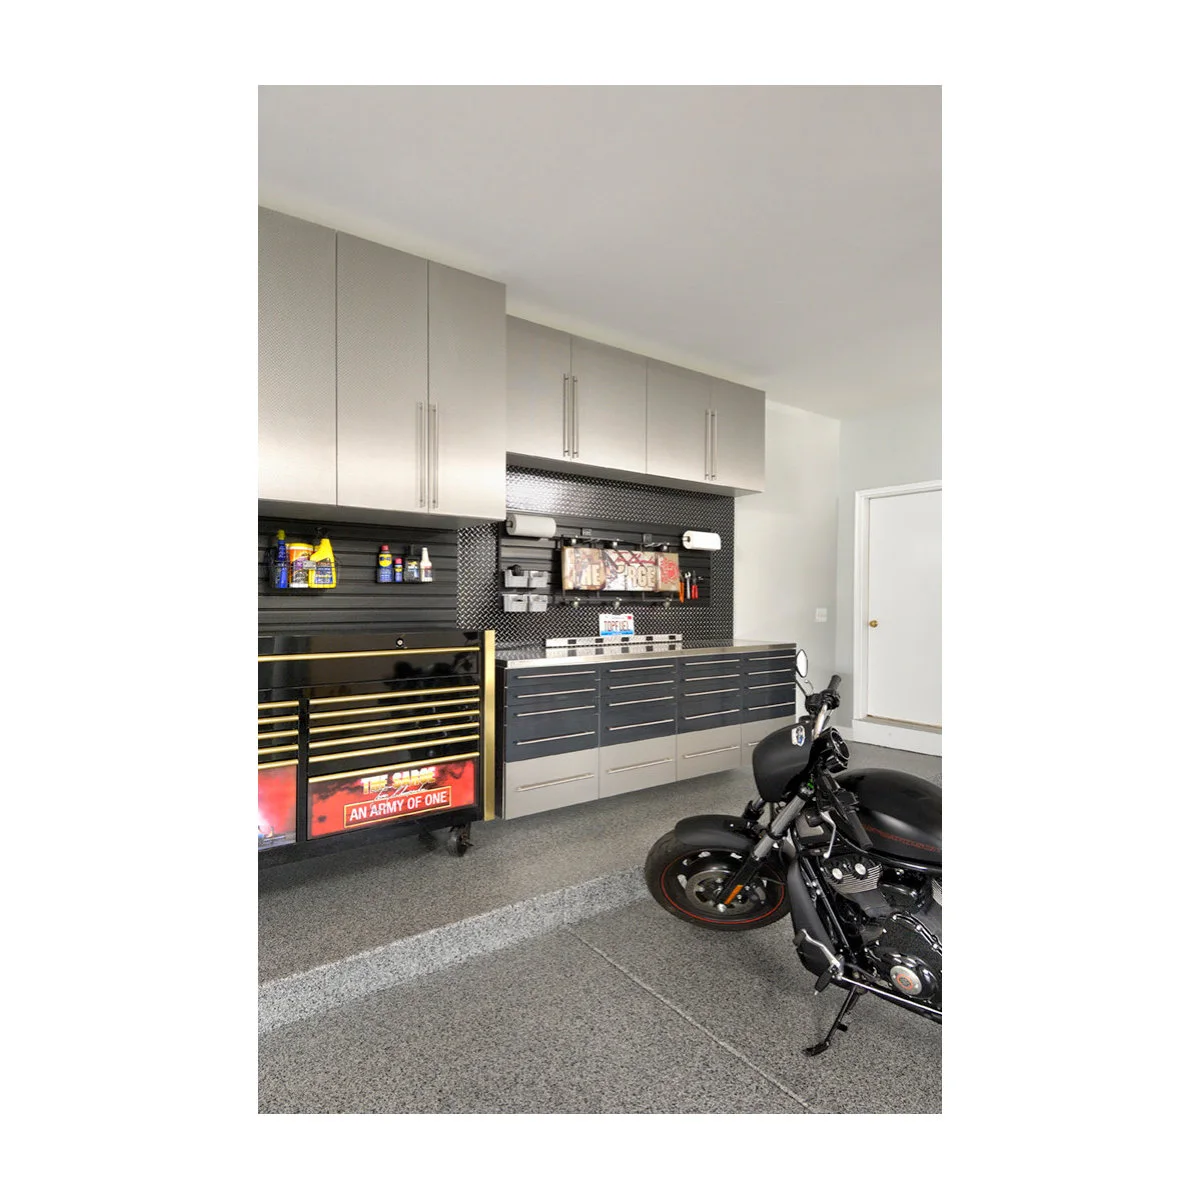
A rolling tool chest sits beside the fixed wall storage, keeping another set of drawers close to the bench. The upper cabinets and slat-wall accessories use the height above it. The motorcycle occupies the floor in front, making the relationship between storage and working clearance particularly important.
Check the space required to open both the fixed drawers and the mobile chest. Keep the chest’s movement route clear and follow its instructions for loading and securing it. A mobile unit is useful only when it can reach the work without blocking the garage door or trapping access to another cabinet.
IDEA 14 / 20
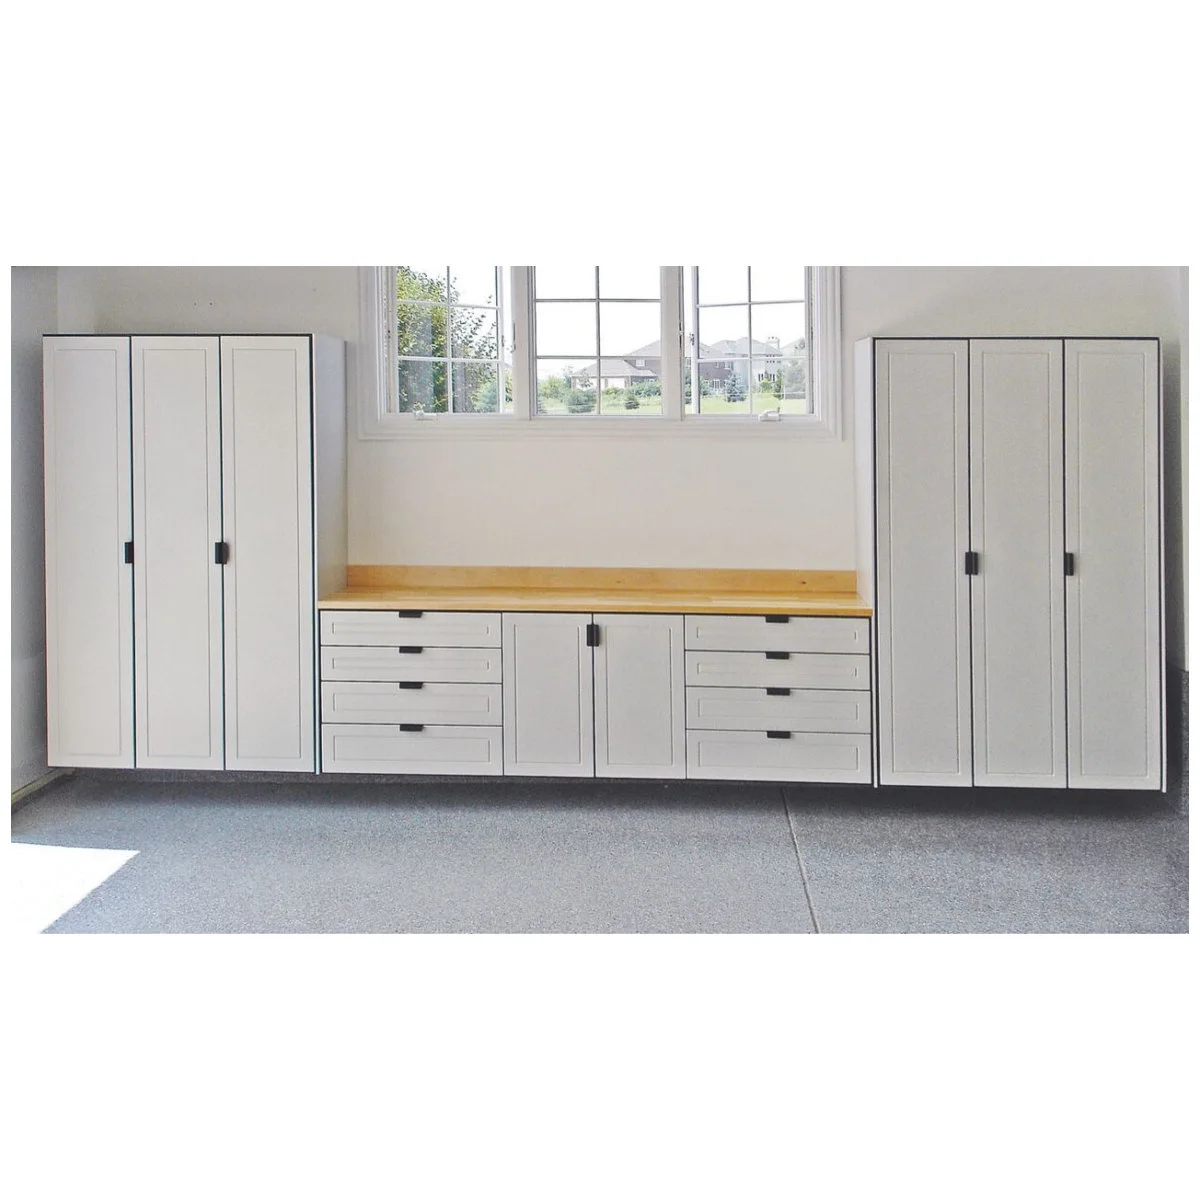
Reserve Tall Cabinets for Bulkier Equipment
 SaveSupport Non AI Creator
Image credit: Project: Banner Garage (via Houzz)
Tall white cabinets frame the worktop, while two banks of shallower drawers sit beneath it. The window leaves the wall above the bench open to daylight. The arrangement provides different storage shapes without spreading cabinets across the middle of the garage.
List the items that genuinely need tall storage before choosing cabinet widths. Check door and drawer movements against the working area, then leave enough usable bench between them. A long run of cabinetry is less helpful if every available surface becomes a landing place for equipment with no assigned compartment.
IDEA 15 / 20
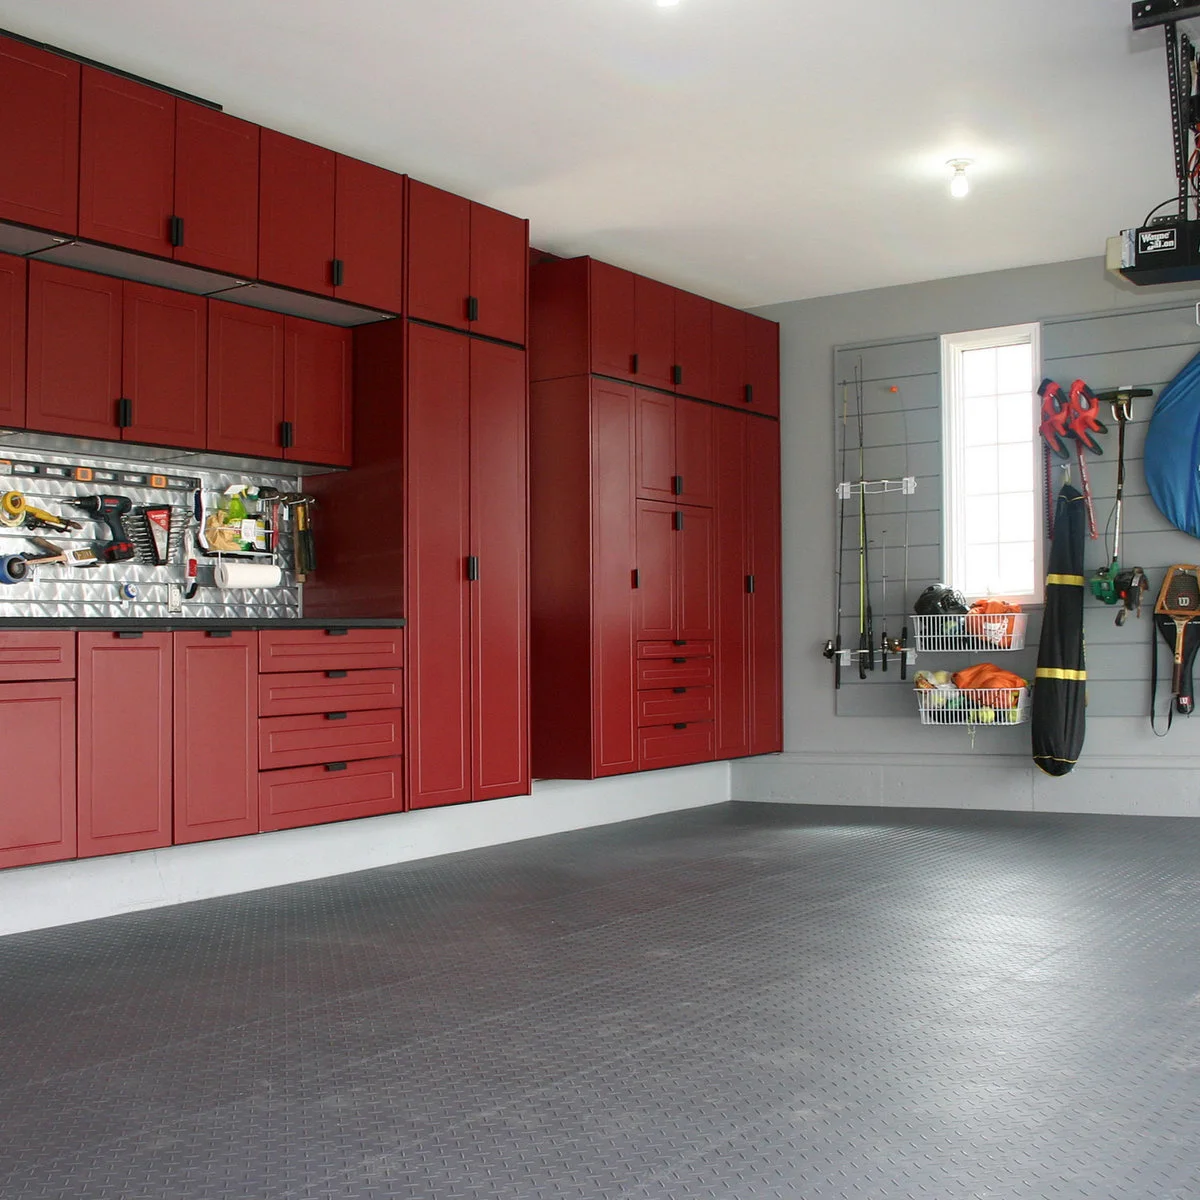
Keep Long Recreational Gear Away from the Worktop
 SaveSupport Non AI Creator
Image credit: Project: Banner Garage (via Houzz)
The red cabinet run contains the workbench and smaller tool storage, while long recreational items hang on the adjoining wall. The open floor separates both storage areas from the garage’s central space. Giving these different categories their own wall positions keeps the worktop from absorbing everything.
Make an inventory of non-workshop belongings before drawing the workshop plan. Long rods, sports bags and outdoor gear can consume the same wall area needed for tools. Assign them a separate zone where possible, and check that their hooks do not project into the route used for carrying project materials.
PART 04
Protect access as the workshop fills
IDEA 16 / 20
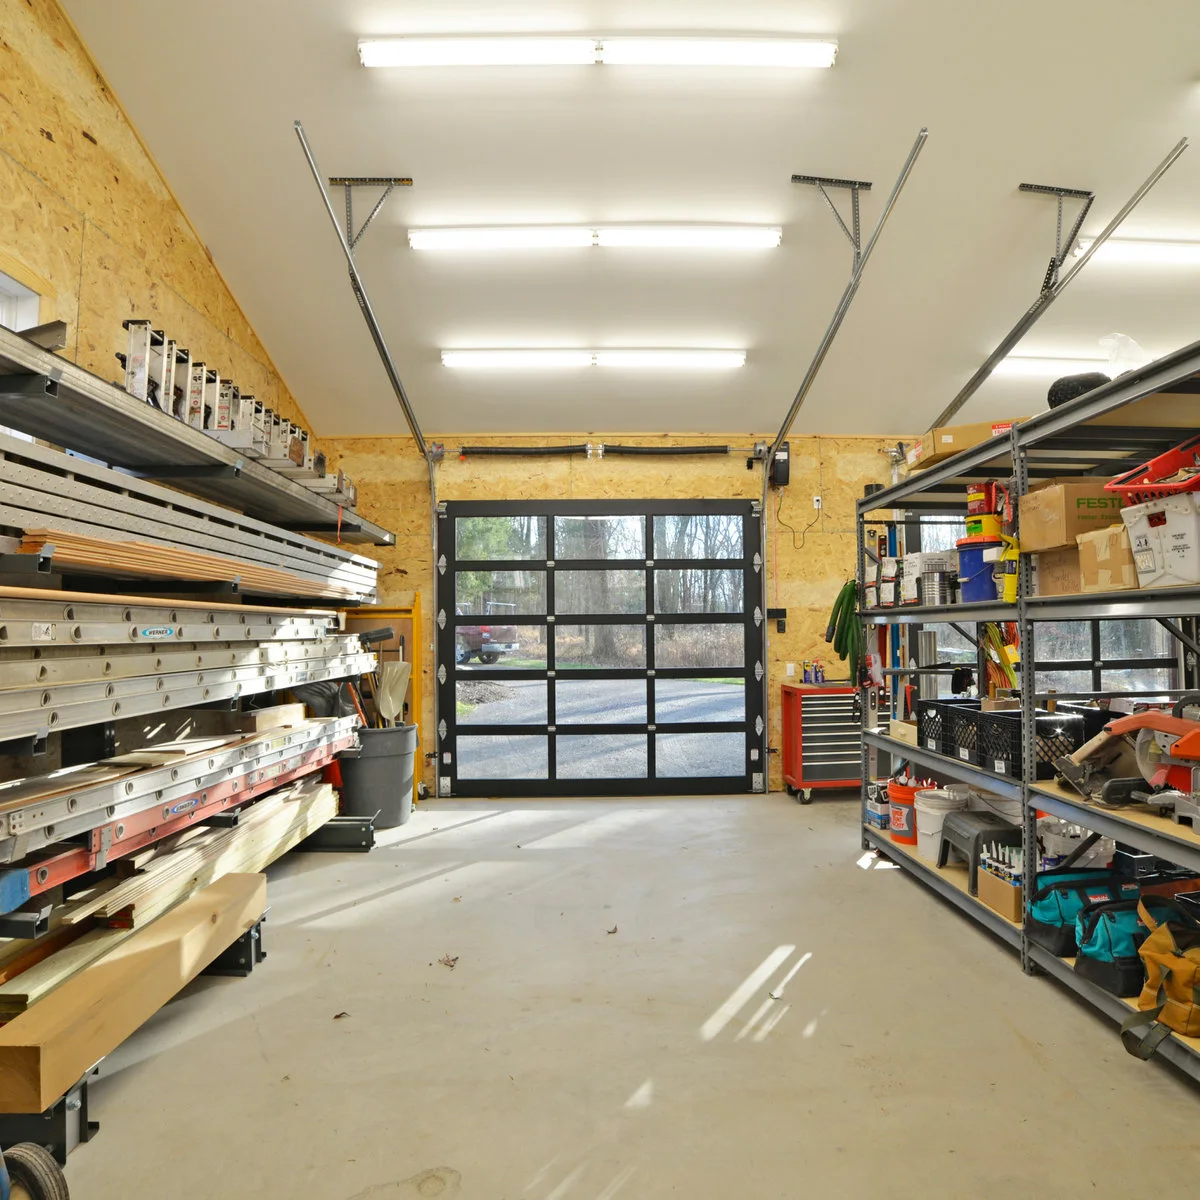
Store Long Materials Along a Clear Aisle
 SaveSupport Non AI Creator
Image credit: Project: John Gehri Zerrer (via Houzz)
Long ladders and boards occupy racks along one wall, with smaller supplies on open shelving opposite. The center remains a clear aisle toward the garage door. The different storage shapes suit their contents rather than forcing long materials into ordinary cabinet compartments.
Plan how each long item will be lifted out as well as how it fits when stored. Use racks and fixings rated for the actual load, and keep heavy items within a manageable reach. Do not let projecting ends narrow the main route or interfere with the door’s movement.
IDEA 17 / 20
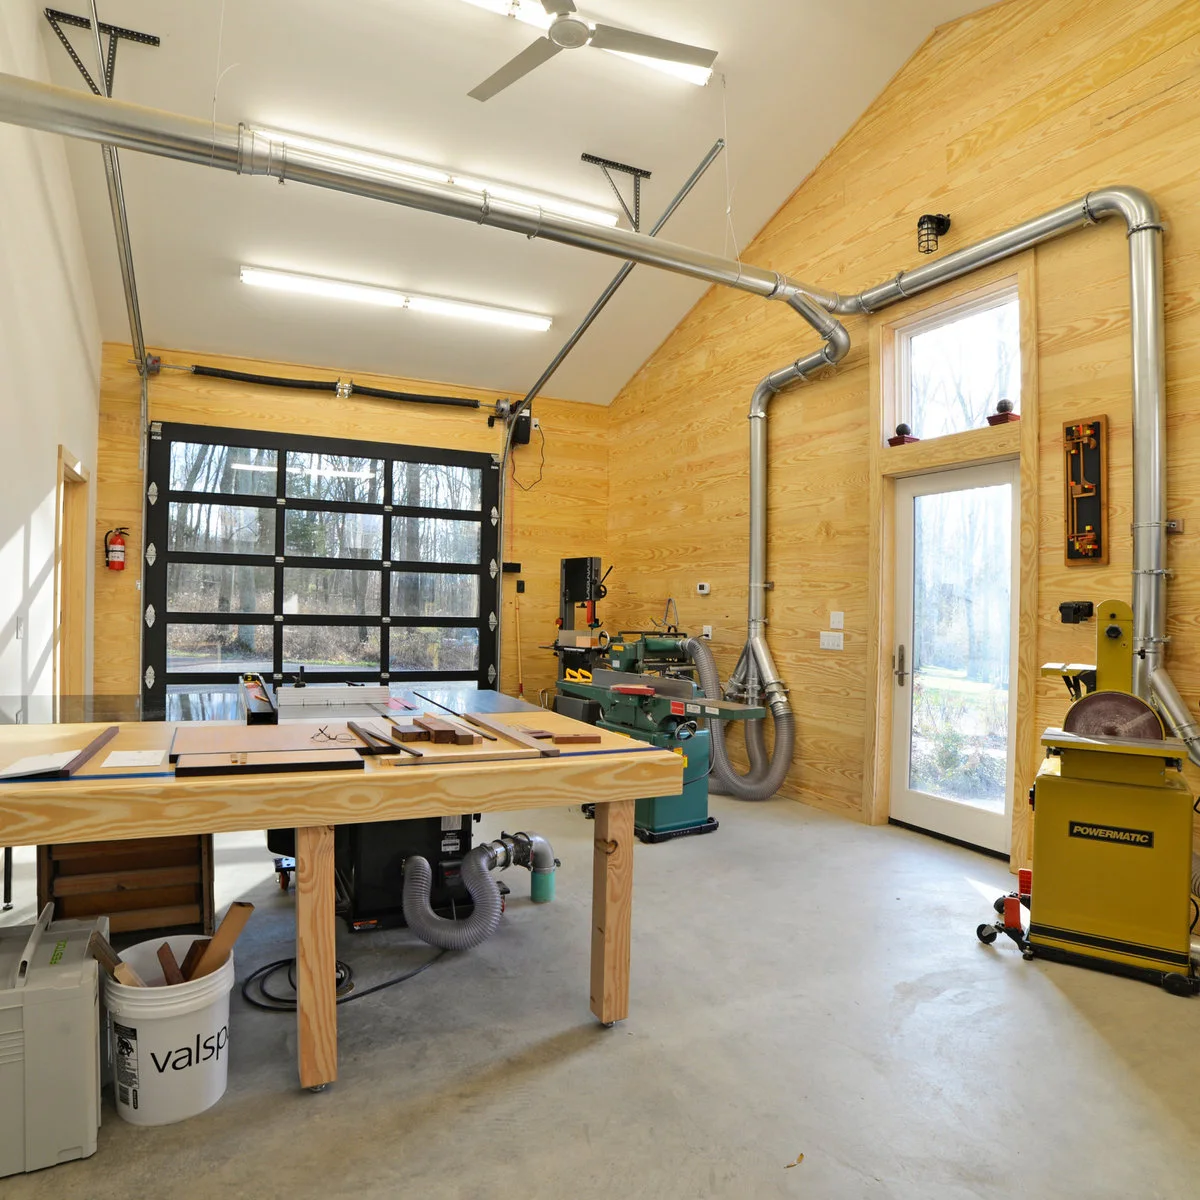
Plan Machine Positions Around Material Movement
 SaveSupport Non AI Creator
Image credit: Project: John Gehri Zerrer (via Houzz)
A central saw table occupies the middle of the workshop, while other machines stand along the wood-lined wall. Ducting rises above the floor to reach different parts of the room. The arrangement leaves visible access between the main table, the wall equipment and the side door.
Use the machine manuals to establish operating space and material-feed paths before choosing positions. Draw those areas at full size where possible. Extraction design must suit the equipment and material being worked; the photograph is useful for understanding layout, not for copying duct sizes or assuming adequate performance.
IDEA 18 / 20
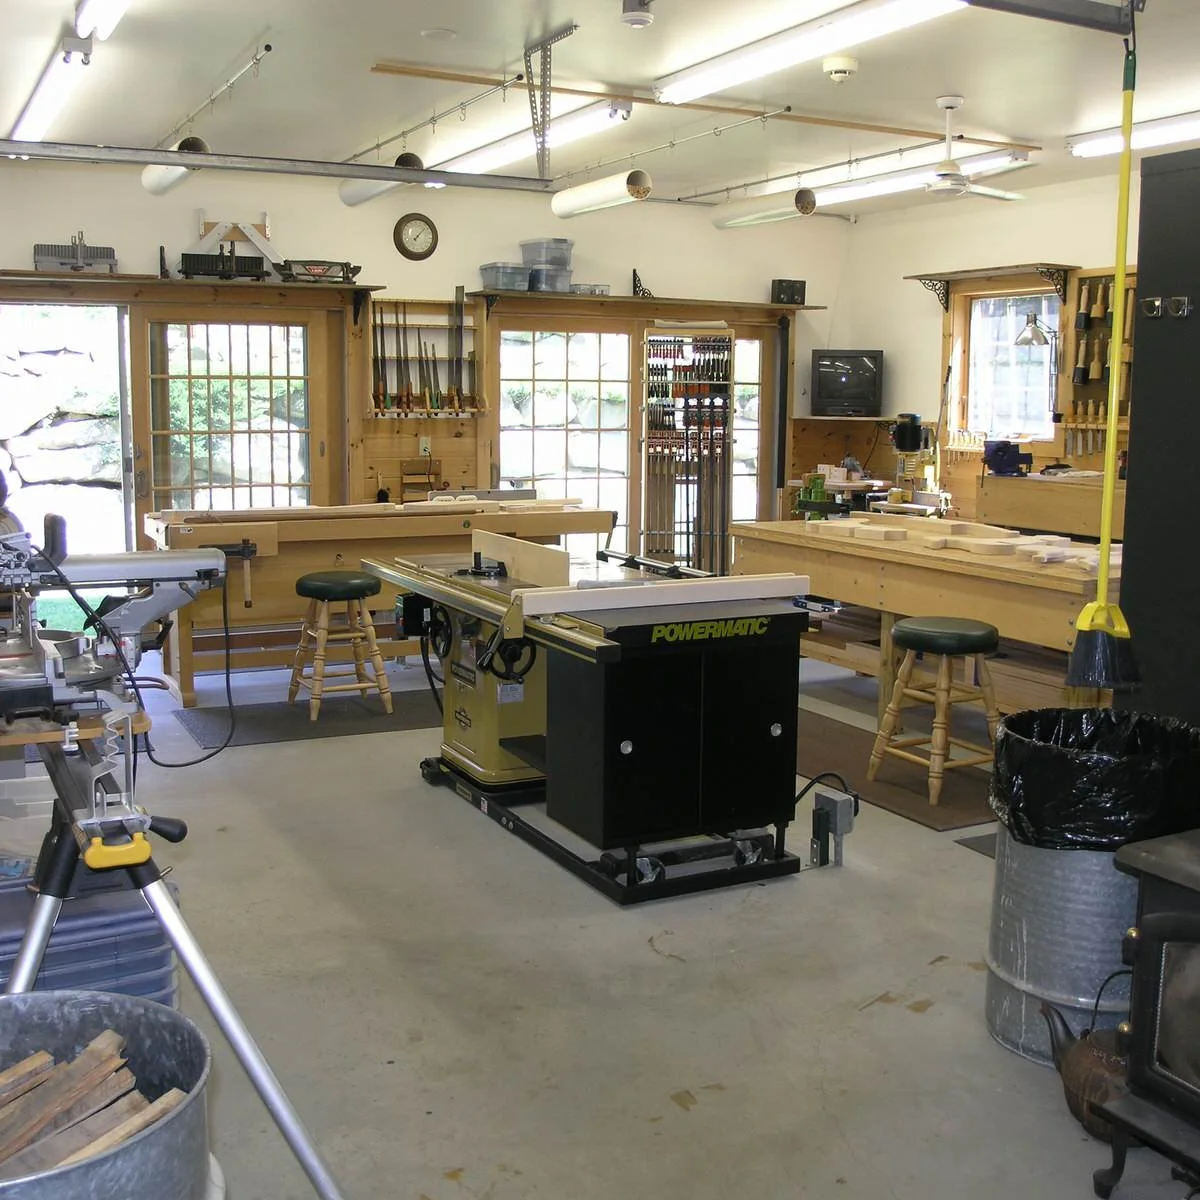
Keep Assembly Benches Separate from the Central Saw
 SaveSupport Non AI Creator
Image credit: Project: Peabody Smith Realty, Inc. (via Houzz)
The saw occupies the central floor, while wooden benches provide separate surfaces beside the windows. Clamps hang vertically between the window openings. This arrangement keeps hand assembly and tool storage around the edge rather than making the saw table serve every task at once.
For a garage adaptation, mark the saw’s working area and the vehicle space as separate footprints. Leave access to the assembly bench even when a project is underway. Store clamps where they can be lifted without crossing a machine’s working path, and keep cleanup equipment easy to reach.
IDEA 19 / 20
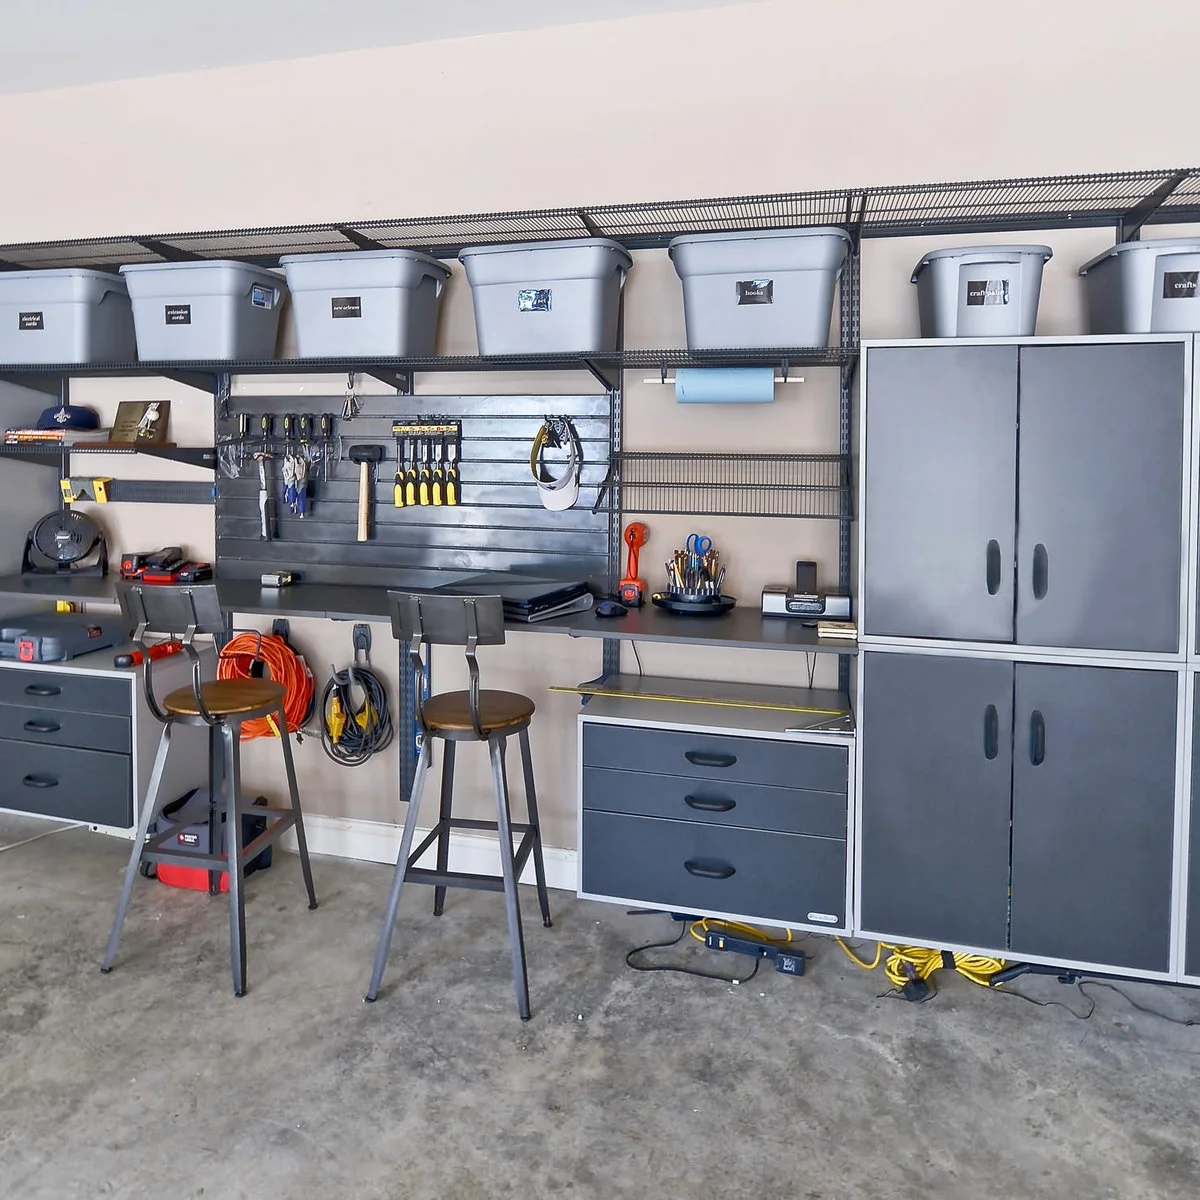
Allow Knee Space for Seated Repair Work
 SaveSupport Non AI Creator
Image credit: Project: Organized Living (via Houzz)
Two stools fit beneath the long worktop between the lower cabinets. Small tools hang on the wall panel, while labeled tubs use the shelving above. The open sections under the bench make seated work possible without giving up all the storage along the wall.
Try the stool and worktop together before fixing the final height. Your knees need room and your feet need a stable position. Keep cords off the floor when equipment is put away, and use labels that describe the contents clearly enough to find a small part without opening every tub. Small home office layouts offer useful comparisons for knee space and a clear seated work position, even when your surface is used for repairs rather than a computer.
IDEA 20 / 20
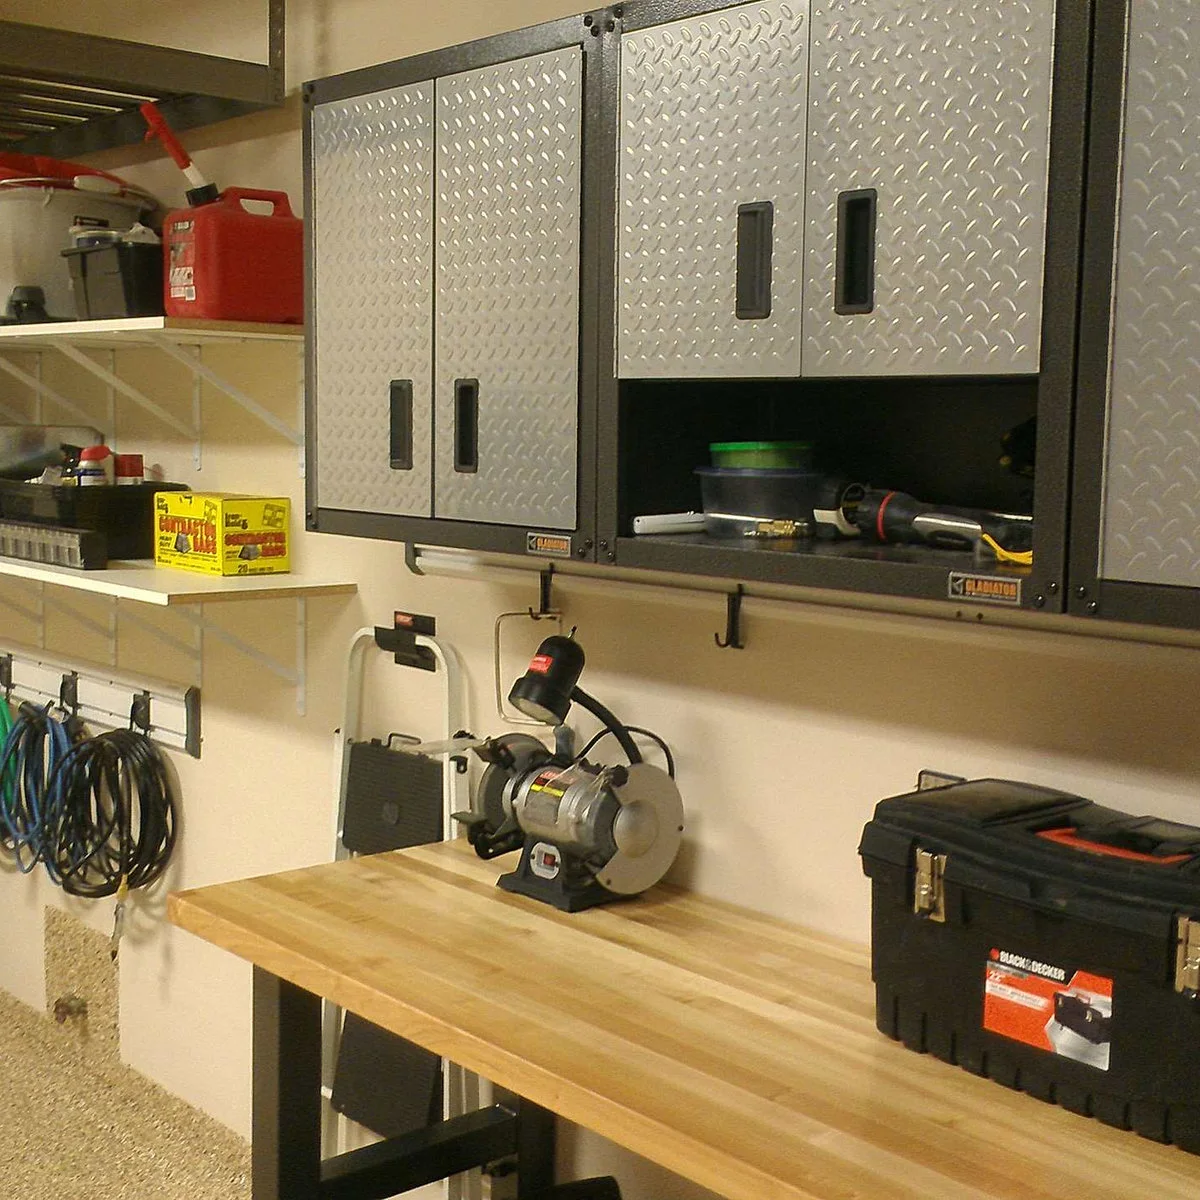
Give a Bench-Mounted Tool Its Own Clear Surface
 SaveSupport Non AI Creator
Image credit: Project: Garage Guru (via Houzz)
The bench-mounted tool has a defined position on the wood top, with a toolbox at the other end. Cabinets above provide enclosed storage while coiled leads hang to the side. The arrangement shows a compact equipment station rather than an entire room devoted to one machine.
Confirm the tool’s mounting, working clearance and protective requirements from its instructions before choosing its position. Keep the surrounding surface clear and store incompatible supplies elsewhere. Separate this task from clean assembly work when necessary, so another project does not have to share the same small area while equipment is operating.
BRING IT ALL TOGETHER
Design around the work, then add storage
Place the largest project and equipment footprints first, including the room needed to use them. Protect the main exit route and garage-door movement, then add benches that support the tasks you repeat. Storage should fit around those decisions rather than determining them.
Keep frequently used tools close to their task and give long materials, small parts and household belongings different places. Review the layout after a few real projects. If you repeatedly move the same obstacle or cannot clear the bench, adjust the arrangement before adding more cabinets.