A stairway wall changes as you move: a picture that looks centered from the hall can disappear behind the railing halfway up. Choose your treatment from the bottom step, the landing and the doorway before committing to a layout.
These stairway accent wall ideas show several ways to handle that changing view, from a collection of small frames to one continuous textured surface. Use the photographs to compare scale and placement, then adapt the detail to your own light, wall shape and access for cleaning.
PART 01
Art and Color That Follow the Stair
IDEA 01 / 20
Build a Gallery That Rises With the Steps
 SaveSupport Non AI Creator
Image credit: Haris Kenjar / Heidi Caillier Design
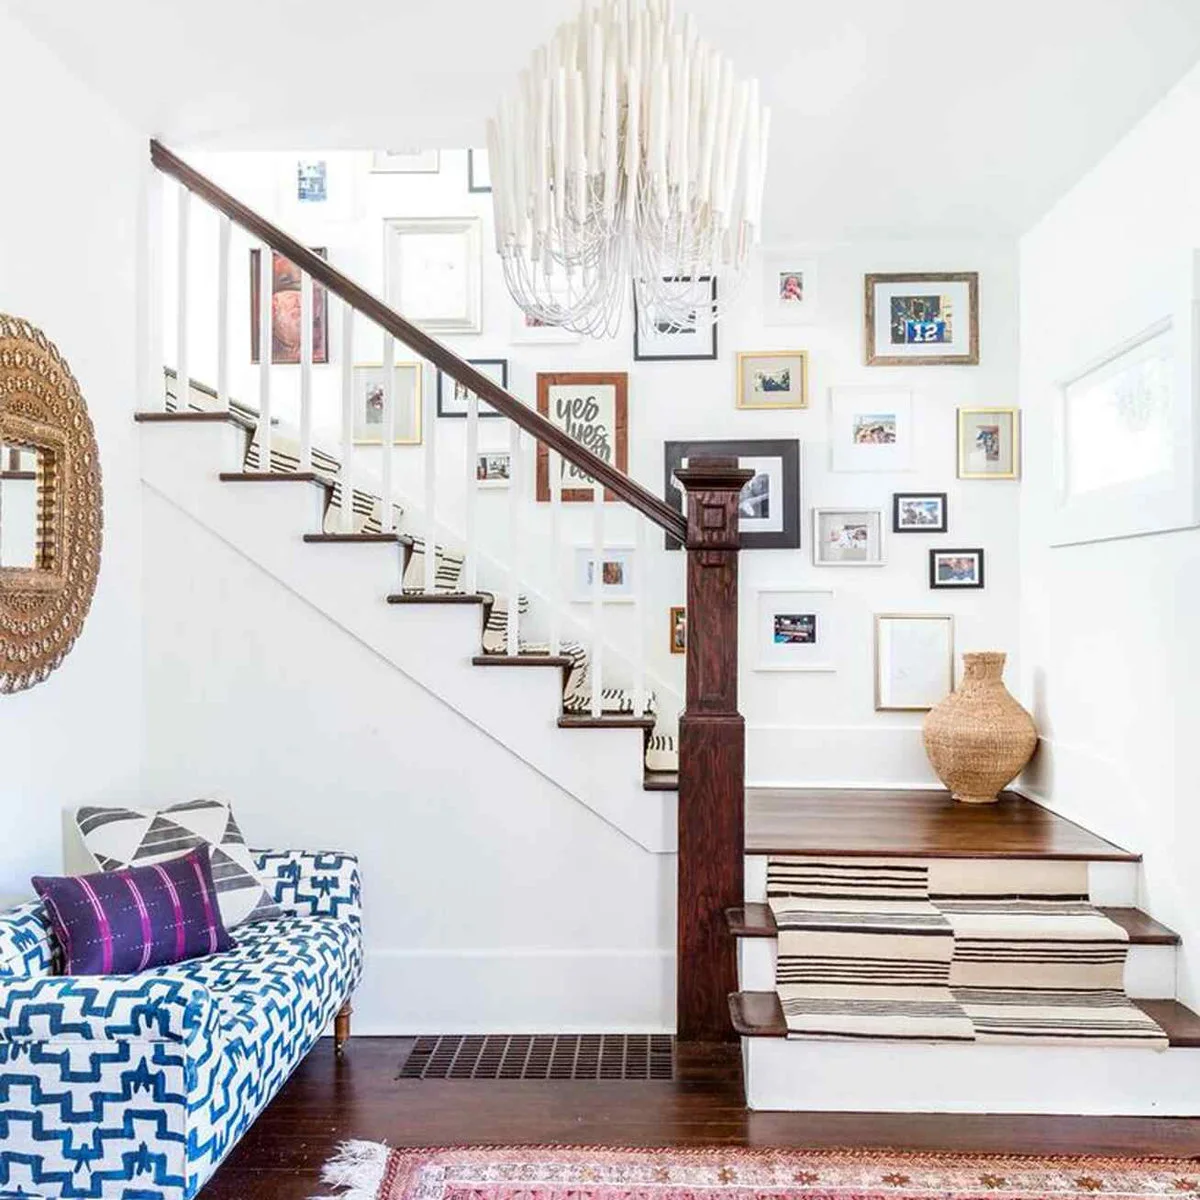
Frames of different sizes form a rising group above the striped stair runner. Black, white and gold borders keep the collection varied, while the white wall gives the smaller pictures enough breathing room to remain visible beside the dark handrail.
Try the arrangement with paper templates before making holes, checking the view from both ends of the flight. Repeat a few frame finishes rather than introducing a new one for every picture. Carry those finishes into console table decor ideas near the stair base for a connected entrance.
IDEA 02 / 20
Give Matching Prints a Clear Grid
 SaveSupport Non AI Creator
Source: houzz.com
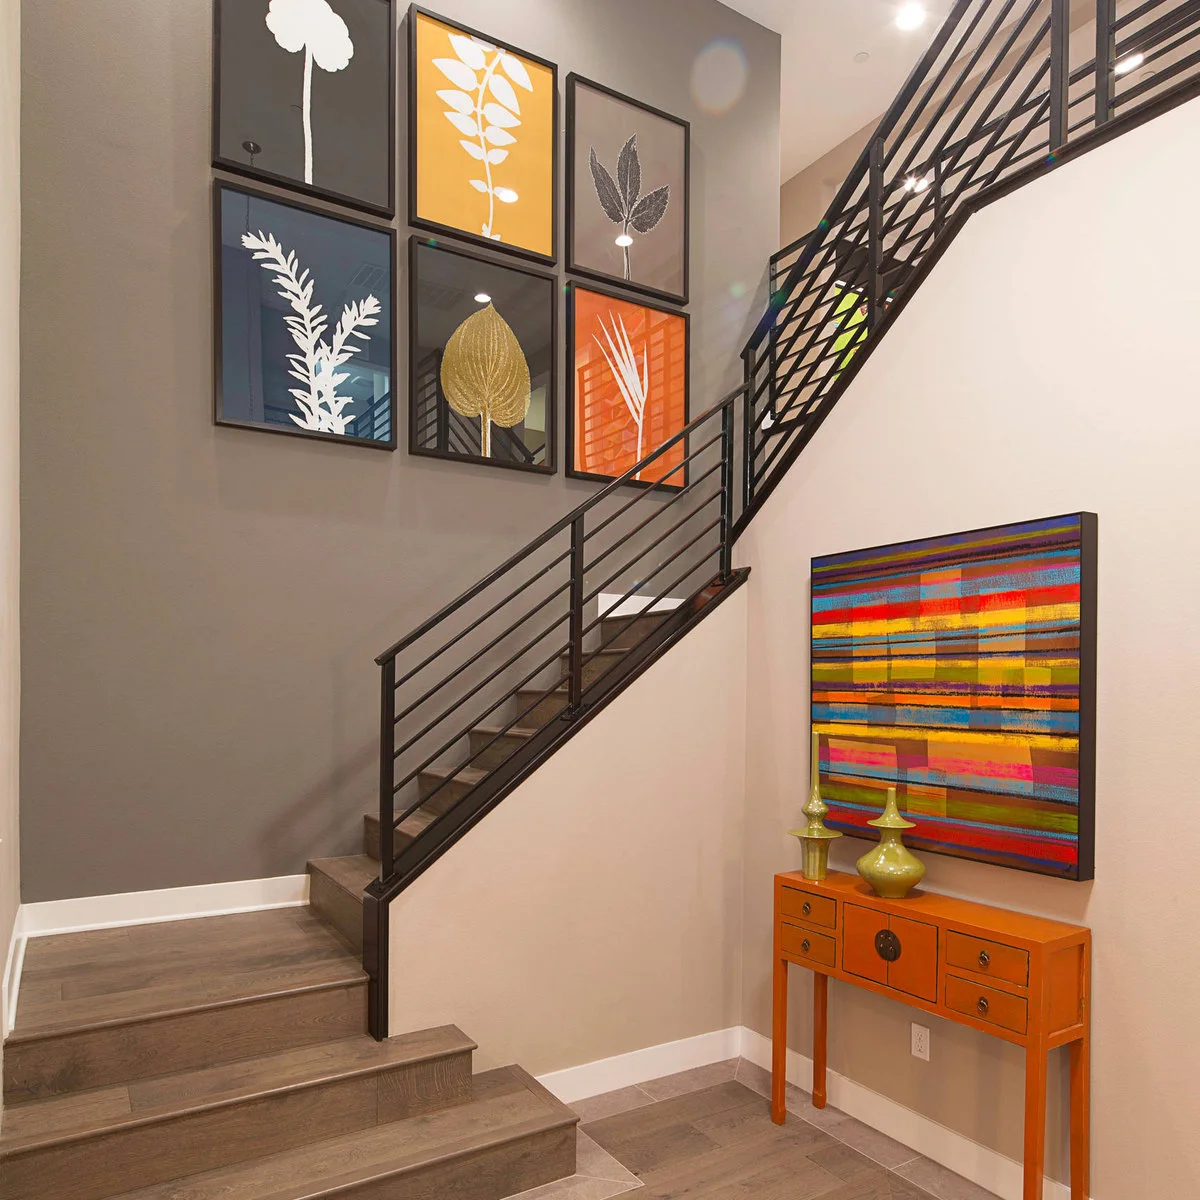
Six botanical prints sit in two orderly rows, each with the same dark frame and generous light border. The regular arrangement contrasts with the horizontal stair railing, creating a clear rectangular group instead of copying every change in the stair angle.
Use this approach when your pictures belong to a set and you want them read together. Measure the whole group before choosing individual frame positions. Leave enough wall around its outer edge so the grid looks intentional rather than squeezed between the rail and ceiling.
IDEA 03 / 20
Wrap the Stair Hall in Pale Blue
 SaveSupport Non AI Creator
Image credit: Rixon Photography / Fiorentino Group Architects
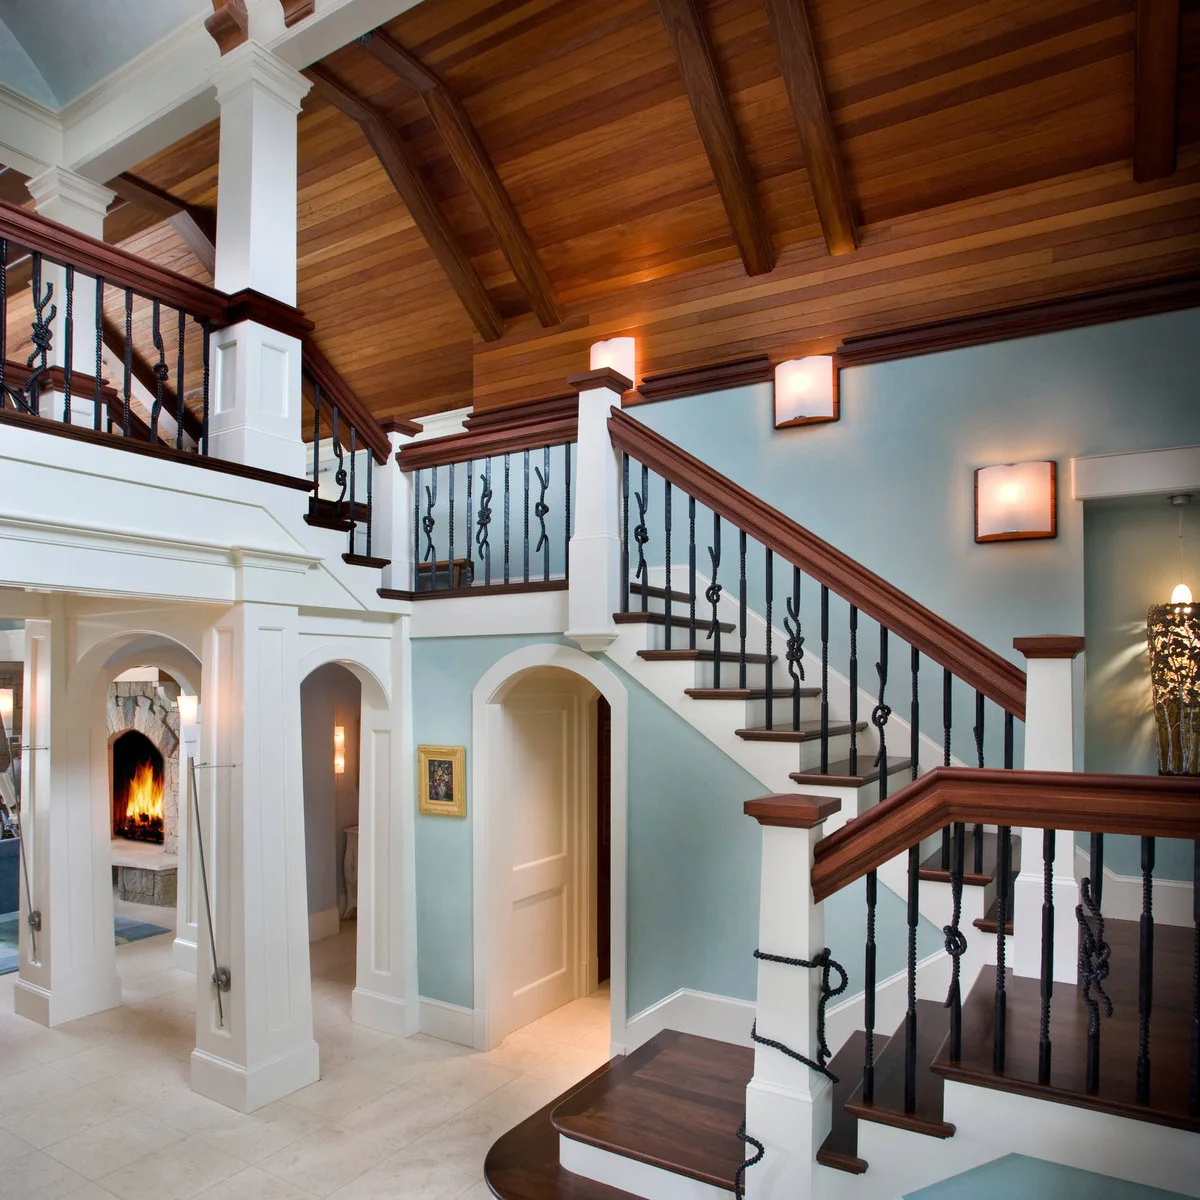
Pale blue walls surround this stair hall, while white trim keeps the openings and lower edges crisp. The dark handrail and wood ceiling bring warmer, deeper tones into the space, so the wall color feels gentle without fading into the background.
Paint a sample on more than one wall because the stair turn creates different shadows. Check it beside the existing wood finish before choosing a color. Preserve contrast at the steps and use appropriate lighting for the route rather than relying on pale paint to brighten everything.
IDEA 04 / 20
Let a Color Block Follow the Stair
 SaveSupport Non AI Creator
Image credit: Francis Dzikowski
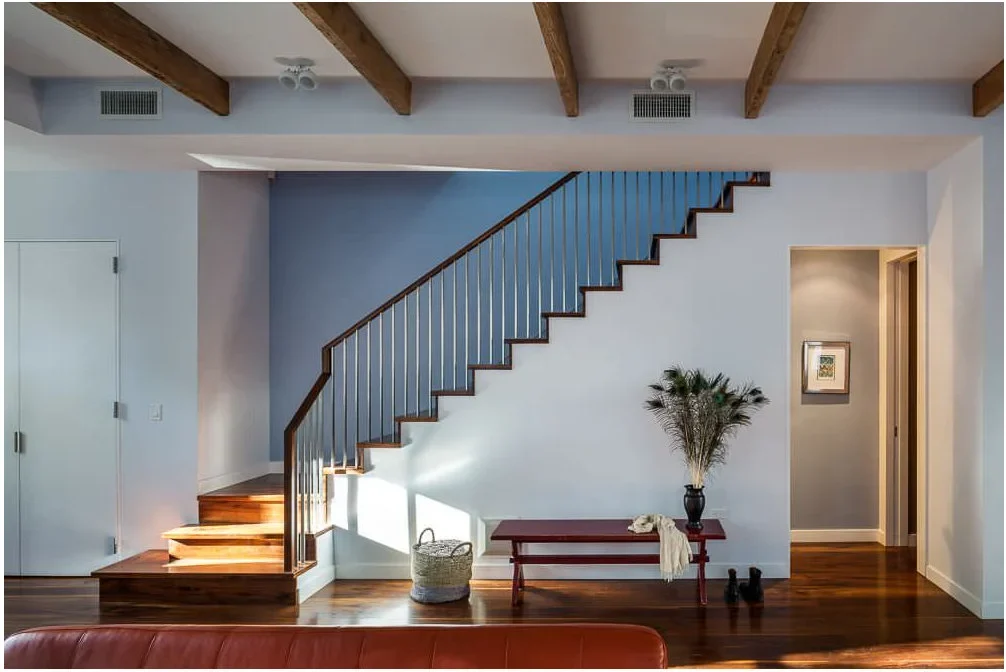
A pale blue area sits above the sloping white stair enclosure, turning the changing wall shape into the accent itself. The slim railing leaves that shape visible, while a dark bench below adds a separate horizontal line at the base.
Follow an existing architectural edge when it gives the paint a natural stopping point. Mark the boundary carefully and view it from the adjoining room before painting. Keep nearby furnishings simple so the angled color area remains easy to understand from several directions.
IDEA 05 / 20
Put One Bold Painting at the Landing
 SaveSupport Non AI Creator
Image credit: Scott Amundson / Studio M Interiors
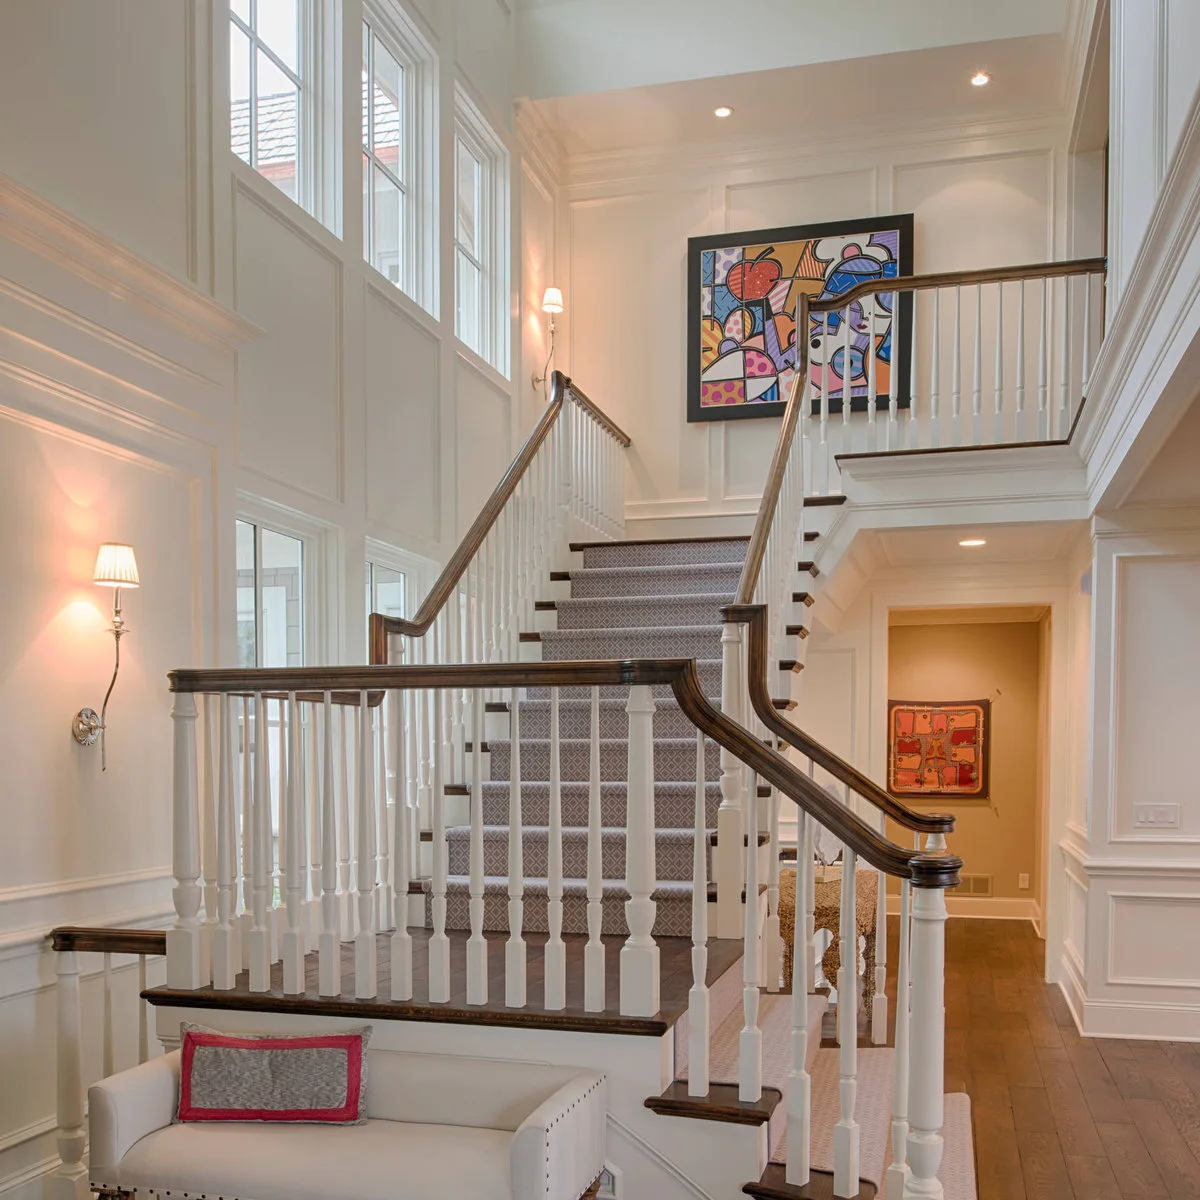
A large colorful painting anchors the landing at the top of this stair run. Its scale gives the eye somewhere to rest after the patterned runner and closely spaced balusters, while the surrounding pale wall keeps the artwork clearly separated from those details.
Choose a piece that reads from the lower approach as well as at close range. Check its relationship to nearby windows, door openings and the railing before hanging. A single generous painting can work better here than many small pieces competing with a busy stair runner.
PART 02
Texture Across Tall Walls
IDEA 06 / 20
Use Warm Stone as a Continuous Backdrop
 SaveSupport Non AI Creator
Image credit: Project: Realstone Systems (via Houzz)
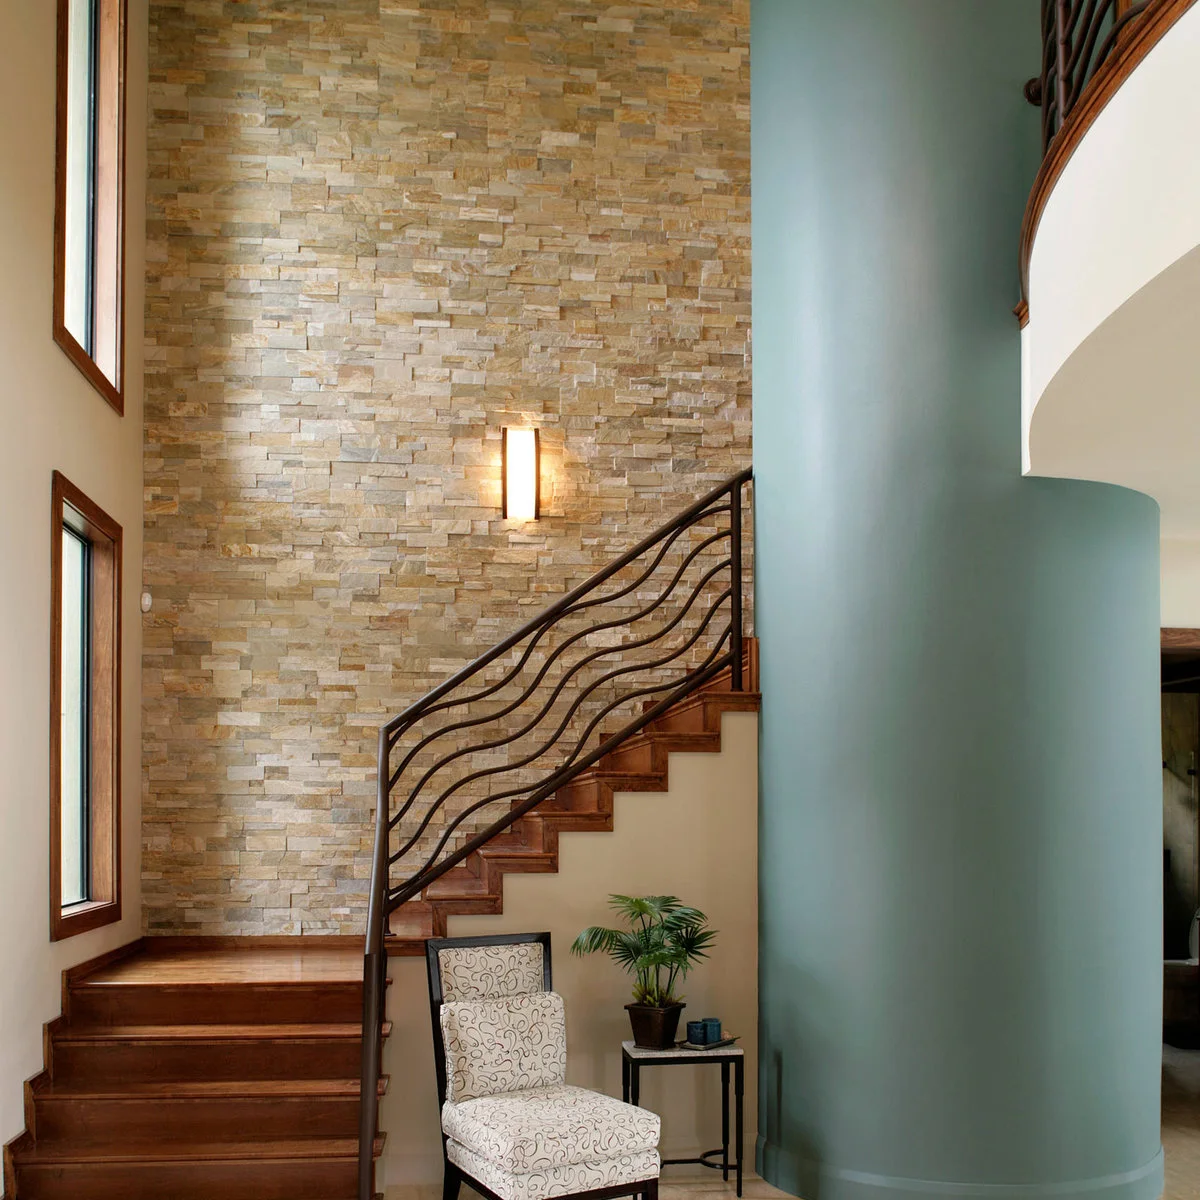
Warm, narrow pieces of stone cover the wall behind the stair, adding depth across the full visible height. The varied surface contrasts with the smooth wood treads and dark railing, creating an accent that does not need additional pictures to feel complete.
Keep the surrounding finishes restrained if the cladding already contains several tones. Before installing any heavy wall treatment, have its suitability and support assessed for the existing wall. Ask about cleaning the recessed joints, particularly where dust will be difficult to reach above the stairs.
IDEA 07 / 20
Balance Dark Cladding With Daylight
 SaveSupport Non AI Creator
Image credit: Robin Hill / KZ Architecture
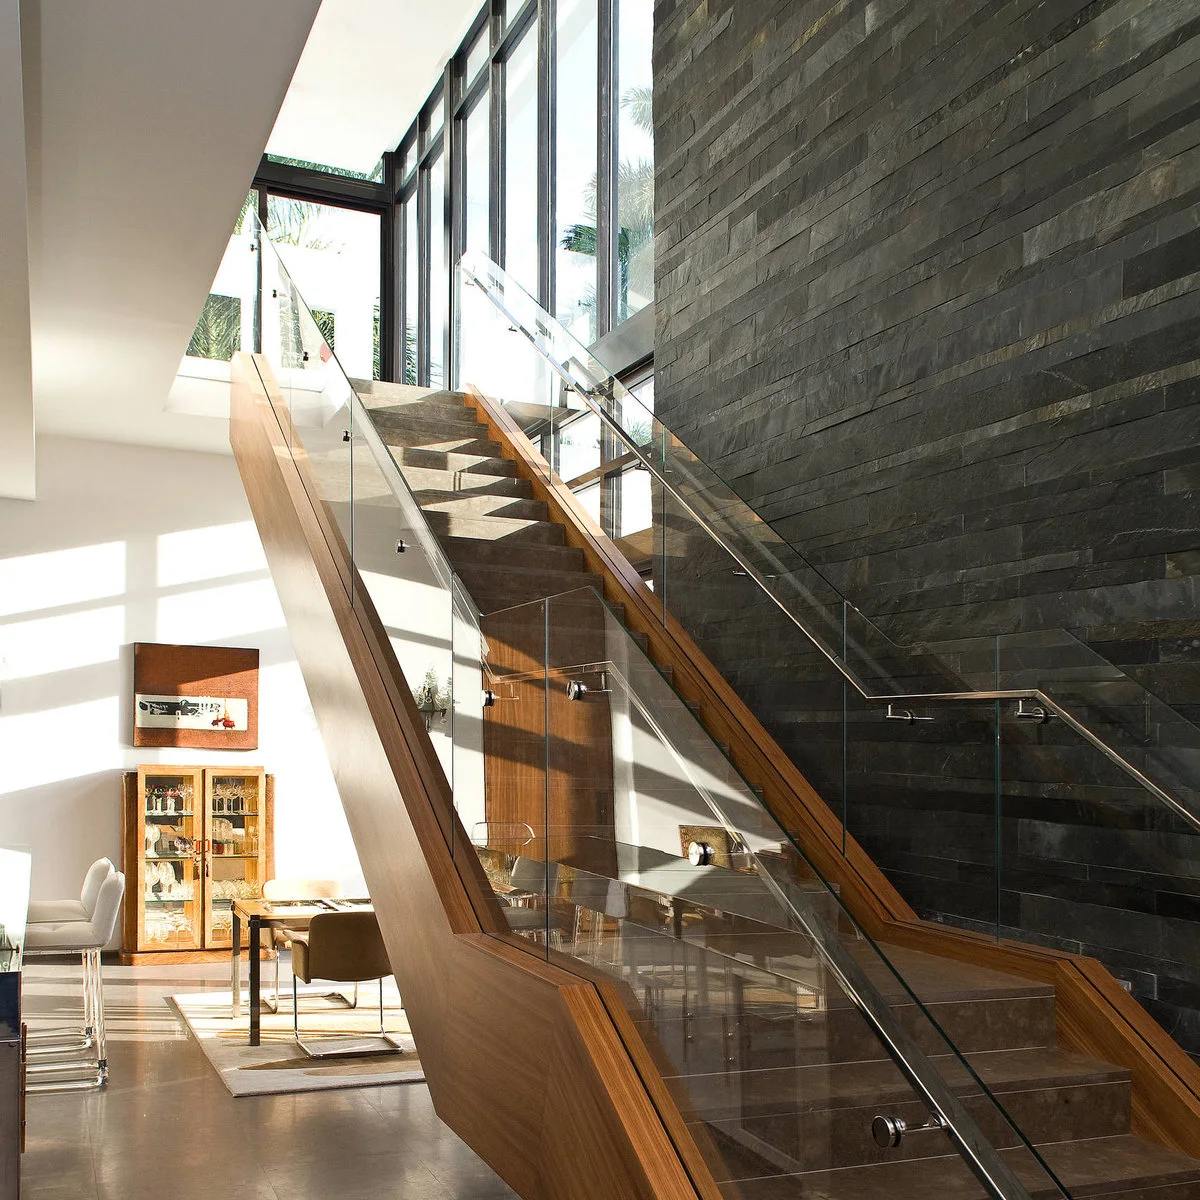
Dark horizontal cladding gives this stairway a strong backdrop, while the glass guard and tall windows keep the space visually open. The arrangement works through contrast: a dense textured wall on one side and broad areas of light and transparency on the other.
Consider how your stair hall looks after sunset before choosing a similarly deep finish. A dark sample can look very different under artificial lighting. Keep the steps and handrail easy to distinguish, and avoid adding busy artwork where the wall texture already supplies plenty of detail.
IDEA 08 / 20
Draw the Eye Up a Narrow Stone Strip
 SaveSupport Non AI Creator
Image credit: Tahvory Bunting / Abigail-Elise Interiors
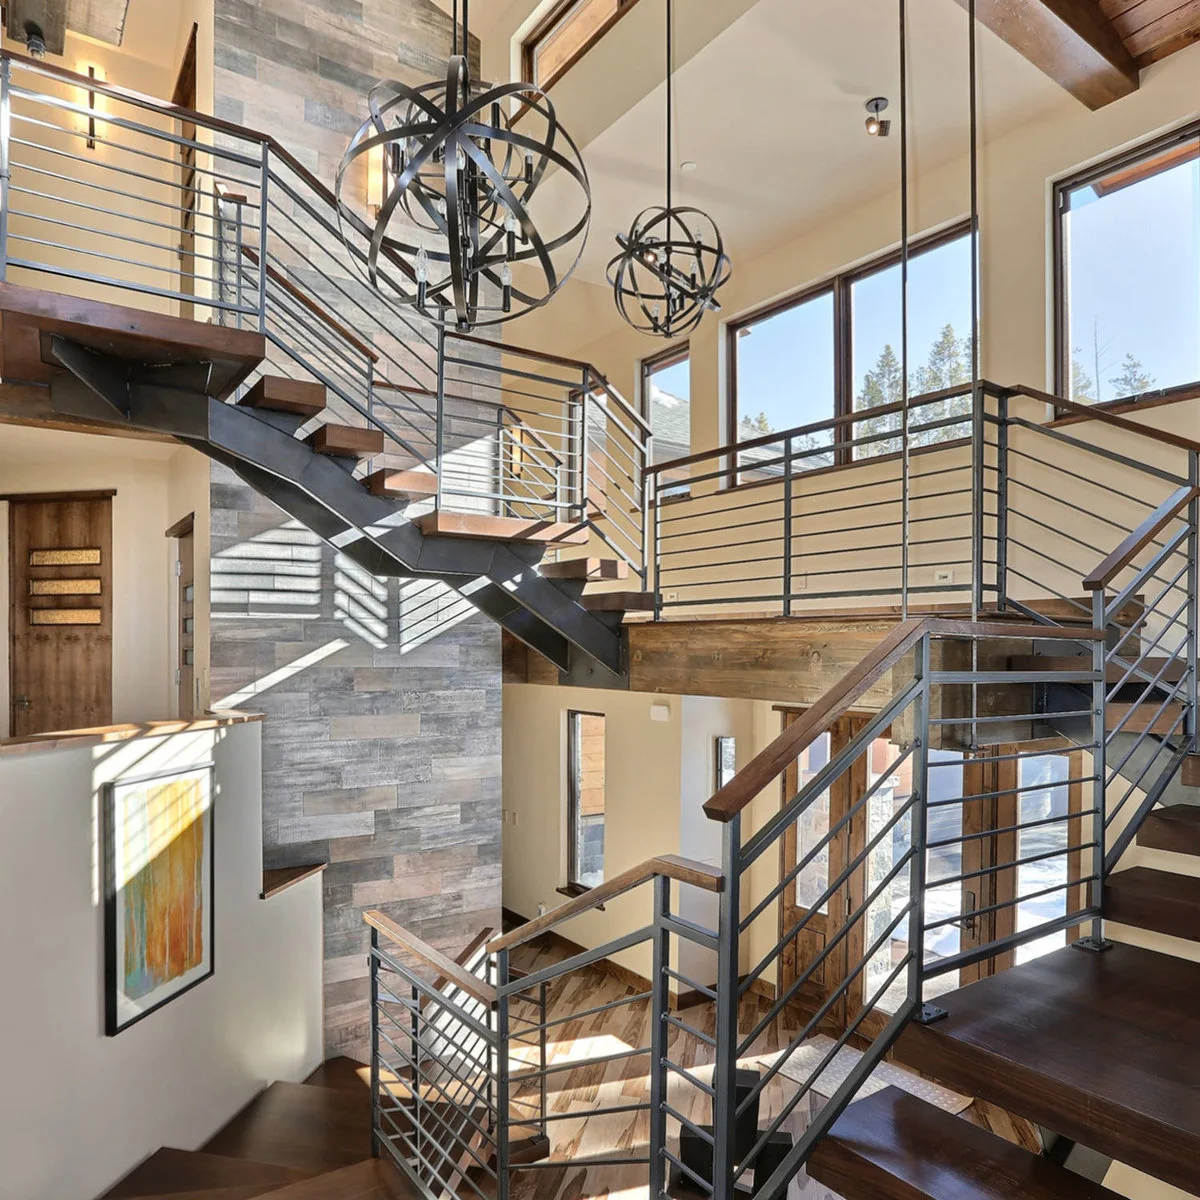
A narrow stone-clad section stretches upward through the stairwell, giving the open flights a continuous reference point. The treatment concentrates texture in one vertical area instead of covering every surrounding wall, leaving the large windows and railing outlines clearly visible.
Use a tall strip when the stairwell has more height than uninterrupted wall width. Plan where the finish begins and ends at each level so the edges look deliberate. The same scale question appears in high ceiling living room ideas: decide what should connect the upper and lower views.
IDEA 09 / 20
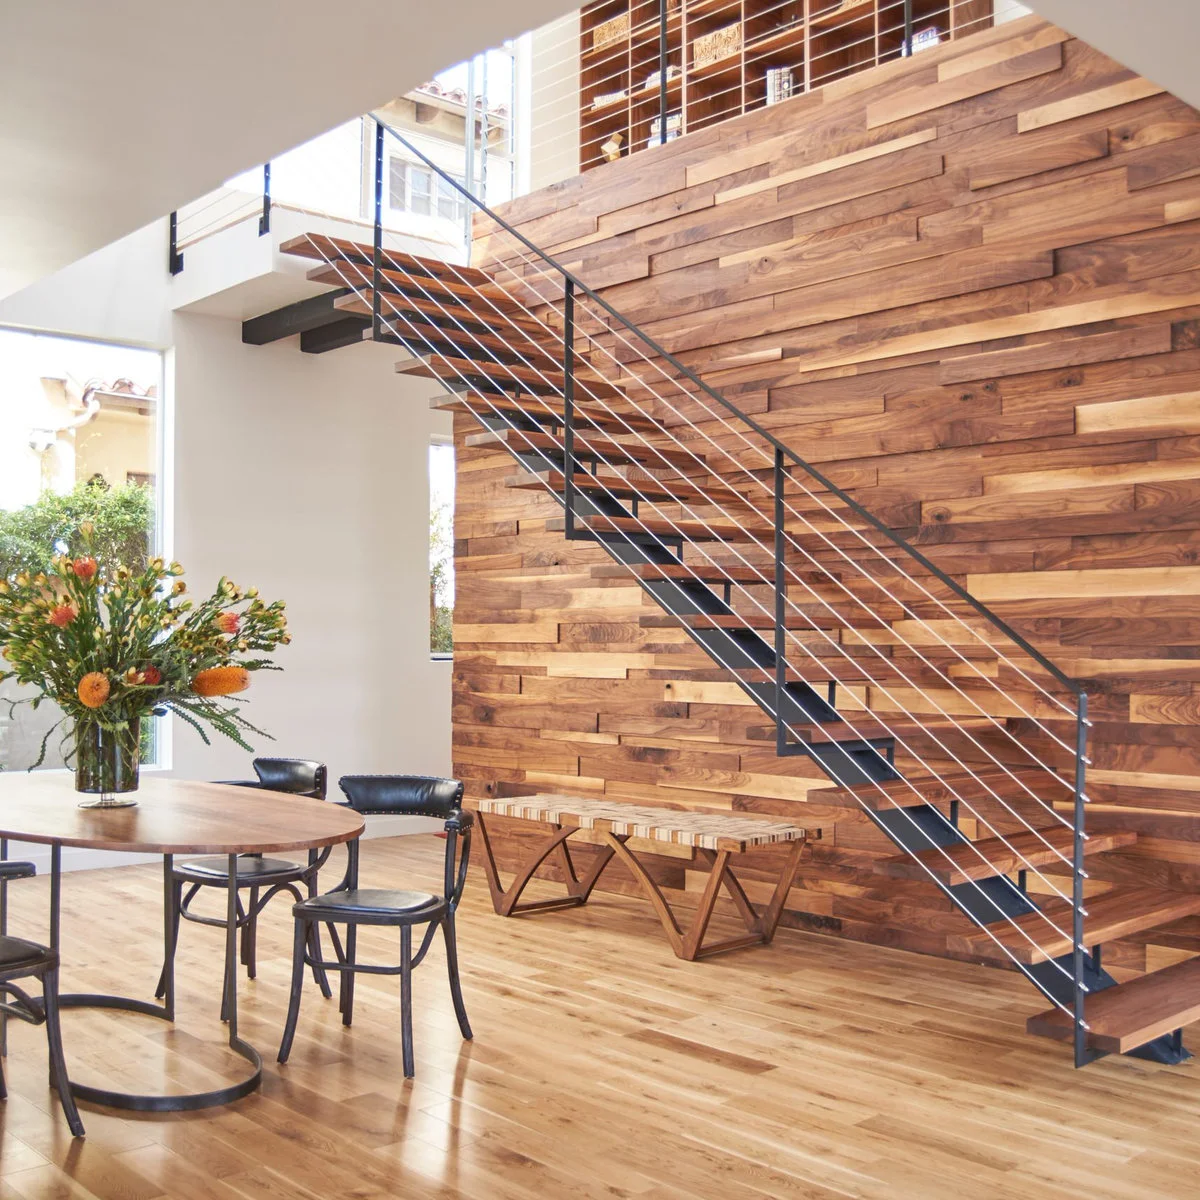
Run Wood Planks Behind an Open Stair
 SaveSupport Non AI Creator
Image credit: Steven Dwall / Shelby Wood Design
Horizontal wood planks create a broad textured backdrop behind this open staircase. Their varying lengths and projecting edges give the wall its own rhythm, while the dark cable railing stays fine enough for the surface to remain visible from the dining area.
Look at a larger sample arrangement before committing to a small board sample alone. Joint placement and depth changes will affect the finished pattern. Consider how you will dust the projecting edges, and let the wall remain the main decorative surface rather than covering it with closely packed frames.
IDEA 10 / 20
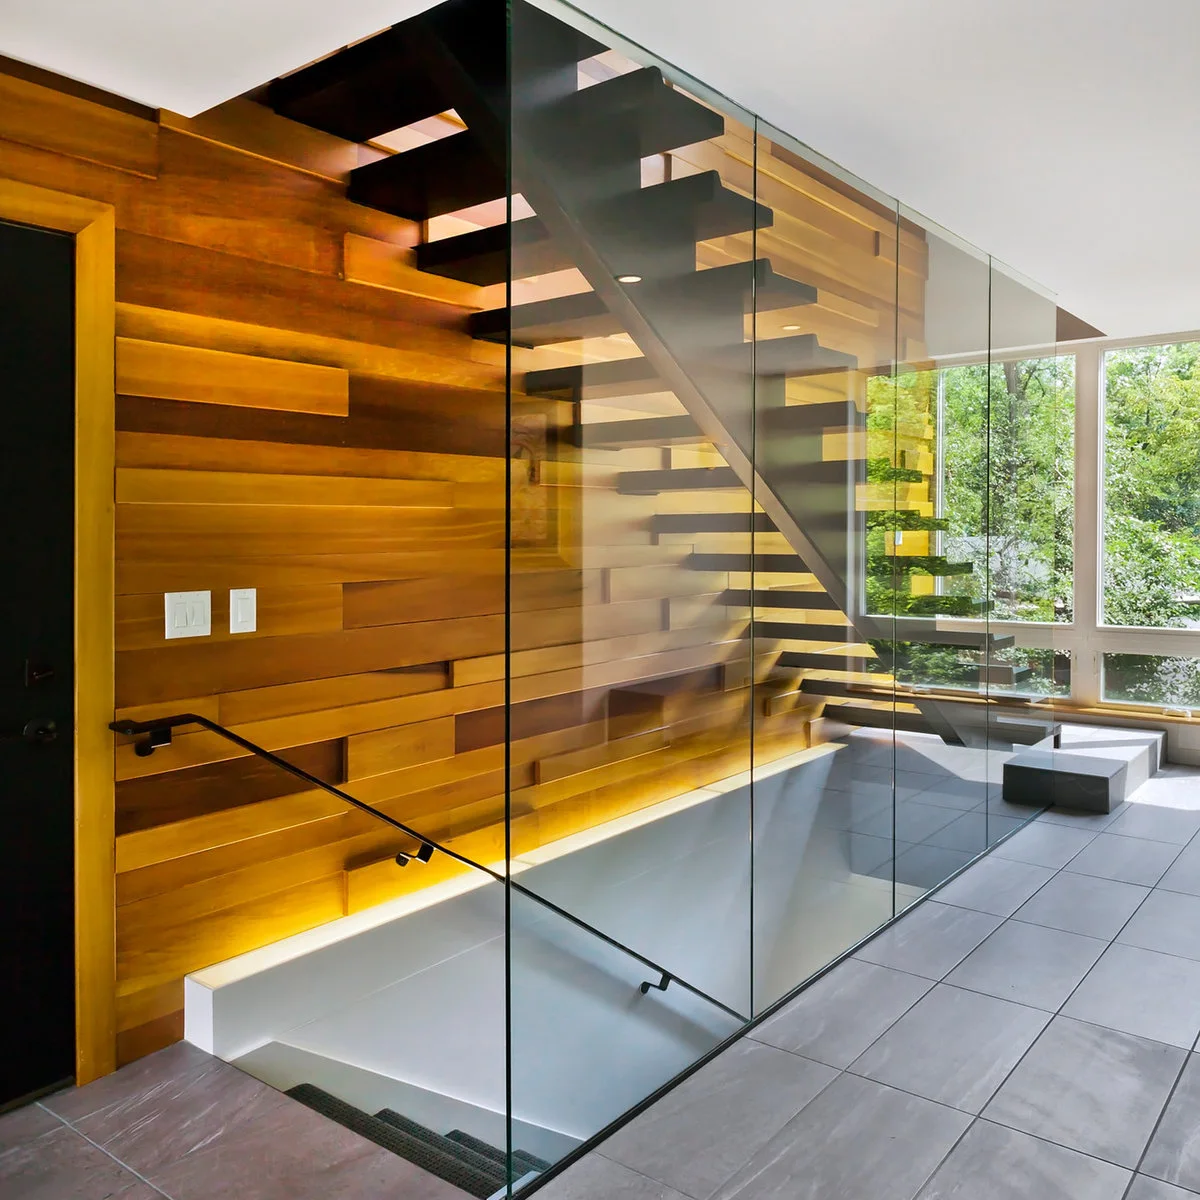
Use Light to Reveal a Wood Wall
 SaveSupport Non AI Creator
Image credit: Gilbertson Photography
A warm wash of light catches the lower edges of the wood-clad wall, making its texture visible beside the open stair. The effect emphasizes changes in depth rather than adding a second decorative pattern, with the darker stair structure providing a clear outline.
If you like this effect, test a sample with the intended lighting before installation. Light placed close to a surface can reveal uneven joints as well as attractive texture. Have any wiring and fittings properly installed, and make sure the fixtures remain accessible for maintenance.
PART 03
Molding and Panel Details
IDEA 11 / 20
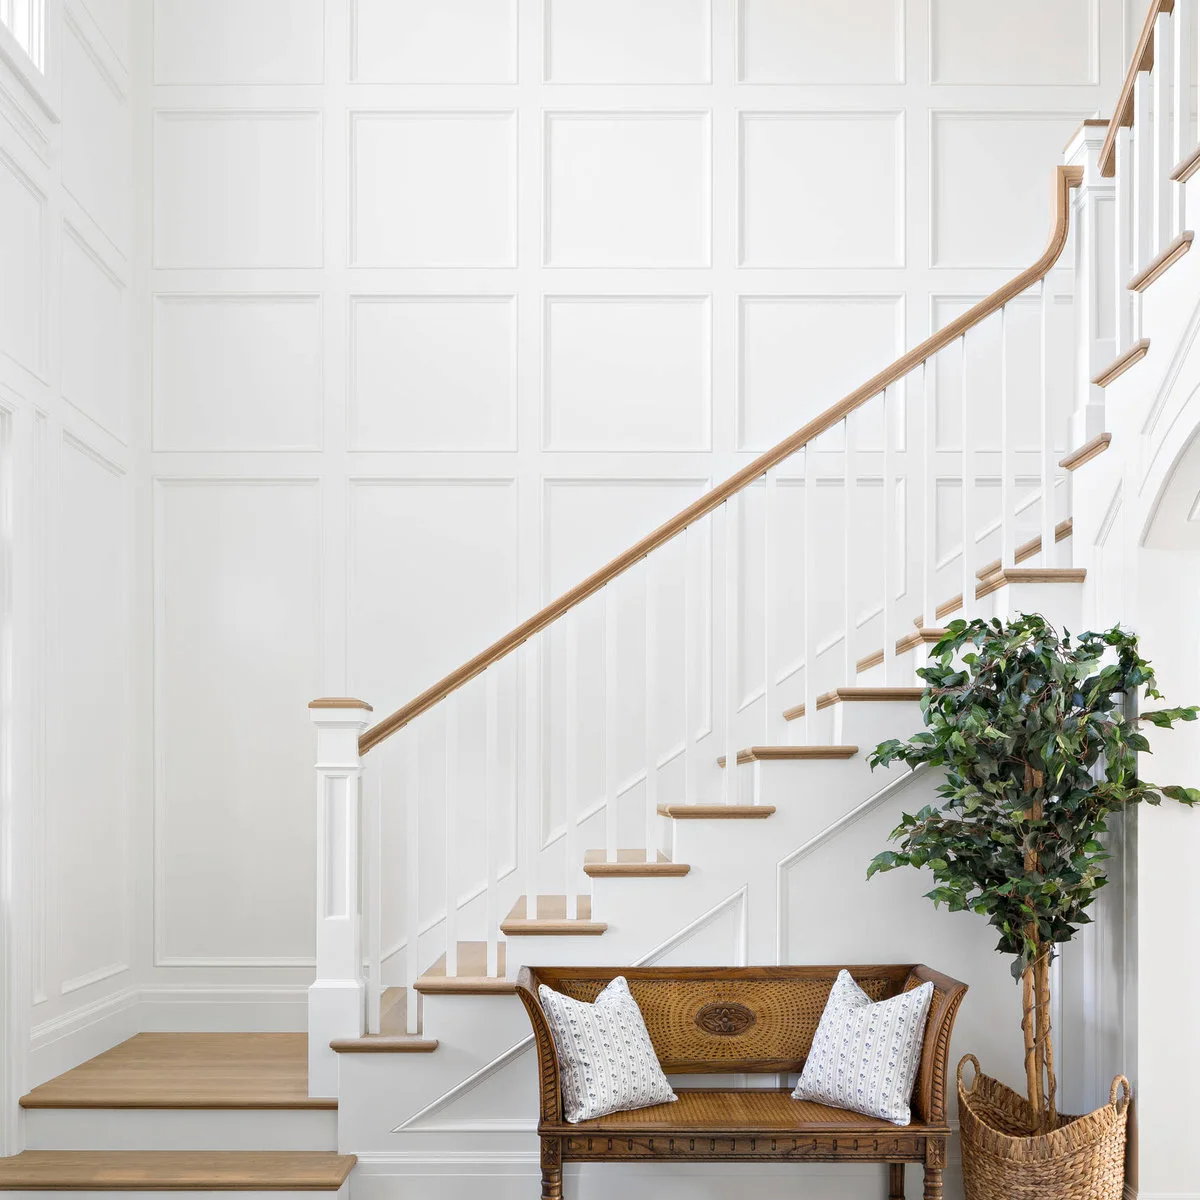
Take a White Grid Up the Whole Wall
 SaveSupport Non AI Creator
Image credit: Project: The Fox Group (via Houzz)
White rectangular paneling extends well above the staircase, using shallow shadows to give a pale wall definition. The dark wood rail makes the stair line readable against that grid, while the bench at the base introduces a smaller, more familiar scale.
Draw the entire elevation before deciding on panel sizes. Doors, landings and ceiling transitions can otherwise leave awkward narrow rectangles at the edges. A single finish across the trim and wall keeps the pattern quieter, especially when the adjacent rail already has substantial visual weight.
IDEA 12 / 20
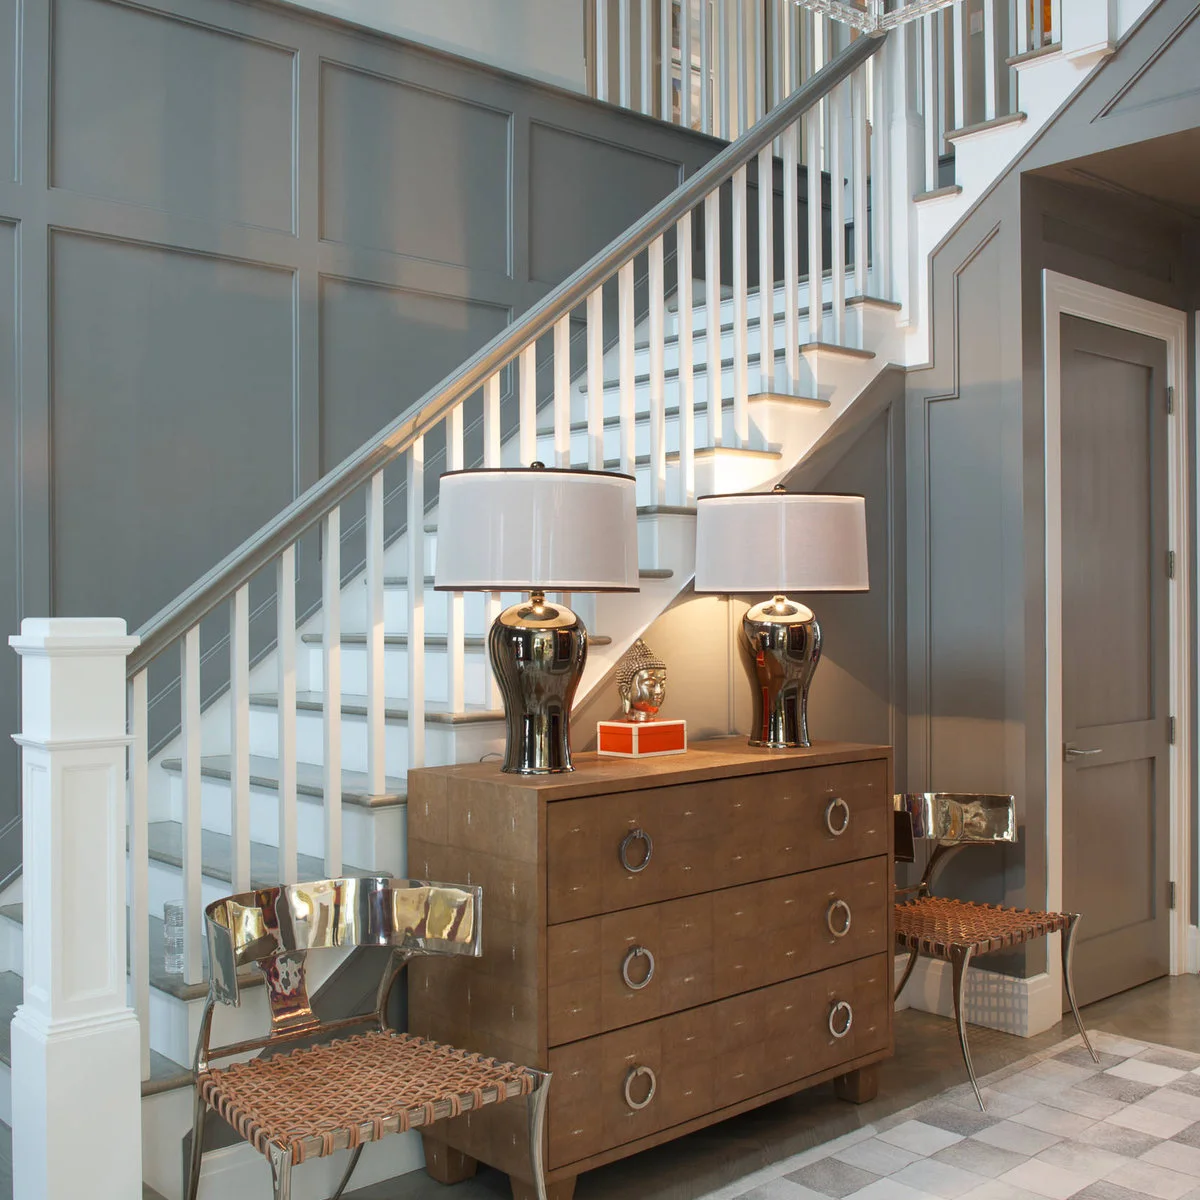
Paint the Molding and Wall the Same Gray
 SaveSupport Non AI Creator
Image credit: Project: Gilles Clement Designs (via Houzz)
Gray paint ties the rectangular wall moldings and background together, so the pattern appears through light and shadow instead of a contrasting outline. White balusters stand clearly in front, and the wood chest below keeps the entrance from feeling entirely cool in tone.
Compare the gray against the existing floor and stair finish in daylight and evening light. Keep the molding profile consistent through the turn, and plan joints before decorating. A unified paint color can quiet a complicated wall, but visible uneven joints will still need careful preparation.
IDEA 13 / 20
Shape the Trim Around the Incline
 SaveSupport Non AI Creator
Image credit: Project: Coats Homes (via Houzz)
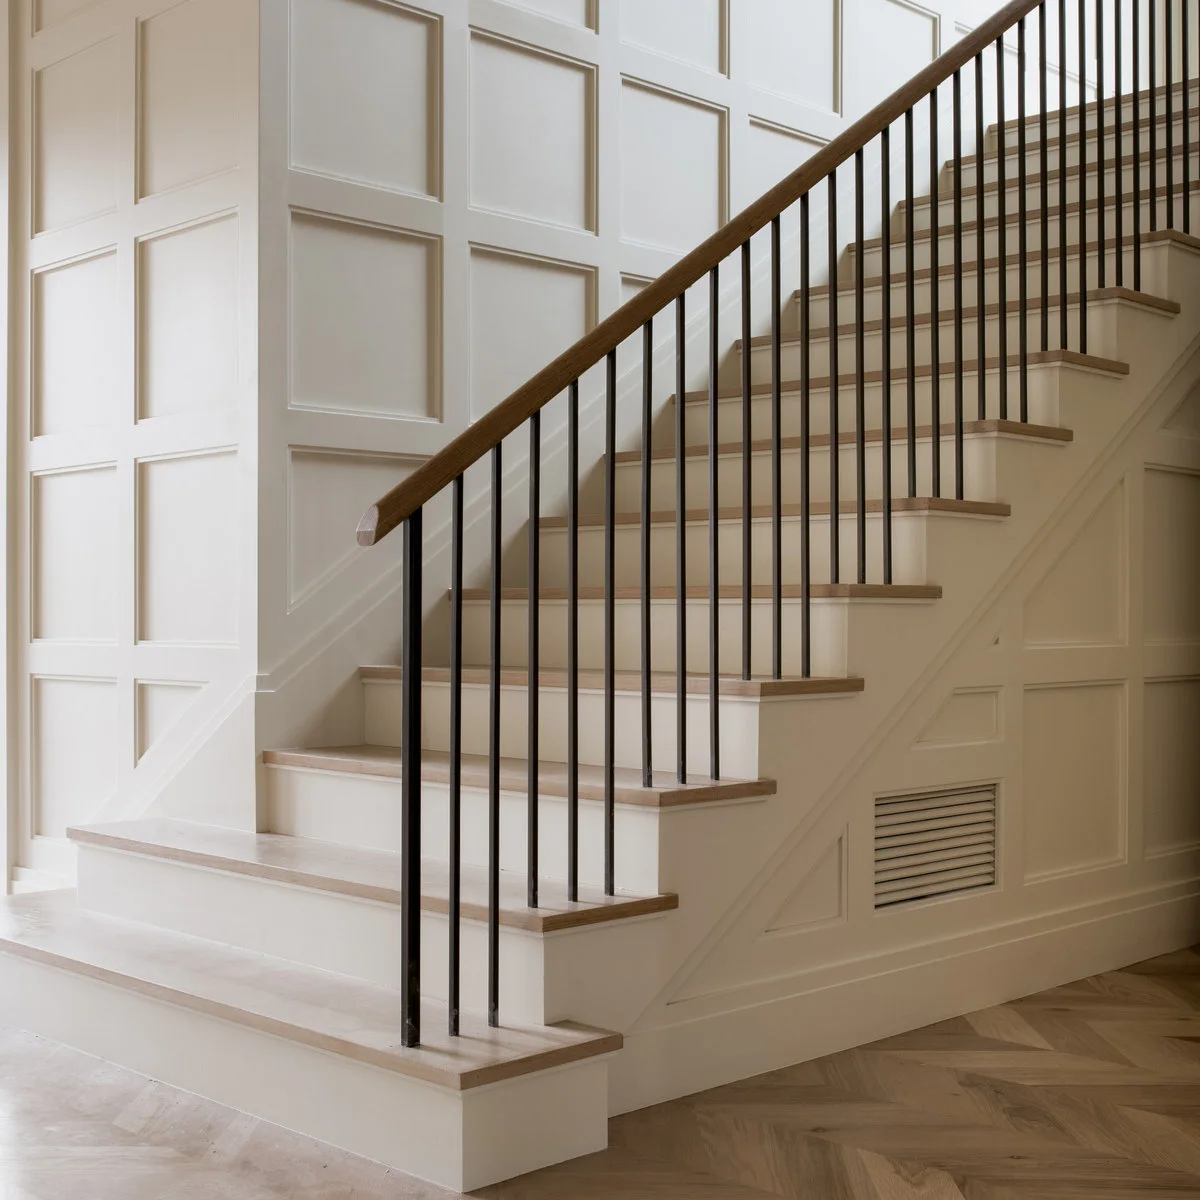
Rectangular panels above the flight meet angled sections that follow the stair incline. The pale finish keeps these different shapes related, while thin black balusters and a warm handrail add a sharp foreground line without hiding most of the wall treatment.
Work out the angled sections on paper before starting the rectangular grid. Leaving the diagonal pieces until last can create cramped shapes where the stair changes direction. Keep spacing consistent where possible, and let the existing stair geometry guide any unavoidable adjustments.
IDEA 14 / 20
Make Larger Wood Panels the Pattern
 SaveSupport Non AI Creator
Image credit: Peter Krupenye Photography / Carol Kurth Architecture and Marie Aiello Design Studio
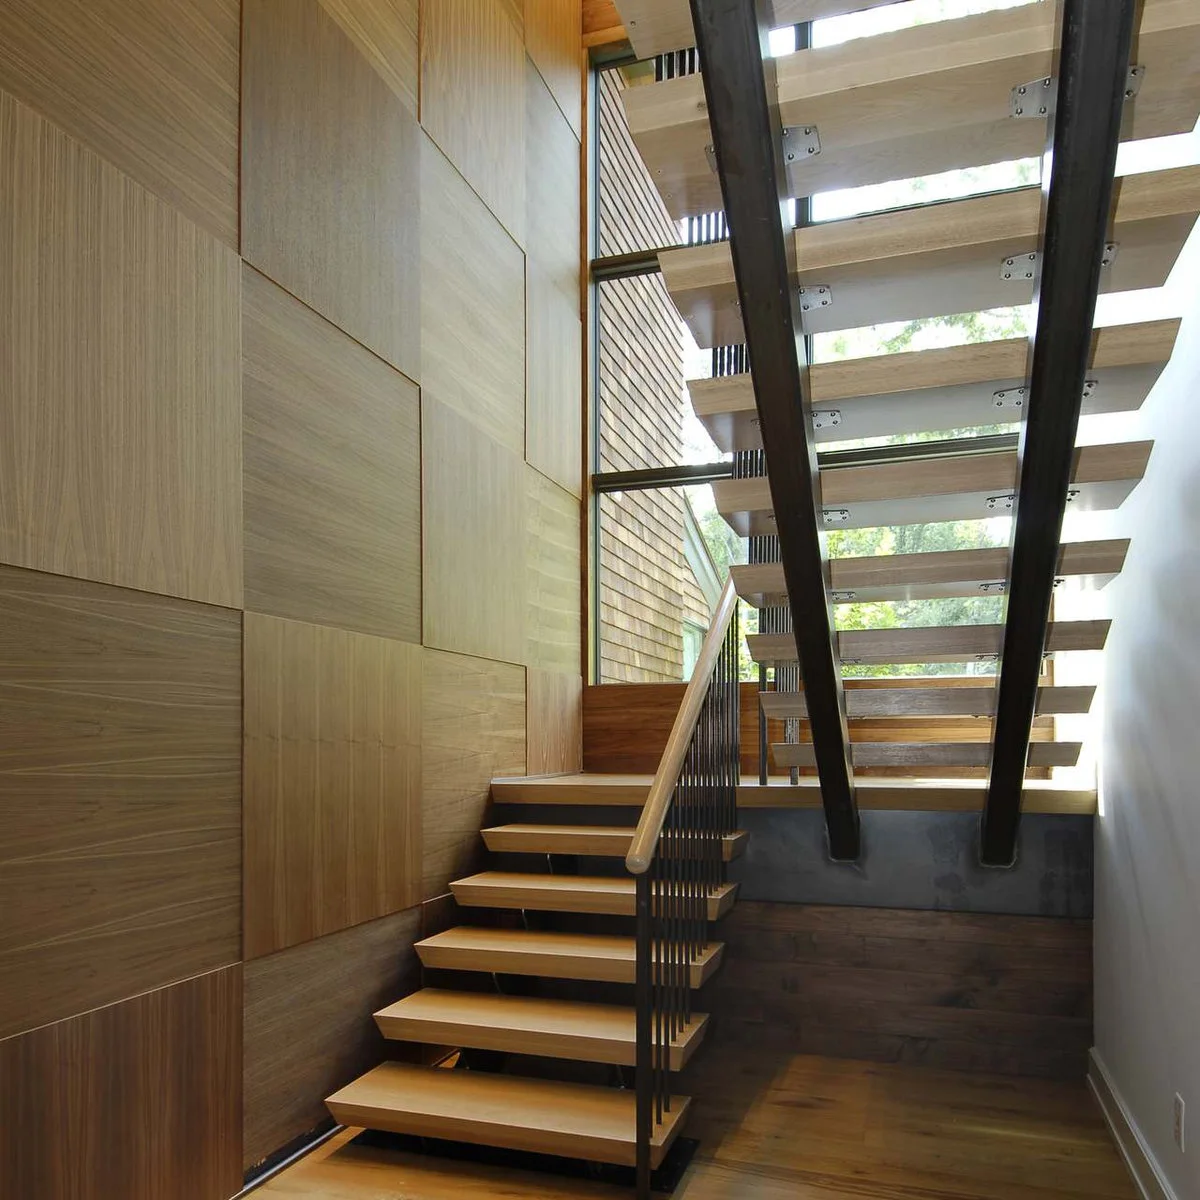
Large wood panels alternate their grain direction, creating a geometric pattern across the wall behind the open stair. The broad rectangles feel different from narrow horizontal boards: each panel becomes a visible part of the arrangement rather than blending into one continuous stripe.
Study panel orientation and seam placement together before ordering a finish. A full wall drawing helps show whether the pattern will meet the landing neatly. For a connected room, borrow the restraint of living room accent wall ideas and keep nearby textiles or artwork from competing with the panel grid.
IDEA 15 / 20
Carry Molding Around a Curved Wall
 SaveSupport Non AI Creator
Image credit: Brantley Photography / Turtle Beach Construction & Remodeling
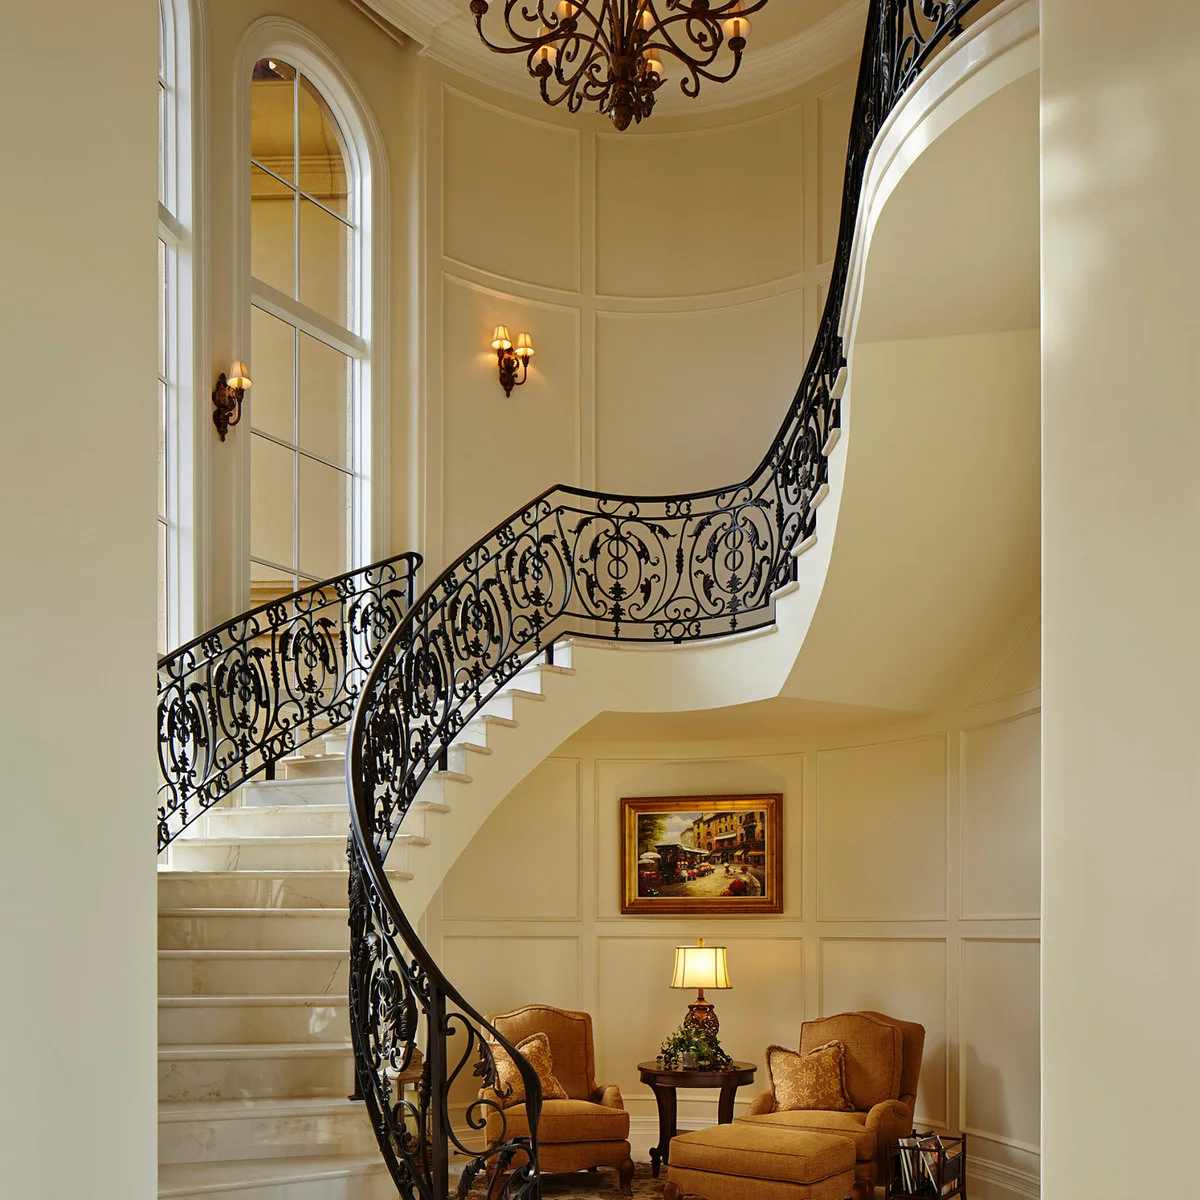
Pale molding follows the tall curved stair wall, adding a measured pattern behind the more decorative metal railing. Keeping the trim close in color to its background allows the railing to remain the stronger outline while the wall still has depth.
Curved surfaces need careful planning at the corners and joints, so discuss the actual wall shape with the installer before selecting trim. Choose the profile alongside the railing rather than in isolation. Simpler molding can give an ornate stair a calmer setting without leaving the wall bare.
PART 04
Landings and Smaller Surfaces
IDEA 16 / 20
Give the Landing a Brick Backdrop
 SaveSupport Non AI Creator
Image credit: Project: Solitude Homes (via Houzz)
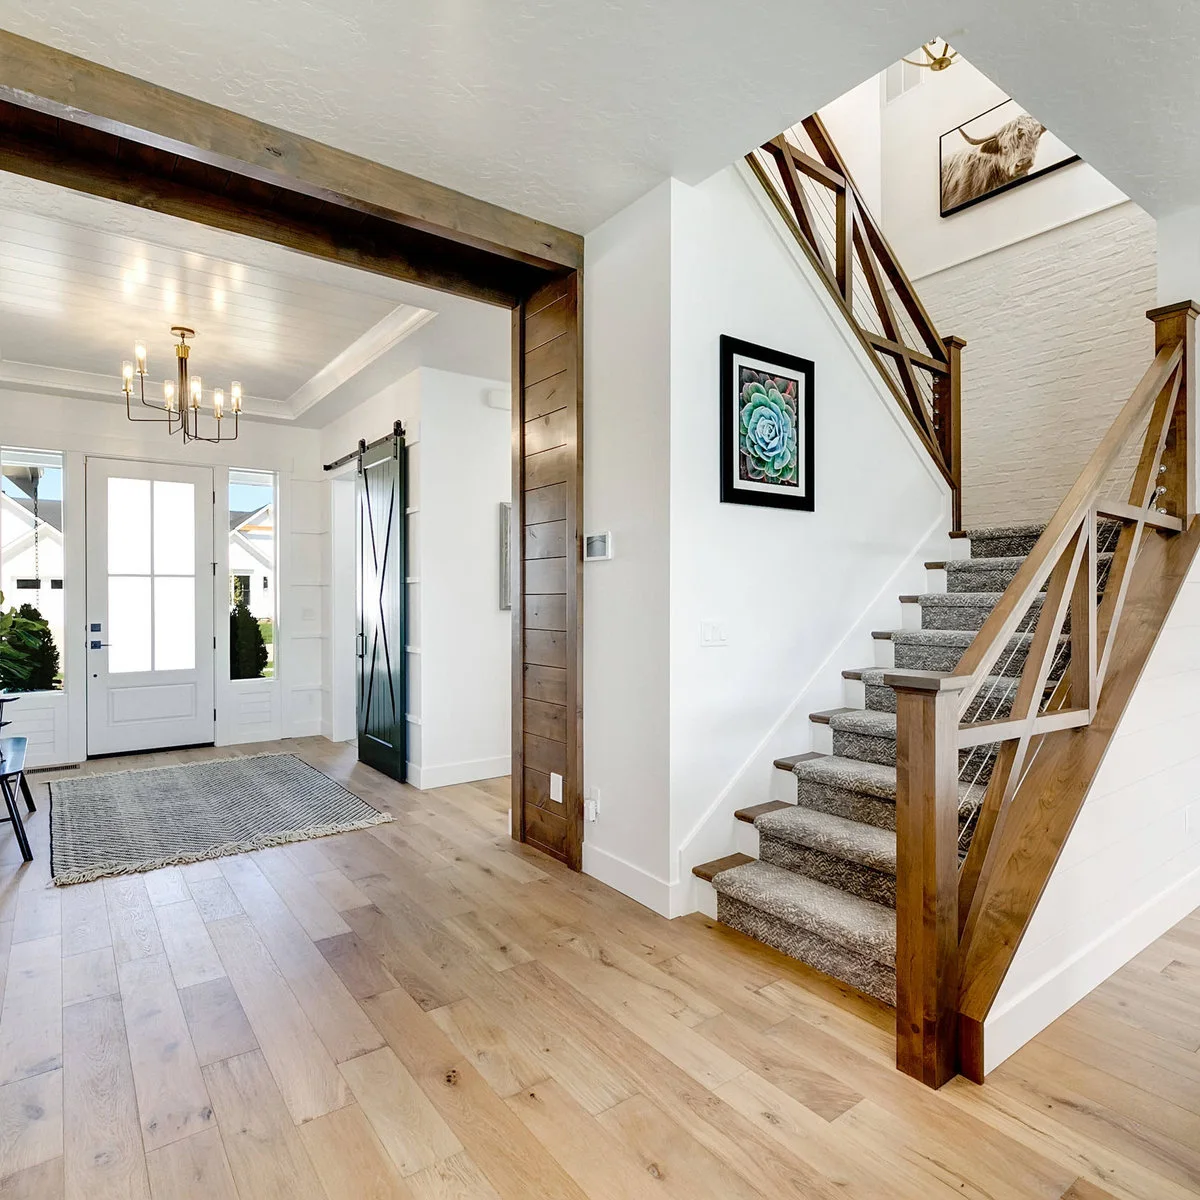
White brick adds a textured backdrop at the upper landing, with framed artwork placed at different heights along the route. The pale brick relates to the surrounding walls, while its small repeating joints give this part of the stairway a separate character.
Treat the landing as a distinct wall area when there is no uninterrupted surface along the whole flight. Check how the texture meets adjoining trim before choosing the finish. Keep artwork spacing generous so both the frames and the brick pattern remain readable from below.
IDEA 17 / 20
Fit Graphic Artwork Behind Open Treads
 SaveSupport Non AI Creator
Image credit: Project: Hillstar Construction Services (via Houzz)
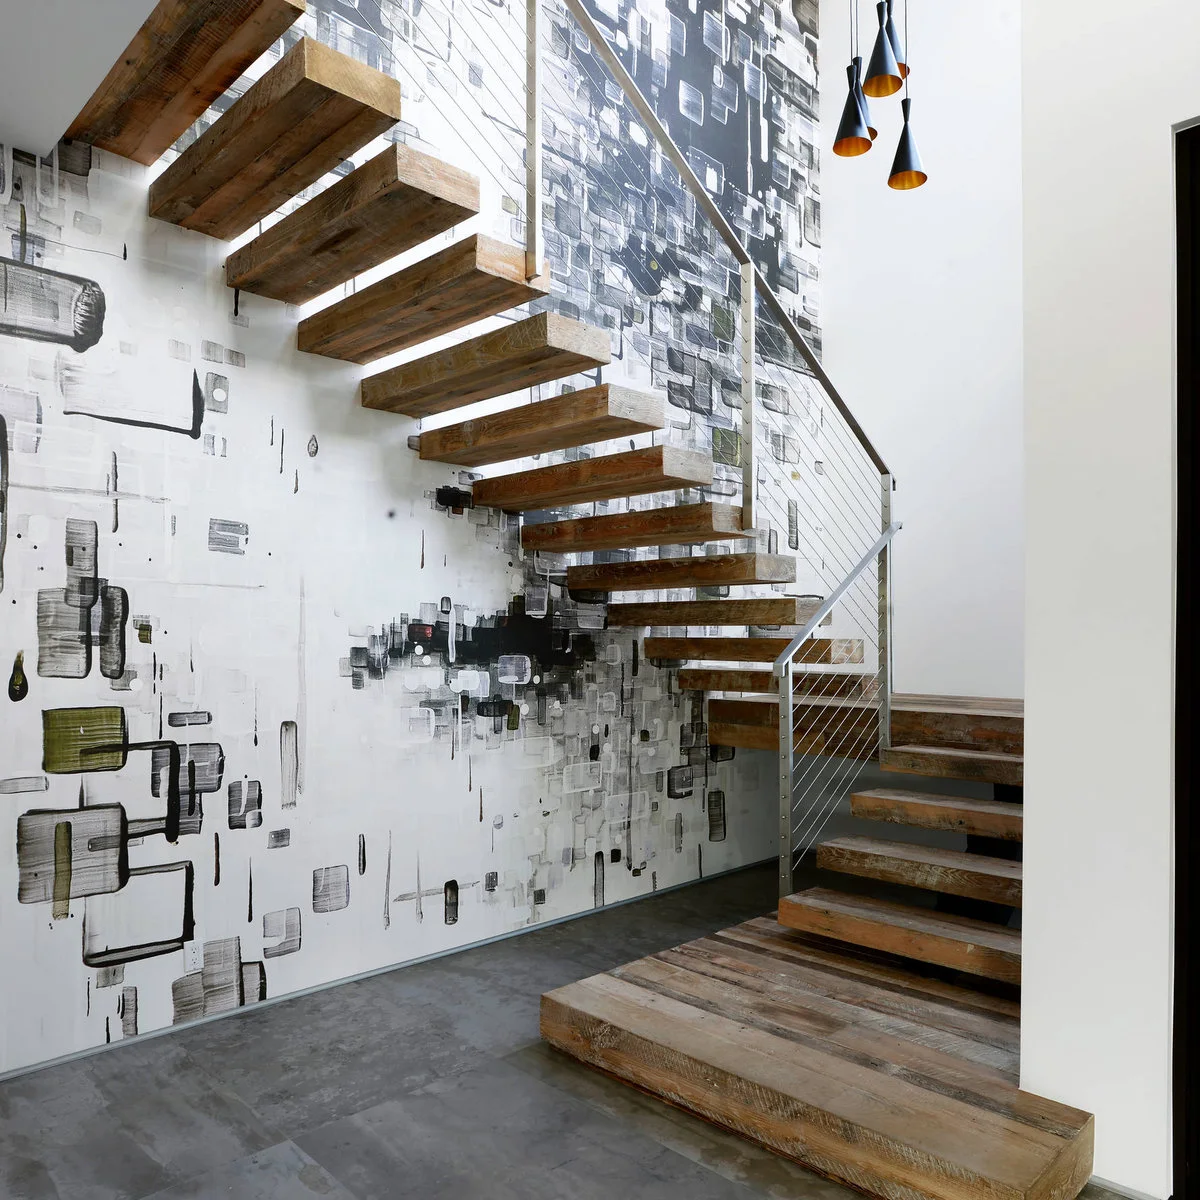
A bold black-and-gray graphic treatment fills the wall beneath the open stair, visible through the gaps between the treads. The open structure turns the image into part of the stairway view, while the mostly pale surroundings prevent the dark pattern from overwhelming the room.
Choose an image that can tolerate being partly interrupted by the stairs. Small lettering or intricate details may become frustrating when seen through the structure. Before installing a large wall graphic, check its surface requirements and map which parts will remain visible from your usual approach.
IDEA 18 / 20
Panel the Short Wall Beside the Flight
 SaveSupport Non AI Creator
Image credit: Ryan Garvin / William Guidero Planning and Design
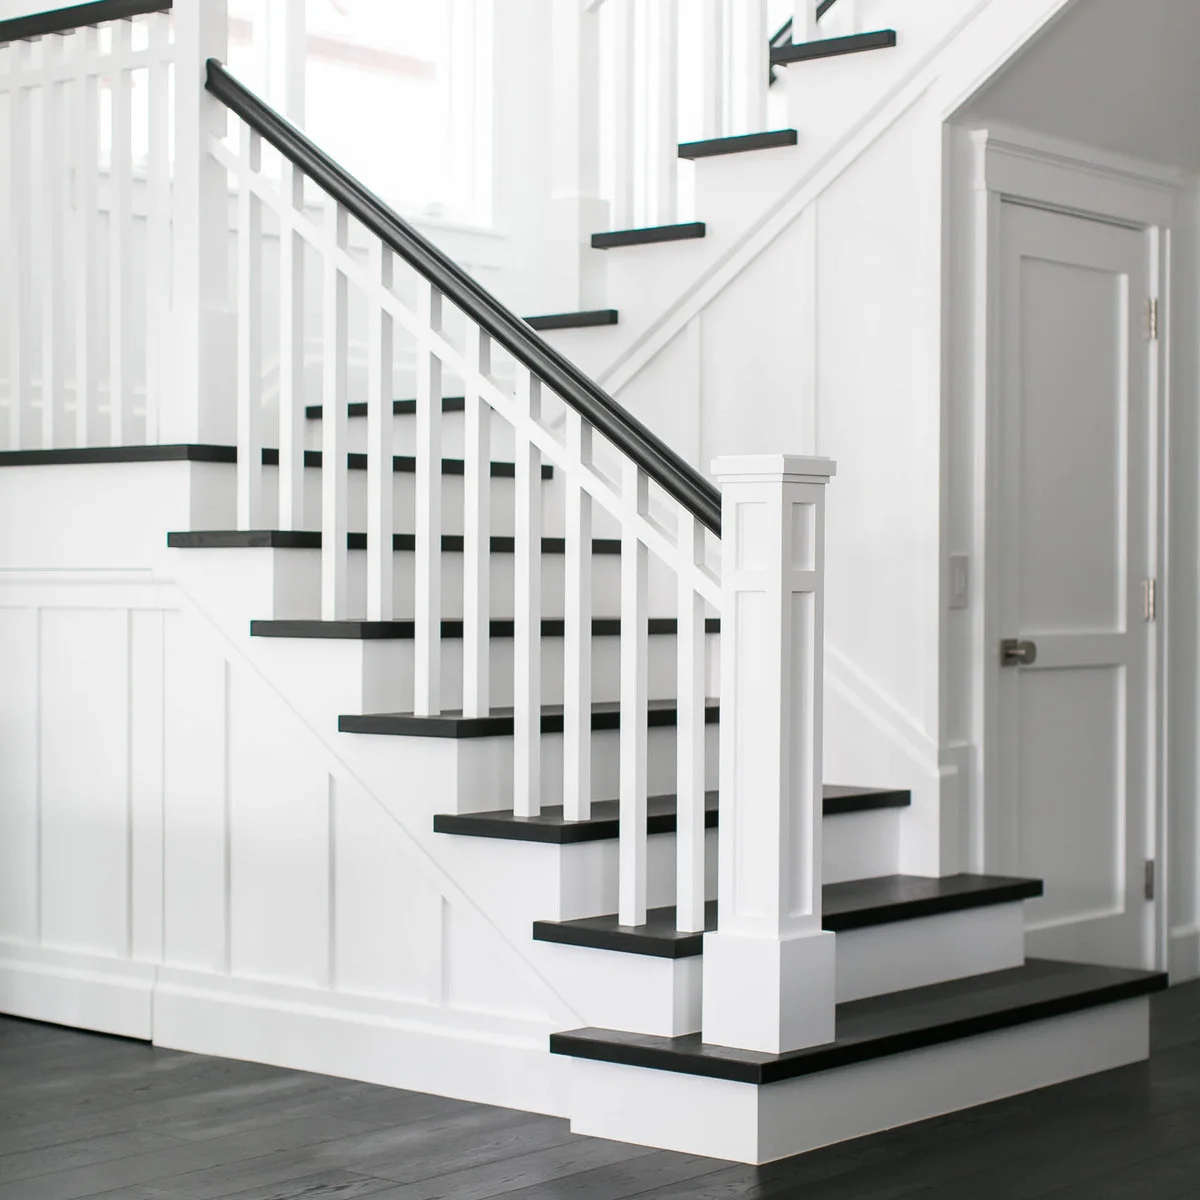
White vertical paneling gives the short stair enclosure a crisp, repeated rhythm. Because the treatment stays on the wall beside the flight, it creates interest at close range without needing a tall uninterrupted surface for oversized artwork or a full gallery.
Consider this smaller area when windows or openings occupy the main stair wall. Plan how the paneling meets the skirting, stair edge and any access doors. Keep trim projections modest beside a narrow route, and preserve the handrail as a practical feature rather than treating it as a display ledge.
IDEA 19 / 20
Use Horizontal Lines on a Narrow Enclosure
 SaveSupport Non AI Creator
Image credit: Ryann Ford / Cuppett Kilpatrick Architecture + Interior Design
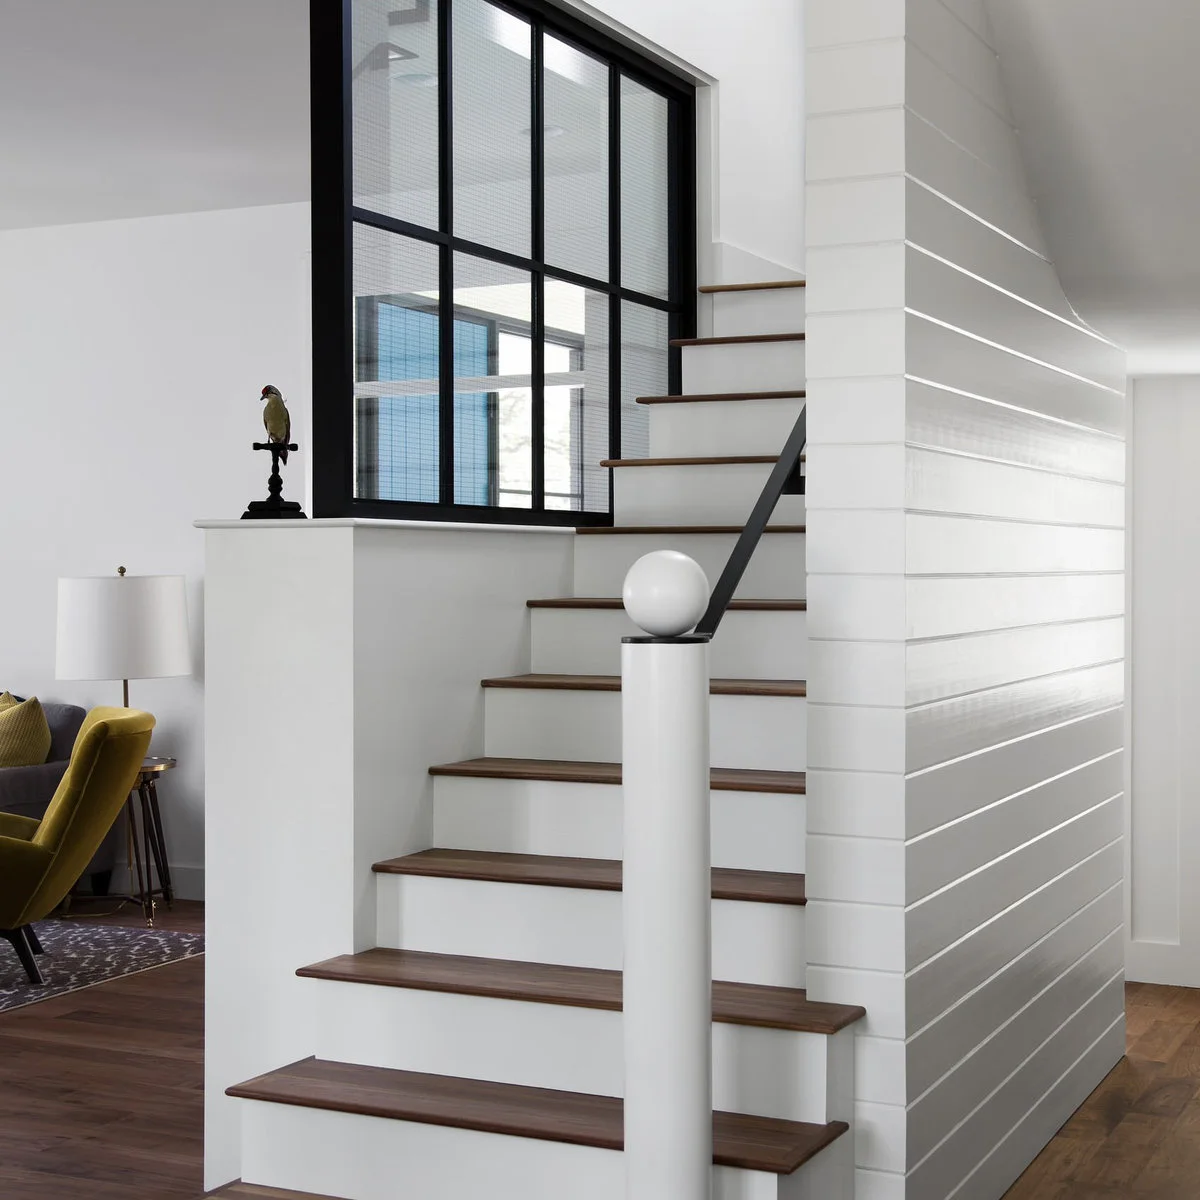
Horizontal white boards cover the narrow wall beside these wood stairs, creating a fine-lined accent opposite the black-framed interior glazing. The treatment works on a modest surface, showing that a stairway feature does not have to occupy the tallest wall in the house.
Continue the lines carefully around any visible corner so the small wall looks finished from the adjoining room. Compare board spacing with nearby window or door divisions before committing. A consistent pale finish helps the texture remain subtle where several architectural lines already meet.
IDEA 20 / 20
Add Stripes Above the Lower Paneling
 SaveSupport Non AI Creator
Image credit: Project: Brookes + Hill Custom Builders (via Houzz)
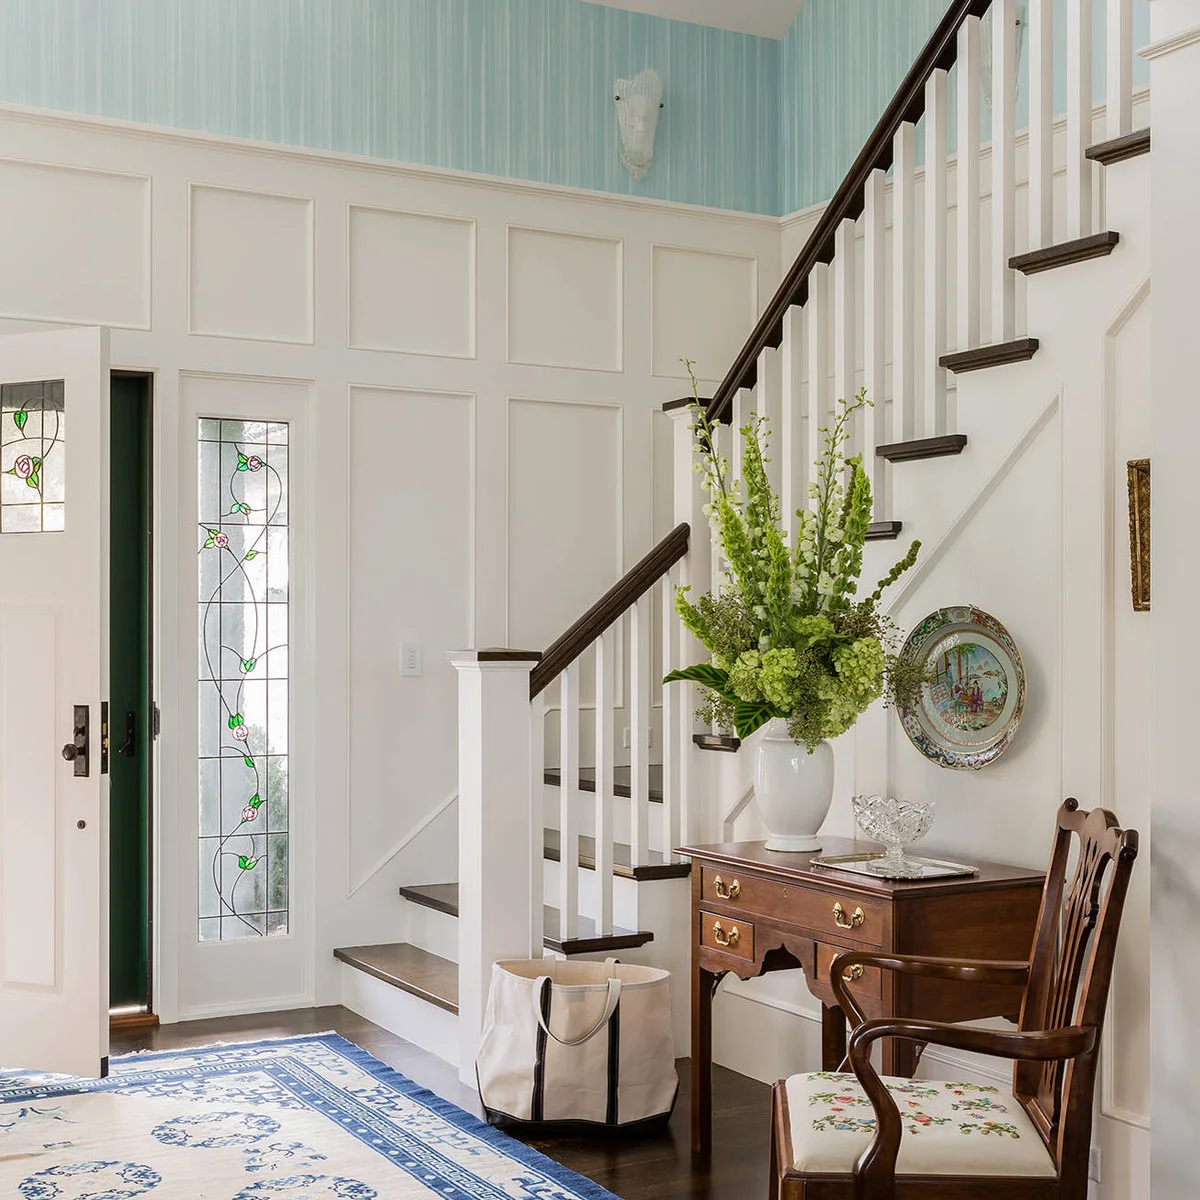
Pale blue stripes occupy the upper wall above white paneling, adding color without filling every surface with pattern. The dark handrail and wood furniture give the stair entrance definition, while the striped area keeps the eye moving upward toward the taller part of the hall.
Try a full wallpaper sample beside the existing trim before choosing stripe width. Vertical lines make uneven edges easy to notice, so plan the starting point and difficult corners with care. Keep the lower wall simpler if you want the upper pattern to remain the main accent.
BRING IT ALL TOGETHER
Choose the View Before the Finish
Start with the wall you actually notice on the way in. If the railing already has a strong pattern, a quieter painted or paneled background can be enough. A plain staircase can carry bolder artwork or a more varied texture.
Plan installation and future cleaning before choosing anything high above the steps. Keep the walking route and handrail usable, and arrange professional access for areas you cannot reach safely. A wall you can maintain will remain more appealing than a dramatic finish that is difficult to care for.