A guest bedroom can be a useful sewing room between visits, provided it is easy to change back. Start with the bed in its sleeping position, then plan the work surface, machine storage and clear route to the door. A room that works only with the bed folded away needs a reliable place for everything displaced when guests arrive.
These photographs include complete room arrangements and useful storage details from documented shared sewing and guest rooms. Several belong to the same real room, showing different tasks rather than suggesting each photograph is a separate house. Choose the changes that solve your own changeover problems; not every spare room needs fitted furniture.
PART 01
Plan the Sleeping Space First
IDEA 01 / 18
Put a Daybed Beside the Sewing Counter
 SaveSupport Non AI Creator
Image credit: Project: Wendy Terrado, Professional Organizer (via Houzz)
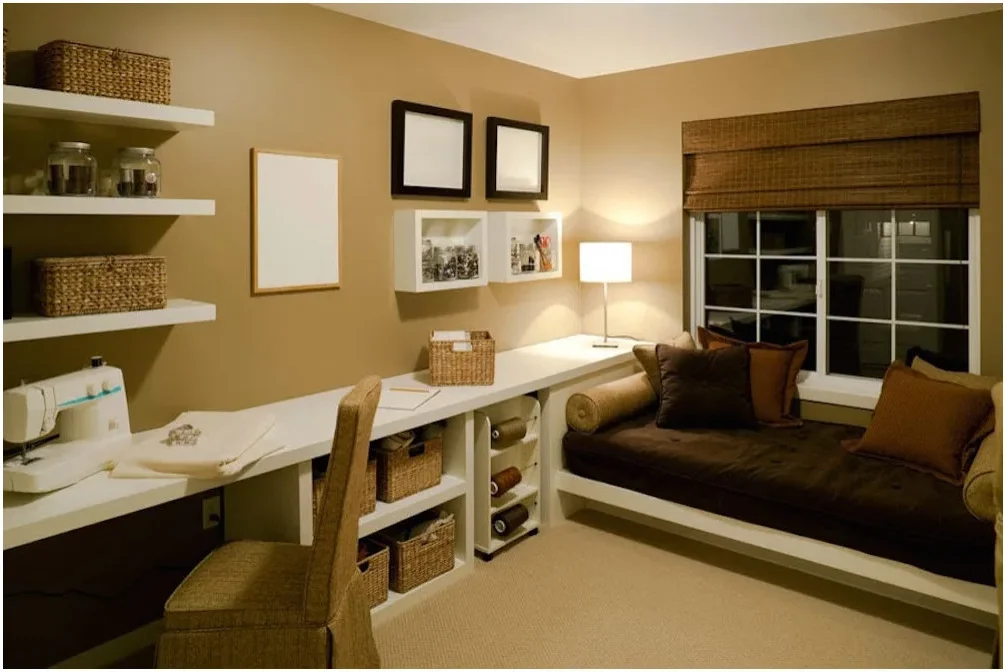
The sewing counter follows one wall, leaving the daybed at the window end of the room. Small baskets occupy the cubbies below the worktop, while shelves and jars keep supplies above it. The dark daybed cushion gives the sleeping corner a clear outline against the pale furniture.
Measure the usable sleeping surface rather than assuming every built-in bench is a guest bed. Keep the machine chair outside the route to the daybed and leave access to the window covering. Use secure containers for sharp tools, especially where guests will pass close to the work surface.
IDEA 02 / 18
Use a Daybed with Storage Below
 SaveSupport Non AI Creator
Image credit: Cressie / Home and Geek
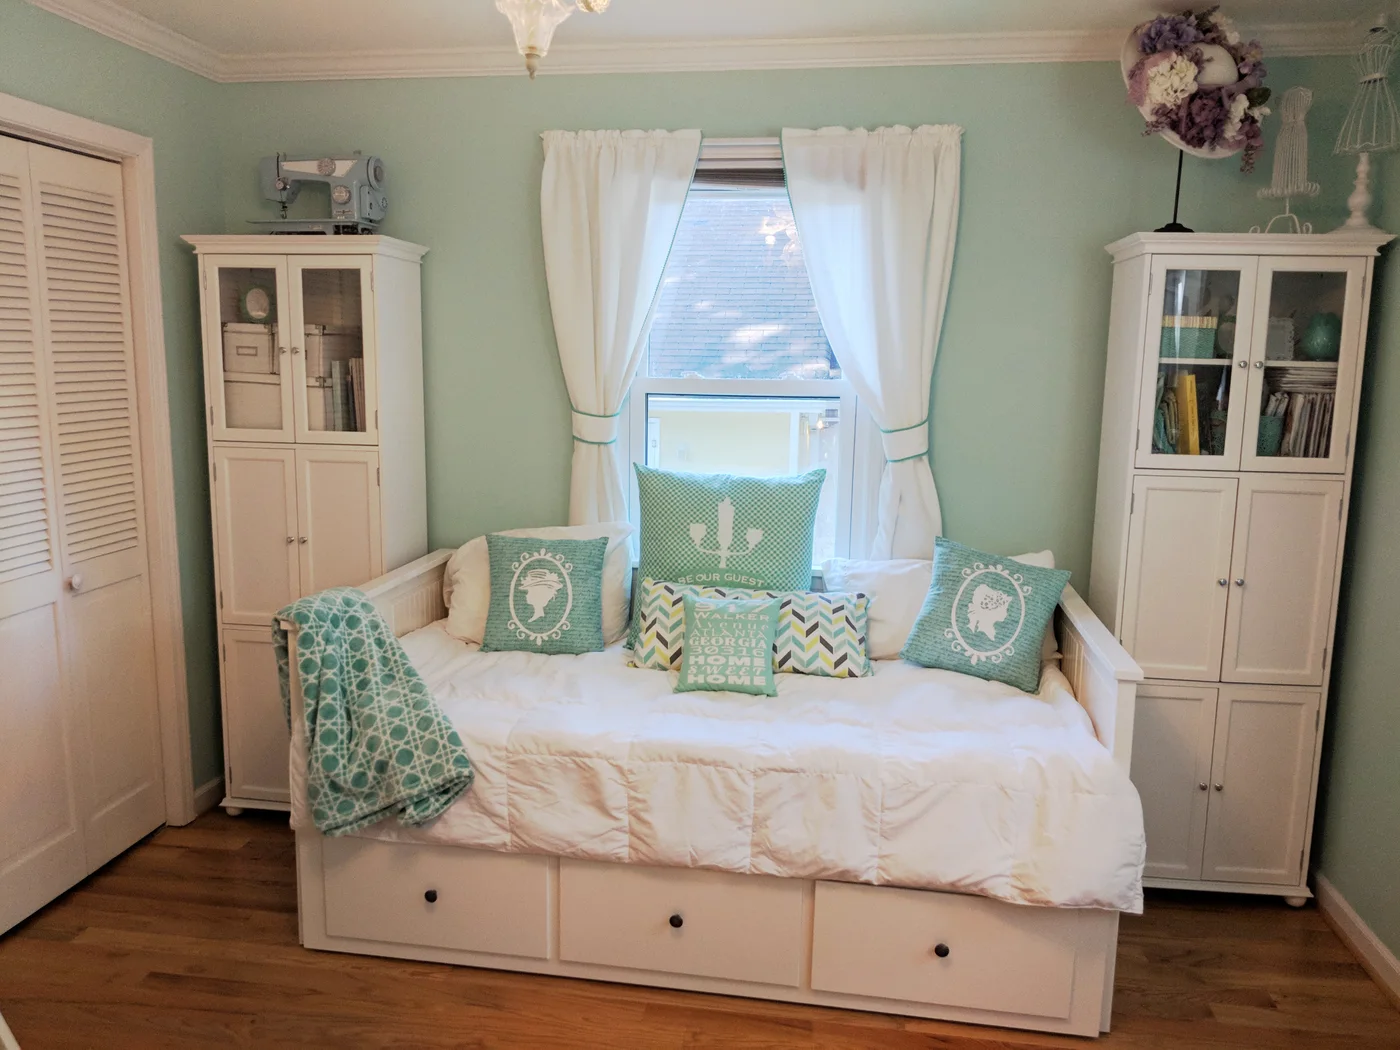
The daybed sits beneath the window with tall storage on either side. Its lower drawers provide another storage position without a separate chest in the middle of the room. White bedding and mint-colored cushions connect the sleeping area with the walls while keeping the bed itself easy to identify.
Compare cozy guest bedroom ideas before filling every cabinet with sewing supplies. Reserve a drawer or shelf for visitors and check that the bed’s full sleeping arrangement can open between the surrounding furniture. Put the extra cushions in a planned location rather than leaving them across the sewing table at night.
IDEA 03 / 18
Leave the Wall Bed’s Opening Area Clear
 SaveSupport Non AI Creator
Image credit: Project: Nicole Strange Interiors (via Houzz)
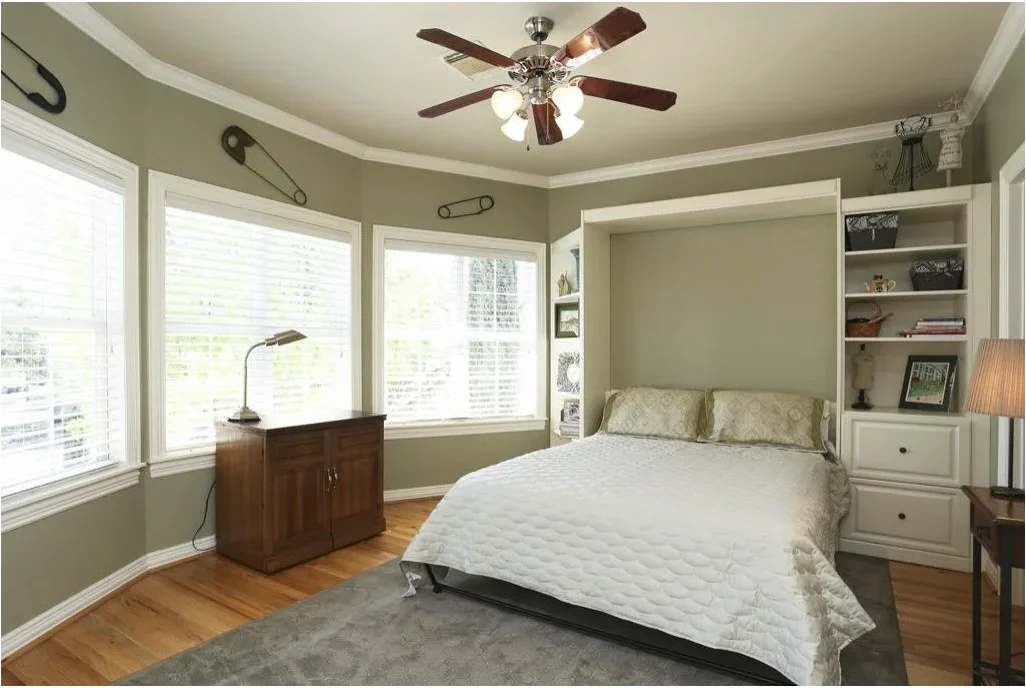
The open bed shows the floor area this shared room needs in guest mode. Shelves and drawers stay beside the mattress, while the brown sewing cabinet is closed beneath the windows. The arrangement makes a useful distinction between equipment that can be put away and furniture that must remain accessible.
Mark the bed’s complete opening footprint before placing a sewing table, chair or rolling cart nearby. Have a wall bed installed according to its instructions and the room’s structure. Keep the approach clear when the bed is open, including access to lights, storage and the nearest door.
IDEA 04 / 18
Combine Bedside Storage with the Guest Bed
 SaveSupport Non AI Creator
Image credit: Mark Lohman / This Old House
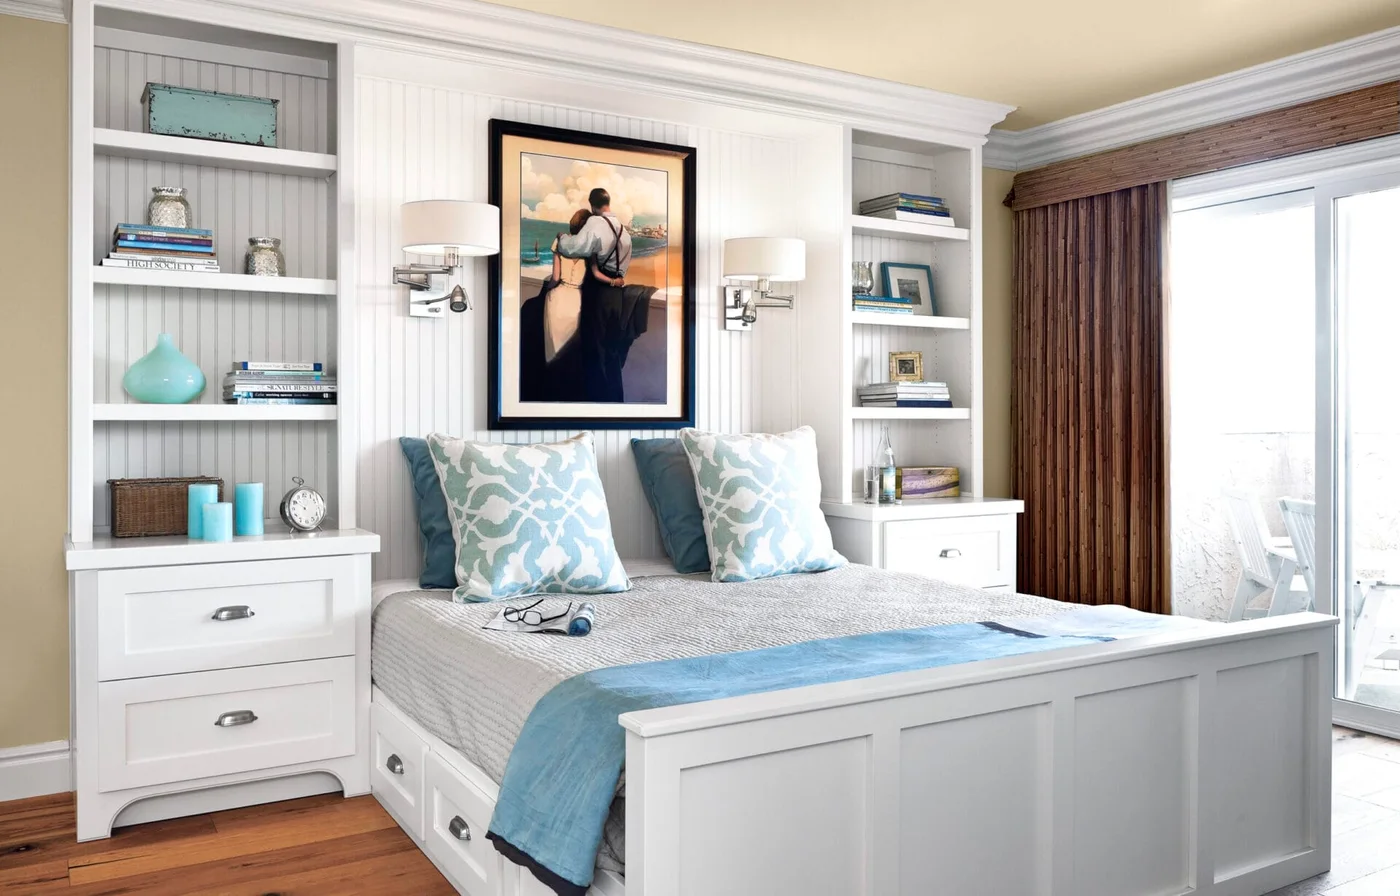
The bed and its surrounding storage form one coordinated wall, keeping the sleeping space distinct from the room’s other work area. Bedside drawers offer closed storage below the open shelves. Two wall lamps leave the tops available for a clock, a book or other small guest items.
Reserve the nearest drawers and reachable shelves for visitors rather than treating them all as sewing storage. Check that the lights can be operated comfortably from the bed. Built-in furniture needs planning around the actual mattress, outlets and access requirements; the photograph alone does not establish suitable dimensions.
IDEA 05 / 18
Keep a Sofa Bed Separate from Supply Shelving
 SaveSupport Non AI Creator
Image credit: Jenny Rushmore / Cashmerette
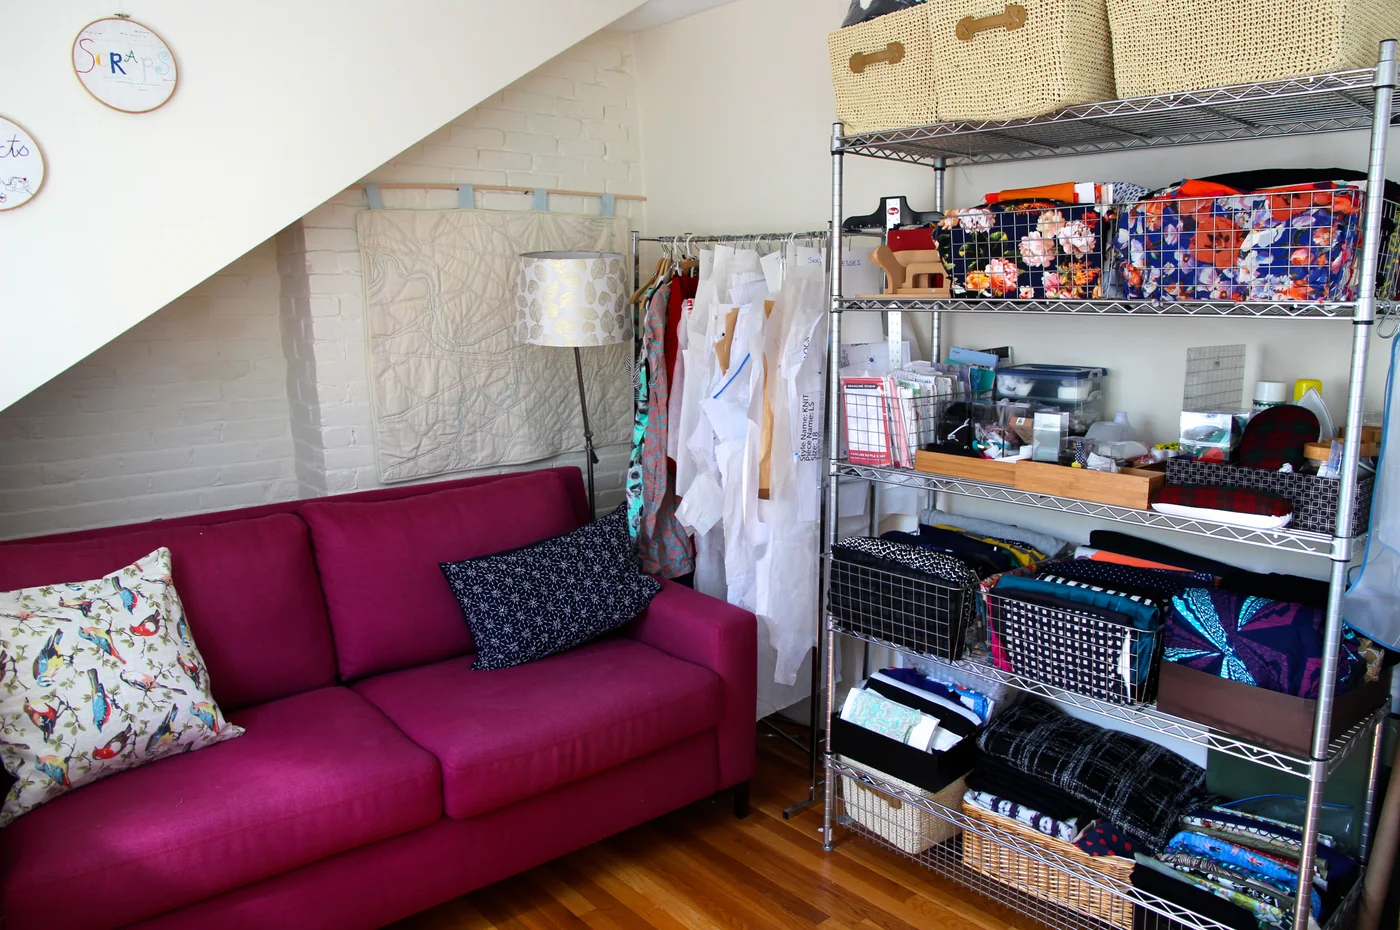
The bright sofa bed gives the room a clear sitting and sleeping position beside the supply shelves. Wire baskets separate fabrics into smaller groups, while taller containers sit above. A clothes rail occupies the gap behind the sofa, showing how much one shared room can be asked to hold.
Check the sofa bed fully opened before fixing the surrounding storage arrangement. Keep the lower shelves and rail from blocking the mattress or the route around it. Remove hanging patterns and loose supplies from the sleeping approach, and secure tall shelving according to its installation instructions.
PART 02
Give Sewing a Useful Work Surface
IDEA 06 / 18
Give Cutting a Surface of Its Own
 SaveSupport Non AI Creator
Image credit: Cressie / Home and Geek
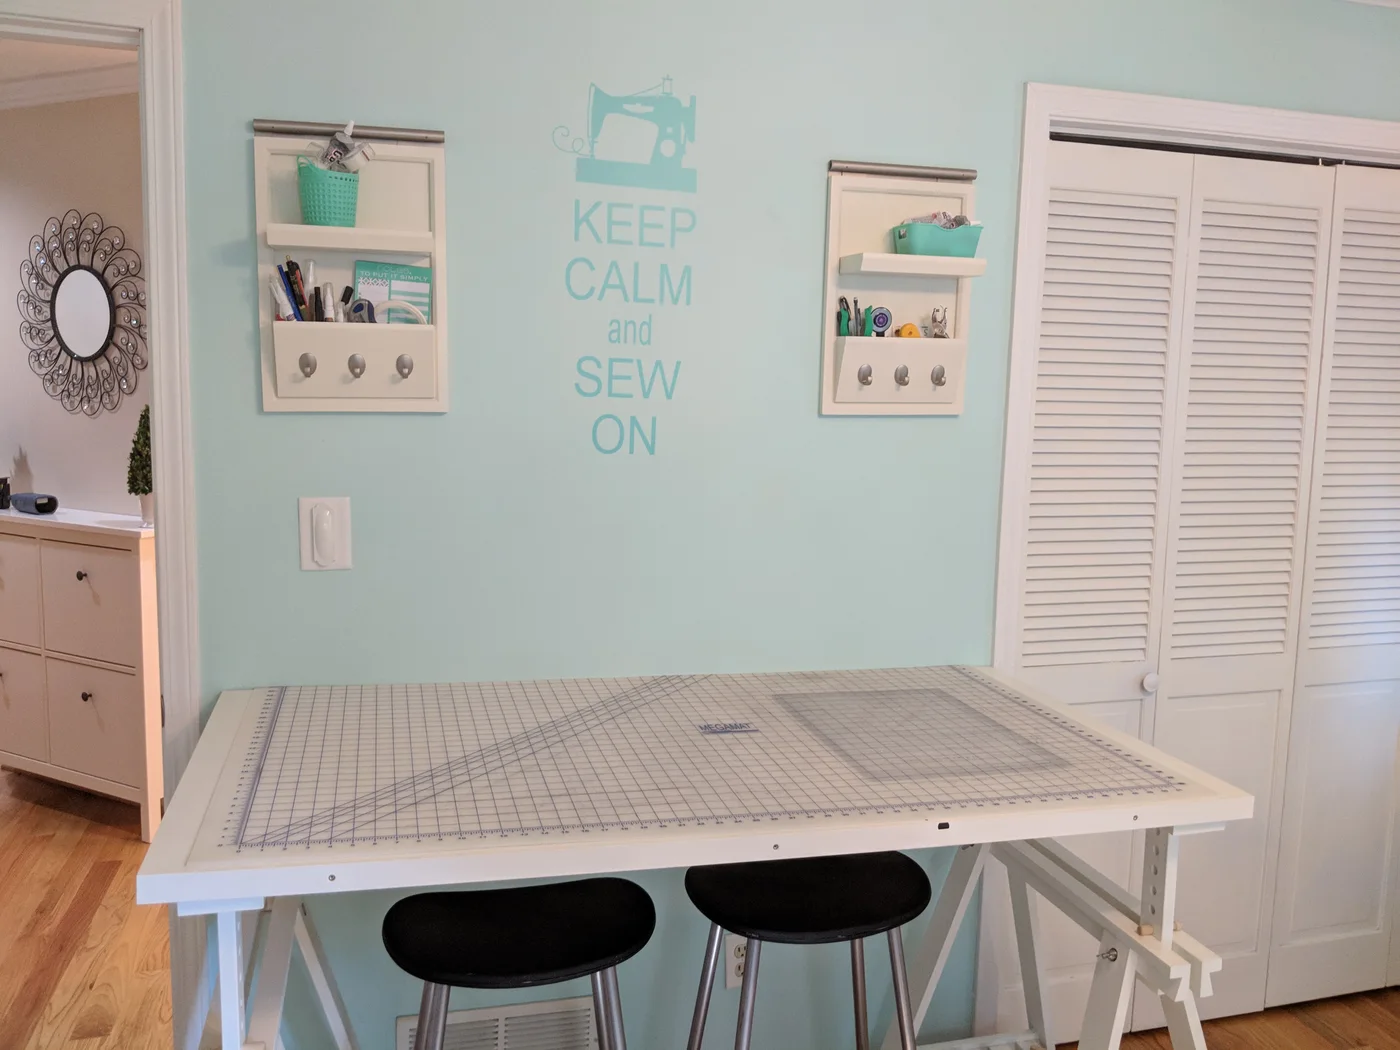
The large cutting mat covers a separate table rather than the guest bed. Small wall organizers hold tools above the work area, leaving the tabletop relatively clear. The nearby closet doors remain part of the room’s circulation, so the table has to work around more than the cutting task alone.
Test the working height with your usual cutting method before choosing stools or table supports. Keep the closet doors usable and plan where the mat and tools will go when guests arrive. Store rotary cutters and scissors securely after use instead of leaving them on an apparently clear surface.
IDEA 07 / 18
Close the Machine Area Without Losing the Desk
 SaveSupport Non AI Creator
Image credit: Cressie / Home and Geek
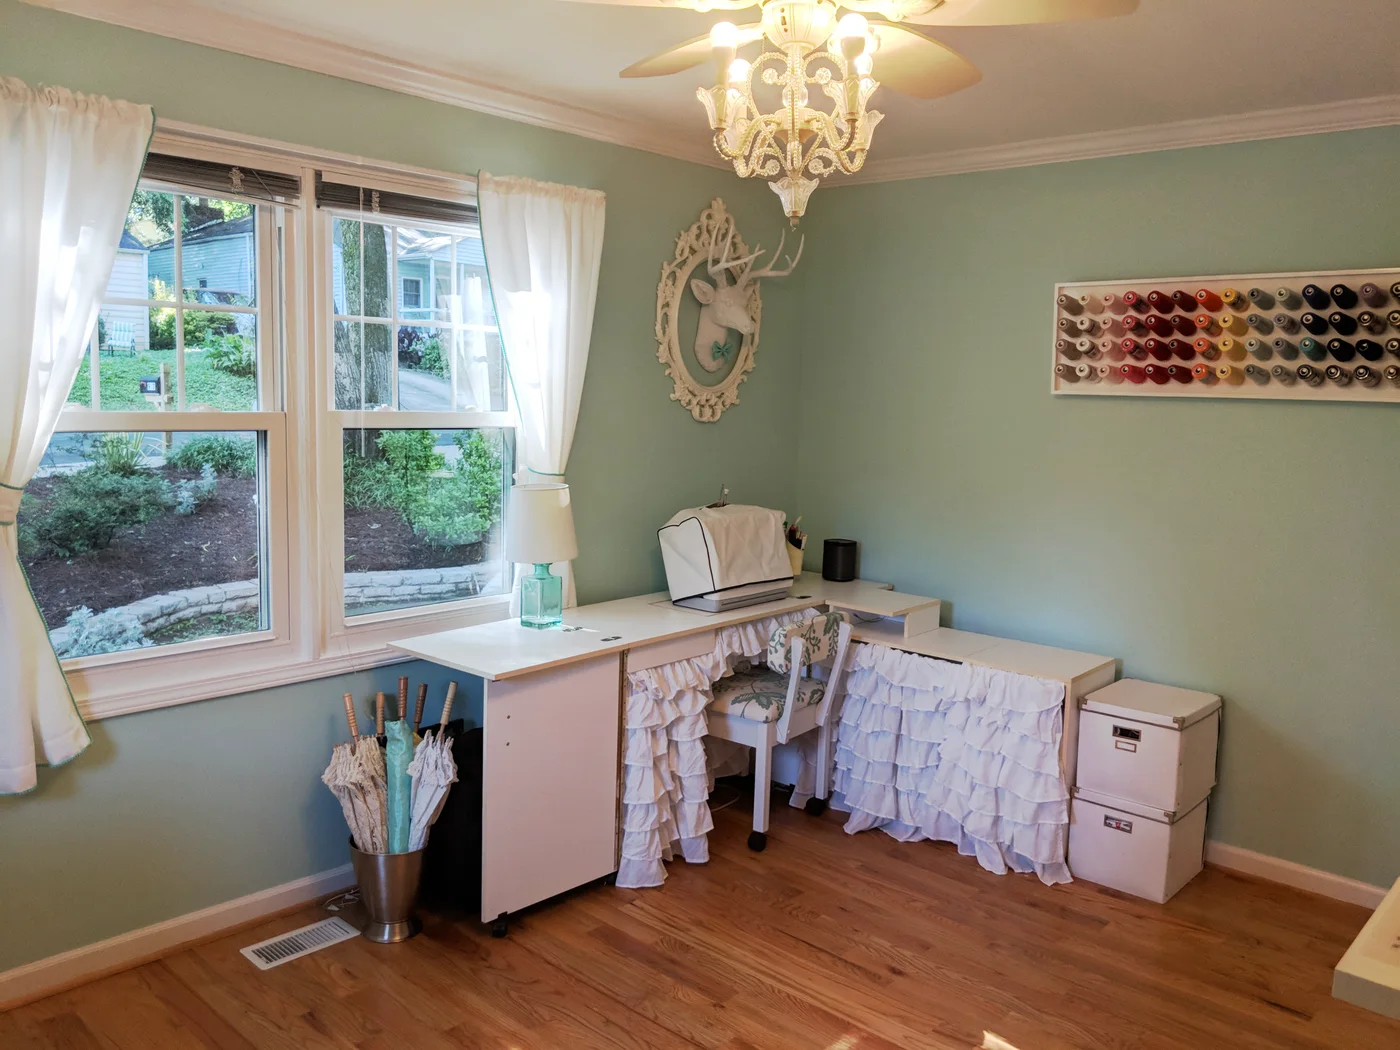
The covered machine keeps a recognizable place on the corner worktop, while the fabric skirt conceals the space beneath. A thread rack occupies the side wall and a small lamp sits near the window. Pale finishes connect the sewing area with the rest of the mint-colored guest room.
A fabric skirt can hide visual clutter, but it does not secure tools or protect equipment from curious hands. Use closed storage for sharp items and follow the machine’s instructions when putting it away. Keep the chair, cabinet movement and window coverings from interfering with one another.
IDEA 08 / 18
Use a Rolling Drawer Unit for Changeover
 SaveSupport Non AI Creator
Image credit: House Vintage
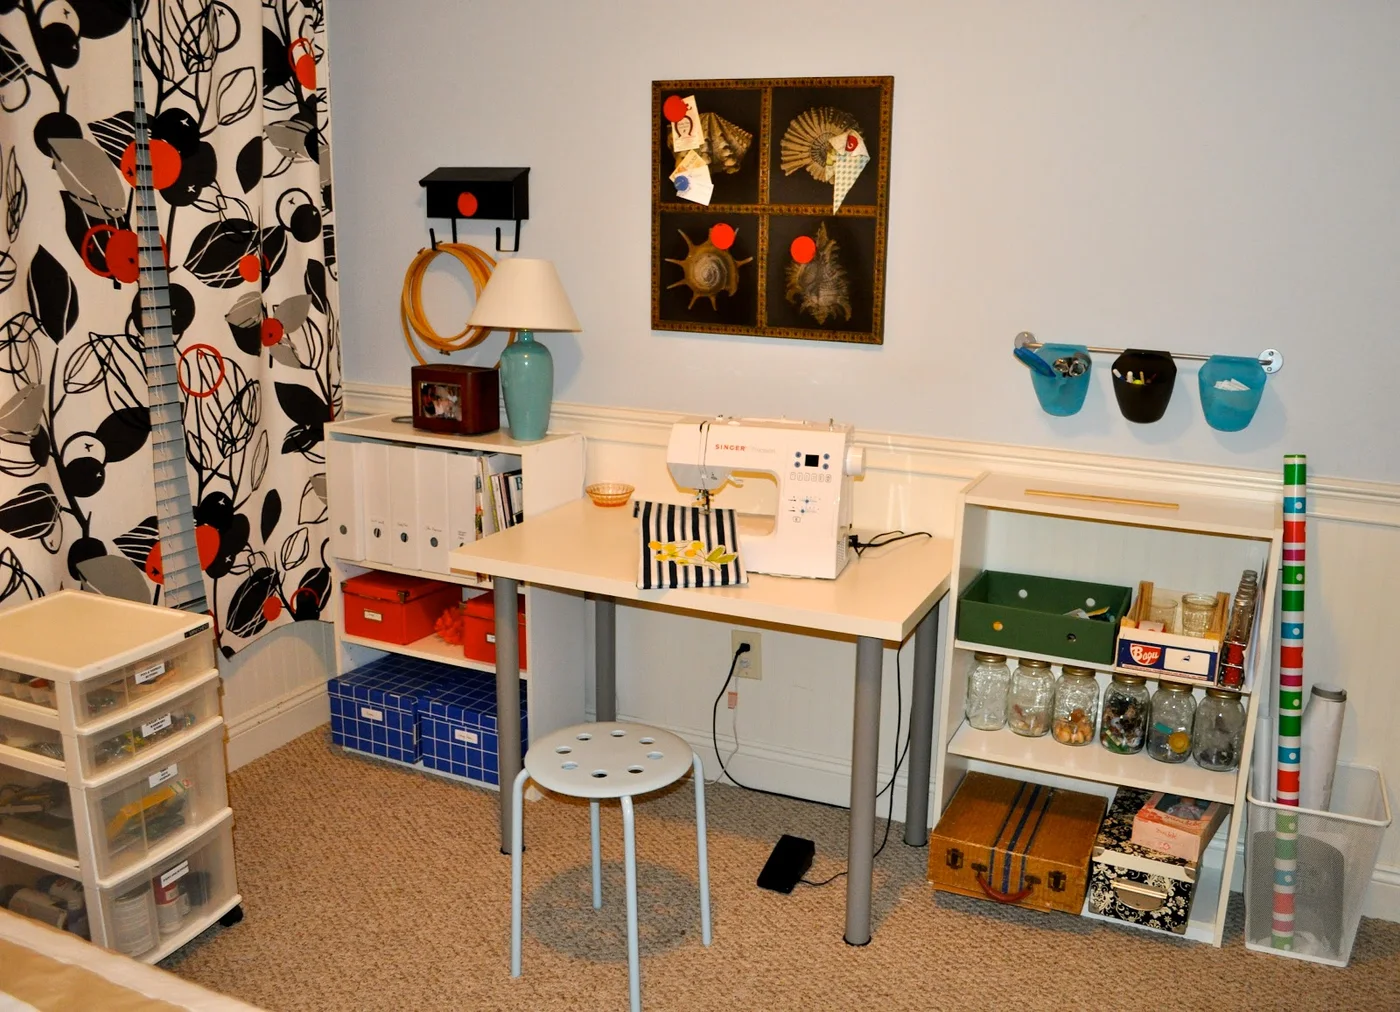
The rolling drawer unit brings supplies beside the sewing chair and can move when the room changes use. Small shelves flank the desk, while wall-hung cups hold a limited number of tools above it. The compact arrangement leaves the machine as the main object on the work surface.
Choose a stable drawer unit that can move without its contents shifting into the route. Give it a specific parking position for guest visits, rather than assuming it will fit beneath the desk. Put away the foot pedal and leads as well as the machine before turning the surface over to visitors.
IDEA 09 / 18
Keep Two Machines on One Compact Worktop
 SaveSupport Non AI Creator
Image credit: Tilly and the Buttons
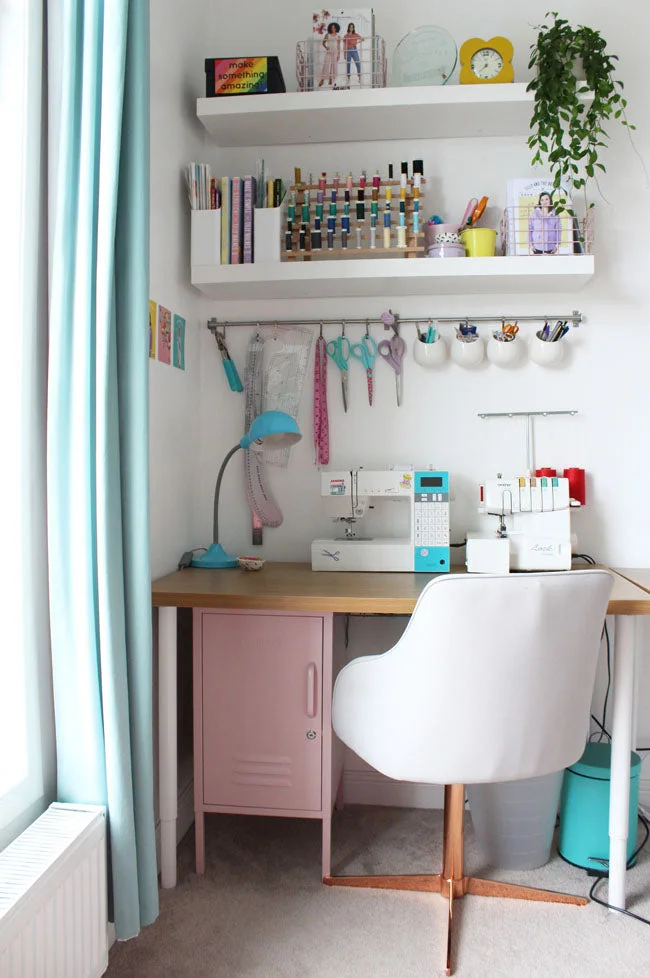
The two machines share a single worktop, with tools and supplies arranged above rather than spread across a second table. The pink cabinet gives the lower area some closed storage. A task lamp sits beside the sewing machine, while the chair can tuck toward the clear central knee space.
Compare small home office ideas for a comfortable chair and useful work-surface layout, then check the extra space your sewing projects need. Leave room to handle fabric without catching it on the neighboring machine. Keep sharp tools secured during guest stays, even if open rails are convenient during work.
IDEA 10 / 18
Fit the Machine to a Modest Desk
 SaveSupport Non AI Creator
Image credit: Angela Pingel
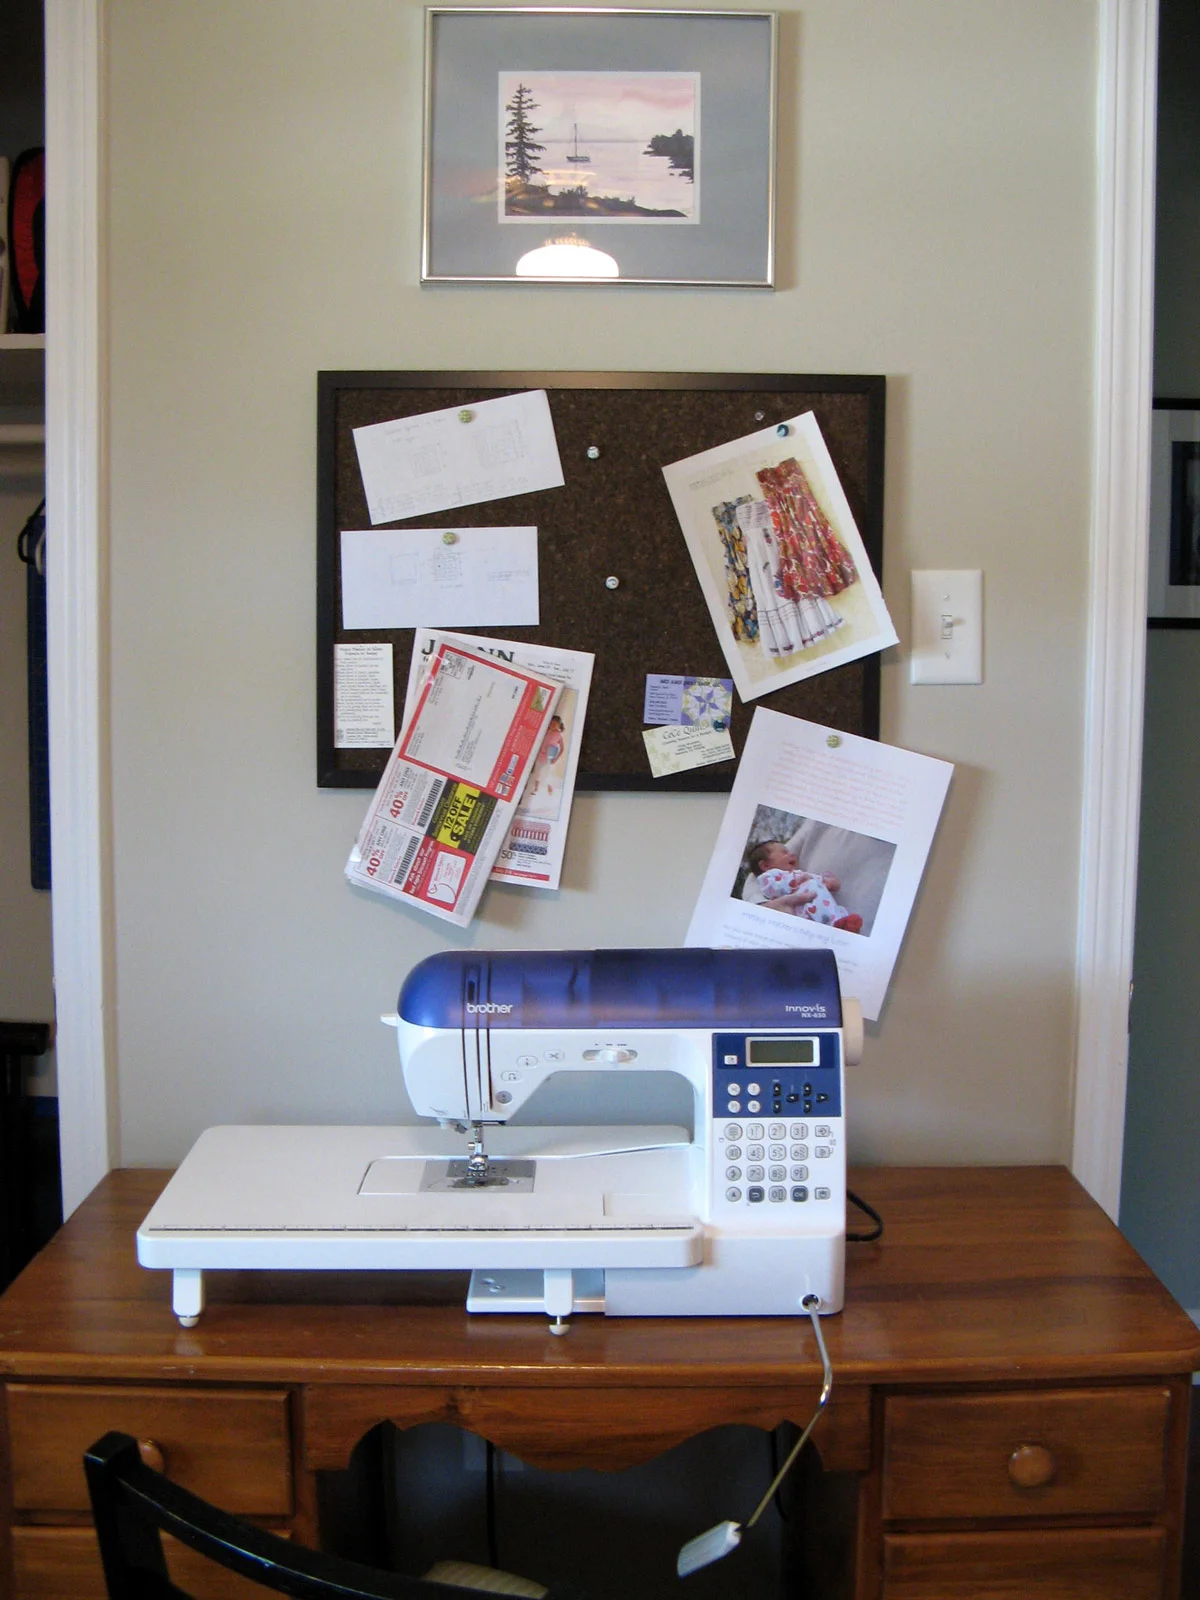
The machine and its extension surface occupy most of the modest desktop, leaving a clear example of the limits of a small sewing station. The noticeboard keeps paper references above the work rather than beneath it. Drawers on either side offer storage without a separate unit beside the chair.
Check the desk’s stability with the machine running and compare its height with your seated working position. Larger projects may need another temporary surface rather than more accessories on the same desk. Before guests use it, clear pins and loose thread, remove trailing leads and store the machine safely.
PART 03
Store Supplies Without Taking Over
IDEA 11 / 18
Separate Fabric into Open Cubes
 SaveSupport Non AI Creator
Image credit: Tilly and the Buttons
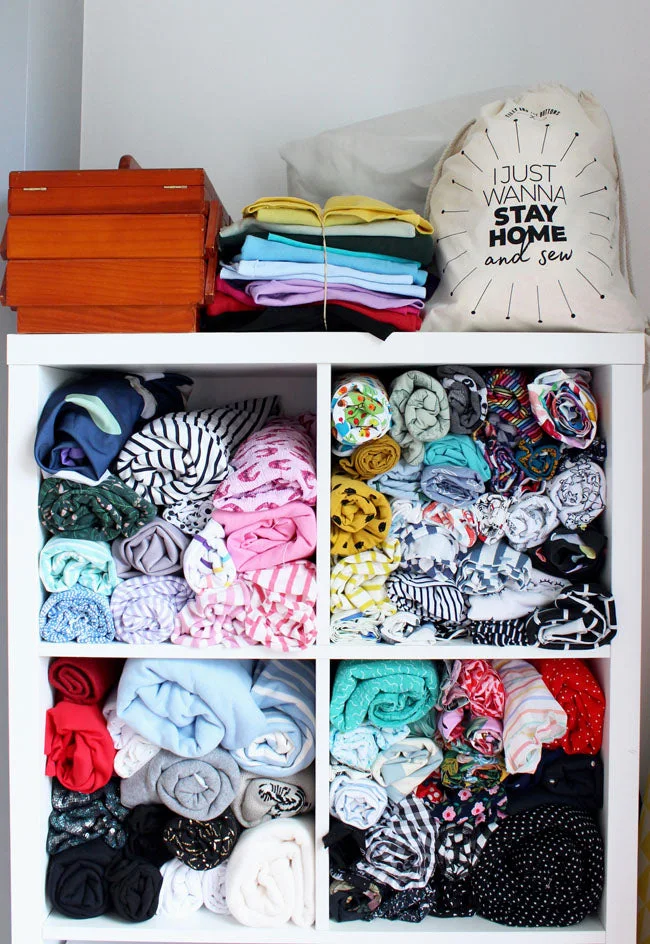
The open cubes divide the fabric into visible groups instead of one deep pile. Rolled pieces show their colors and patterns at the front, while a sewing box occupies the top surface. This storage detail comes from a shared sewing room that also accommodates guests.
Choose groups you can maintain rather than sorting only for appearance. Avoid packing each cube so tightly that removing one piece pulls out the rest. Keep some guest storage separate, and leave the cabinet top available if it is also the room’s most useful place for a visitor’s bag.
IDEA 12 / 18
Move Thread onto a Wall Rack
 SaveSupport Non AI Creator
Image credit: Jenny Rushmore / Cashmerette
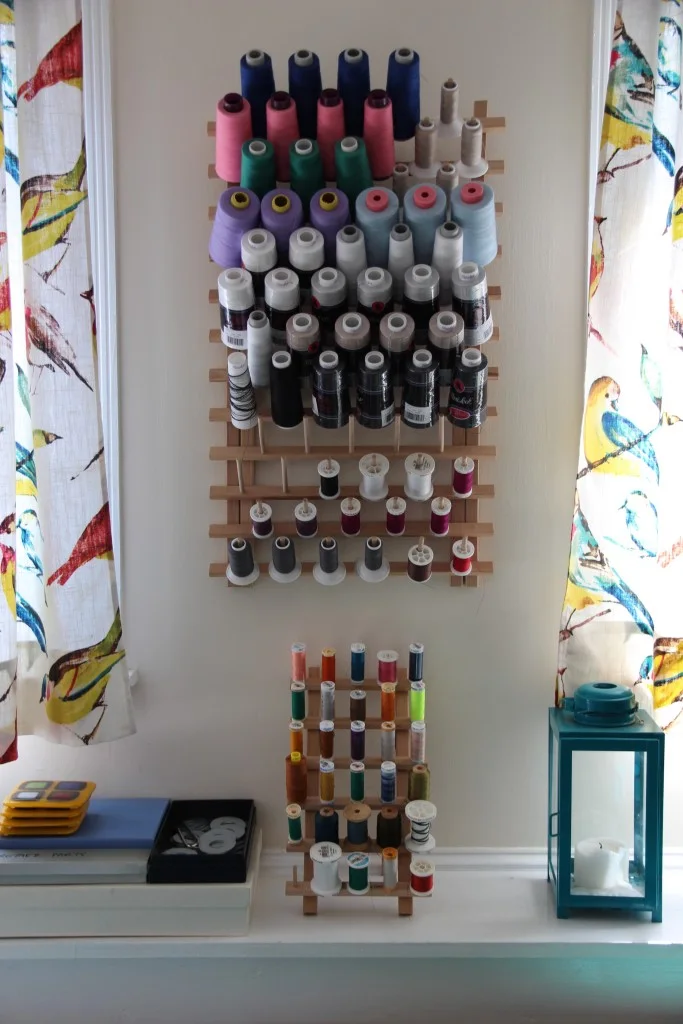
The wall rack separates the larger cones into rows, leaving the surface below for smaller spools and a few other items. Their colors are easy to compare without opening several boxes. The rack uses the narrow wall strip between windows instead of another full-height piece of storage.
Check the rack’s fixing and loading requirements before filling it. Keep thread away from direct sunlight where possible and choose a covered container if dust is a problem. In a guest room, place the rack where passing bags and sleeves will not brush against the cones or pull loose thread.
IDEA 13 / 18
Hang Paper Patterns in Labeled Groups
 SaveSupport Non AI Creator
Image credit: Jenny Rushmore / Cashmerette
The hanging patterns remain flat enough to sort through, while category cards divide the rail into recognizable groups. Keeping them together avoids spreading paper pieces across the bed or worktop. This detail is part of a sewing room that also uses a sofa bed for visitors.
Label the groups in a way that matches how you actually find patterns, and keep small pieces with their main project. Leave a separate section for guests’ clothing if the rail is shared. Move loose paper away from the sleeping area before a visit, and avoid overloading the support.
IDEA 14 / 18
Use the Closet for Hanging Projects
 SaveSupport Non AI Creator
Image credit: Angela Pingel
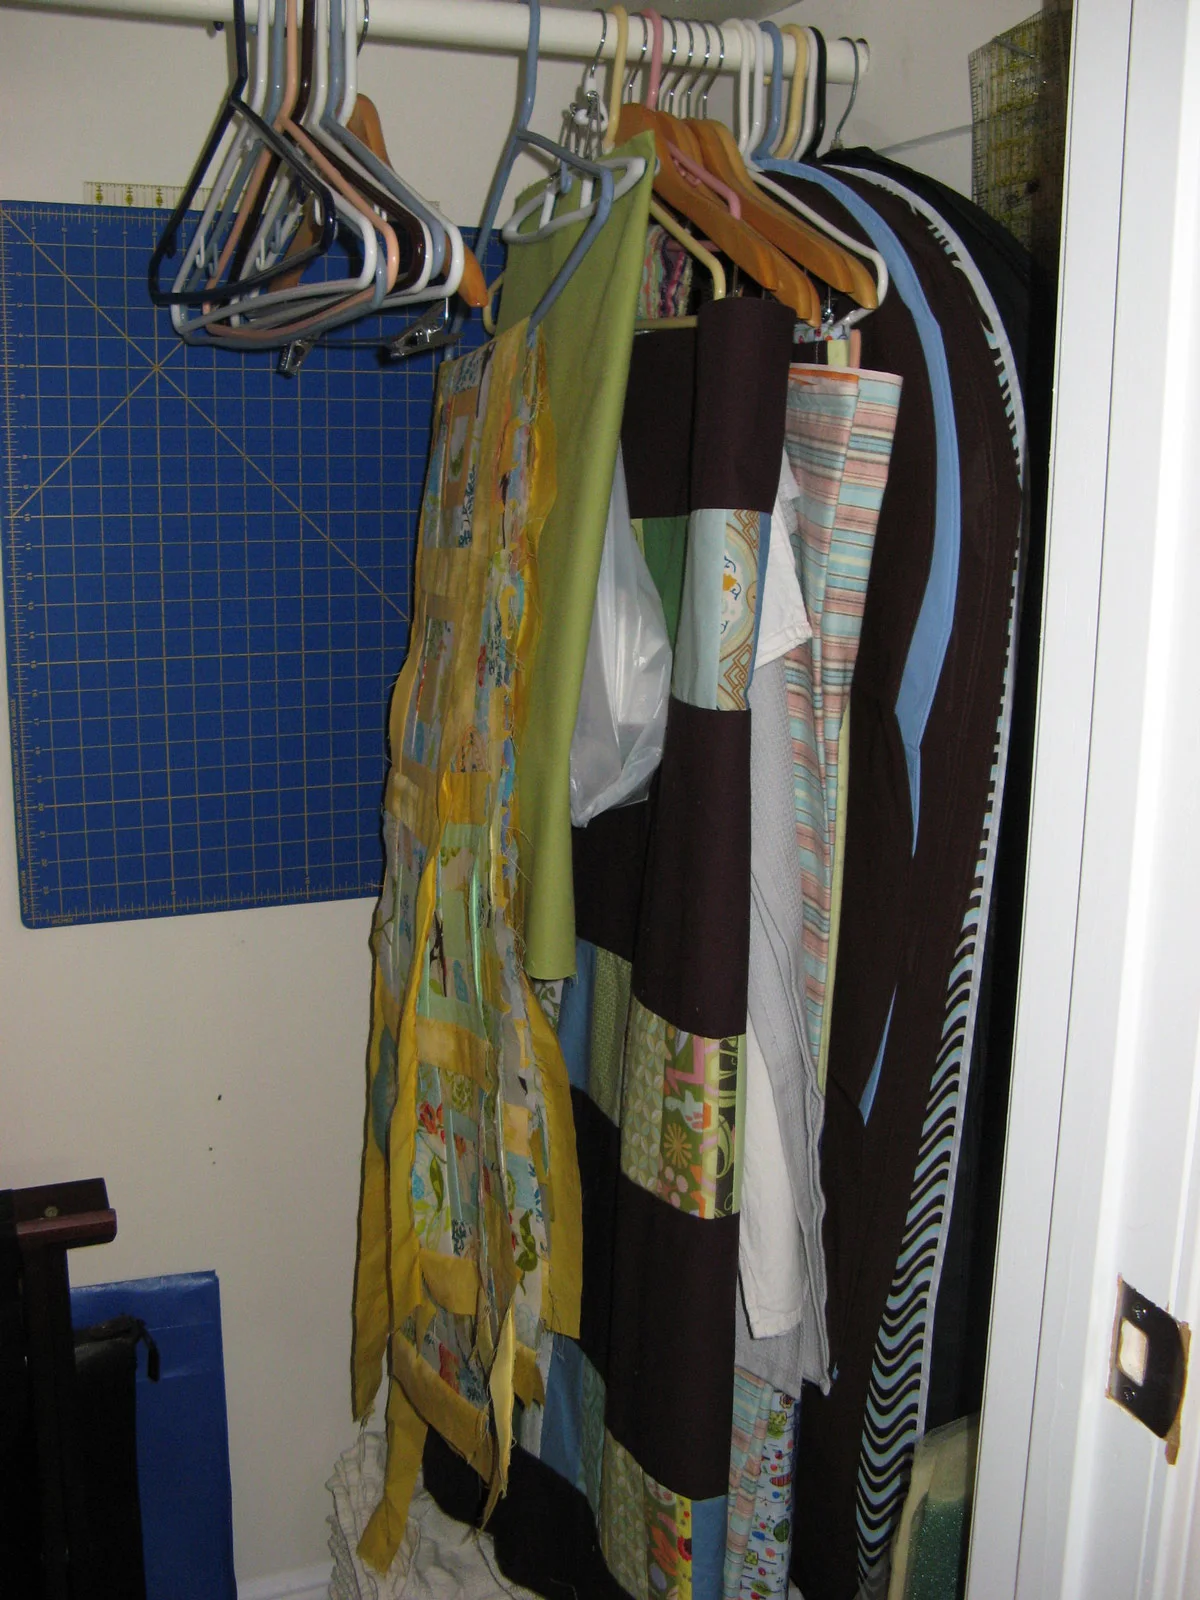
The closet holds larger fabric pieces and unfinished quilts vertically, while the cutting mat occupies the side wall. That keeps broad materials off the bed without needing another open rack in the room. The arrangement also shows why a shared closet needs a deliberate division of space.
Reserve reachable hanging space for visitors before filling the rail with projects. Check that clips or hangers suit the fabric and will not damage it. Store cutting tools securely rather than treating the open closet as a safety barrier, and keep the door free to close without compressing stored work.
IDEA 15 / 18
Keep Small Supplies in Closed Jars
 SaveSupport Non AI Creator
Image credit: Life by Ky
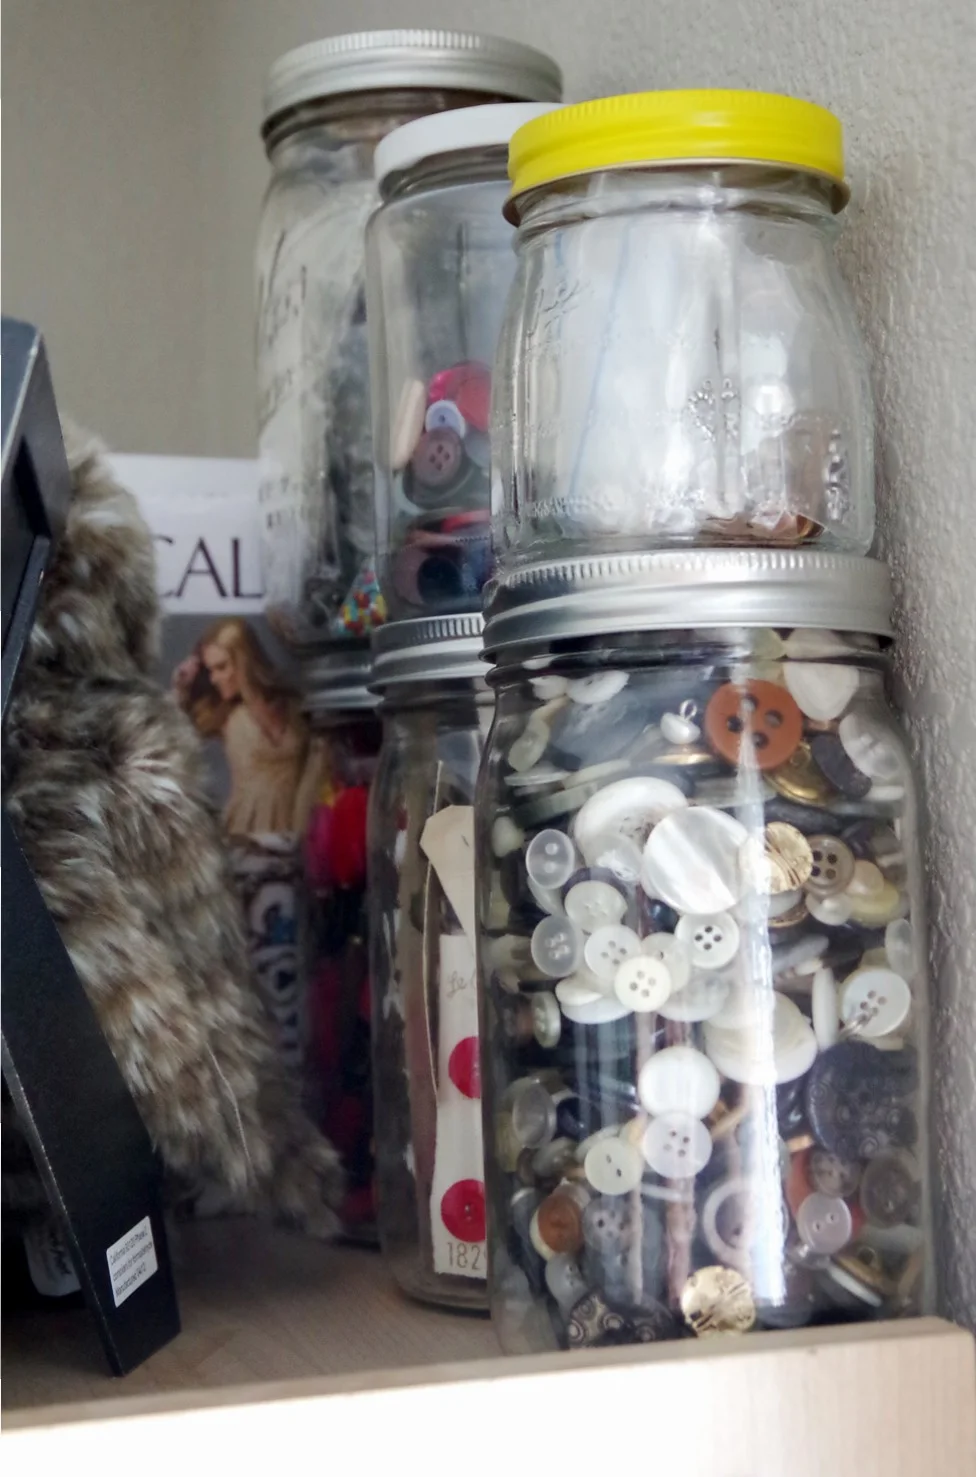
The clear jars make the buttons visible without tipping them into a tray, while their lids keep the different groups contained. Reusing similar-sized vessels can create a simple shelf arrangement without a fitted drawer unit. The detail belongs to a sewing area beside a guest bed.
Choose containers that you can open and lift comfortably, and avoid balancing filled jars on top of one another. Keep small parts secured away from children and put the containers somewhere guests do not need to move them. Label similar contents if you regularly lose time searching through several jars.
PART 04
Make the Change Back to Guest Room Easier
IDEA 16 / 18
Make the Cleared Desk Useful to a Visitor
 SaveSupport Non AI Creator
Image credit: Mark Lohman / This Old House
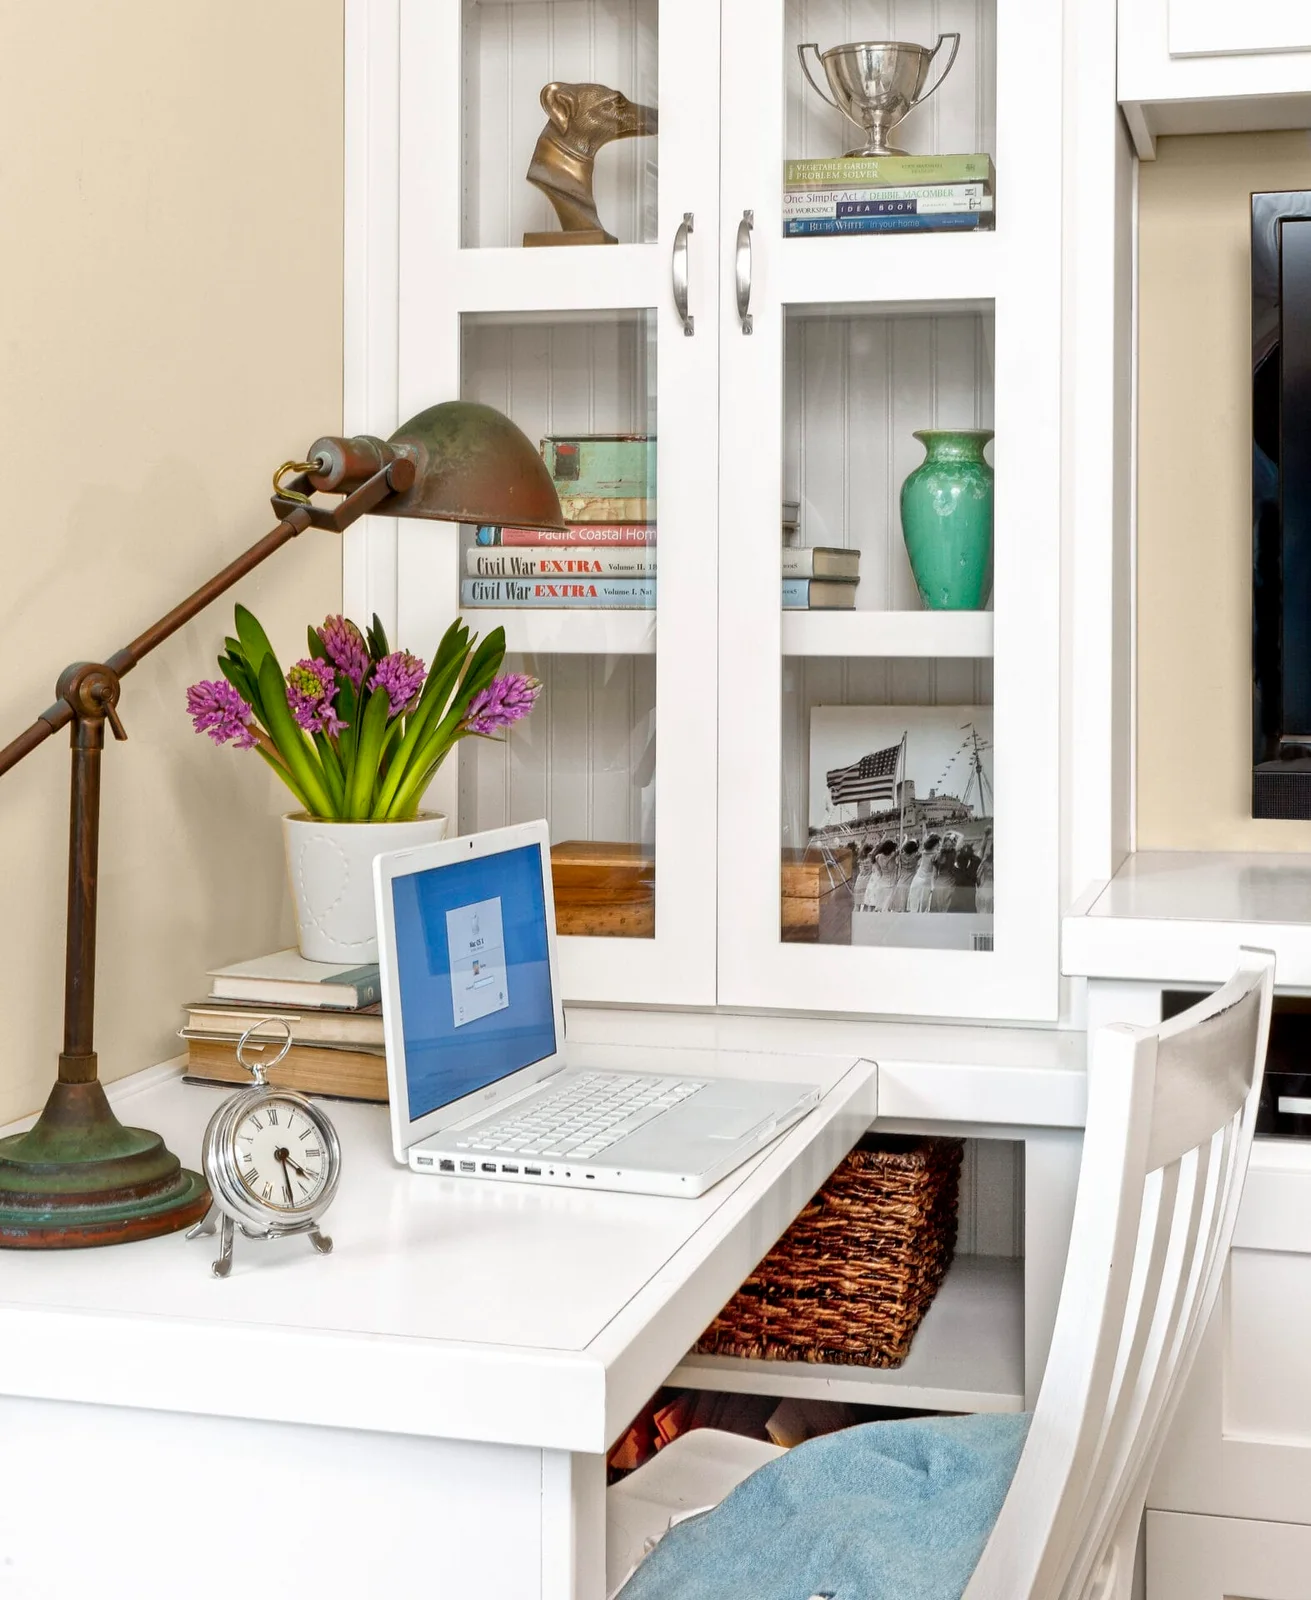
The cleared desktop shows another use for the sewing surface when a visitor arrives. A lamp and clock remain available, while glass-front cupboards provide storage above. The open knee space and nearby basket position keep the desk recognizable as a useful place to sit, rather than another display shelf.
Compare bedroom nightstand ideas with the desk’s guest role so visitors have somewhere reachable for everyday items. Keep a suitable outlet accessible and route leads away from feet. A surface used for sewing needs a careful check for pins and sharp fragments before it becomes a laptop or writing desk.
IDEA 17 / 18
Keep Guest Linens in a Bed Drawer
 SaveSupport Non AI Creator
Image credit: Mark Lohman / This Old House
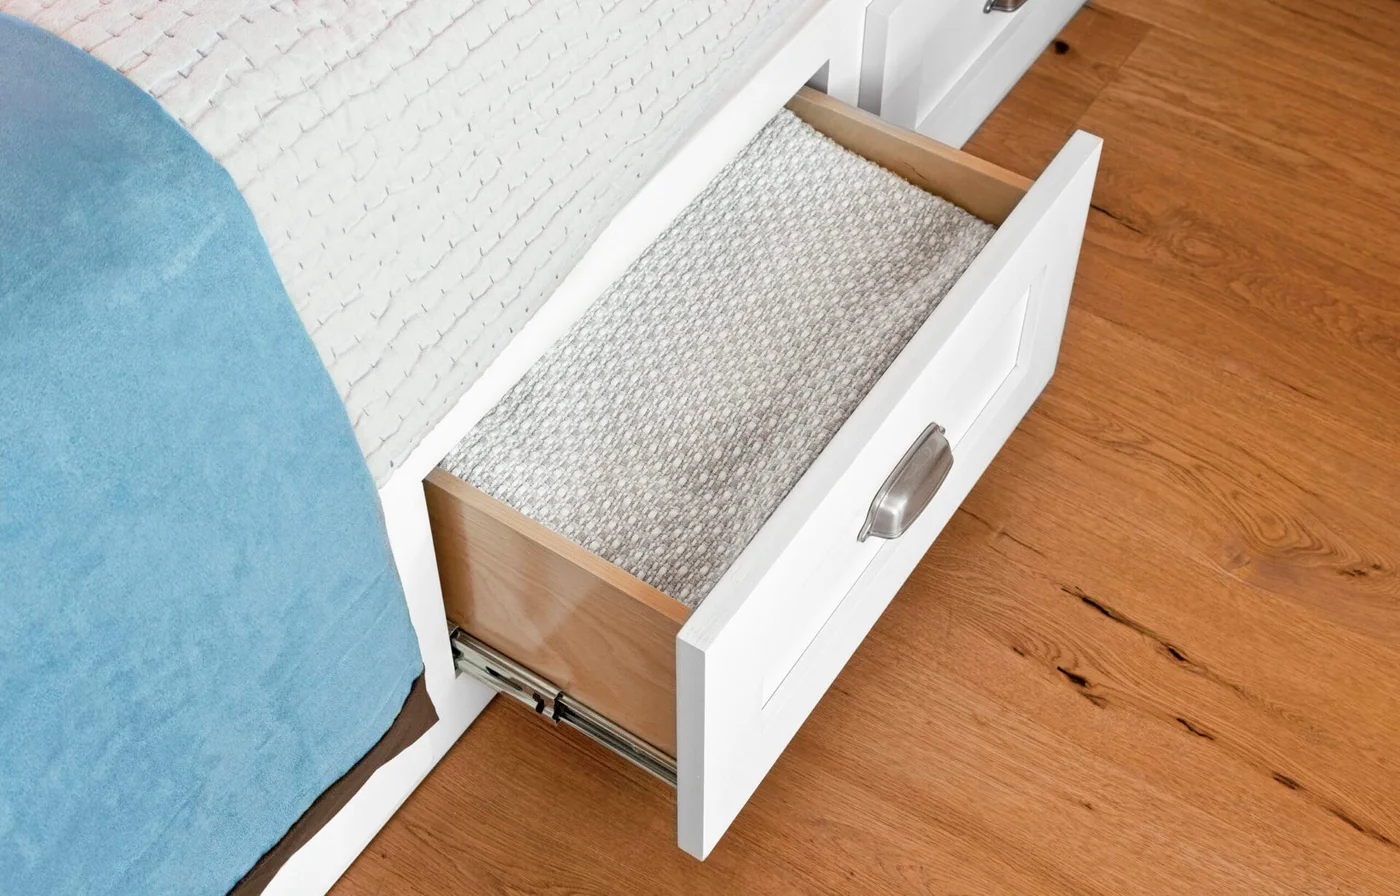
The open drawer gives the bedding a defined storage position directly beneath the mattress. Its pale front matches the bed frame, leaving the storage visually quiet when closed. Keeping the guest linens together reduces the number of separate cupboards that must be opened during changeover.
Leave enough floor space to pull out the drawer without moving the sewing chair or supply cart. Store only clean, dry linens and check the drawer’s loading guidance. Keep project fabrics in a separate container so visitors’ bedding does not become mixed with offcuts, pins or unfinished work.
IDEA 18 / 18
Use Closed Built-Ins to Simplify the Room
 SaveSupport Non AI Creator
Image credit: Project: Closet Factory (St. Louis) (via Houzz)
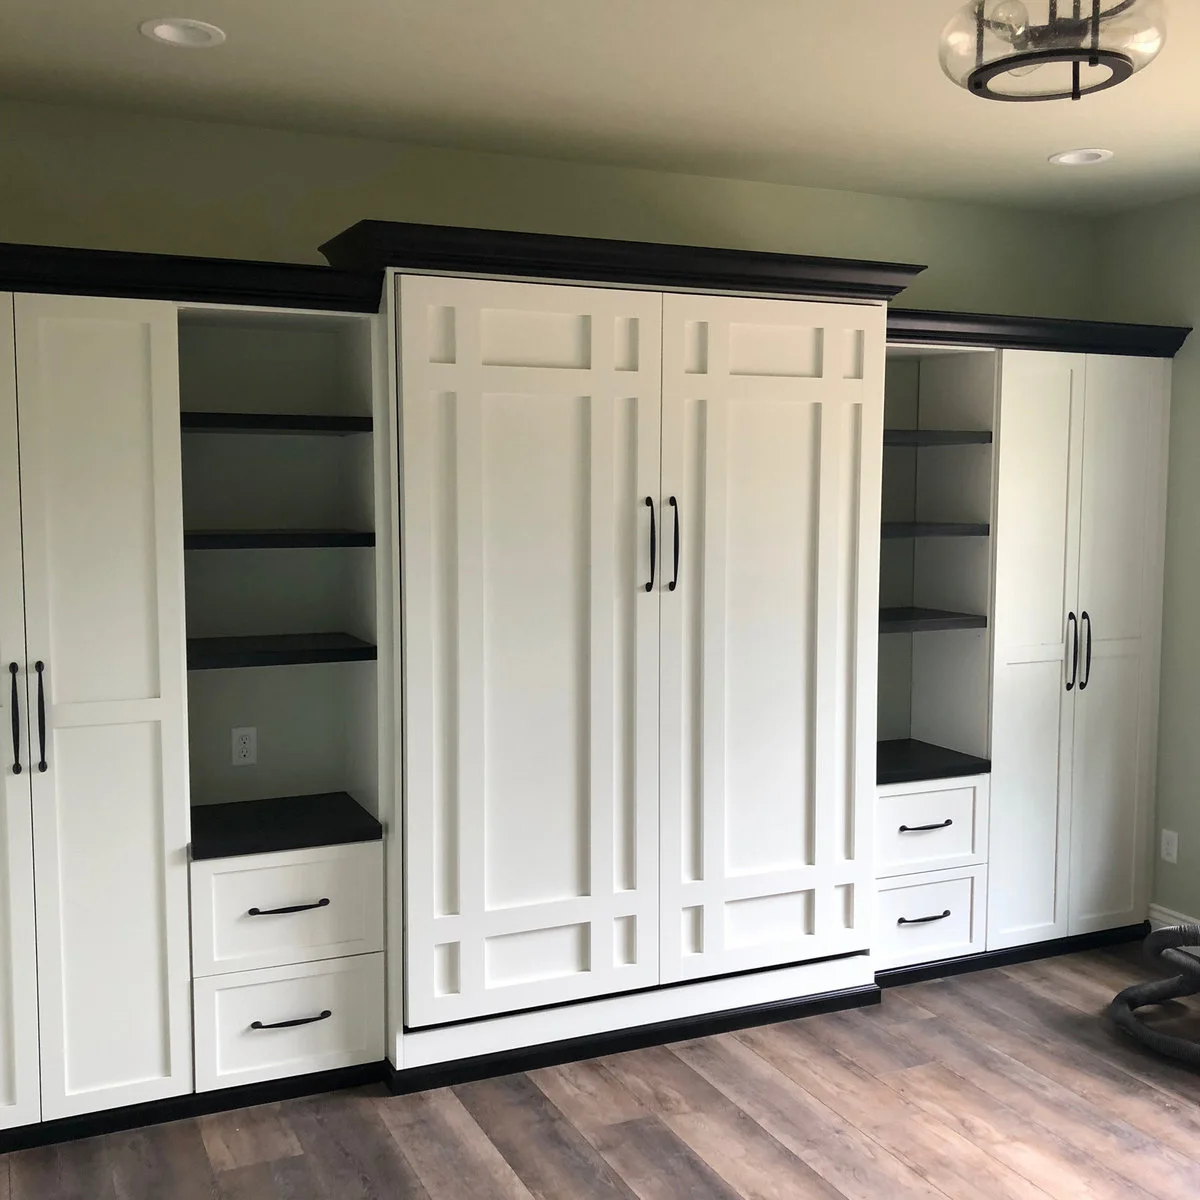
The central wall-bed front and surrounding cupboards create a consistent closed outline. Open side shelves leave a few reachable surfaces, while the drawers below provide smaller storage compartments. With the bed folded away, the visible floor stays available for the room’s sewing use.
Plan the guest arrangement as carefully as the closed daytime view. The open bed, sewing chair and stored equipment all need somewhere to fit without blocking the doorway. Ask the installer about the mechanism, fixing and access requirements, and keep the bed’s operating area free of loose supplies.
BRING IT ALL TOGETHER
Keep a Short Guest-Arrival Routine
Finish each sewing session by returning needles, pins and cutting tools to a secure container. Before a guest arrives, clear the bed and its approach, put away trailing leads and check the floor for loose supplies. An attractive shelf does not replace safe storage for sharp or small items.
Keep a clear surface and an accessible outlet for visitors instead of filling every useful space with your own equipment. Decide where the sewing chair, cutting mat and unfinished project will go during a stay. If the room takes hours to change over, simplify the everyday arrangement rather than adding another organizer.