A doorless shower can use a fixed glass screen, a tiled partition or a deep alcove to separate the washing area from the rest of the bathroom. The important distinction is the entrance: there is no hinged or sliding shower door to move out of the way.
These photographed bathrooms show several ways to handle that opening. Compare the showerhead position, the route into the shower and the nearby fittings before choosing a look. A beautiful open entrance still needs a suitable drainage, waterproofing and ventilation plan for your particular room.
PART 01
Let a Fixed Screen Catch the Splash
IDEA 01 / 20
Leave One Side of a Clear Screen Open
 SaveSupport Non AI Creator
Image credit: Project: The HomeStyles Group (via Houzz)
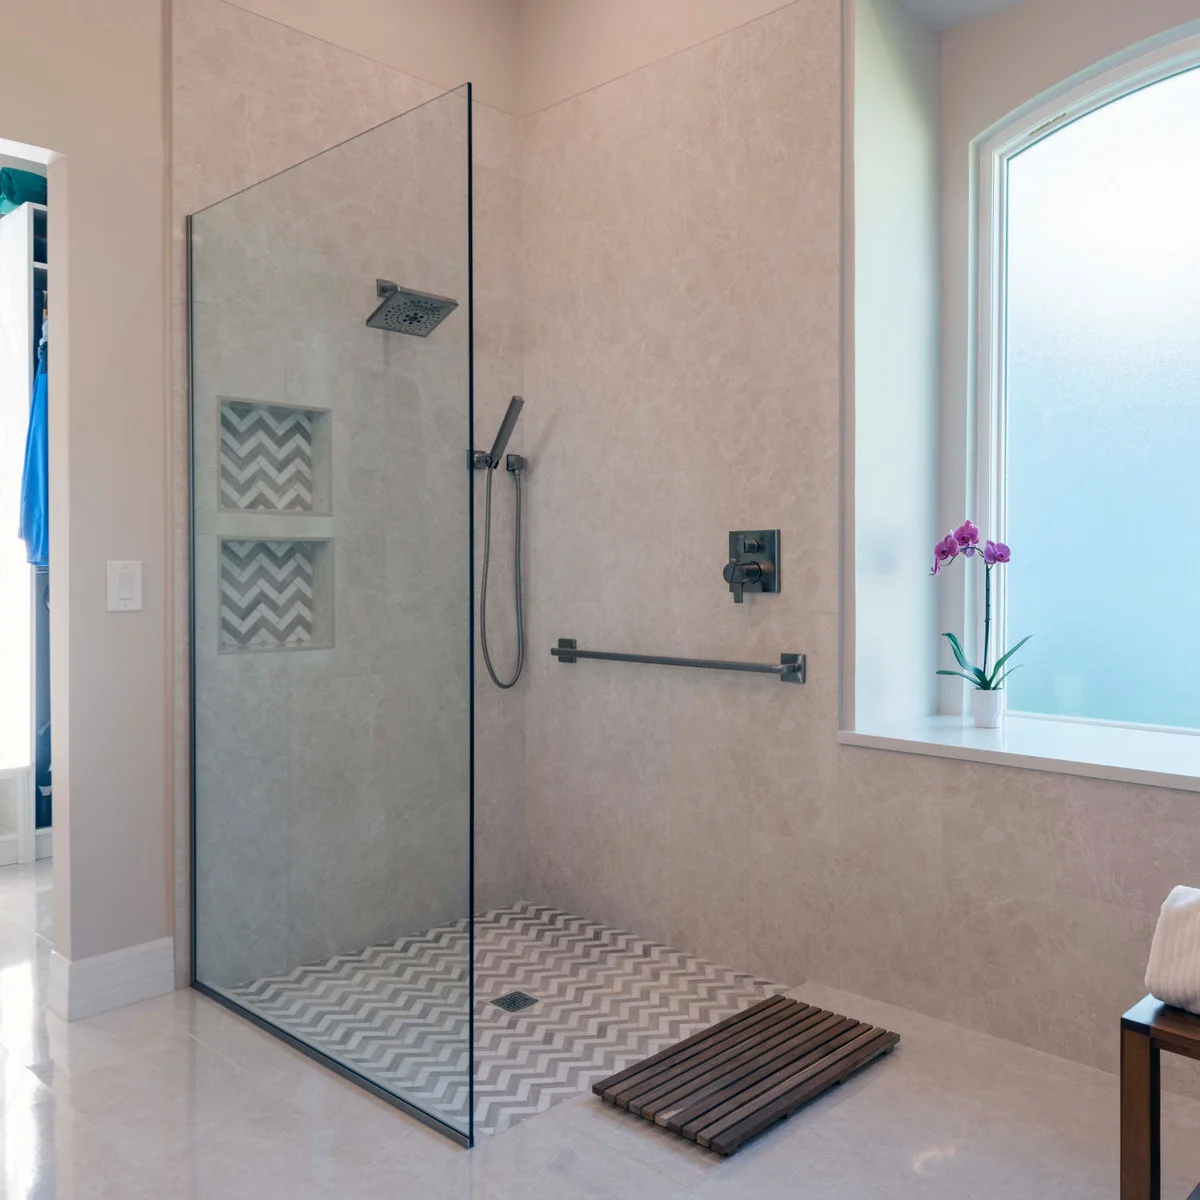
One clear screen shelters the showerhead side, while the entrance remains open beside the frosted window. Chevron tiles mark the shower floor and repeat inside the two recessed niches. The horizontal grab bar and separate handheld shower add useful fittings without a moving door.
Check the approach to the opening with the shower mat and any stool in their usual positions. A loose mat should not narrow the route or become an obstacle. If support fittings are needed, have their position and structural fixing planned around the actual user.
IDEA 02 / 20
Put Clear Glass Above a Low Partition
 SaveSupport Non AI Creator
Image credit: Norman Sizemore / Benvenuti and Stein
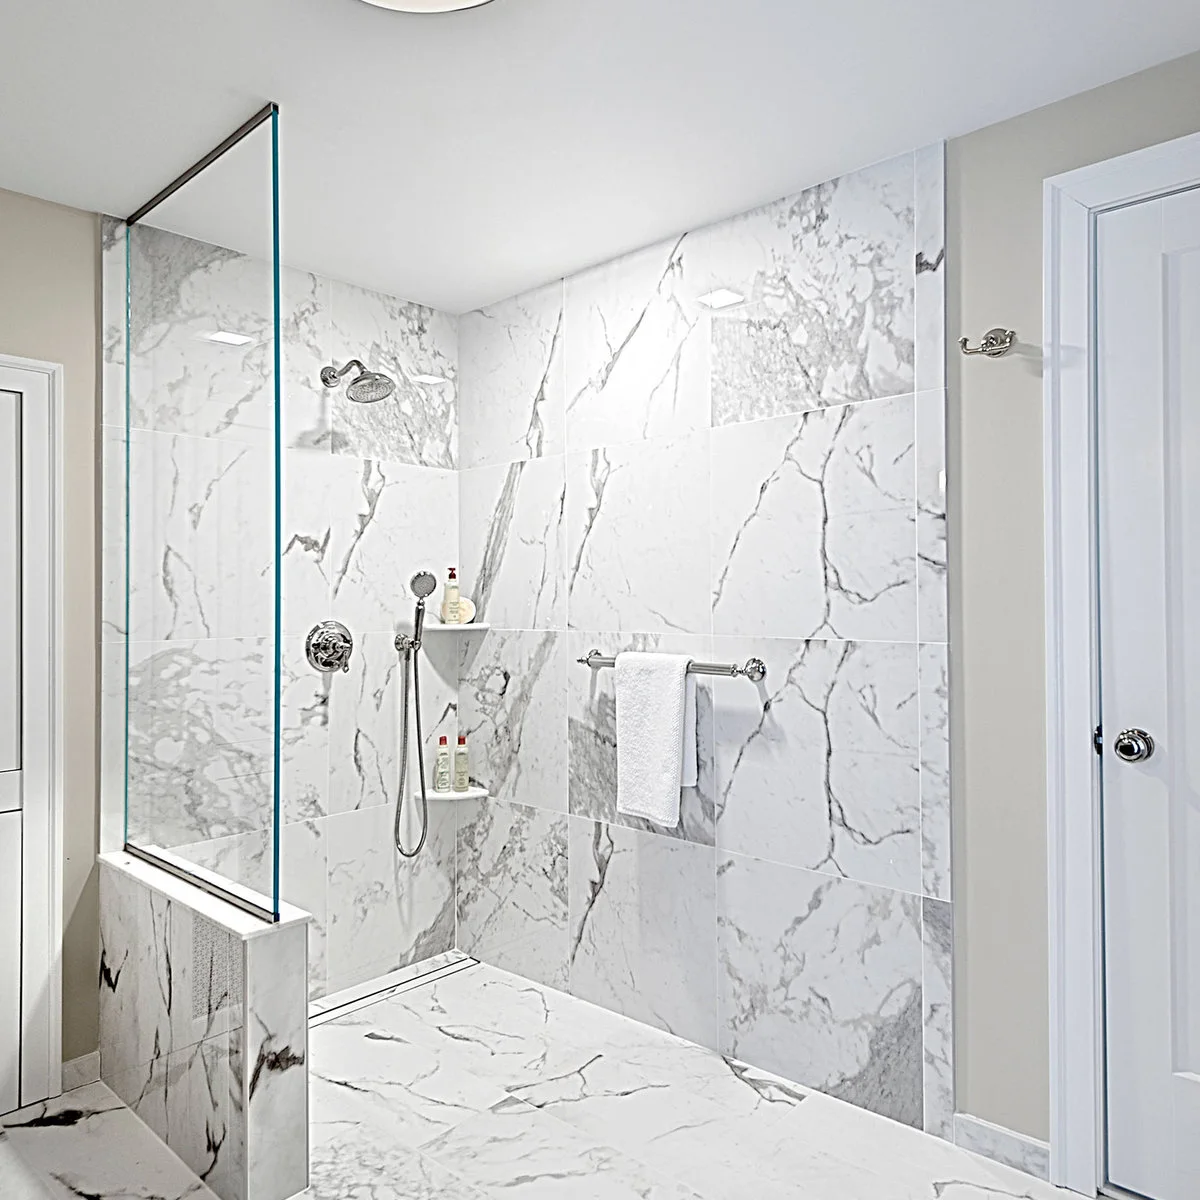
Clear glass rises above the low partition on the left, keeping the white, strongly veined walls visible from outside. The opening is beside the bathroom doorway rather than directly in front of the showerhead. A linear drain runs across the back of the washing area.
Coordinate the partition cap, screen fixing and waterproofing before the tile layout is finalized. The top of a half wall is another surface to wipe, so keep it reachable. Ask the installer to explain the drainage arrangement rather than judging the floor slope from the photograph.
IDEA 03 / 20
Keep a Raised Tray Visually Simple
 SaveSupport Non AI Creator
Image credit: Project: U Name It Construction (via Houzz)
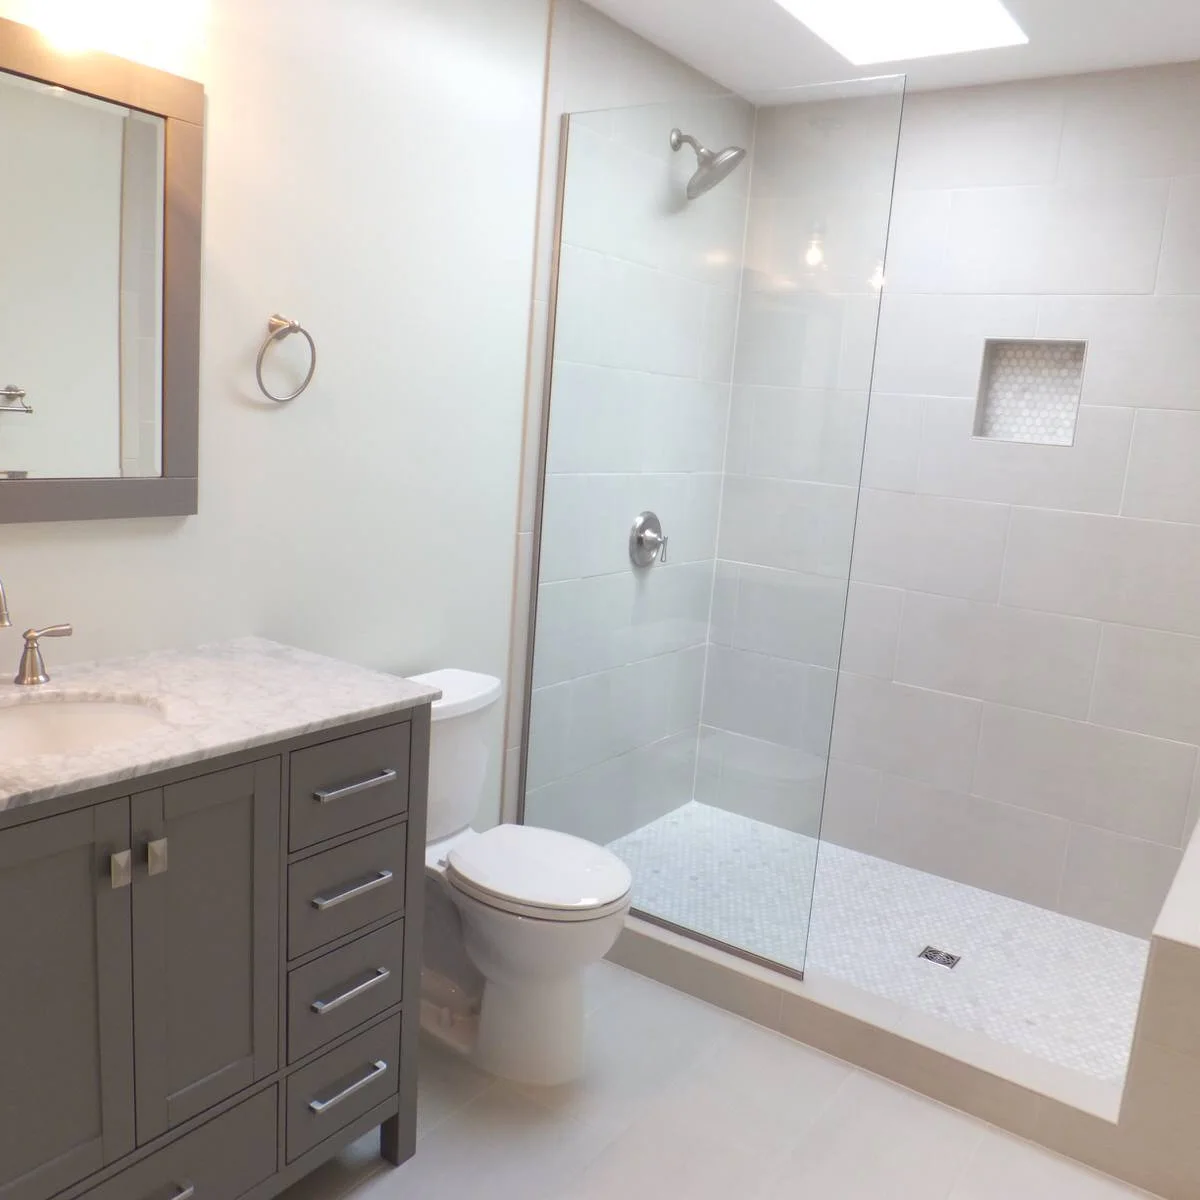
A single clear panel separates the shower from the toilet, while the right side stays open above a raised white edge. Pale wall tiles and a small recessed niche keep the arrangement quiet. The gray vanity adds contrast without making the shower screen feel visually heavy.
Remember that a doorless entrance can still have a step to cross. Compare the approach with other small bathroom ideas and check that the toilet does not crowd the opening. Choose the tray and surrounding finishes for the people using the room rather than assuming clear glass makes access effortless.
IDEA 04 / 20
Use Two Grid Screens Around a Corner
 SaveSupport Non AI Creator
Image credit: Project: Coastal Shower Doors (via Houzz)
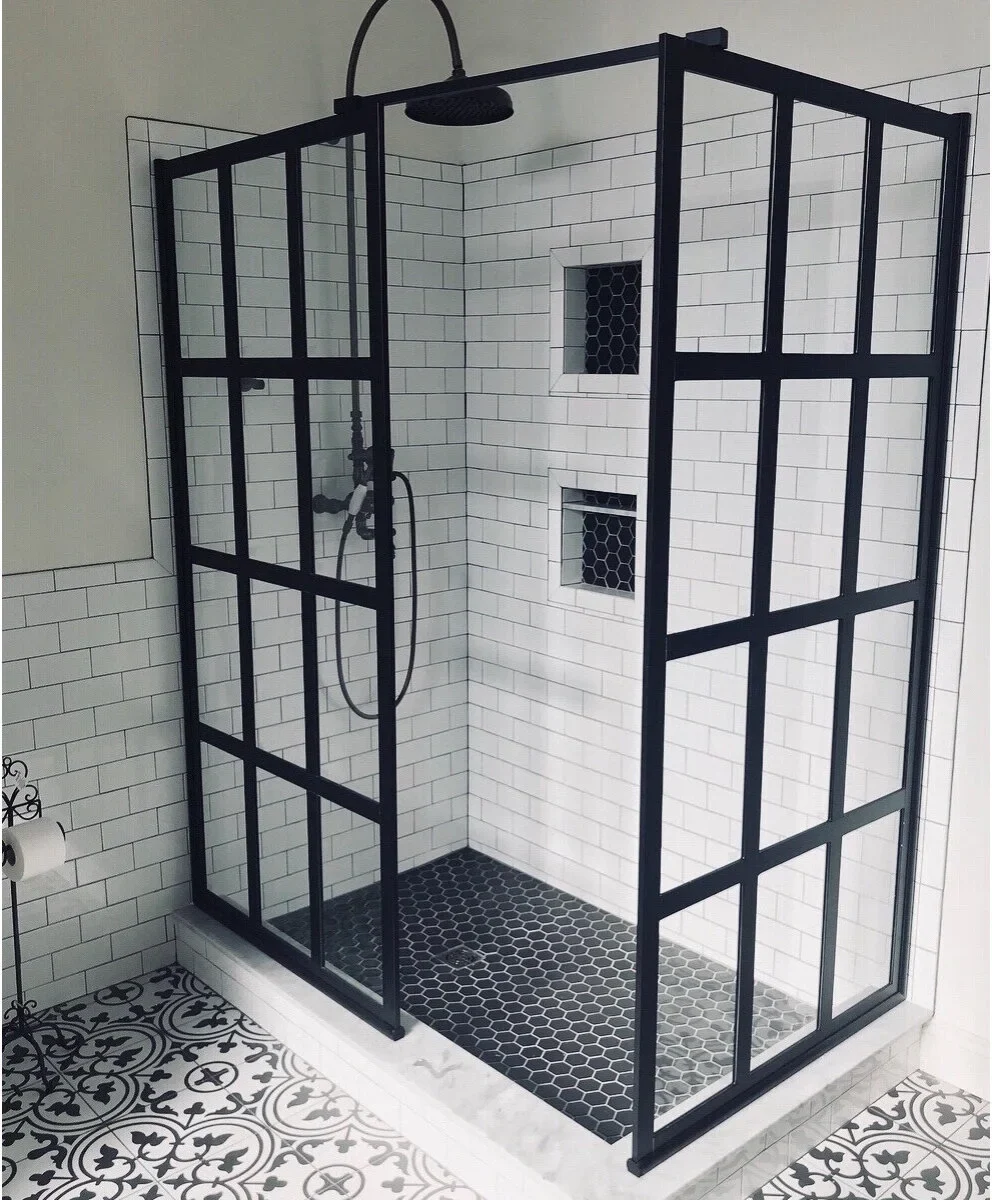
Two black grid screens turn the shower corner but stop short of closing the entrance. The dark framing repeats the shower fittings and black hexagonal floor, while white subway tiles keep the walls lighter. Two inset shelves repeat the dark floor color inside the shower.
Check the clear opening between the screens with your body turned as it would be when stepping in. Grid frames also introduce more edges to wipe than a plain panel. Keep the curb visible and confirm that screen fixings and finished surfaces suit the chosen enclosure system.
IDEA 05 / 20
Keep the Walk-In Gap Between Fixed Panels
 SaveSupport Non AI Creator
Image credit: Clinton Glass Company
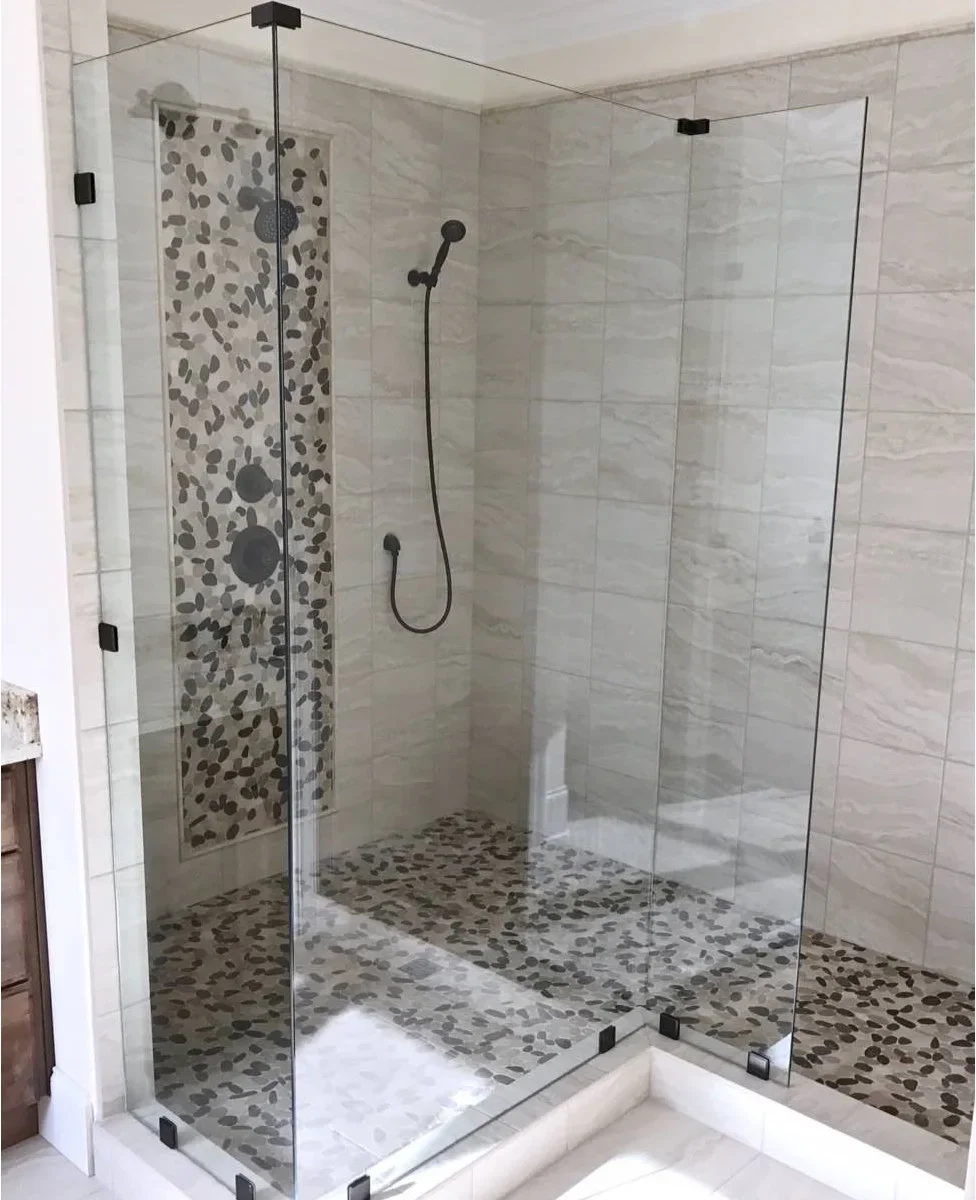
Clear panels wrap around the corner but leave a walk-in gap between their free edges. Dark clamps repeat the shower fittings, while the pebble-patterned floor continues up one wall as a vertical accent. The rest of the pale wall tile stays comparatively quiet around it.
Measure the gap after allowing for the finished glass and its fittings, rather than relying on the rough opening. Check access to both faces of each panel for cleaning. A textured-looking floor still needs its own suitability and care checks; appearance alone does not establish slip resistance.
PART 02
Build Shelter Around the Entrance
IDEA 06 / 20
Let a Half Wall Separate Neighboring Fixtures
 SaveSupport Non AI Creator
Image credit: Project: Bunn Remodeling and Construction (via Houzz)
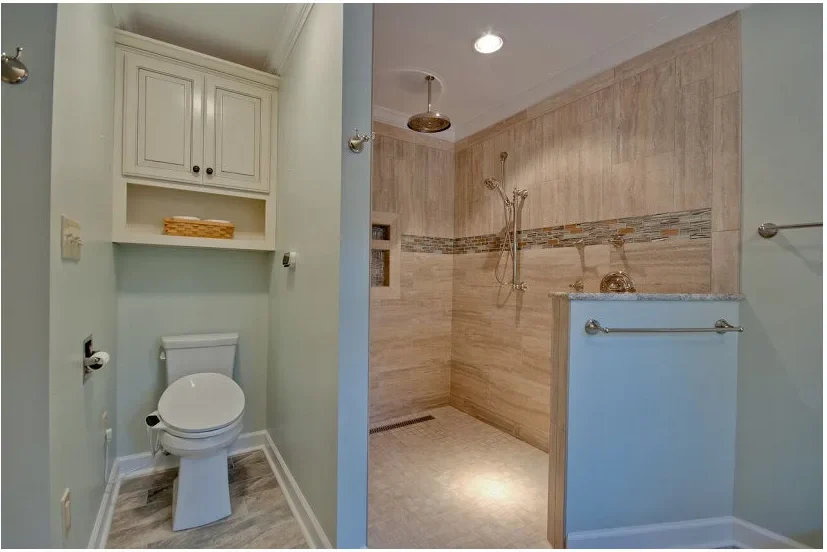
A pale blue half wall separates the shower from the room without closing the upper space. Beige tiles and a narrow mosaic band define the washing area, while the toilet occupies its own adjacent alcove. The ceiling-mounted head sits well inside the shower rather than above the entrance.
Consider the toilet alcove and shower as separate working spaces when checking the plan. Leave enough room to approach both and keep the towel rail outside the strongest spray. Test the reach to shower controls before choosing a partition height or committing to built-in storage nearby.
IDEA 07 / 20
Choose Glass Blocks for a More Sheltered Edge
 SaveSupport Non AI Creator
Image credit: Project: Monarch Builders & Remodelers (via Houzz)
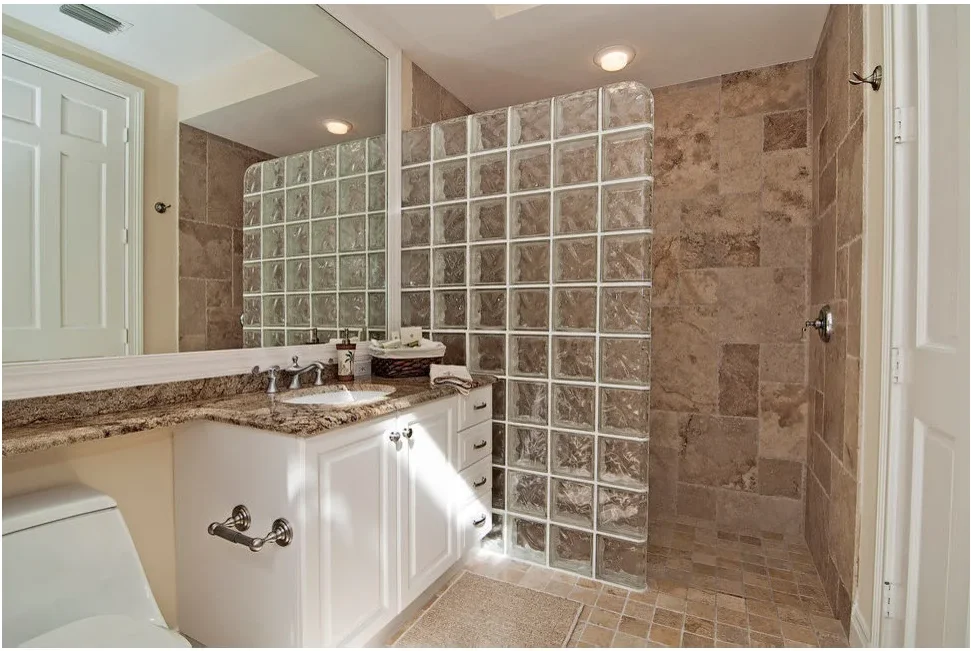
A substantial glass-block wall separates the shower from the white vanity while allowing light through its textured surface. The entrance stays open on the right, beside the tiled wall with the controls. Warm brown tiles connect the shower with the rest of the bathroom floor.
A block partition takes up more physical space than a thin screen, so include its full thickness in the layout. Consider the joints and both wall faces in your cleaning plan. Keep the opening easy to approach and confirm that the adjacent vanity can tolerate the expected moisture.
IDEA 08 / 20
Turn the Entrance Behind a Tiled Wall
 SaveSupport Non AI Creator
Image credit: Steven Paul Whitsitt Photography / Hampton Kitchens of Raleigh
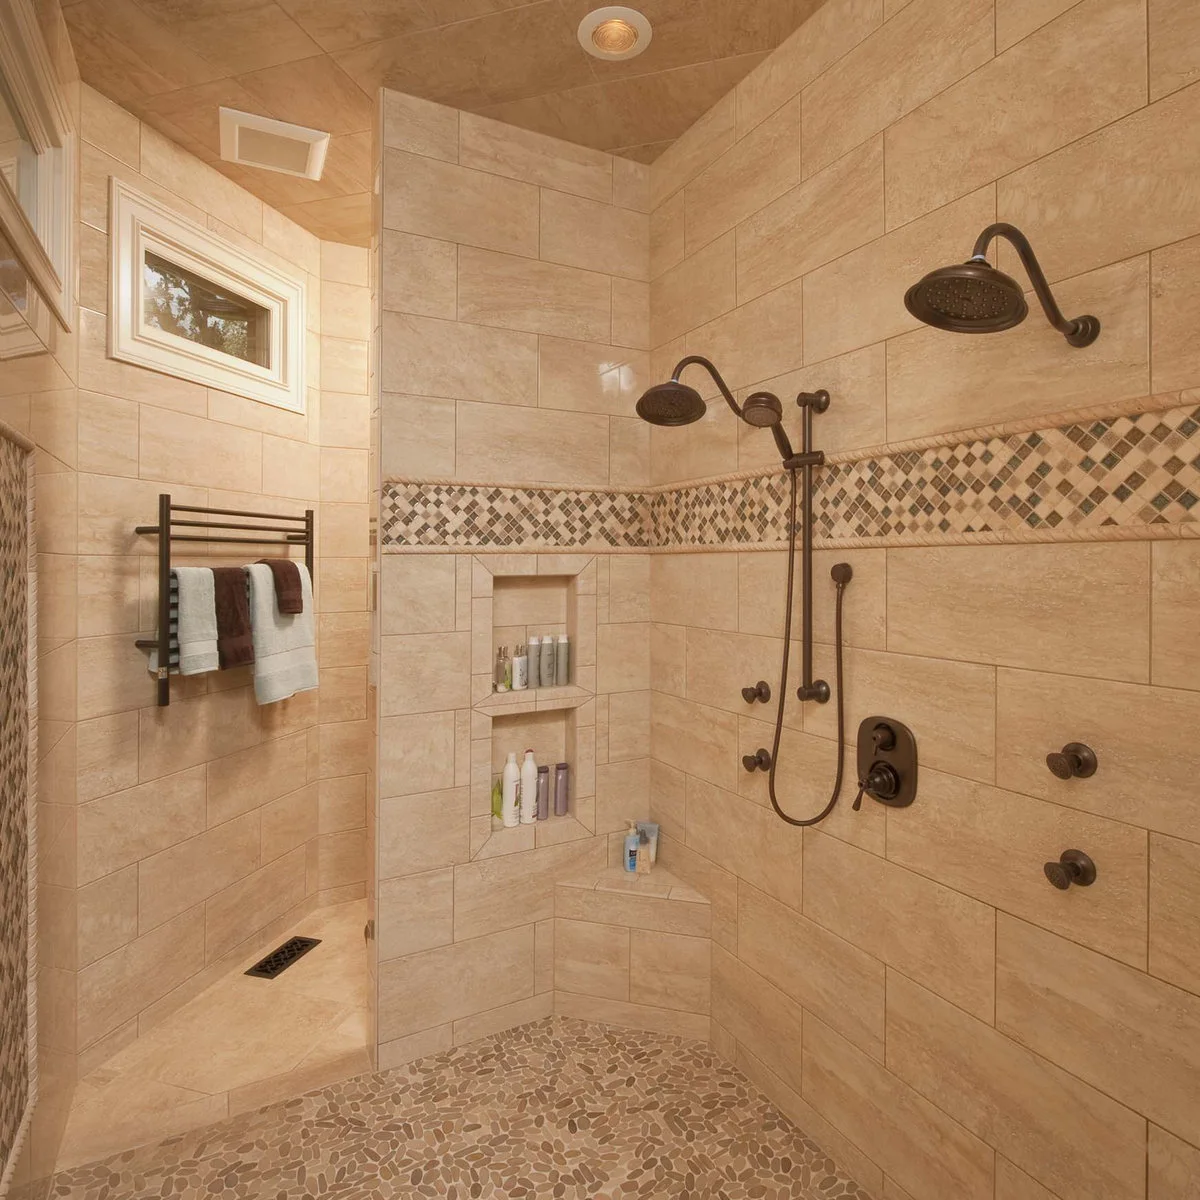
The tiled partition turns the entrance away from the two wall-mounted showerheads, creating a sheltered route into the washing area. A horizontal mosaic band links both sides of the wall, while stacked niches keep bottles recessed. The pebble-patterned floor distinguishes the shower from the approach behind it.
Plan the controls, niches and entrance together so the partition does not make the shower awkward to use. Multiple outlets also need a plumbing assessment for the actual installation. Check that every corner behind the return wall can be reached for cleaning and that the approach remains well lit.
IDEA 09 / 20
Hide the Shower in a Tall Alcove
 SaveSupport Non AI Creator
Image credit: Christopher Horwood
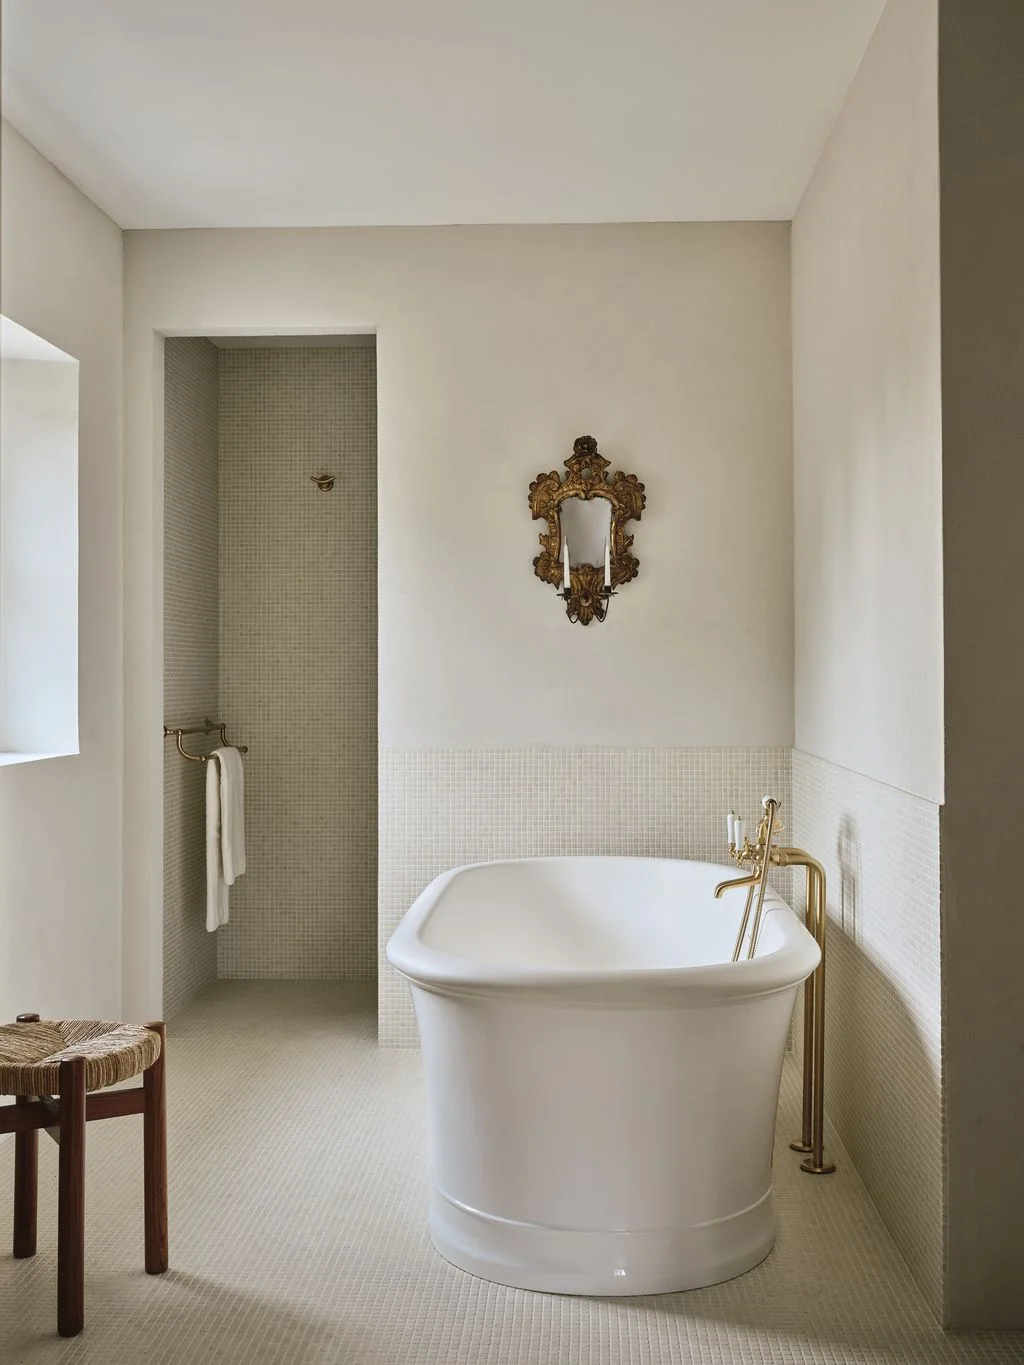
A tall rectangular opening places the shower to one side of the freestanding bathtub. Small pale mosaic tiles continue across the alcove walls and floor, while the narrow opening keeps most of the washing area out of direct view. Warm metal fittings connect the two bathing spaces.
Use a measured plan to check the depth behind an alcove opening; the photograph cannot show how much room is available inside. Keep the entry clear of stools and bath accessories. A recessed shower also needs suitable lighting and ventilation rather than relying only on daylight elsewhere in the room.
IDEA 10 / 20
Keep the Alcove Open Above a Shaped Tray
 SaveSupport Non AI Creator
Image credit: Simon Brown
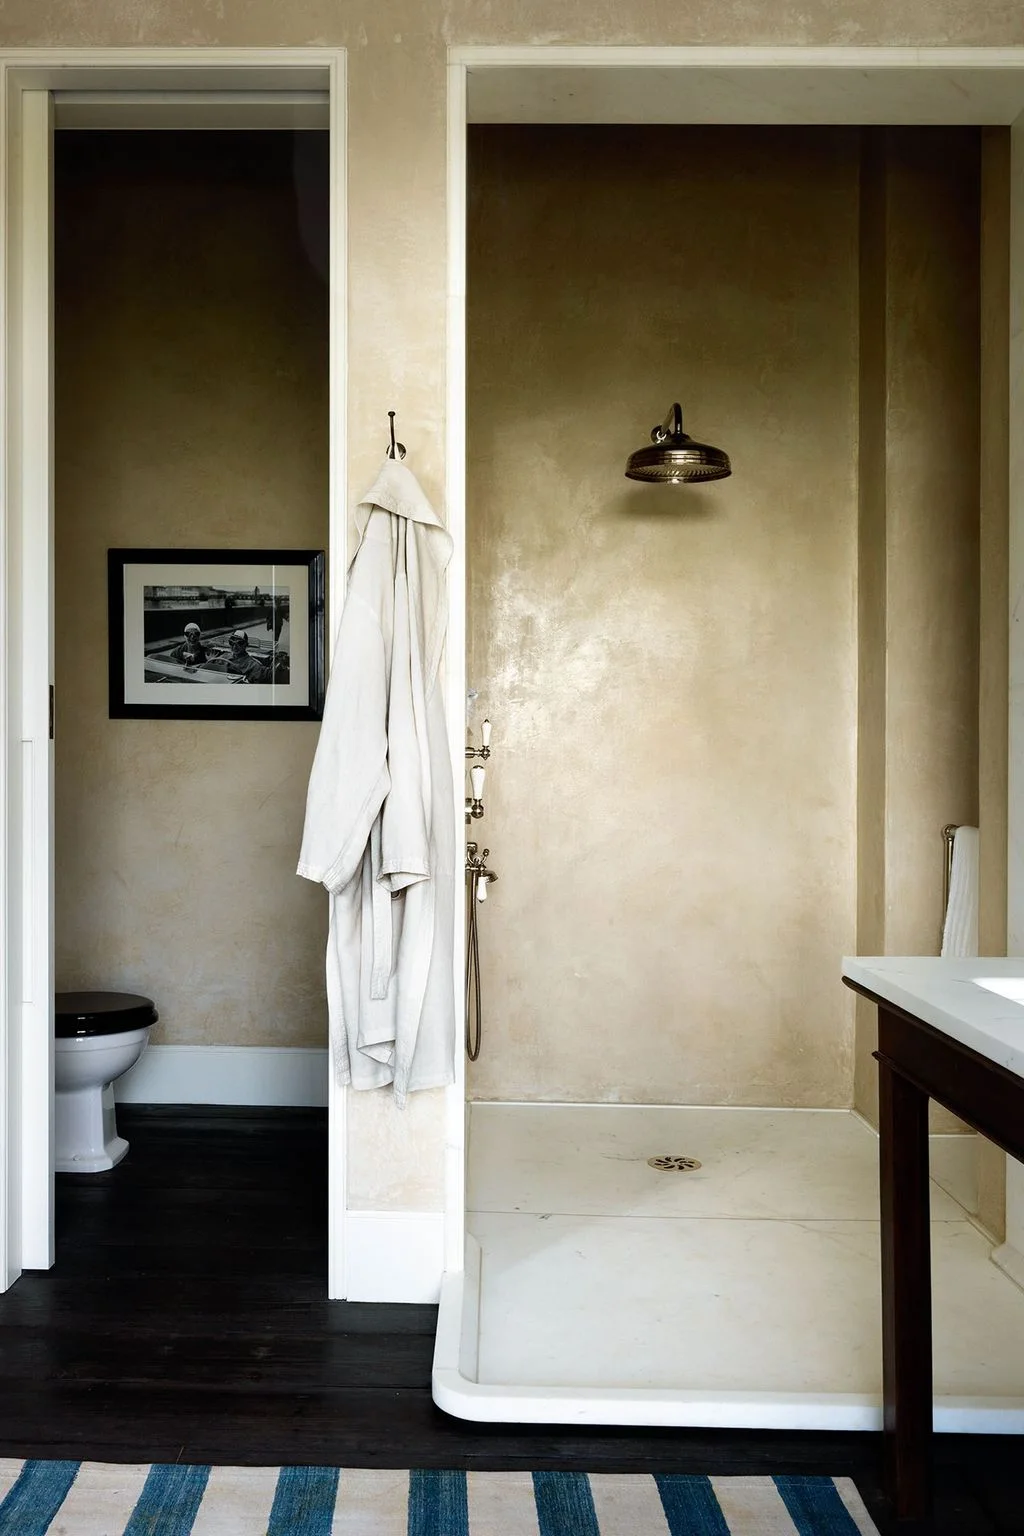
The open alcove uses a pale projecting tray to establish the shower boundary without a glass front. Its rounded outer corner softens the transition beside the dark floor. A wall between the shower and toilet compartment provides privacy, while the showerhead remains clearly visible above the tray.
Allow for the tray’s projection when checking the passage beside the vanity. Its edge still needs to be crossed, so this arrangement should not be treated as step-free. Check the wall finish’s stated suitability for direct water exposure and follow its specified cleaning and maintenance instructions.
PART 03
Give the Shower Its Own Character
IDEA 11 / 20
Give a Narrow Alcove a Pink Checker Pattern
 SaveSupport Non AI Creator
Image credit: Christopher Horwood
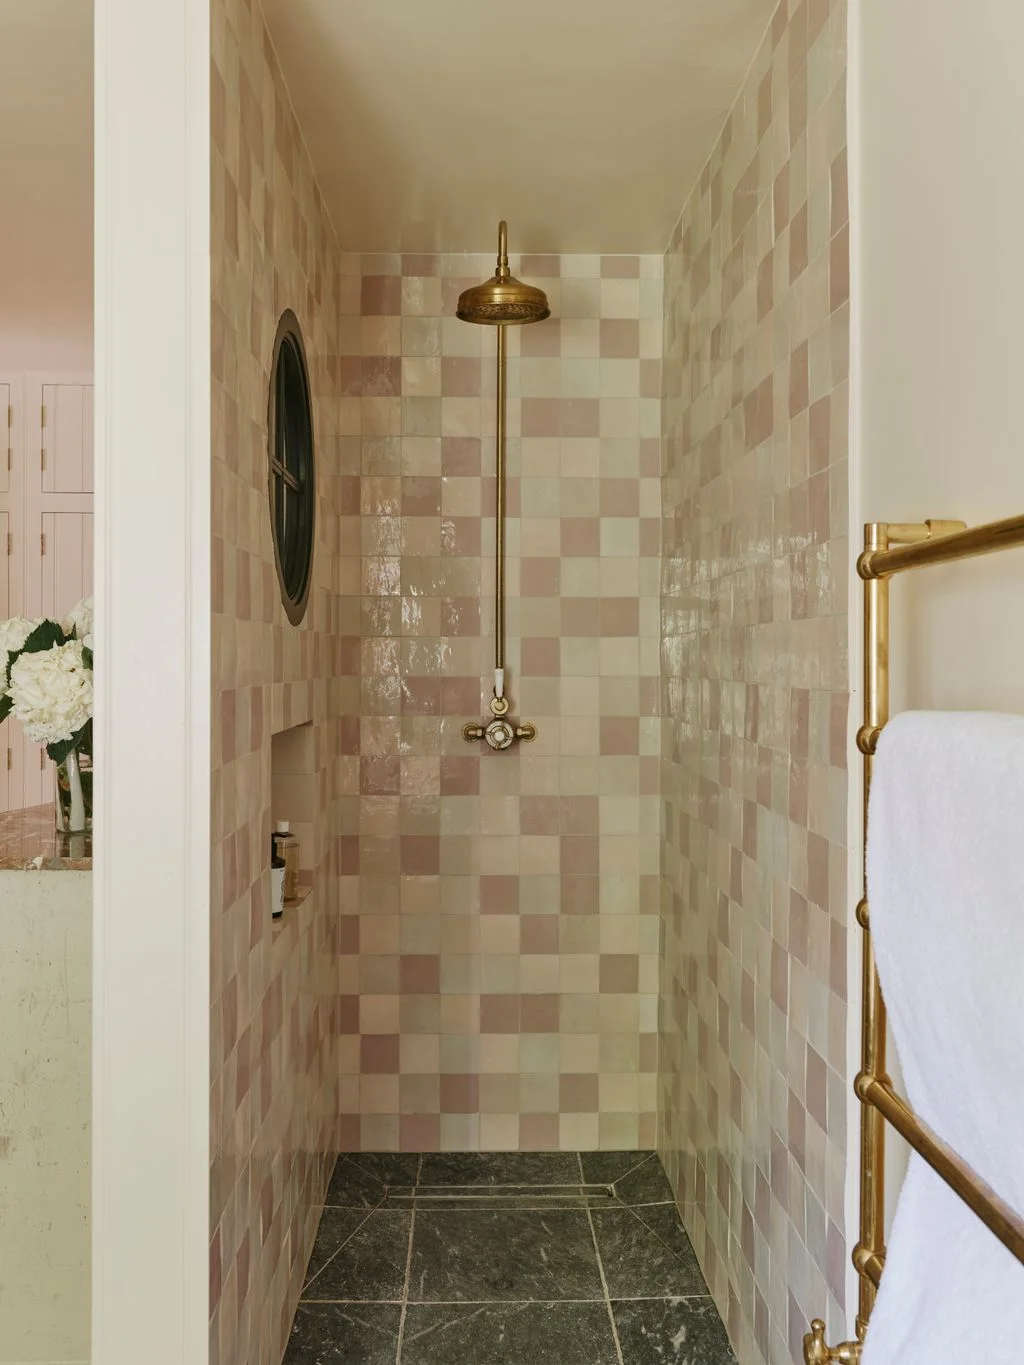
Pink and cream squares wrap the narrow alcove, giving the shower a distinct identity without an enclosing door. A round dark-framed window interrupts the pattern on the side wall. The brass-colored column shower sits at the far end above a darker floor and a narrow linear drain.
Set out the tile pattern around the window and niche before installation so small cuts do not collect at the most visible edges. Check how the window junction will be waterproofed. A deep alcove can shelter the opening, but its splash behavior still depends on the actual dimensions and shower use.
IDEA 12 / 20
Run Pattern Across the Back Wall and Floor
 SaveSupport Non AI Creator
Image credit: Owen Gale
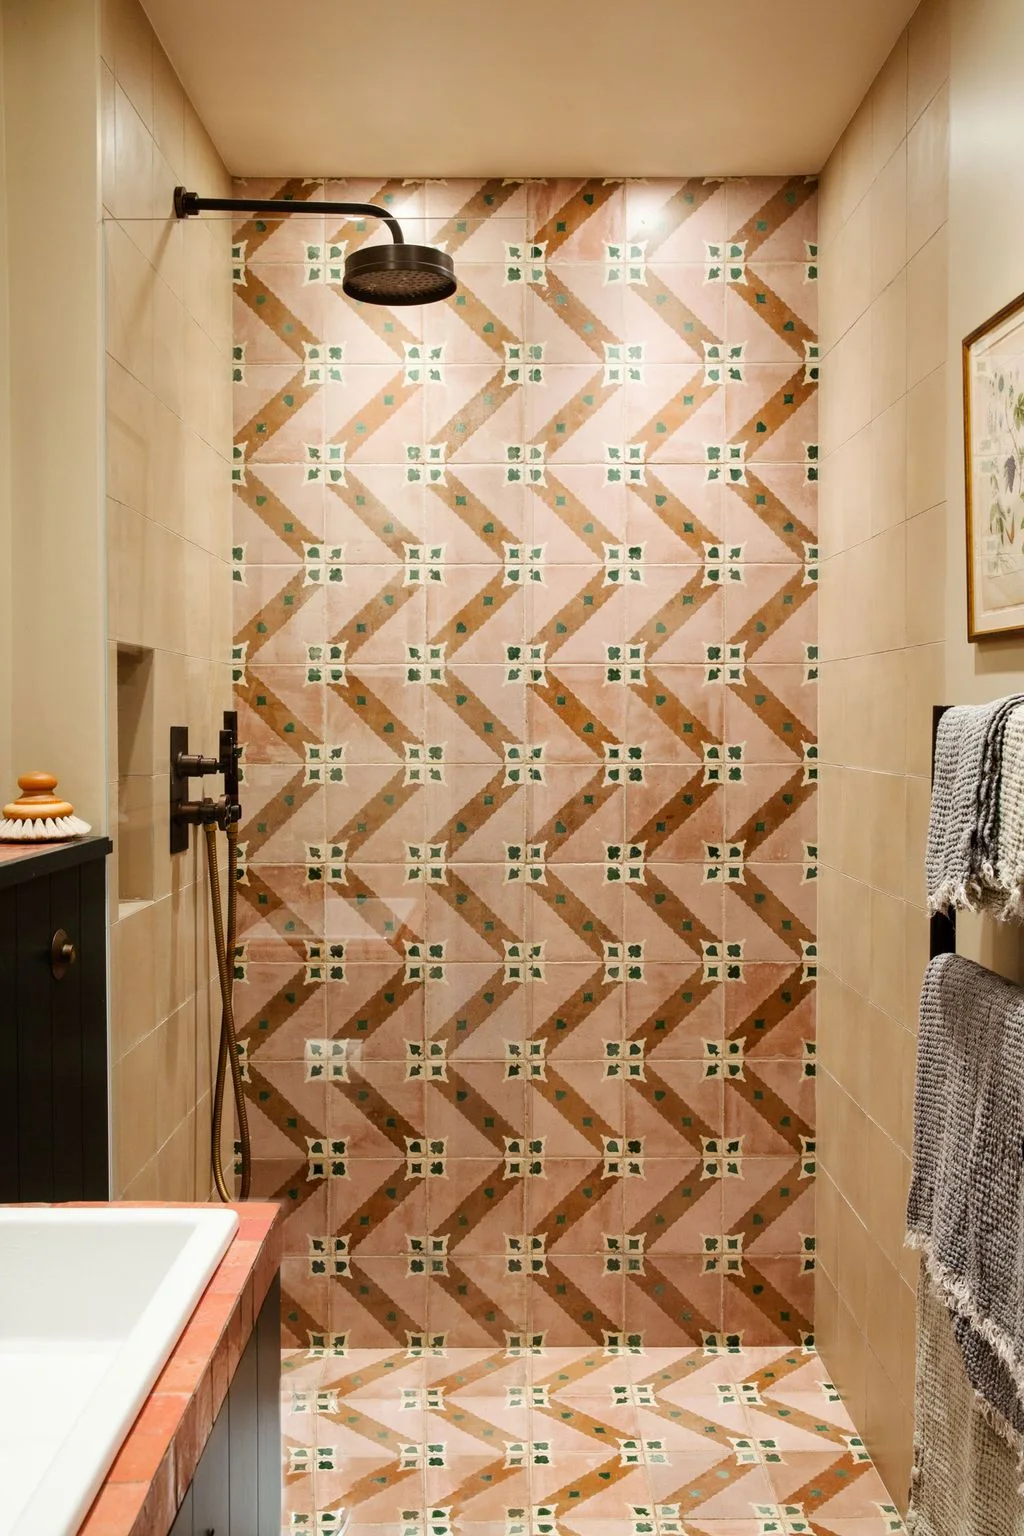
The pink, ochre and green pattern runs from the rear wall onto the shower floor, creating a continuous band of color. Plain pale side tiles let it stand out. A clear screen borders the left side, while the dark showerhead and controls provide simple outlines against the pattern.
For more bathroom tile ideas, compare how much pattern you want visible from the doorway before covering every surface. Confirm separate wall and floor suitability even when the design looks identical. Plan the pattern around the drain and inspect grout and cleaning requirements before making the final selection.
IDEA 13 / 20
Frame Yellow Tiles with a Dark Screen
 SaveSupport Non AI Creator
Image credit: Michael Sinclair
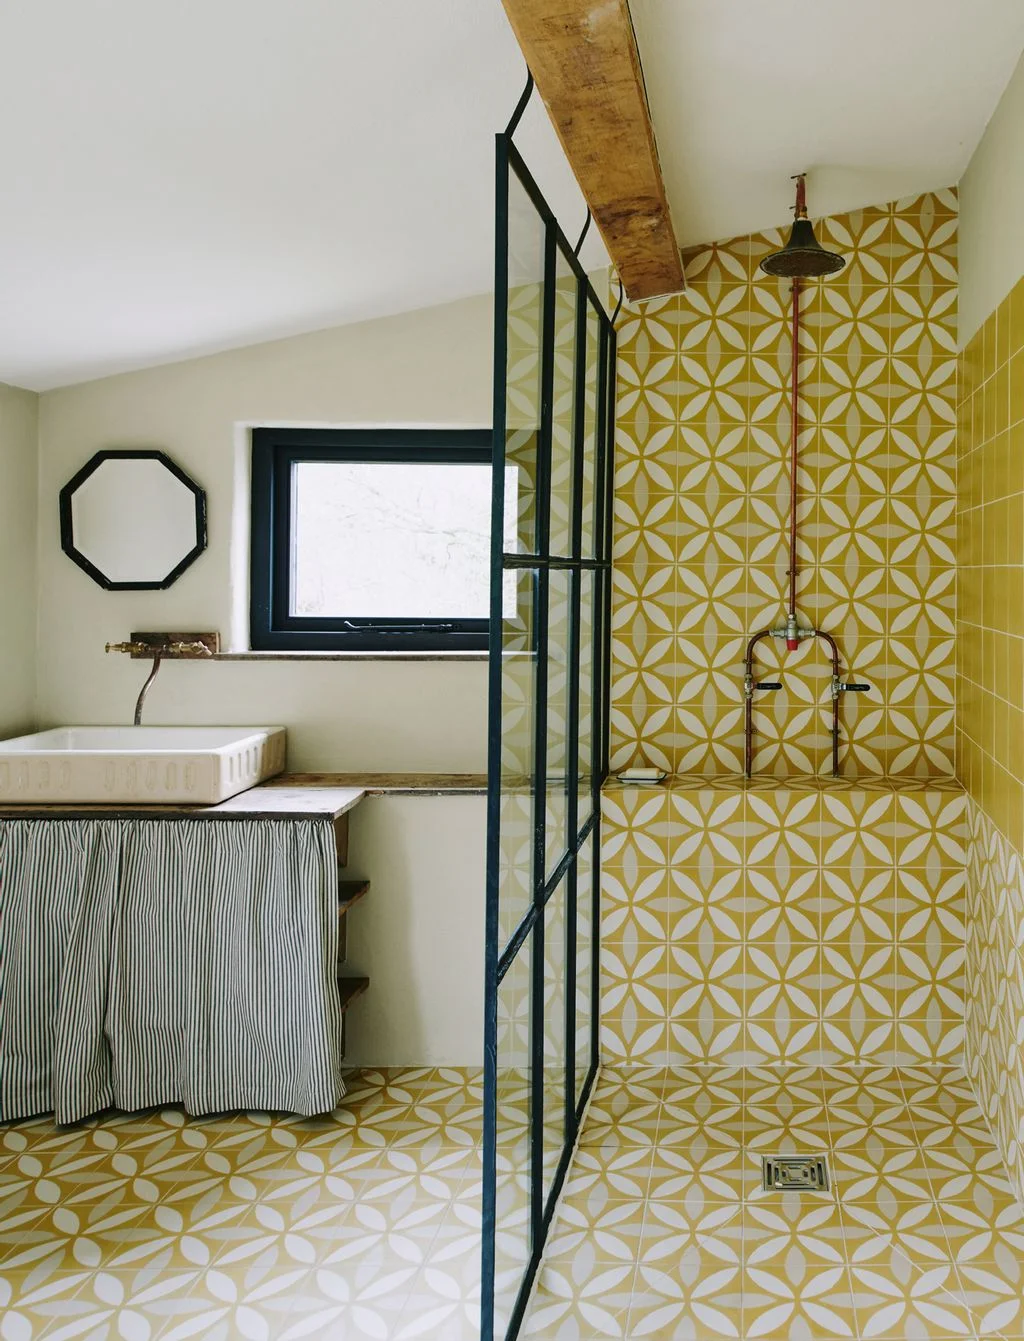
A dark-framed screen separates the yellow shower from the skirted sink, with the entrance open at the front. The circular tile pattern continues from the rear wall across the floor, while plain yellow squares cover the side wall. An exposed wood beam marks the lower ceiling above.
Check standing headroom at the shower position and along the entrance route when planning under a sloping ceiling. Keep nearby fabric beyond the likely splash area. The screen’s free edge should remain easy to see and clean, especially where a strong floor pattern continues through the opening.
IDEA 14 / 20
Repeat Black Outlines Around a Plain Screen
 SaveSupport Non AI Creator
Image credit: Alicia Taylor
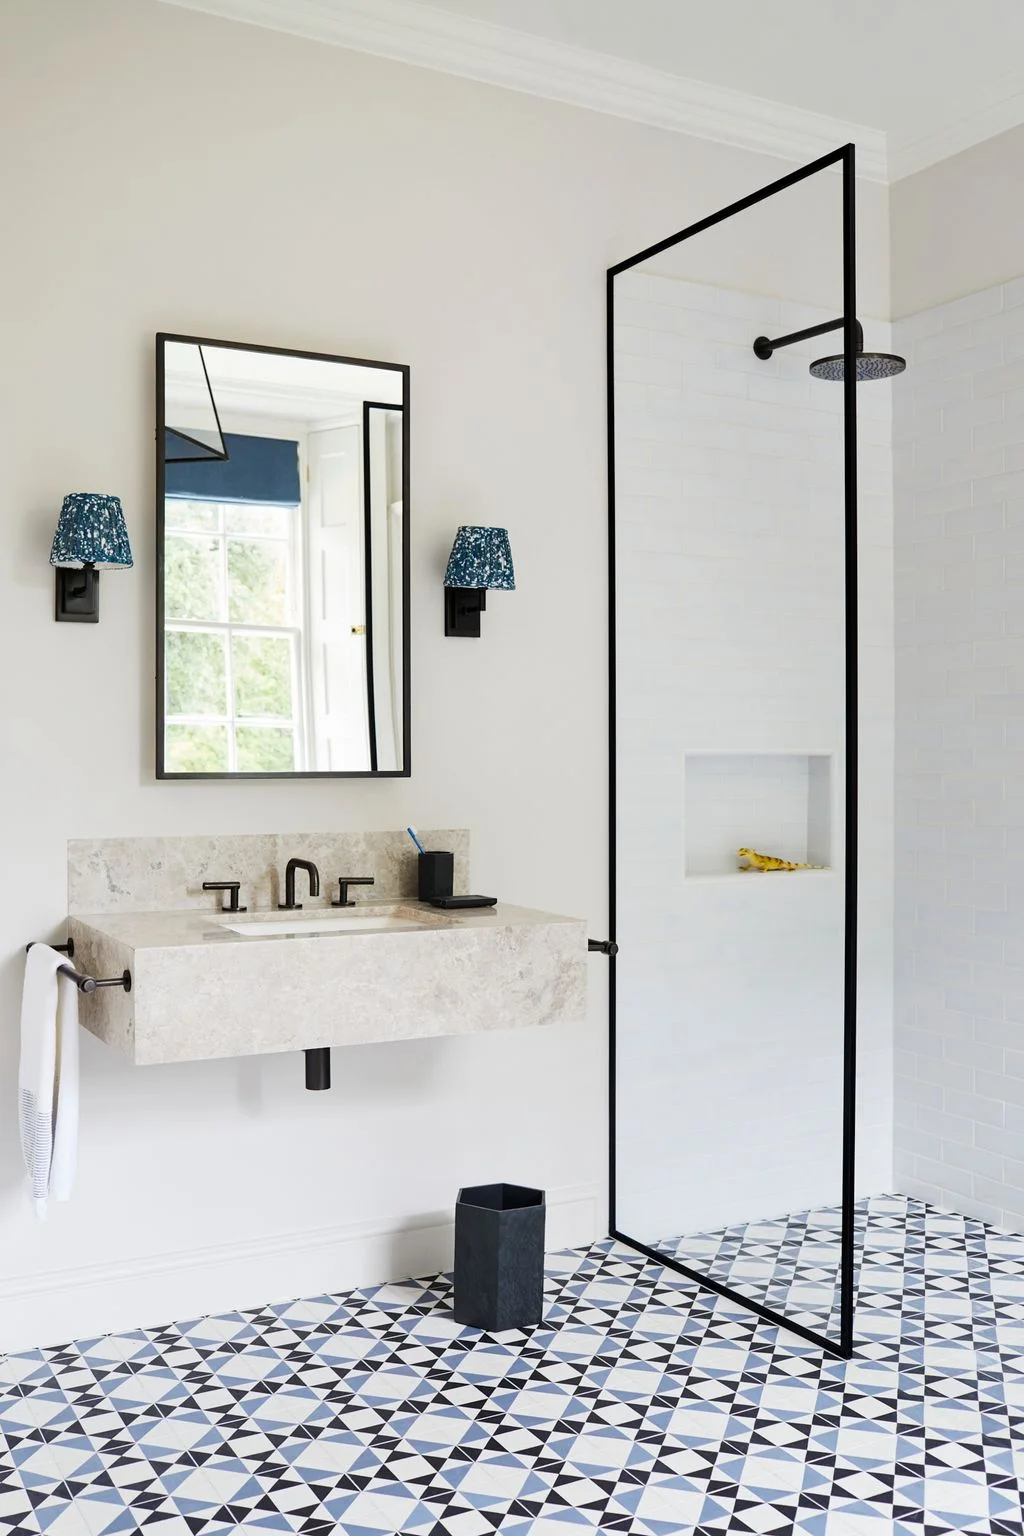
A slim black frame outlines the shower screen and repeats the mirror, faucet and showerhead finishes. White wall tiles keep the shower calm, while the blue, black and white floor supplies the movement. The open entrance remains to the right of the fixed panel beside a recessed shelf.
Check the screen’s position against the sink’s working space, including where someone stands to wash and dry their hands. The panel should protect the basin area without making the entry cramped. Use the frame as a visual reference when testing the passage, rather than measuring only between bare walls.
IDEA 15 / 20
Fit a Bright Shower Beneath the Roof Slope
 SaveSupport Non AI Creator
Image credit: Paul Massey
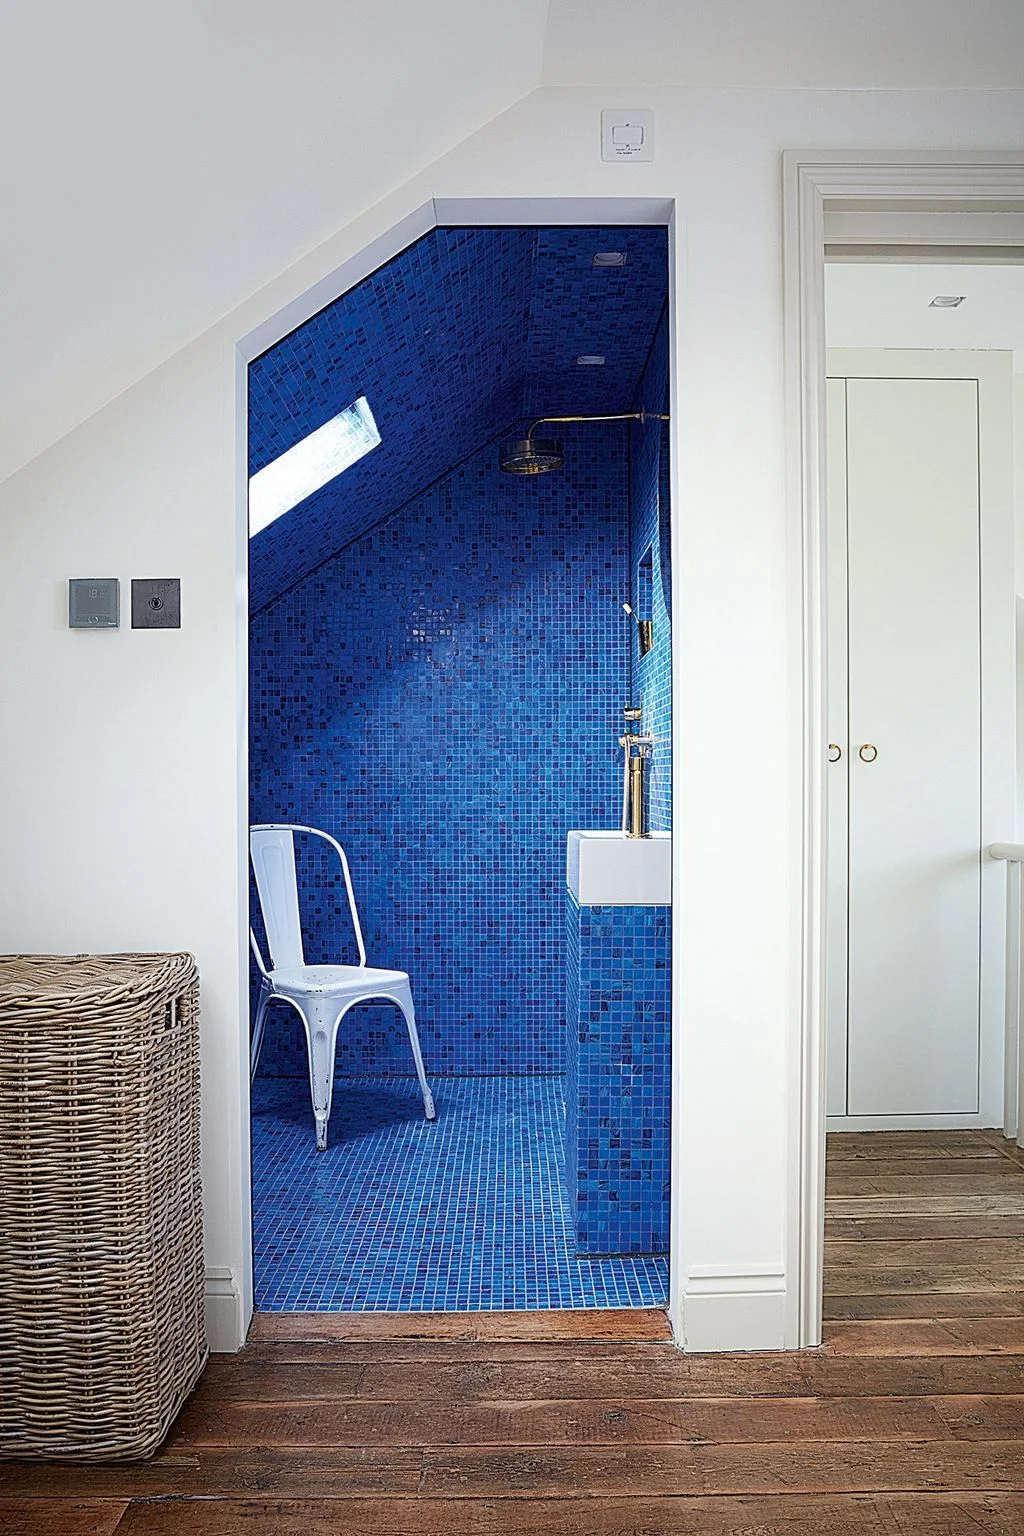
Bright blue mosaic tiles cover the walls, floor and sloping ceiling inside the open shower. A small skylight brings light into the alcove, while brass-colored fittings stand out against the blue. The irregular opening follows the roof shape rather than forcing a rectangular enclosure into the space.
Check usable headroom around the showerhead and the full standing area before copying an attic arrangement. Coordinate roof-window details with the wet-area construction. Keep movable furniture out of the normal approach, and use a purpose-designed shower seat if seated washing is part of the plan.
PART 04
Consider the Details You Use Every Day
IDEA 16 / 20
Pair a Half Wall with Recessed Storage
 SaveSupport Non AI Creator
Image credit: Norman Sizemore / Benvenuti and Stein
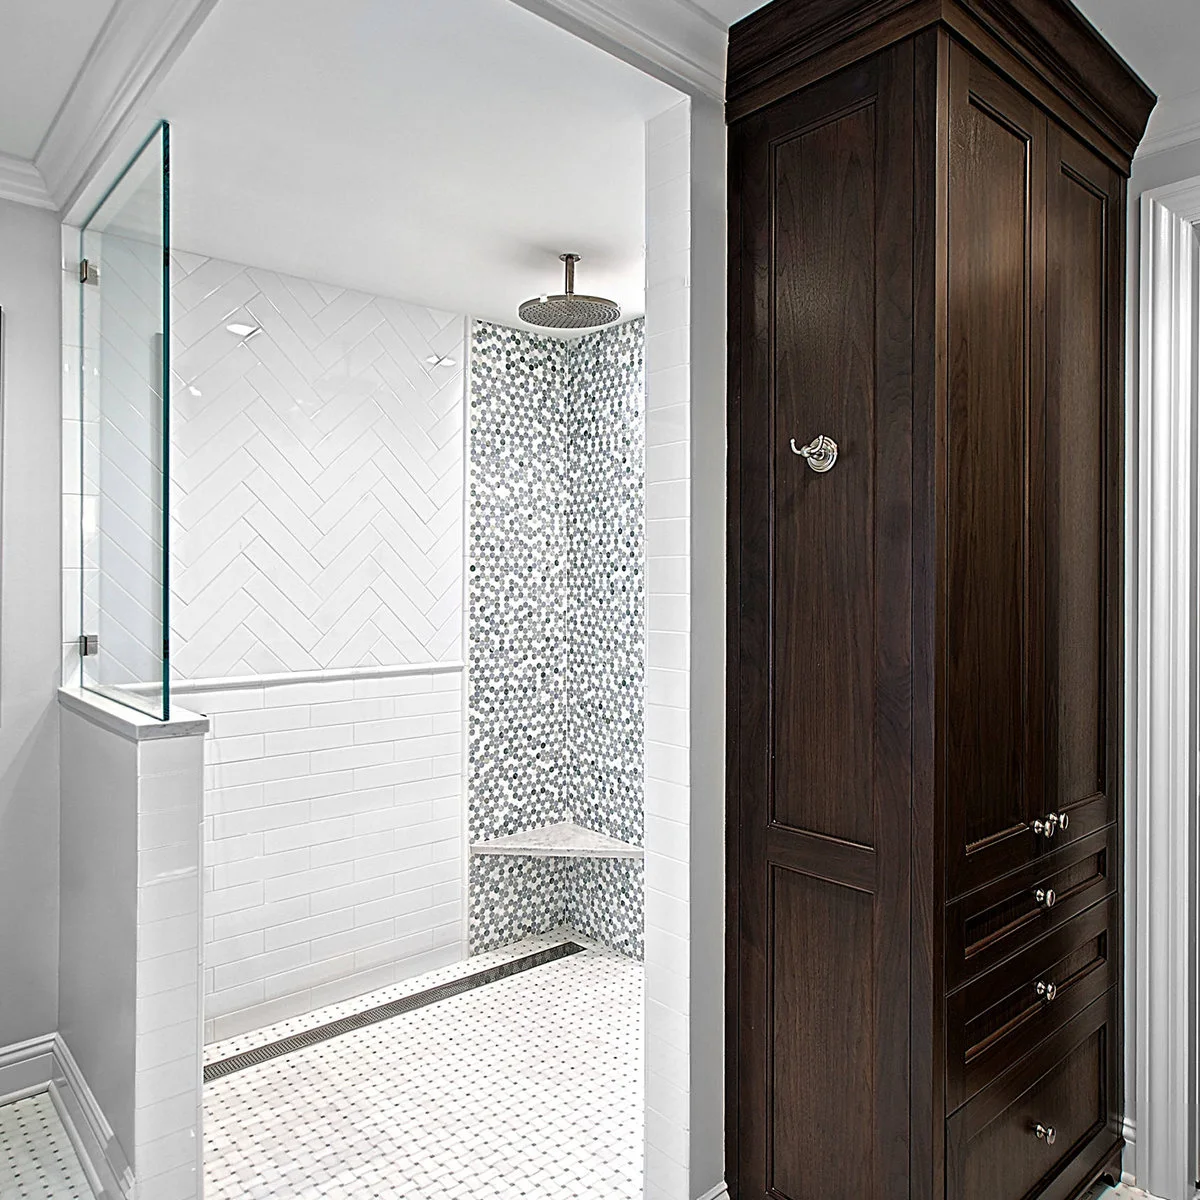
A clear screen rises from the white half wall, leaving the entry open beside the tall wood cabinet. Herringbone tiles cover one shower wall, while a small mosaic corner and triangular shelves add a more detailed storage area. A linear drain follows the base of the wall.
Check the linen cabinet doors with someone standing at the shower entrance so the two uses do not compete. Keep dry storage outside the likely splash path. Plan shelf depth around the bottles you use, and make sure corners remain reachable without stretching around the screen or entering an awkward stance.
IDEA 17 / 20
Keep a Fixed Screen Light Beneath a Skylight
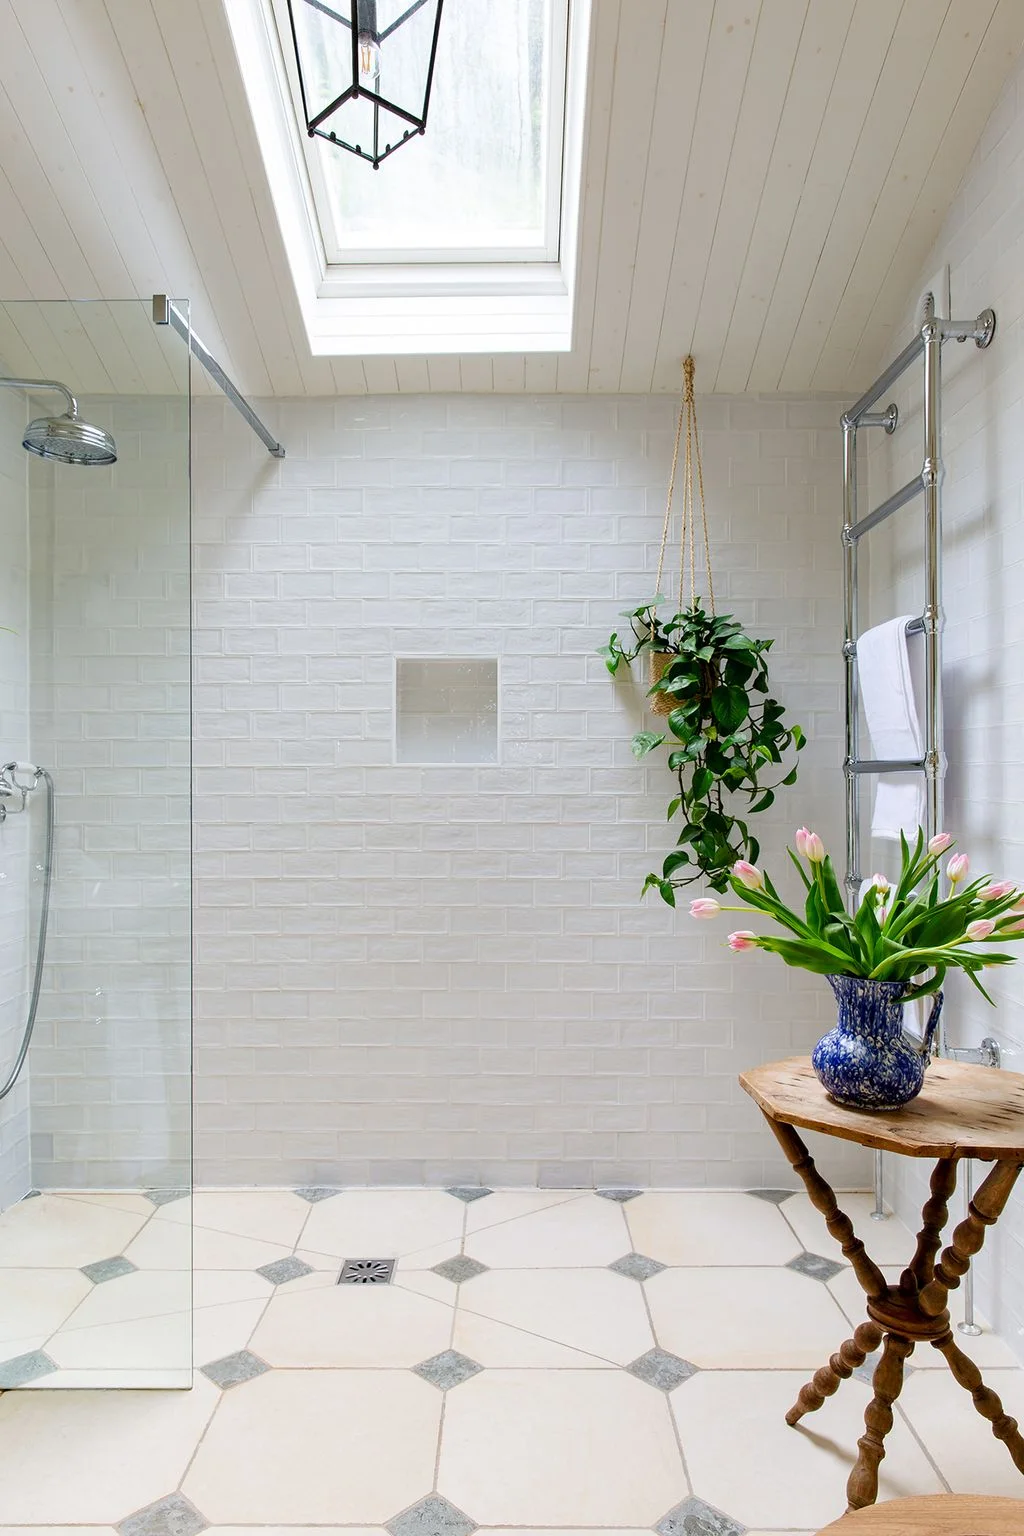 SaveSupport Non AI Creator
Image credit: Owen Gale
A clear panel shelters the showerhead side while leaving an open route beside the white tiled wall. Pale octagonal floor tiles continue through the shower, with smaller gray inserts and a central square drain. The skylight makes the simple arrangement feel brighter without a heavy frame.
Confirm the floor specification and drainage independently of its uninterrupted appearance. Keep the approach clear of decorative tables or trailing plants if they narrow the route. Where daylight is overhead, make sure installed lighting still gives enough visibility for evening use and for cleaning around the screen’s lower edge.
IDEA 18 / 20
Separate the Bath with a Low Wall and Screen
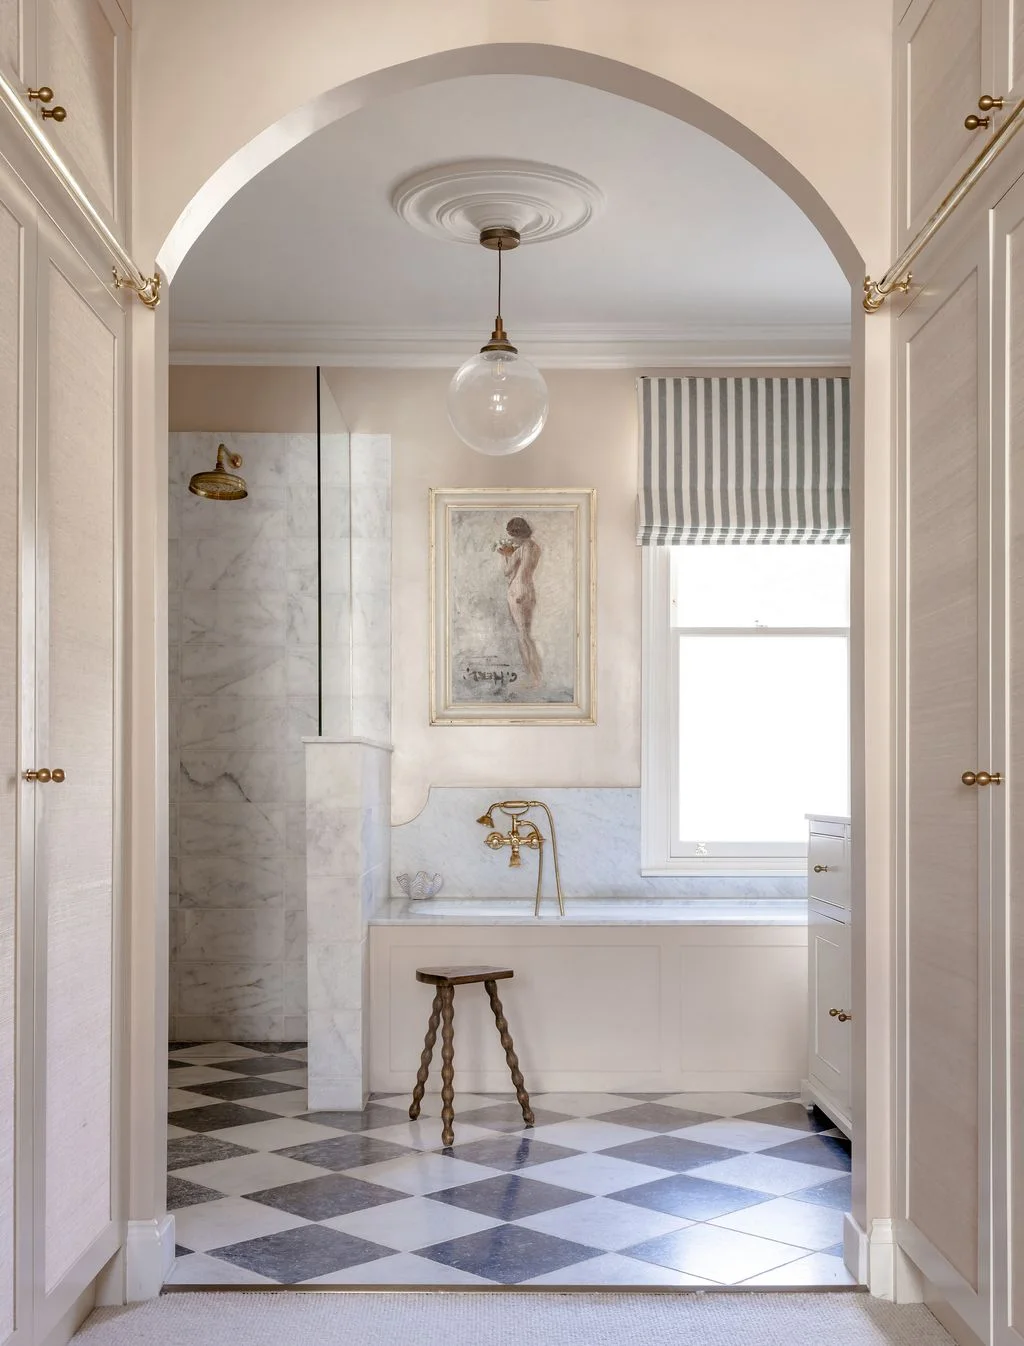 SaveSupport Non AI Creator
Image credit: Owen Gale, Styling: Rachel Moreve
A low pale wall and clear upper screen separate the shower from the built-in bath. The showerhead is tucked to the left, while the bath stays in view beneath the window. Large gray and white checkerboard tiles give the shared floor a strong, orderly pattern.
Check the bath approach and shower entry separately before placing a stool or other accessory between them. Compare bathroom hand towel holder ideas when deciding where nearby drying points belong. Keep screens, faucets and any projecting partition ends from creating awkward reaches as you move between the two fixtures.
IDEA 19 / 20
Use Muted Tile Variation Around a Half Wall
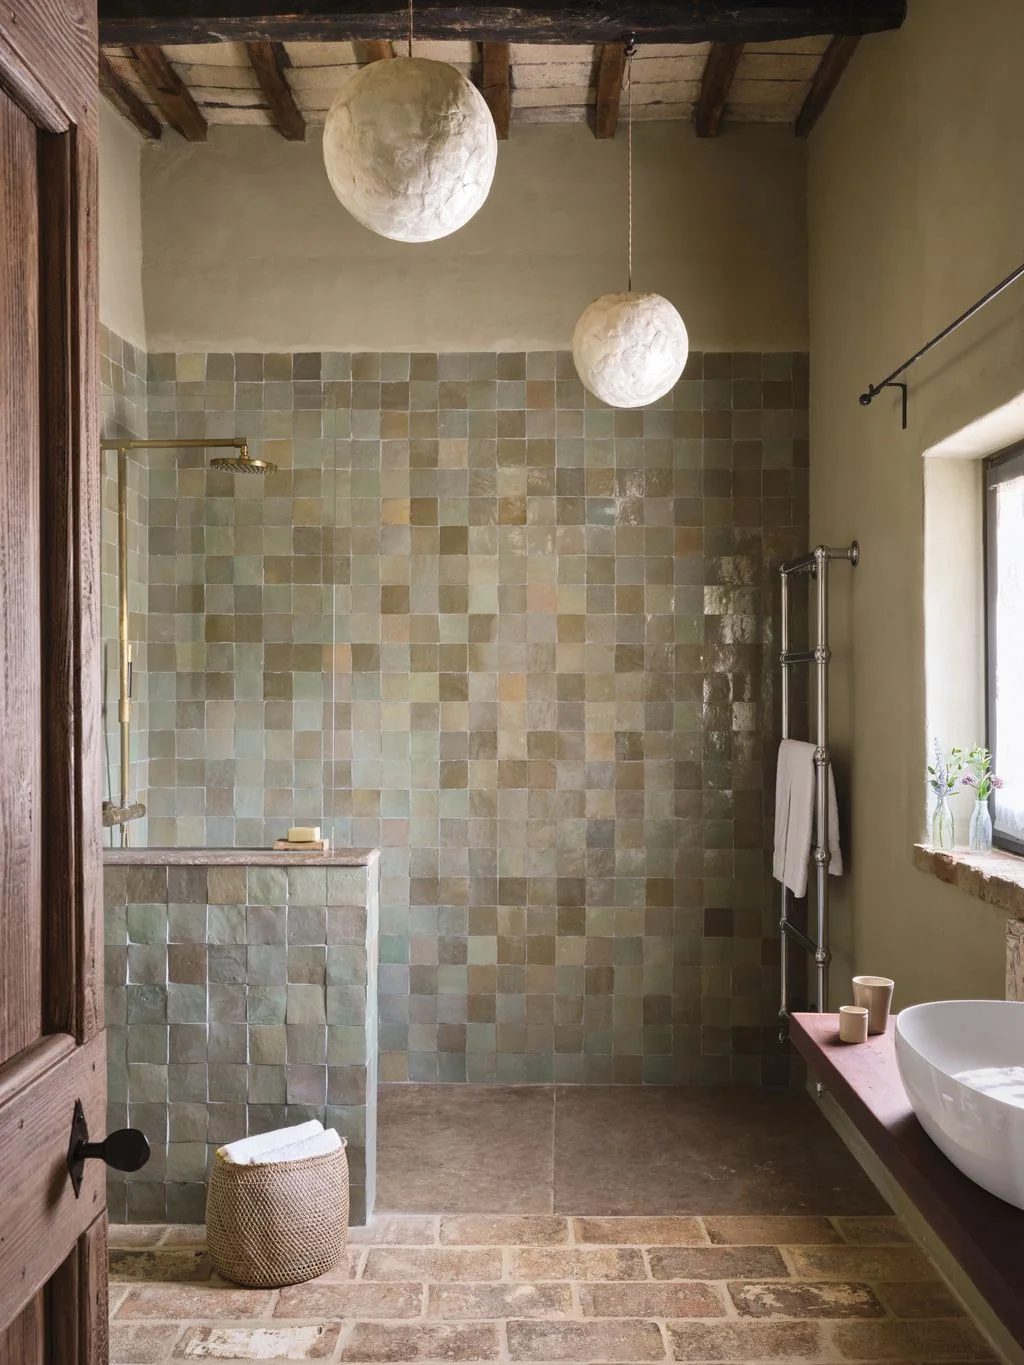 SaveSupport Non AI Creator
Image credit: DAVIDE LOVATTI
A low tiled wall shelters the shower’s front edge, while varied green, gray and beige squares spread across the rear wall. A clear screen rises above part of the partition, keeping the room visually connected. The exposed ceiling beams and pale rounded pendants add contrasting shapes above.
Have lighting selected and positioned for its actual bathroom location rather than copying a decorative pendant without checking suitability. Keep the top of the partition easy to wipe and free of clutter. Compare the tile variation across several samples before ordering, because broad color differences become more noticeable over a large wall.
IDEA 20 / 20
Use a Soft Arch with a Recessed Shelf
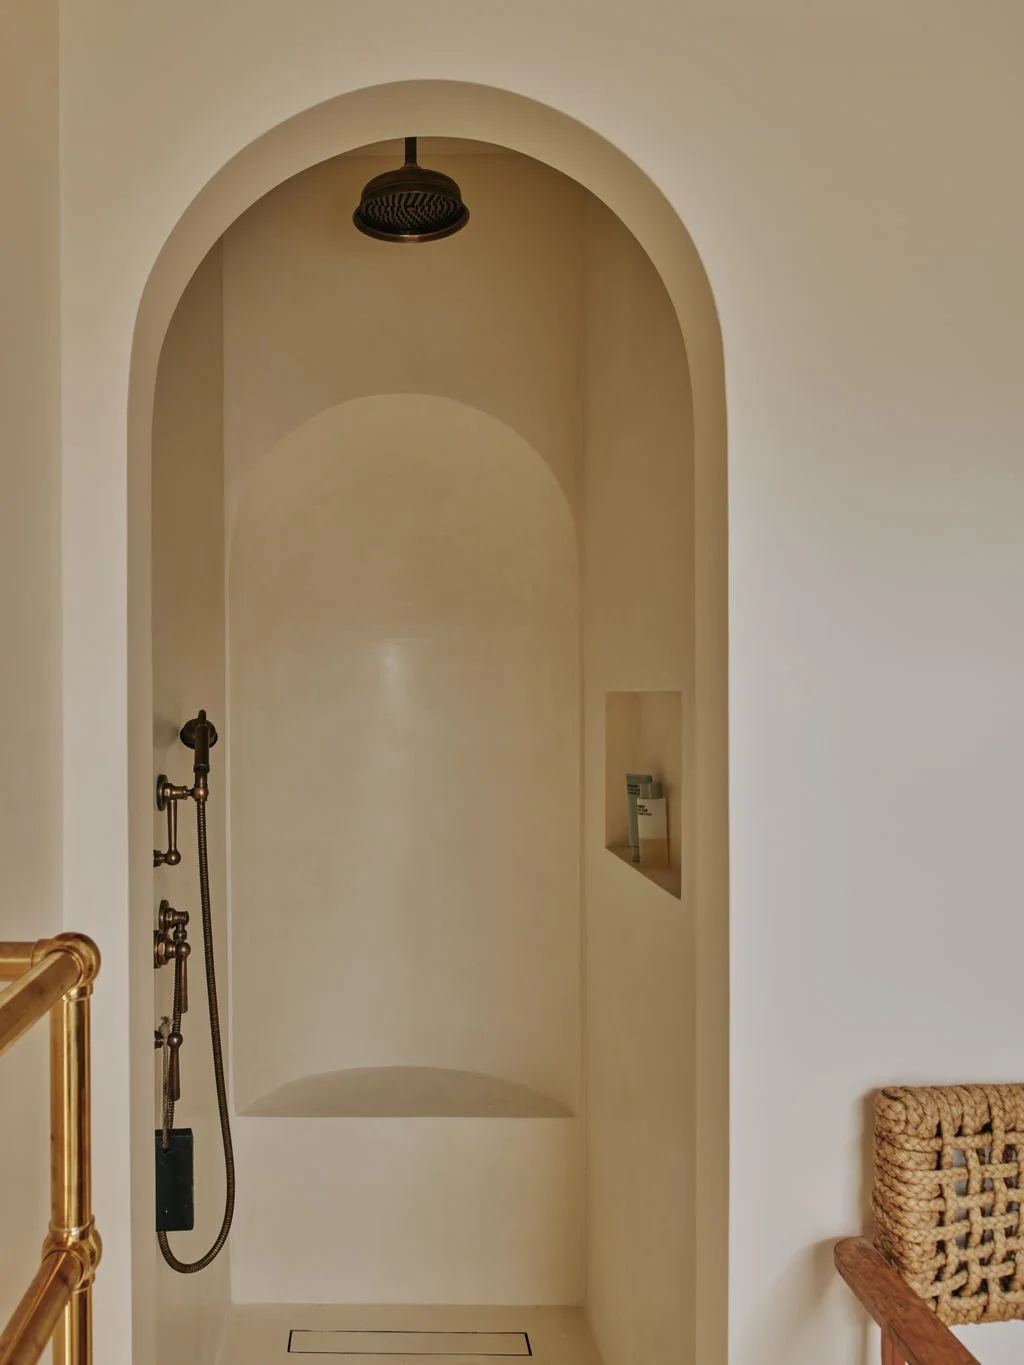 SaveSupport Non AI Creator
Image credit: Christopher Horwood
A soft arch frames the shower without a door or visible glass panel. The warm pale finish continues across the walls and floor, with a recessed shelf on the right and brass-colored controls on the left. A linear drain sits near the front of the washing area.
Choose a complete finish system intended for direct shower exposure, including its preparation and junction details. A smooth appearance alone does not establish water resistance. Keep the niche low enough to reach comfortably and discuss maintenance with the installer before choosing a largely continuous surface for the shower interior.
BRING IT ALL TOGETHER
Plan the Water Before Choosing the Finish
Mark the entrance, showerhead, controls and storage on a measured plan, then walk through the sequence of turning on the water, stepping in and reaching for a towel. Check what stands beyond the opening and whether it can tolerate occasional splash.
Have a suitable bathroom professional coordinate the floor construction, drainage, waterproofing and ventilation. Removing a door does not automatically create a step-free or accessible shower. Keep the actual users, cleaning routine and room layout at the center of the decision.