A tiled fireplace can be a small border around an existing opening or a broad surface that shapes the whole room. The most useful choice starts with the fireplace you actually have: its opening, surround, hearth and the way the room is used. Color and pattern come after those fixed details.
These examples show several ways to place tile without treating every fireplace as the same construction. A photograph can suggest a palette or layout, but an operating fire needs an appliance-specific installation. Confirm the tile, backing, adhesive, hearth and clearances with an appropriate installer before work begins.
PART 01
Give an existing surround a clear color
IDEA 01 / 16
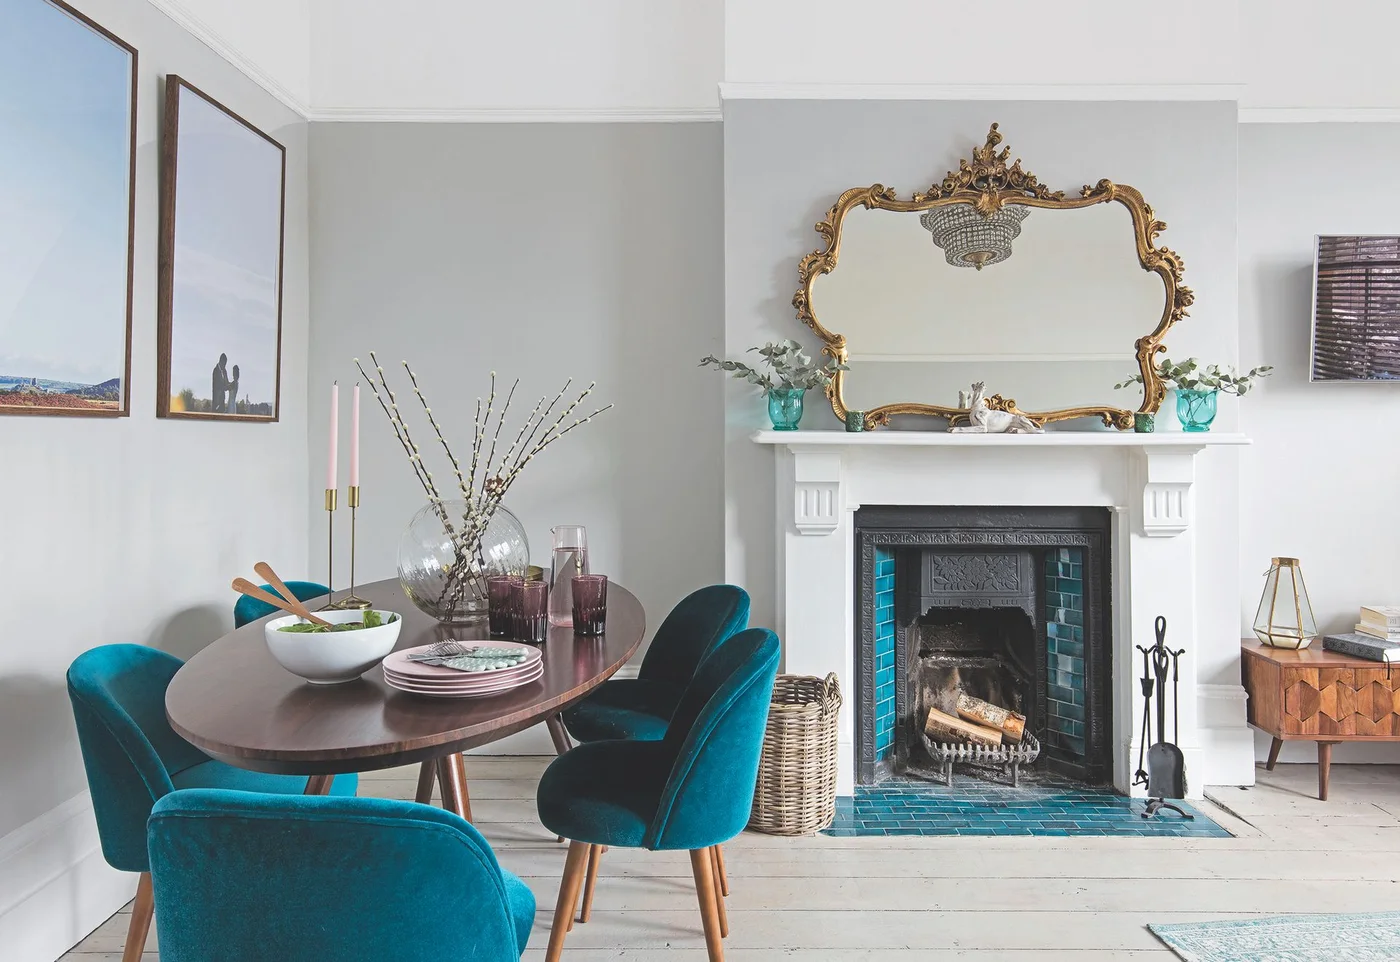
Connect a Teal Hearth to Dining Chairs
 SaveSupport Non AI Creator
Image credit: Future PLC / David Giles
Teal tiles give this pale dining room a concentrated patch of color, linking the fireplace to the chairs around the table. The white mantel separates the colored inset from the gray wall. Continuing the tile across the hearth makes the small fireplace feel like a complete feature rather than an isolated decorative strip.
Compare tile samples with the upholstery in the actual room; a close relationship is enough without an exact match. Keep chairs and baskets outside the operating clearances of a working fireplace. Our dining room accent wall ideas offer other ways to introduce color around a table without changing every wall.
IDEA 02 / 16
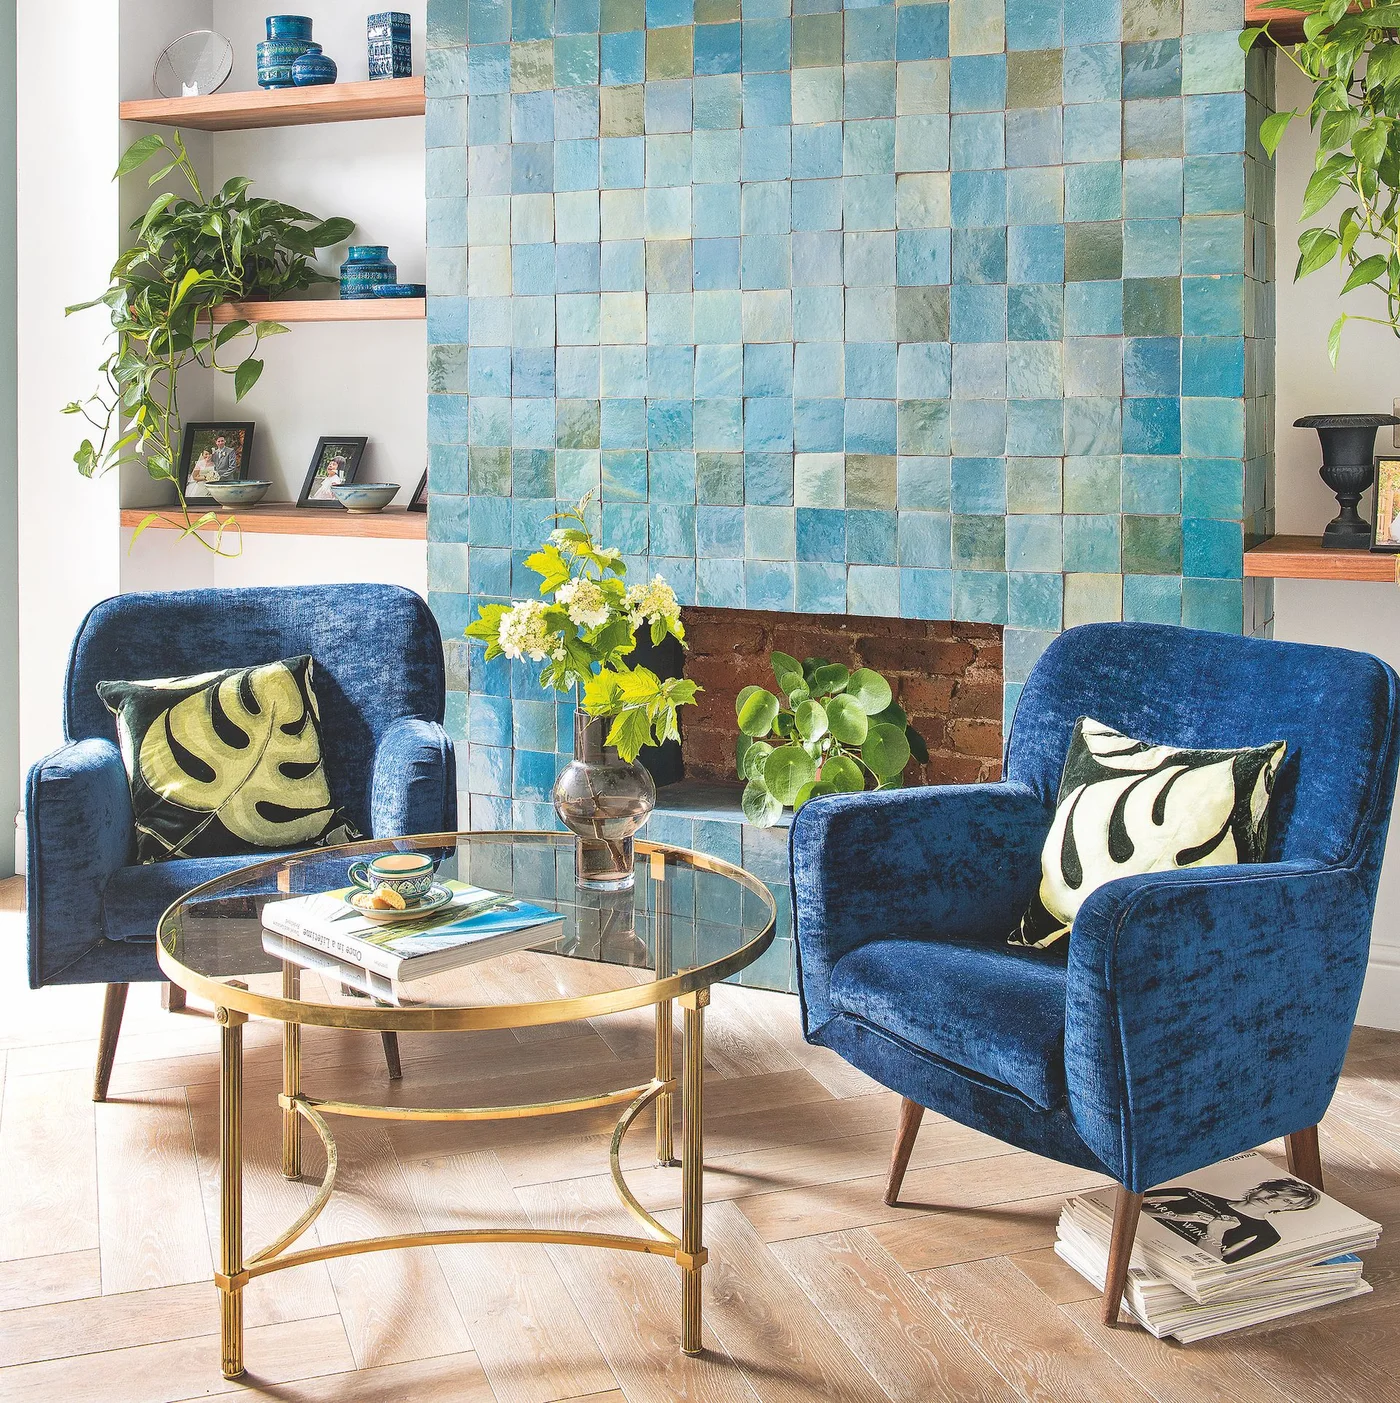
Let Mixed Blue Squares Cover the Chimney Breast
 SaveSupport Non AI Creator
Image credit: Future PLC/Colin Poole
Variation between the blue and green squares gives this broad chimney breast much of its character. Simple shelves on either side keep the edges legible, while the blue chairs bring the color forward into the seating group. Plants occupy the opening in this decorative arrangement, turning it into part of the display.
Lay out a selection of tiles before installation so their tonal variation is distributed rather than clustered accidentally. Decide whether the opening is decorative or operational before planning plants and shelves. A tiled surface alone does not establish fire safety; the complete assembly and required clearances must suit the actual appliance.
IDEA 03 / 16
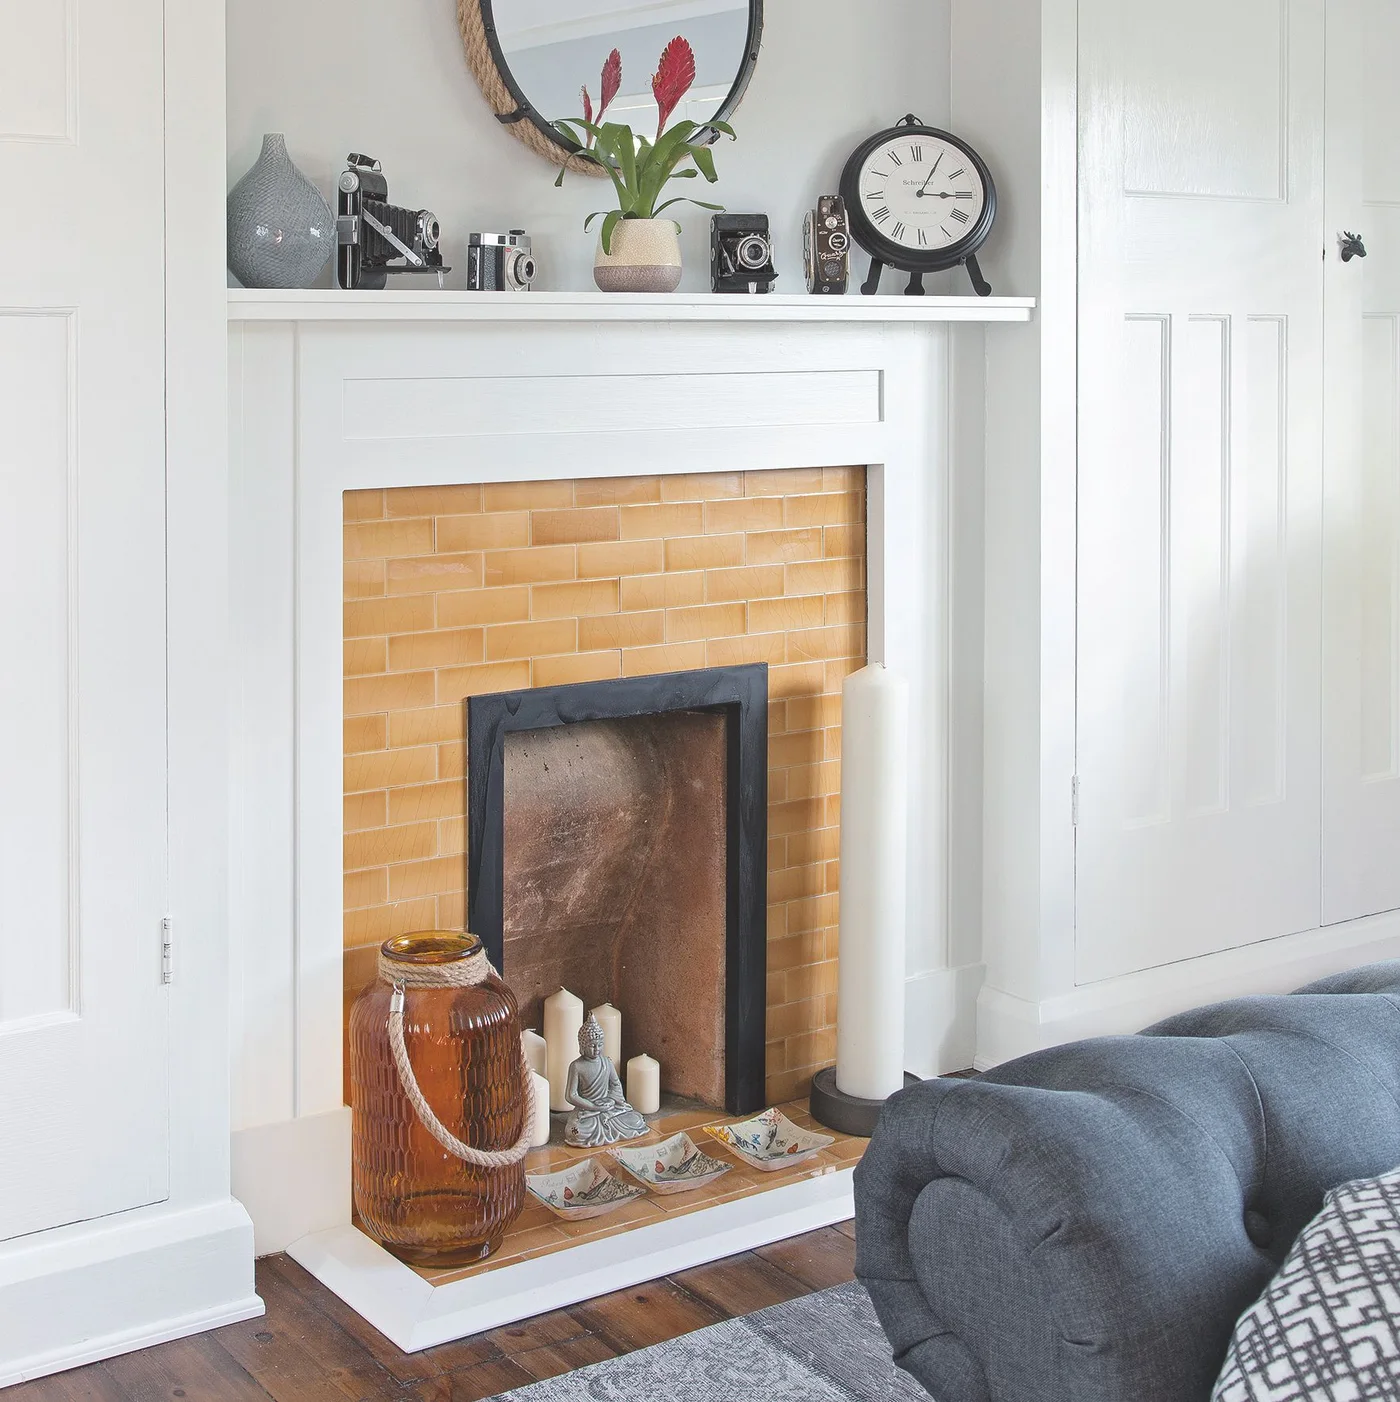
Warm a White Surround with Amber Tile
 SaveSupport Non AI Creator
Image credit: Future PLC / David Giles
Amber tile adds warmth inside the broad white surround, with a matching hearth drawing the color out toward the room. The gray sofa and pale cupboards keep the rest of the arrangement quieter. Small objects repeat the amber tone, but the strong rectangular opening remains the clear center of the tiled area.
Use a full-size layout to check narrow cuts beside the opening and the finished edge of the hearth. If retaining an old surround, assess its condition before covering neighboring surfaces. Decorative candles and vessels belong only where they are stable and appropriate to the fireplace use, rather than being copied from the photograph into an active fire area.
IDEA 04 / 16
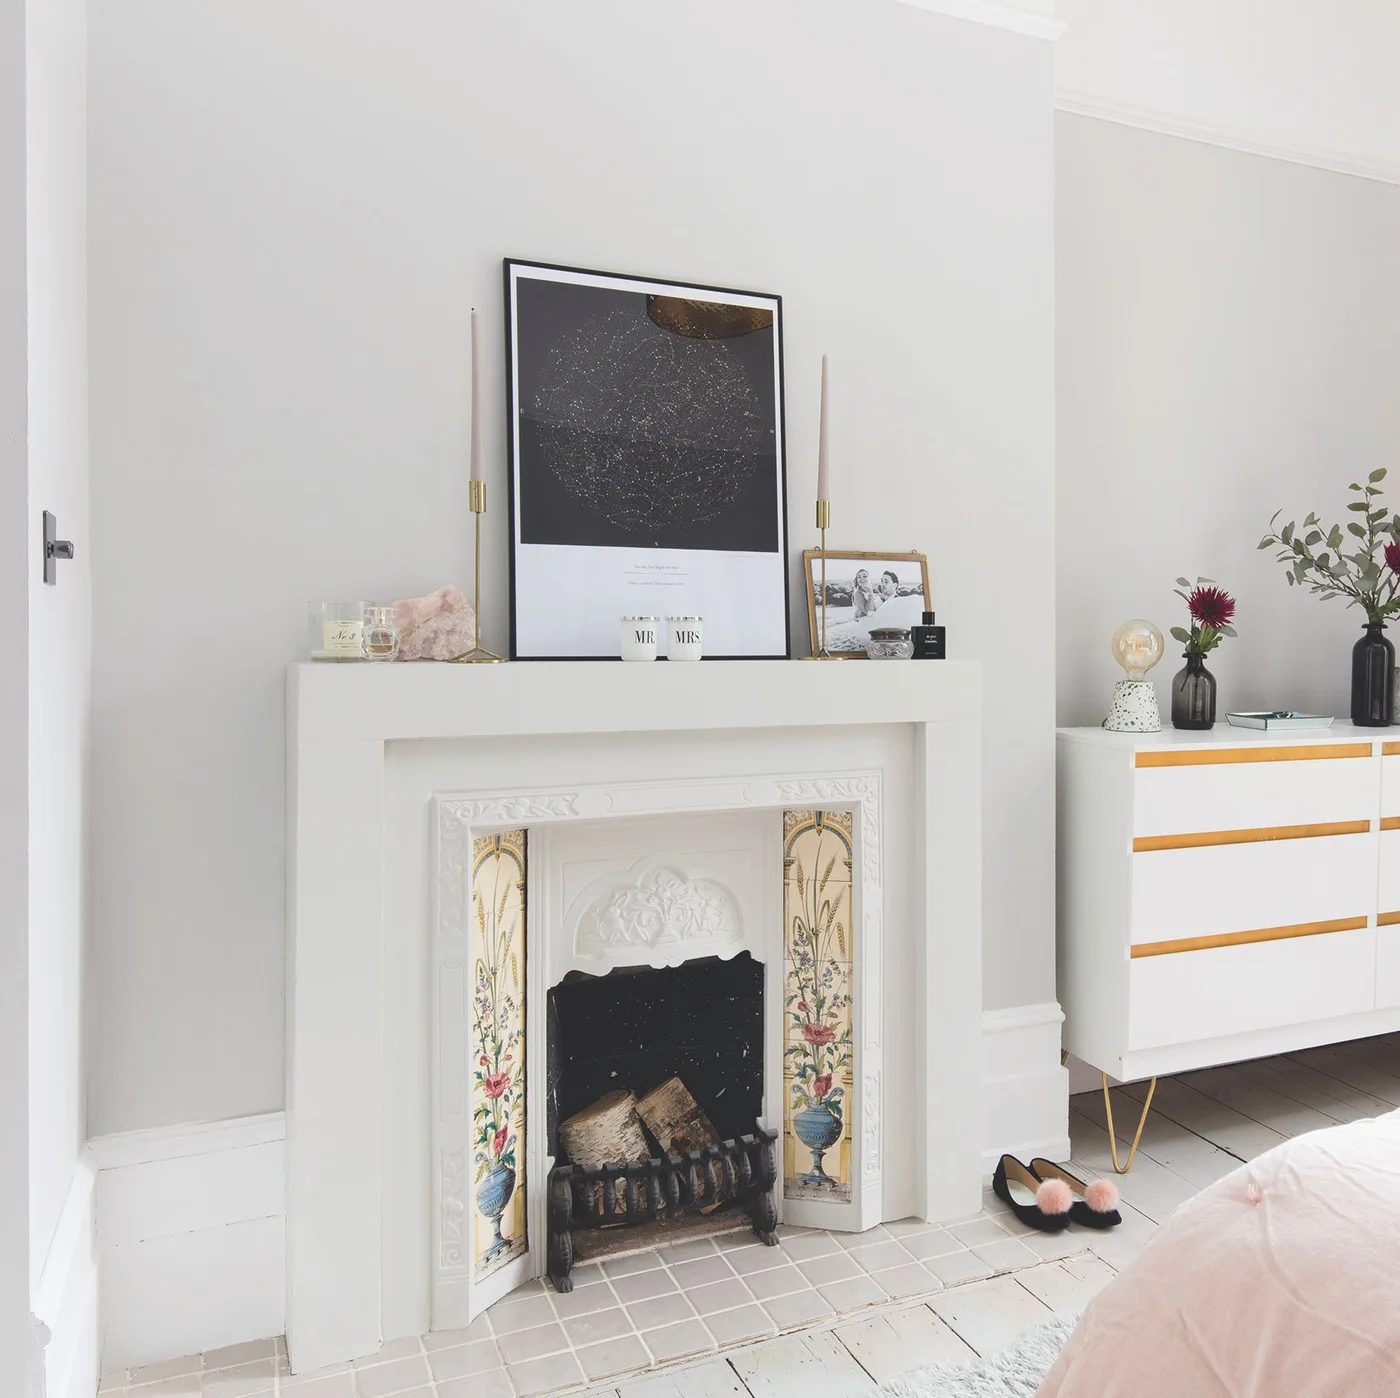
Preserve Narrow Floral Tile Panels
 SaveSupport Non AI Creator
Image credit: Future PLC / David Giles
Narrow floral panels supply intricate detail while leaving most of the fireplace white. Their vertical shape suits the small opening, and the pale square hearth provides a quieter base. The surrounding bedroom stays restrained, allowing the flowers and fine borders to remain visible without a larger expanse of pattern.
Inspect original decorative tiles before considering replacement, and seek suitable restoration advice if their finish or fixing is fragile. Avoid assuming a tile can be cleaned with any household product. Our bedrooms with paneling show other ways to give a pale bedroom character while keeping the larger wall surfaces relatively calm.
PART 02
Plan the recess and hearth together
IDEA 05 / 16
Use a Herringbone Lining Inside a Wood Surround
 SaveSupport Non AI Creator
Image credit: Future PLC / David Giles
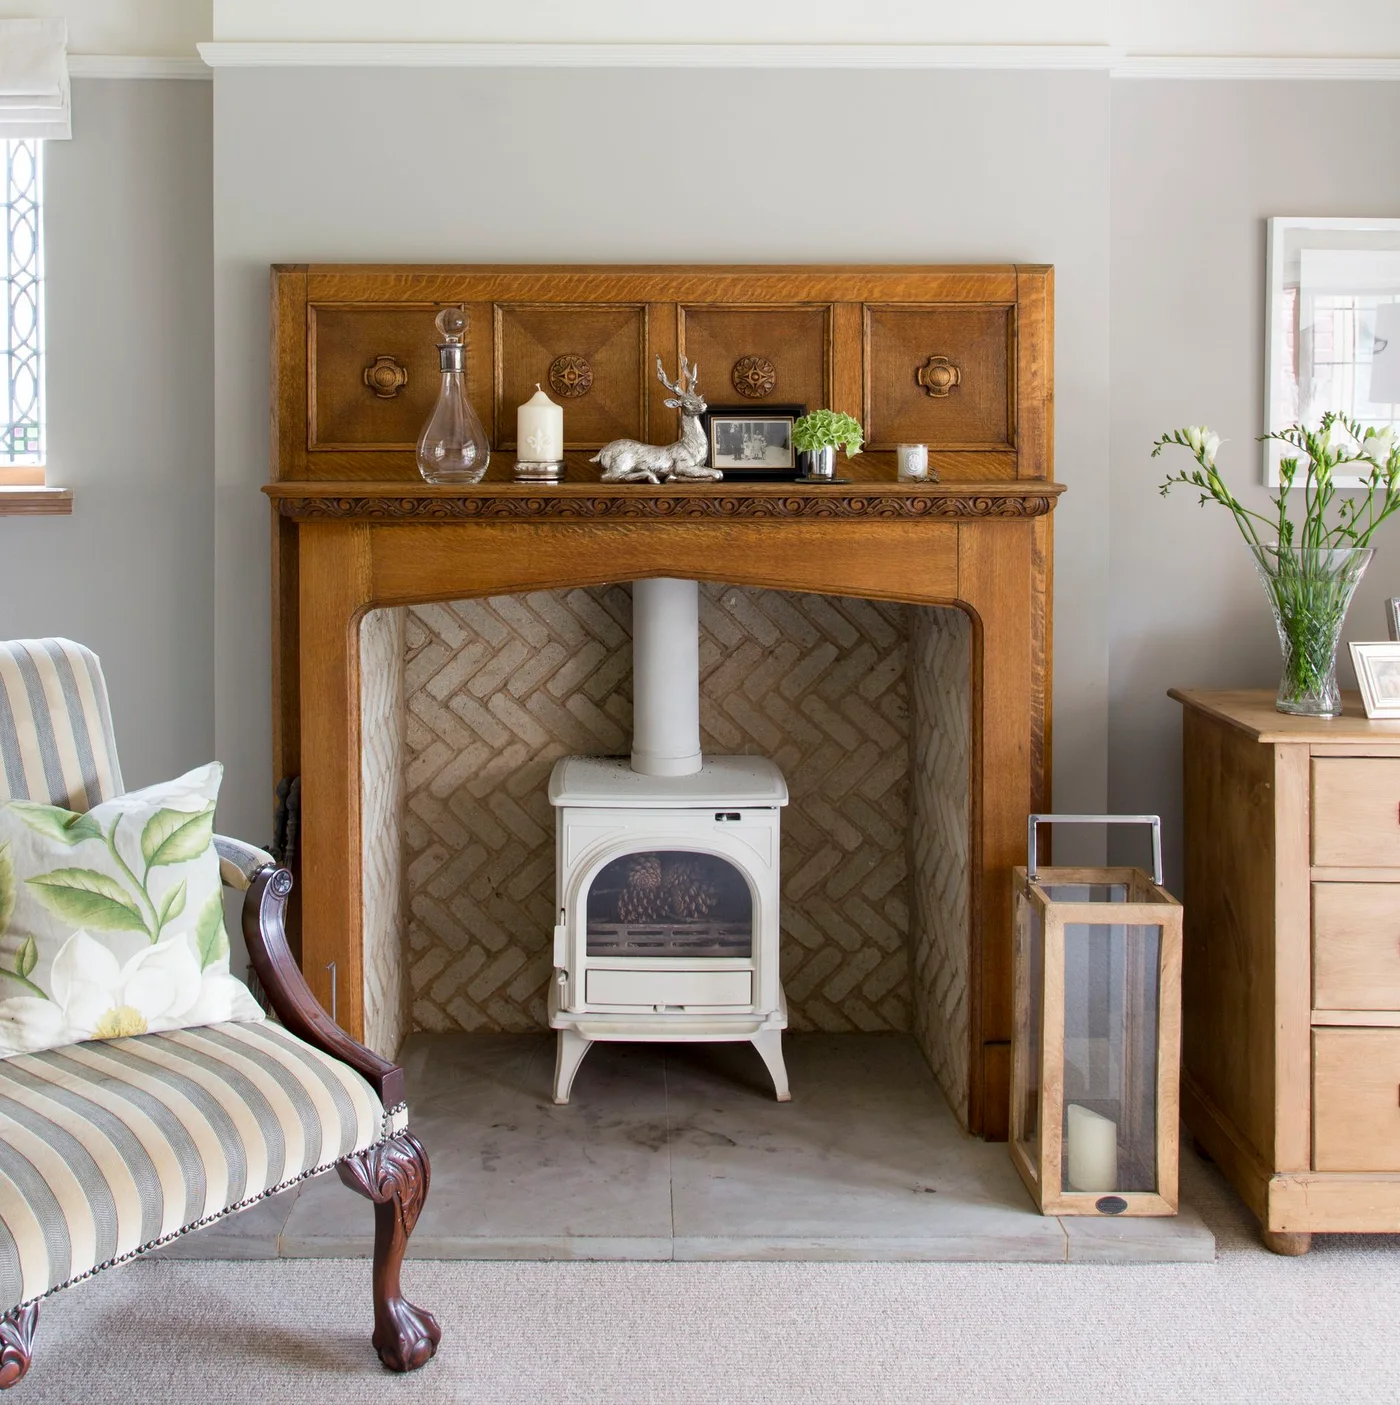
The herringbone arrangement introduces diagonal movement inside the otherwise rectangular wood surround. Its pale color relates to the small stove and hearth, while the carved mantel remains the stronger outer frame. Keeping the pattern within the recess shows how a detailed lining can work without covering the full chimney breast.
Confirm the proposed lining product, substrate and complete fixing system with the installer rather than choosing from appearance alone. A wood surround requires appliance-specific clearance checks, even beside a pale or seemingly solid lining. Keep the nearby chair, lantern and cabinet beyond the required distances and leave maintenance access practical.
IDEA 06 / 16
Carry a Black-and-White Pattern onto the Hearth
 SaveSupport Non AI Creator
Image credit: CTD Tiles
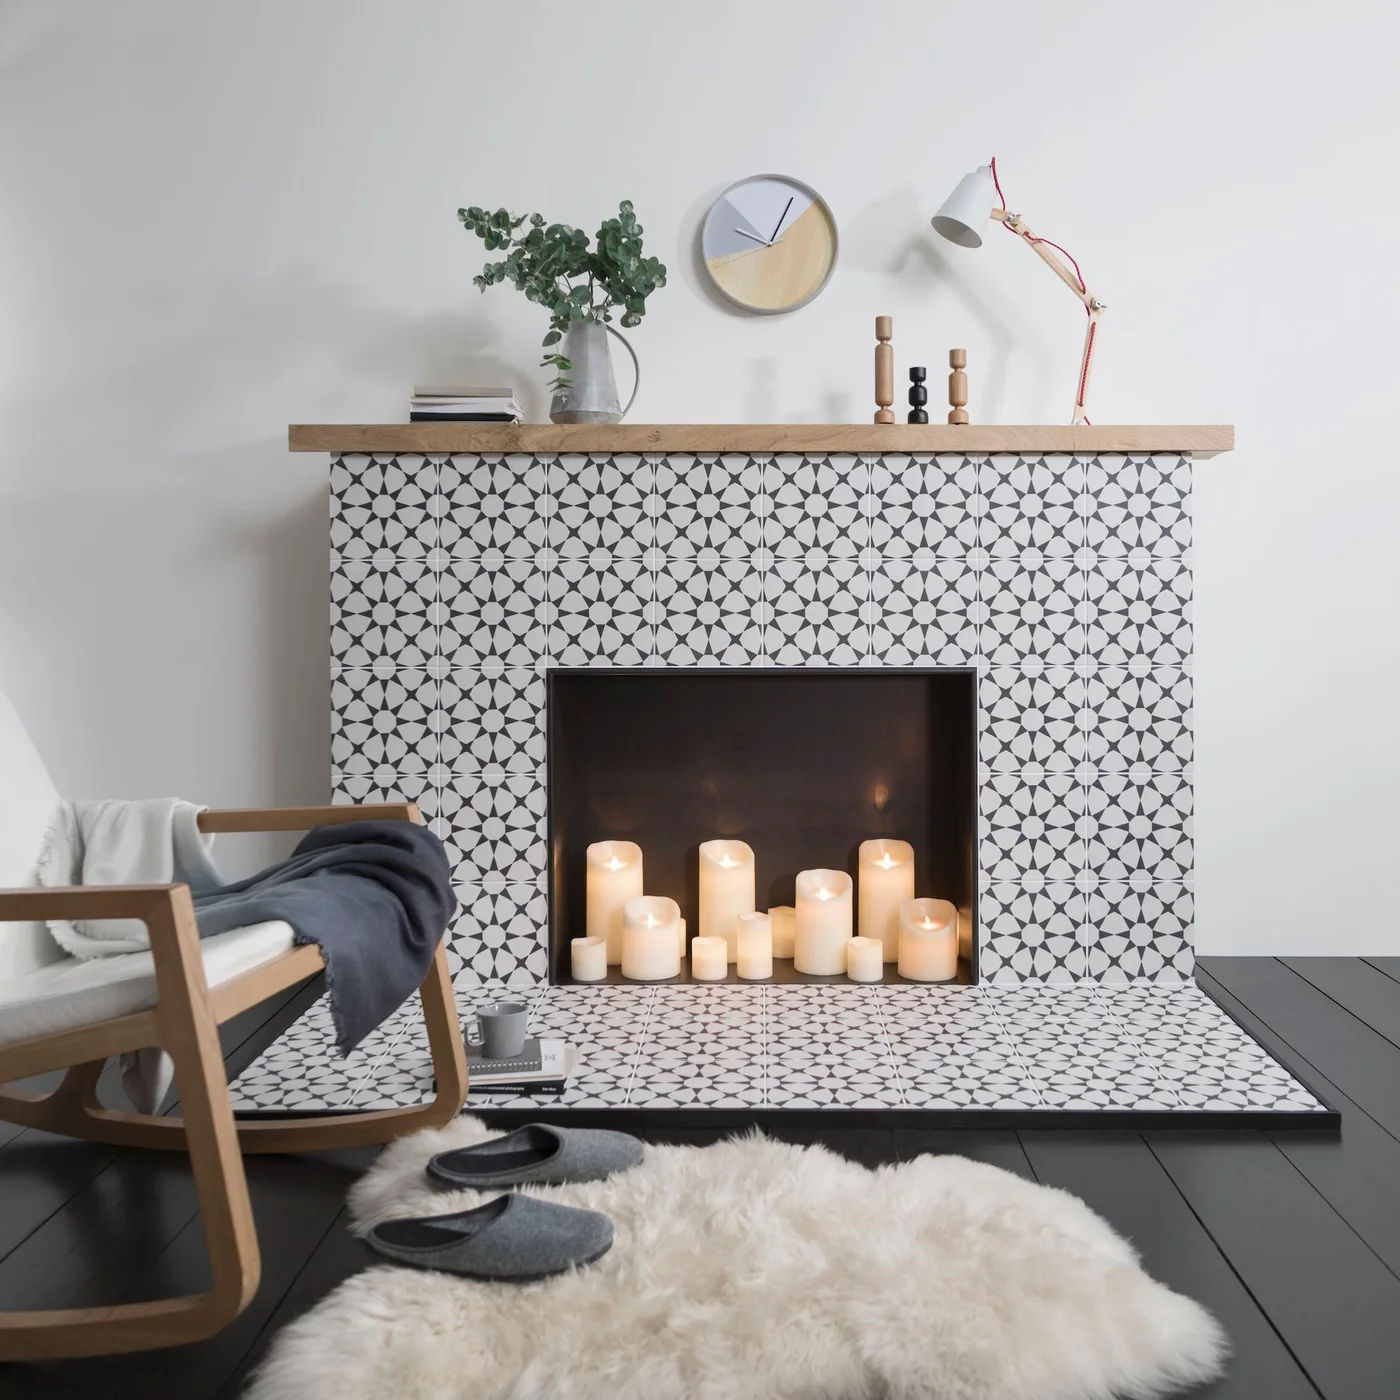
The same repeating pattern covers the face and hearth, making the fireplace read as one strong geometric shape. A plain wood mantel offers a clear upper boundary, while the surrounding white wall prevents the pattern from spreading across the whole room. Candles occupy the opening in the pictured decorative arrangement.
Plan the pattern from the center of the opening and check its alignment at the change from vertical face to horizontal hearth. Specify a surface suitable for each location and the intended fireplace use. Flameless candles can provide a similar display without a cluster of open flames; keep decorative furniture clear if the fireplace operates.
IDEA 07 / 16
Pair a Terracotta Hearth with Exposed Brick
 SaveSupport Non AI Creator
Image credit: Arada
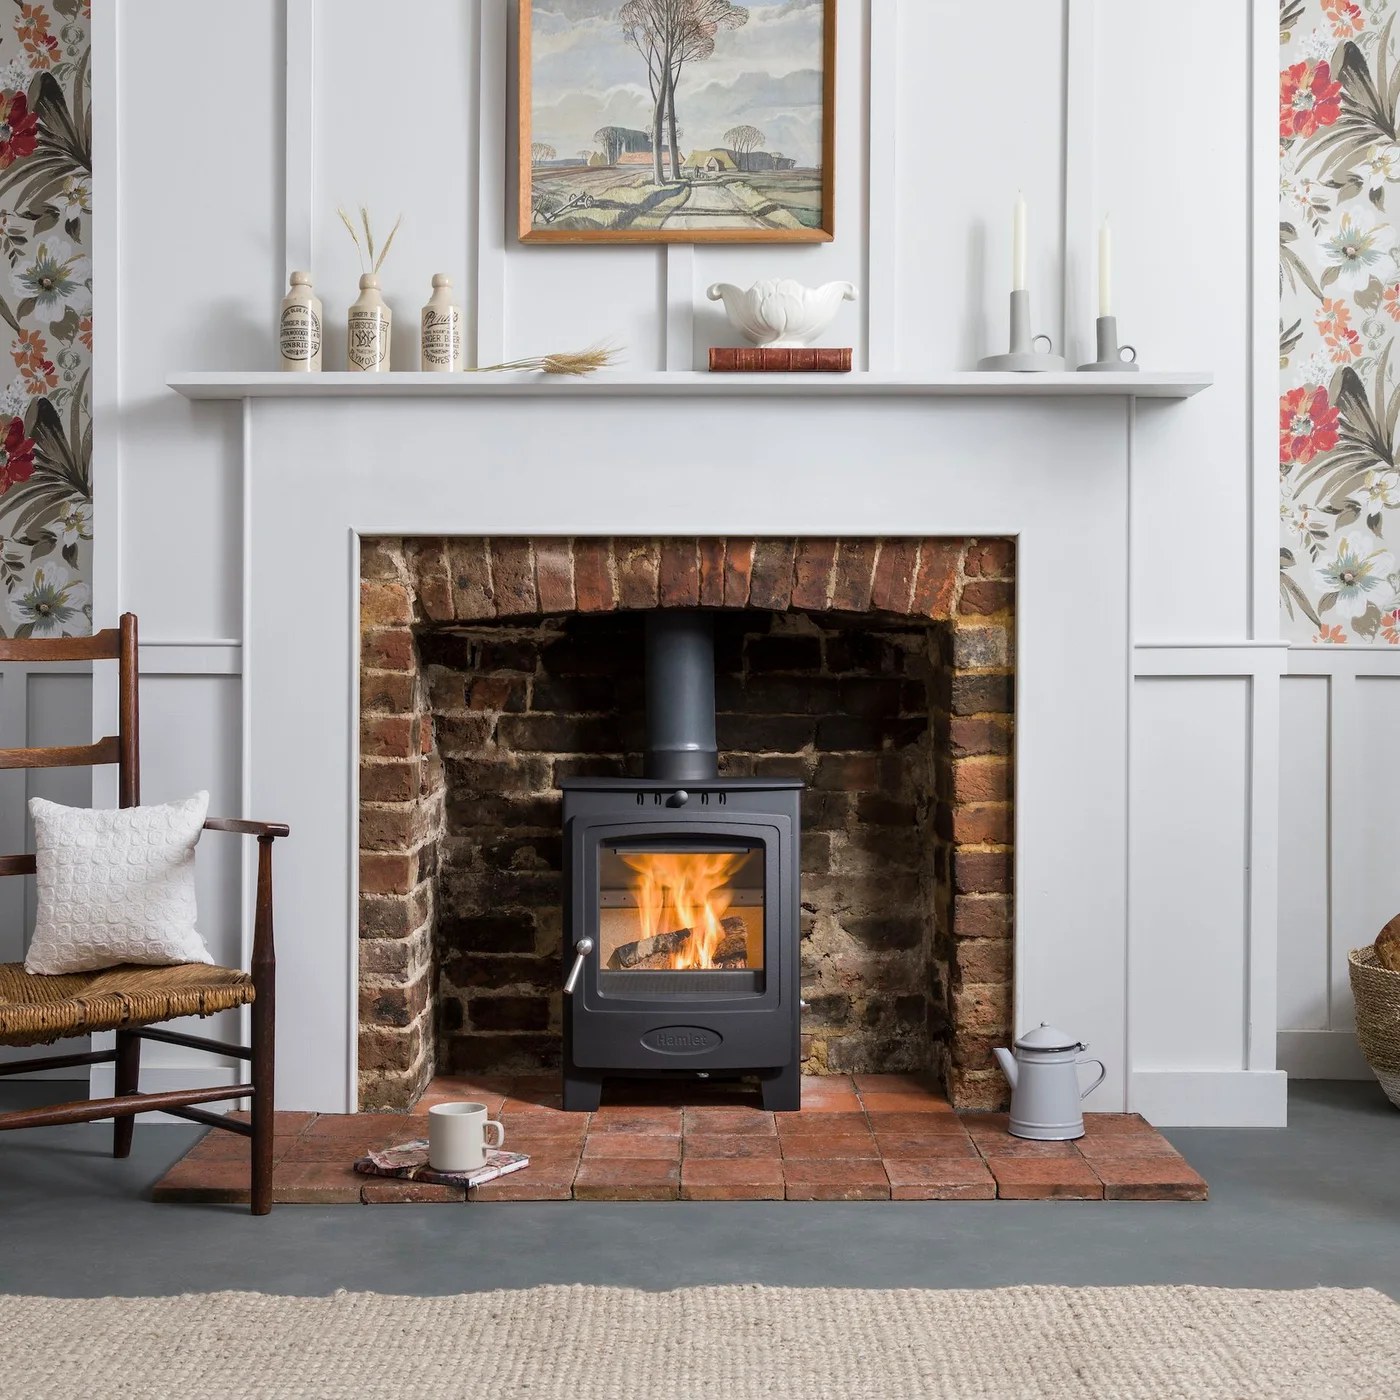
Reddish hearth tiles pick up the warm tones of the brick opening while remaining visually distinct from it. The pale surround and paneling give the rougher surfaces a clean frame. Floral wallpaper and a simple chair soften the room around the stove without requiring another decorative treatment directly behind it.
Check the hearth projection, construction and edge detail against the specific stove instructions and local requirements. Do not infer adequate clearances from the position of a chair or ornament in a photograph. Leave enough accessible surface for the maintenance the appliance requires, and choose cleaning methods appropriate to the actual tile and grout.
IDEA 08 / 16
Contrast Pale Herringbone with a Graphic Hearth
 SaveSupport Non AI Creator
Image credit: Arada
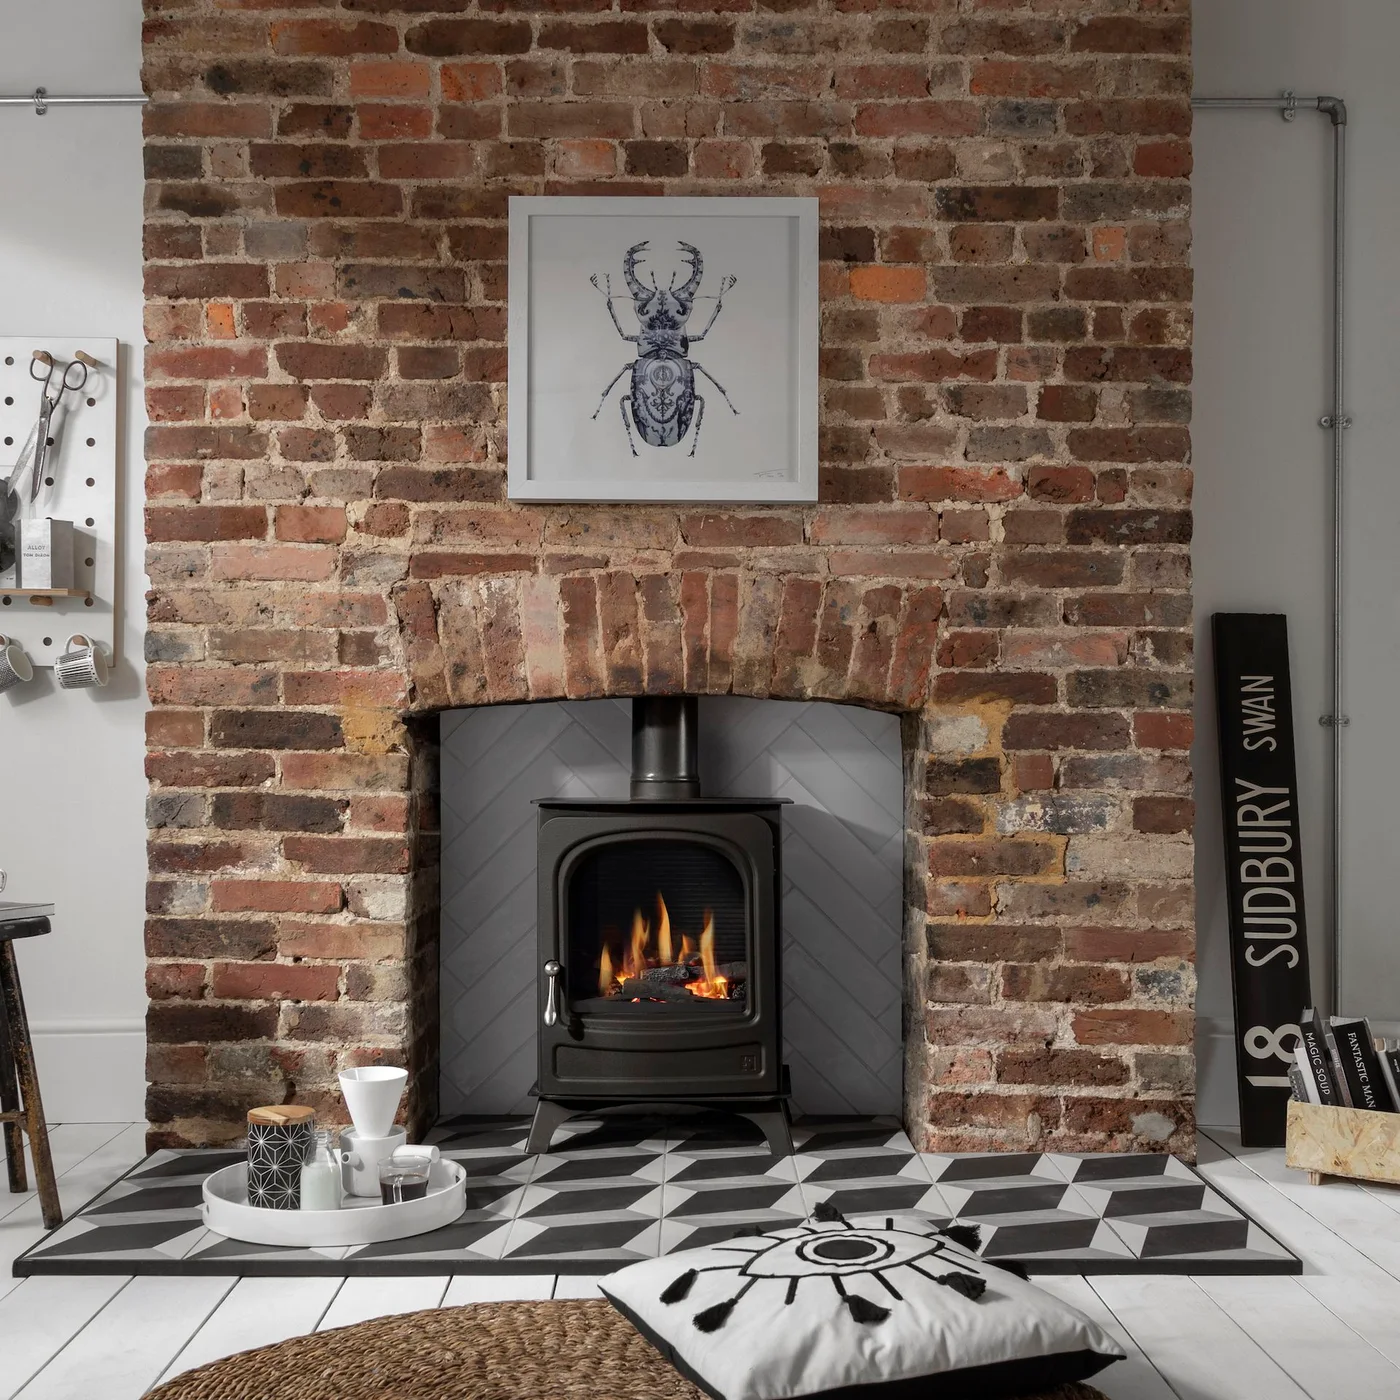
Two patterns have different jobs here: the pale herringbone creates a quieter background inside the opening, while the bold hearth defines the floor area. Exposed brick separates the tiled inset from the white walls. The black stove connects naturally to the darker shapes in the geometric floor pattern.
Keep the lining and hearth specifications separate when discussing materials with an installer, because their exposures and construction needs may differ. Check where pattern cuts will fall around the stove footprint. Remove the decorative tray and nearby soft furnishings from the operating area rather than using this styled photograph as an installation diagram.
PART 03
Balance tile with other wall finishes
IDEA 09 / 16
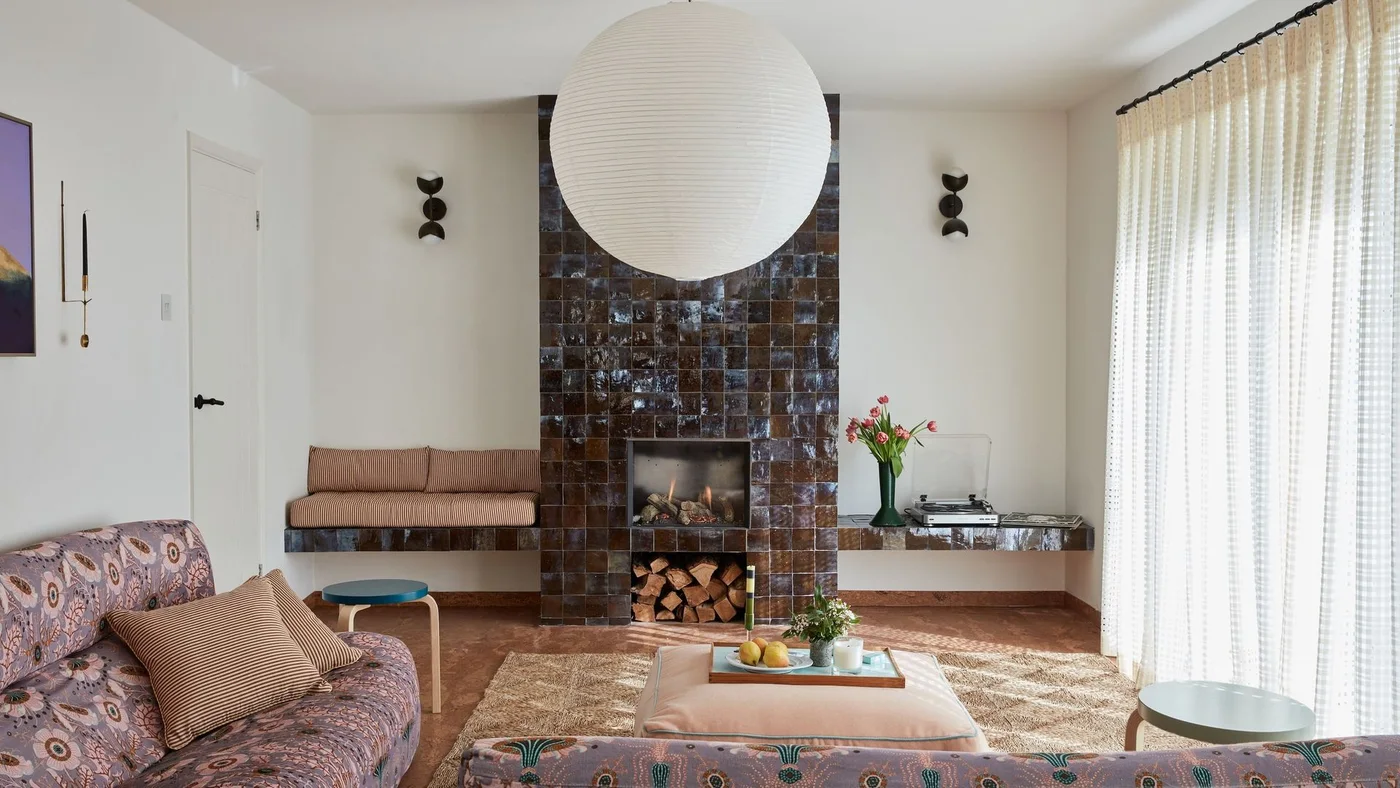
Extend Brown Tile onto Side Ledges
 SaveSupport Non AI Creator
Image credit: Côte de Folk
Brown tiles continue from the tall chimney breast onto the low ledges, tying the fireplace to both sides of the room. Variation in the glossy faces keeps the dark surface from feeling flat. Pale walls and a large white pendant balance the heavier center, while the patterned sofas introduce softer shapes nearby.
Draw the tile grid across the face, corners and ledges before fixing begins, including the visible underside edges. A ledge near an appliance is not automatically a safe seat or display shelf. Confirm heat exposure, clearances and any permitted storage with the installer before planning cushions, electronics or logs around it.
IDEA 10 / 16
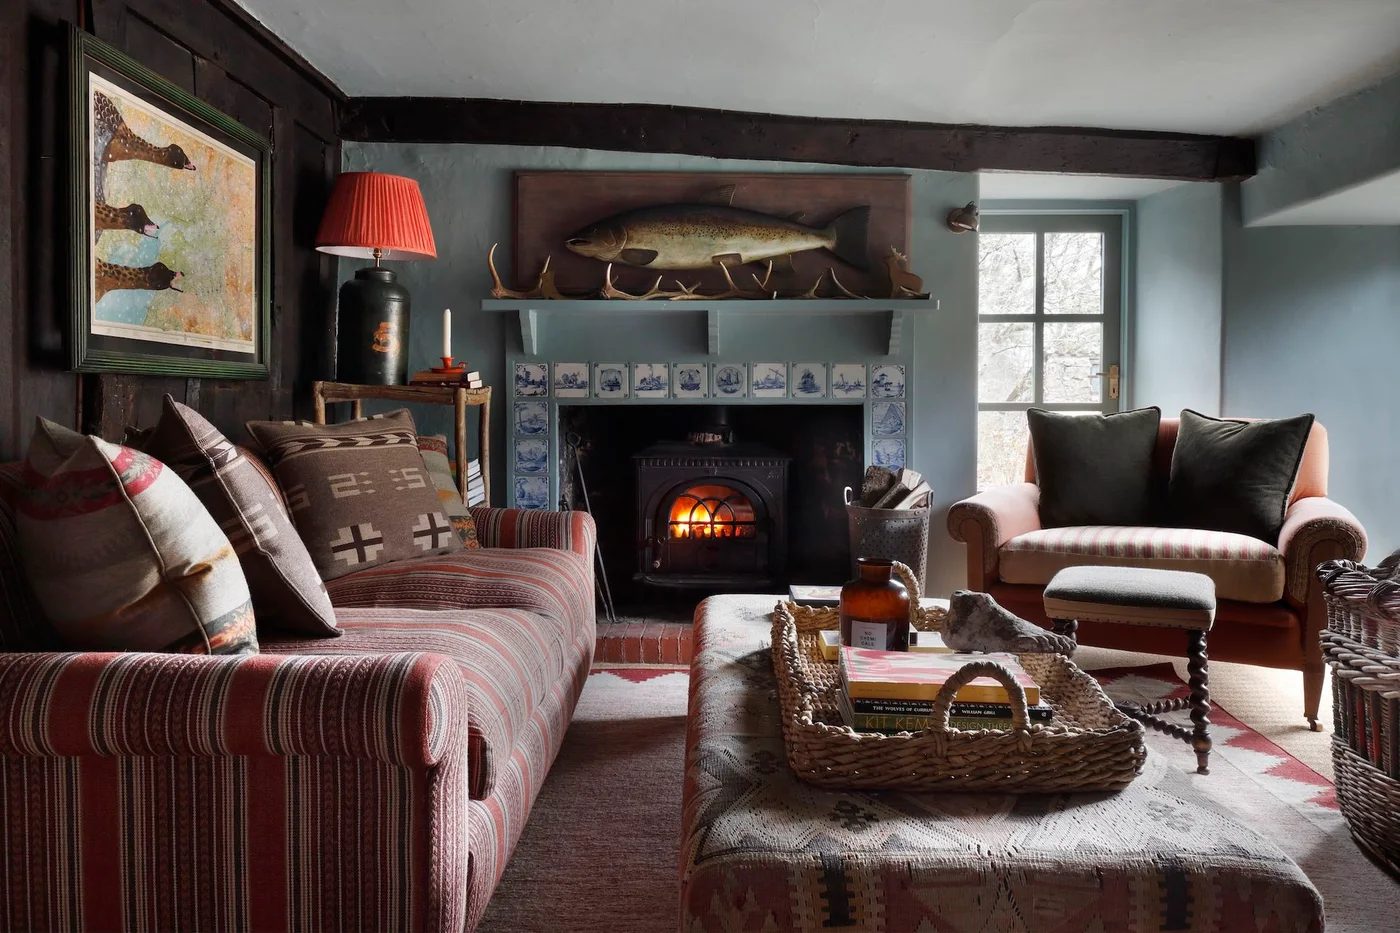
Frame a Stove with Blue-and-White Picture Tiles
 SaveSupport Non AI Creator
Image credit: Alexander James. Design: HÁM Interiors
A narrow border of illustrated tiles adds small scenes around the stove rather than a single large repeating pattern. The pale blue wall and mantel make the border feel integrated, while darker beams and striped seating give the room depth. The fireplace remains detailed without needing a full tiled chimney breast.
Arrange picture tiles where their individual scenes can be seen without awkward cuts at the corners. If mixing reclaimed pieces, compare thickness and condition before agreeing the layout. Our rustic living room decor ideas explore similarly layered rooms; keep combustible decorations and upholstered seating outside the clearances specified for your stove.
IDEA 11 / 16
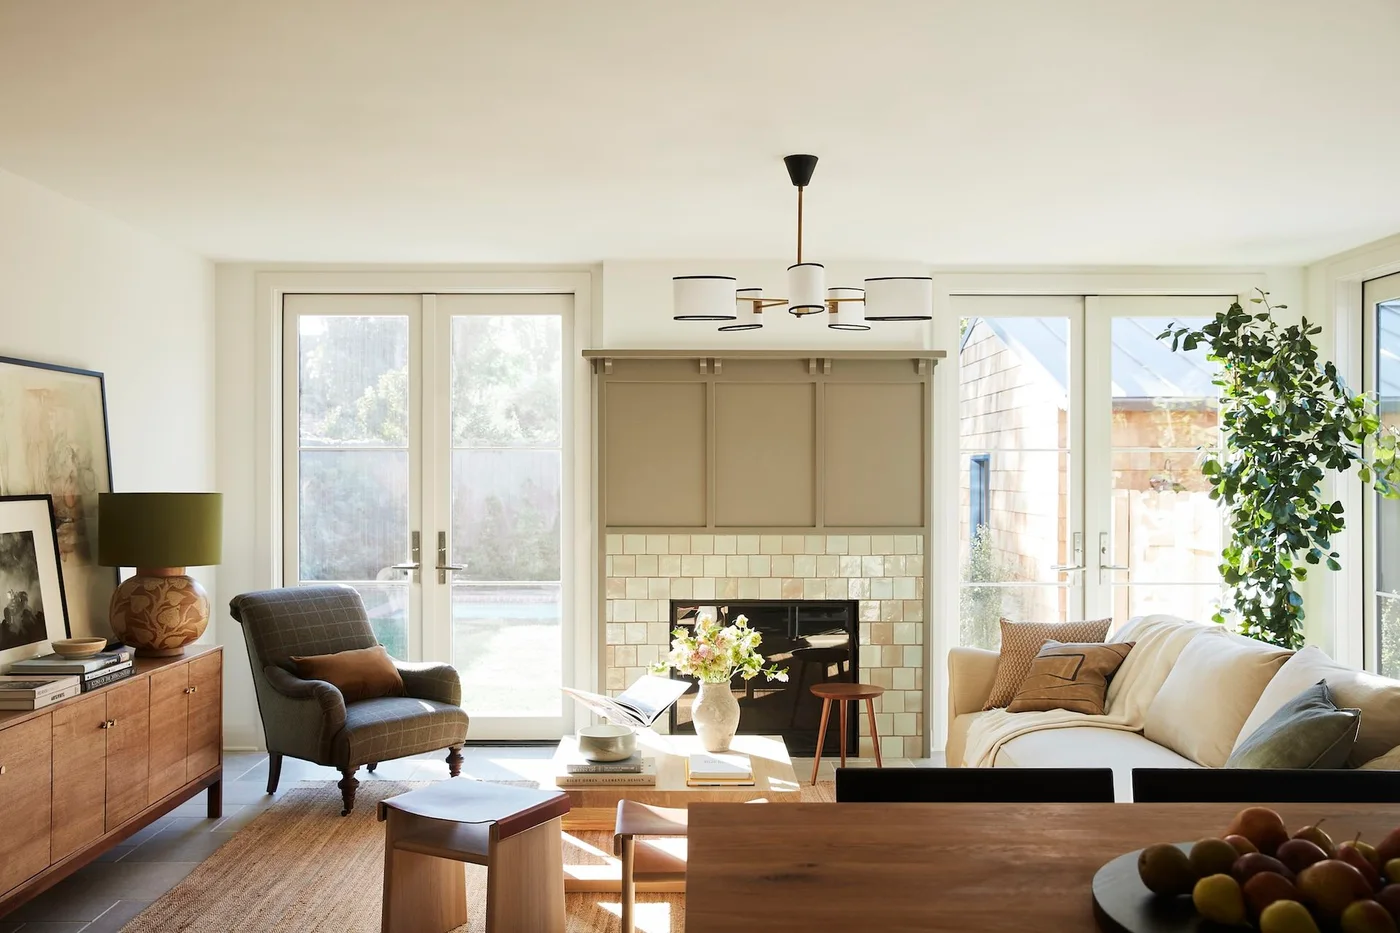
Keep Cream Tile Below Painted Paneling
 SaveSupport Non AI Creator
Image credit: @Treasurbite. Design: Mercantile and Merchant / Ryan Perella
The tile stops at a clear horizontal line beneath the painted paneling, allowing two quiet textures to share the same wall. Slight variation among the pale squares gives the fireplace detail without a bold pattern. Wood furniture and the soft sofa keep the room warm rather than making the light palette feel empty.
Set out the transition between tile and paneling before installation so neither ends with a thin accidental strip. Confirm all trim materials and their positions against the appliance requirements. Test pale grout samples beside the tile and consider the cleaning access around the opening, where soot or dust may be more noticeable.
IDEA 12 / 16
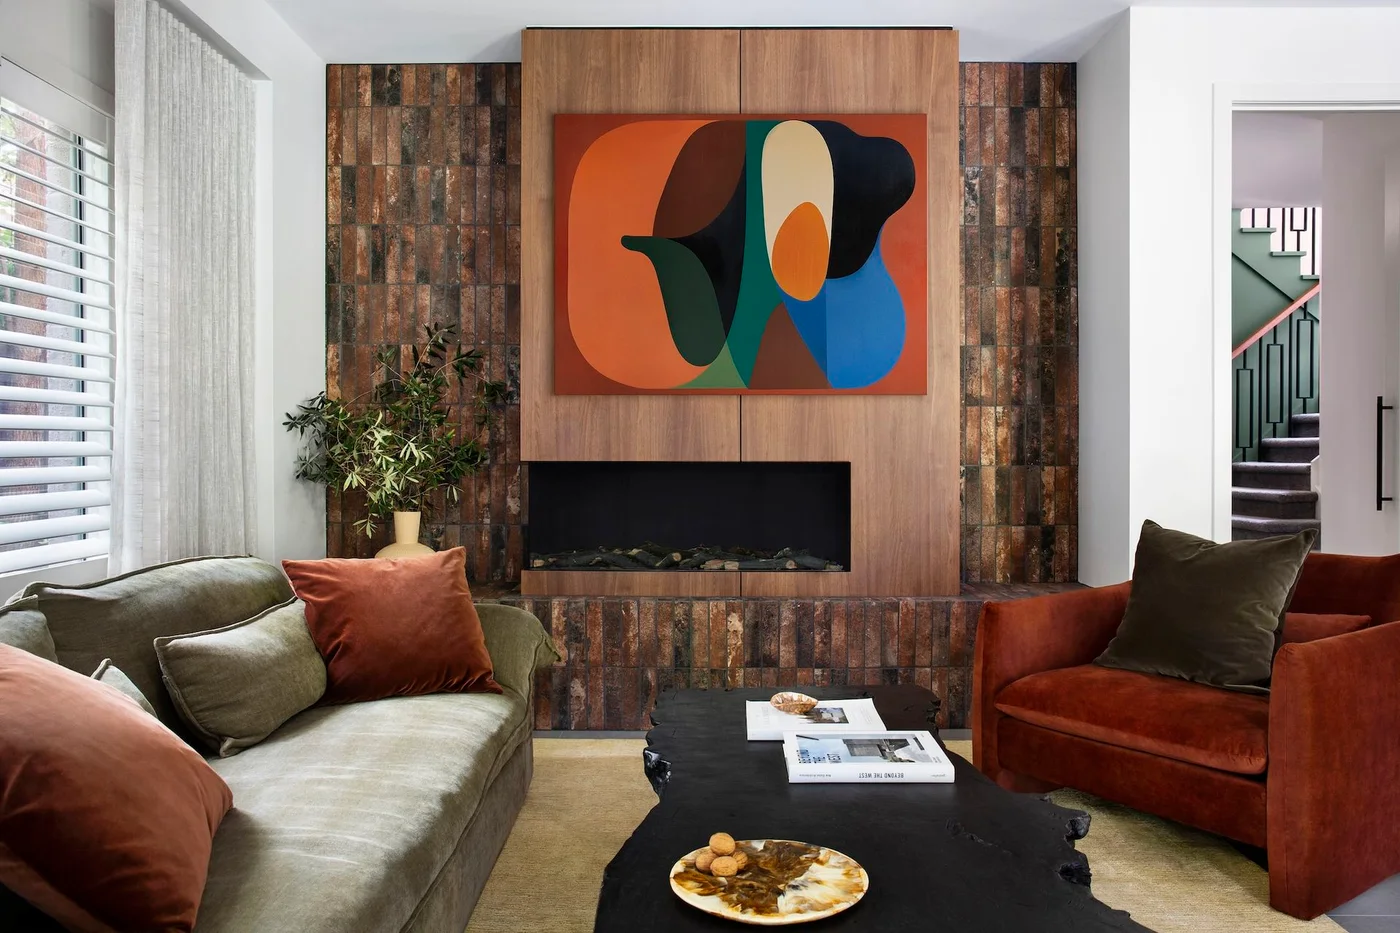
Use Slim Brown Tiles to Frame a Central Panel
 SaveSupport Non AI Creator
Image credit: David Puckering. Design: The Stylesmiths
Slim vertical tiles give the outer edges a textured rhythm, while the broad central panel forms a quieter backdrop for the artwork. Brown tones connect the fireplace to the rust sofa and warm cushions. The green seating adds contrast, keeping the complete arrangement from becoming a single range of brown.
Ask the installer to identify the actual panel material and confirm its permitted use and clearances; a wood-like appearance does not tell you how a fireplace assembly is constructed. Plan movement joints, corner trims and access panels early. Keep artwork placement within the appliance manufacturer recommendations for temperatures and neighboring finishes.
PART 04
Use shape and texture on a larger wall
IDEA 13 / 16
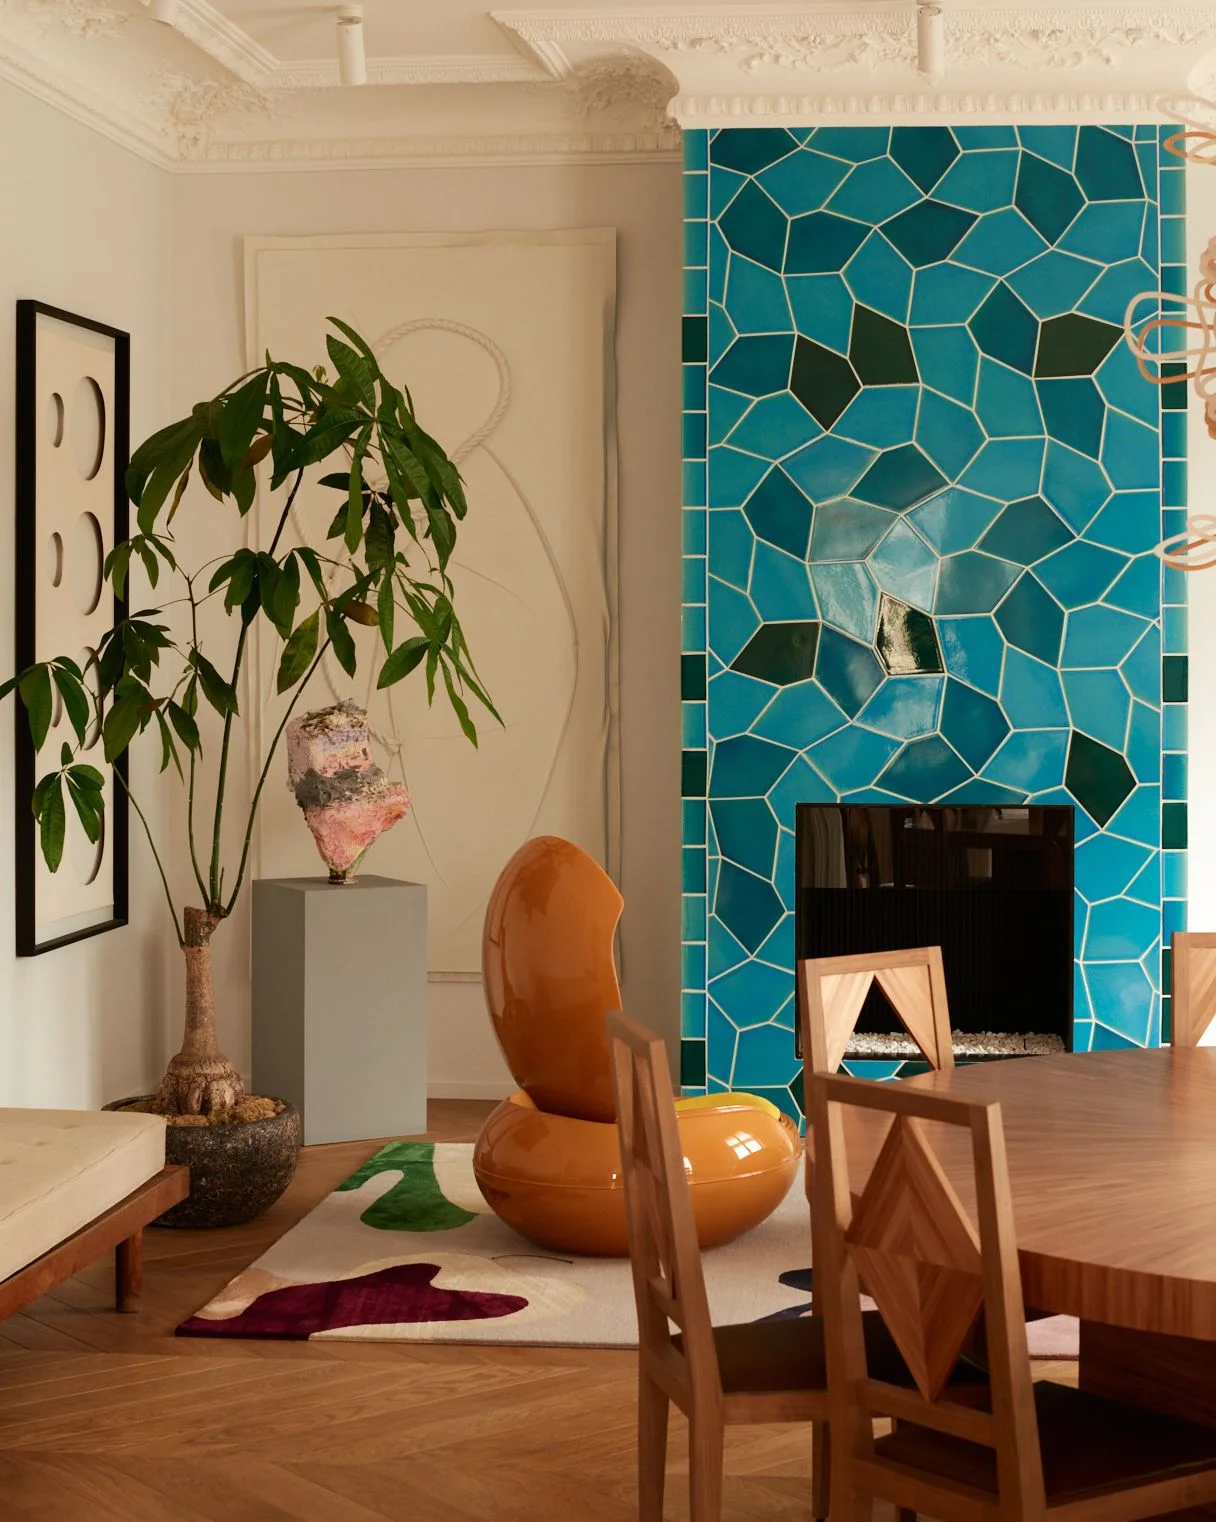
Make Turquoise Tile an Irregular Mosaic
 SaveSupport Non AI Creator
Image credit: François Coquerel. Design: Hauvette & Madani
Irregular pieces and pale grout create a lively mosaic across the chimney breast. Turquoise supplies the main color, with darker pieces breaking up the field. The bright orange chair offers a separate accent, while pale walls and ornate molding give the bold modern surface an architectural boundary.
Request a layout sample that includes grout width as well as tile colors, since the grout is a major part of this effect. Agree how irregular cuts will meet the opening and outside corners. Our colorful living room ideas show related combinations, but assess pattern and color in your own room before covering a tall wall.
IDEA 14 / 16
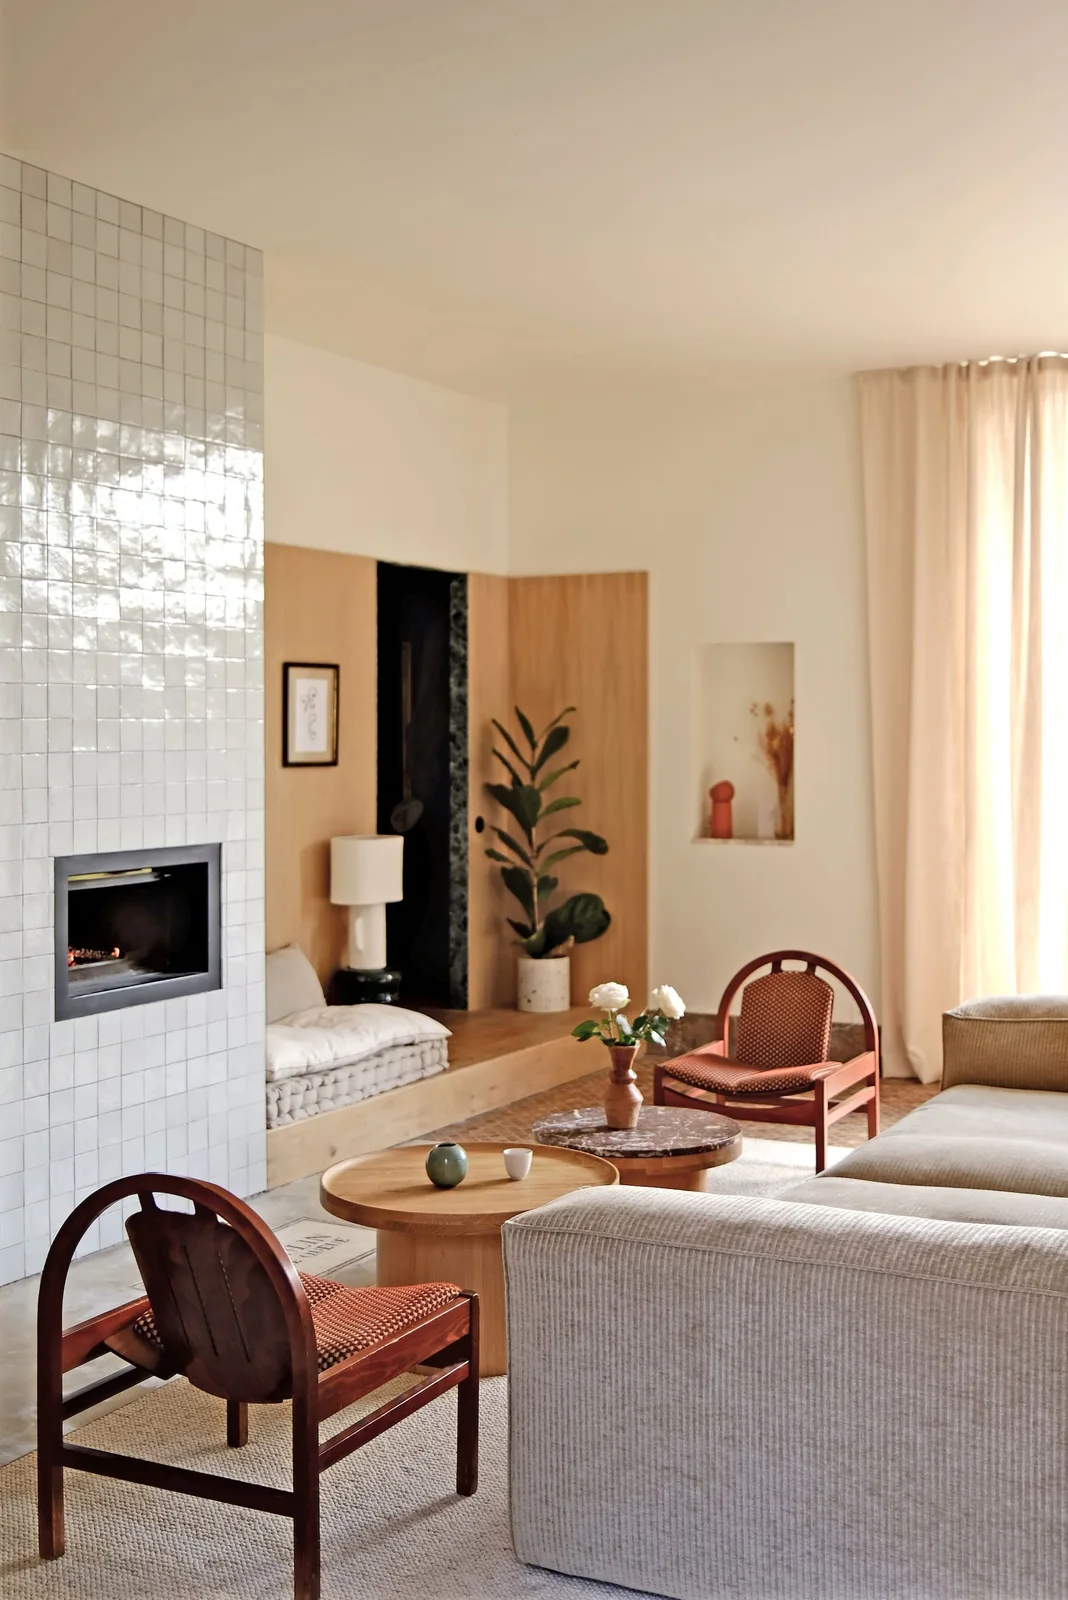
Bring Texture to a Pale Fireplace Wall
 SaveSupport Non AI Creator
Image credit: Hauvette & Madani
Small glossy squares give the pale fireplace wall visible texture as daylight moves across it. The dark opening stays distinct without an ornate mantel. A neighboring wood bench and reddish chairs add warmth, showing how a largely neutral tiled surface can sit comfortably among several different wood and fabric tones.
View a sample in side light so you understand how much surface variation and reflection to expect. Decide whether unevenness is part of the chosen product before installation begins. Plan the junction with the bench carefully and confirm required clearances; neighboring cushions should not be positioned solely by copying the photograph.
IDEA 15 / 16
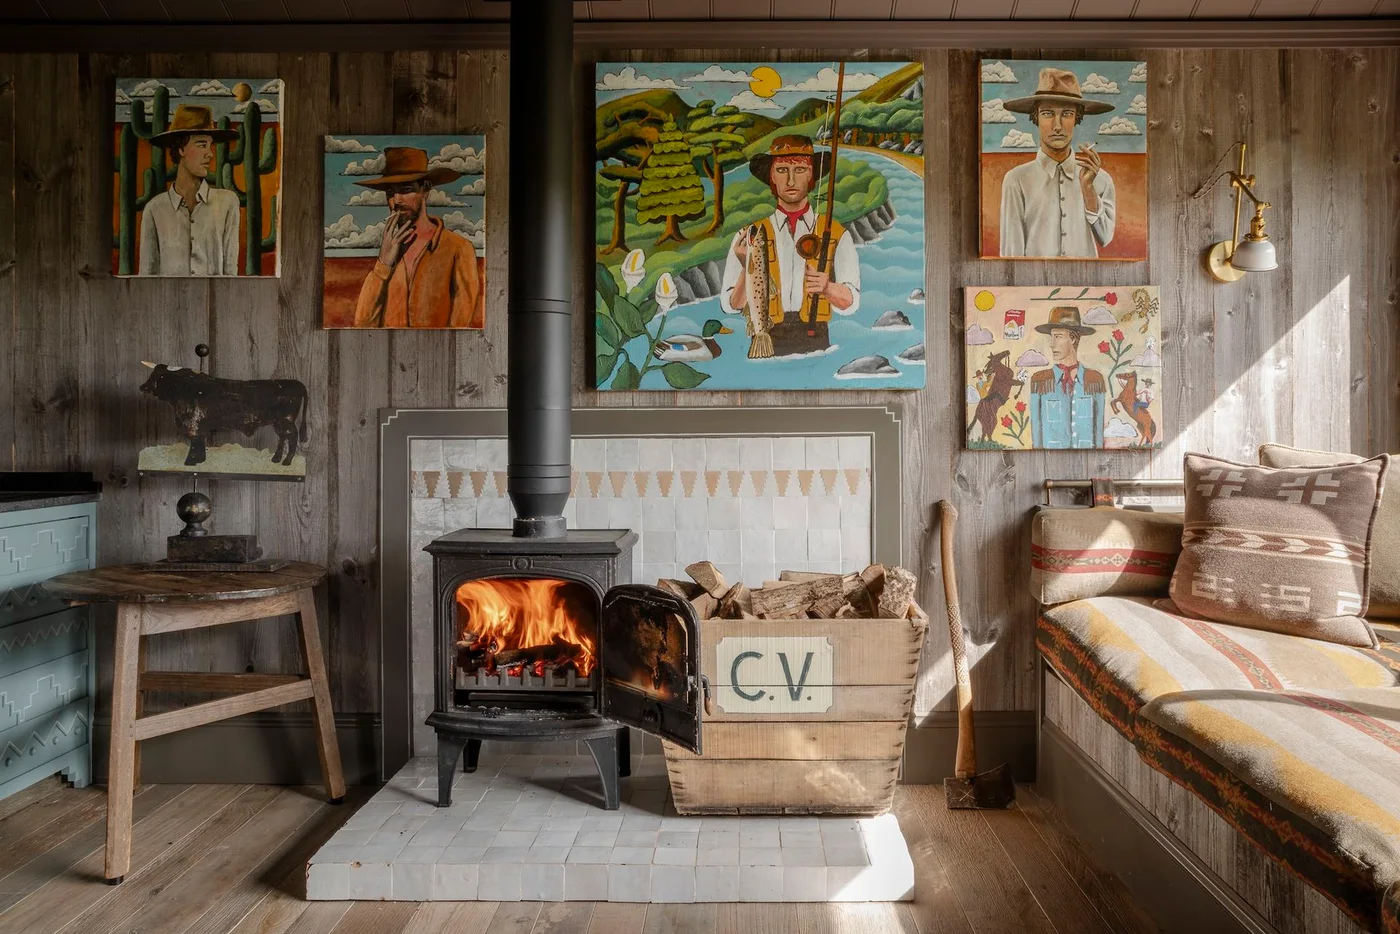
Give a Cabin Stove a Pale Tiled Base
 SaveSupport Non AI Creator
Image credit: HÁM Interiors
Pale tile separates the stove area from the dark wood floor and wall, making its footprint clearly visible. A small patterned border adds detail behind the flue without competing with the surrounding pictures. The built-in seating and wood surfaces make the room feel intimate, while the tile introduces a lighter break.
Treat the pictured log box, wood wall, artwork and seat as styling to assess individually against the stove manual. Tile attached to a combustible background does not by itself establish a safe heat shield. Have the hearth and wall assembly specified for the appliance, and keep access for ash removal and cleaning unobstructed.
IDEA 16 / 16
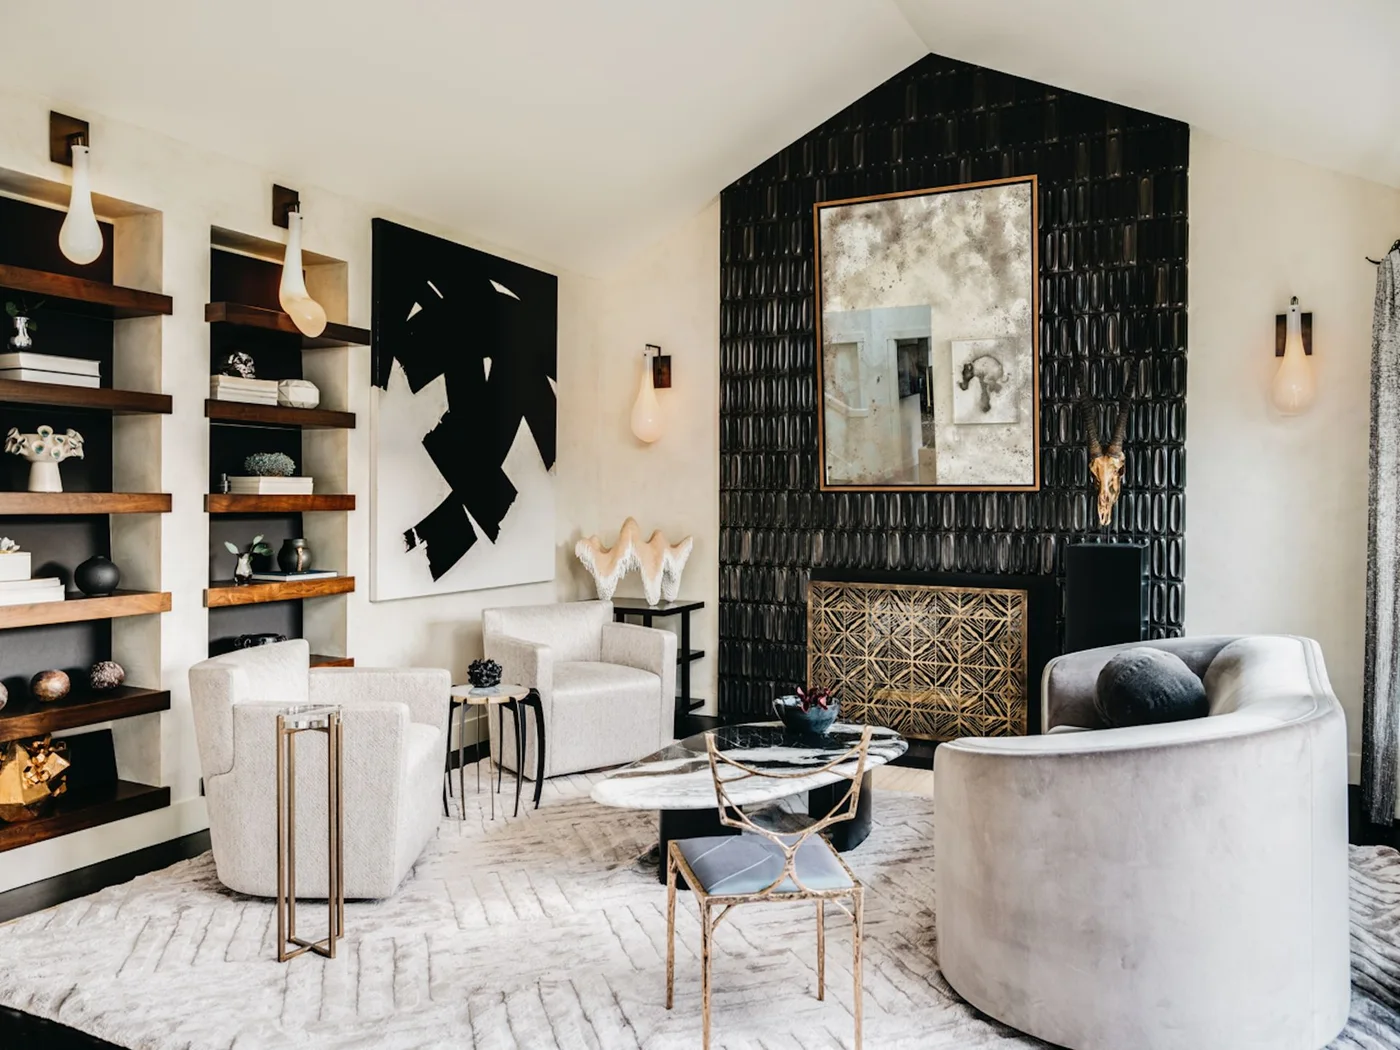
Use Relief Tile on a Dark Chimney Breast
 SaveSupport Non AI Creator
Image credit: Christopher Stark. Design: Holly A Kopman
Raised oval forms make the black tile catch light across the chimney breast instead of reading as a completely flat dark block. Pale seating gives the surface a strong contrast, while the patterned screen adds a different scale of detail at the opening. Wood shelves soften the surrounding black-and-white arrangement.
See relief tile in person if possible and consider the extra edges that will collect dust. Confirm how it will finish neatly around the screen and opening before ordering. Keep the mirror securely fixed, and check its placement and all adjacent shelves against the appliance instructions rather than assuming a decorative screen controls heat exposure.
BRING IT ALL TOGETHER
Resolve construction before choosing the final pattern
Draw the opening, mantel, hearth and adjoining surfaces together. Check the tile grid at corners and changes of direction so the finished arrangement looks deliberate. Take samples into the room and compare their color, grout and surface reflection with the furniture you intend to keep.
For a working fireplace, have the complete assembly checked against the specific appliance instructions and applicable local requirements. Do not assume that tile alone makes a nearby wood surface safe. Keep decorative displays, seating and stored logs out of required clearances, and leave cleaning and servicing access usable.