Green kitchen tiles can form a narrow backsplash, cover a fuller wall or introduce color through a smaller painted motif. Compare the layout with your cupboards and counters before choosing the tile. A pale green rectangle, a glossy darker square and a patterned mosaic have different outlines and will need different grout and edge decisions.
These kitchens show green through solid colors, mixed shades and decorative scenes. Look at generous samples in the actual room, plan cuts around corners and fittings, and ask about care for the exact tile and grout. Keep shelves and appliances positioned for practical access, so the tiled surface can be cleaned and the counters remain useful.
PART 01
Choose the tiled area and larger green effect
IDEA 01 / 18
Let Varied Green Tiles Lead the Sink Wall
 SaveSupport Non AI Creator
Image credit: deVOL
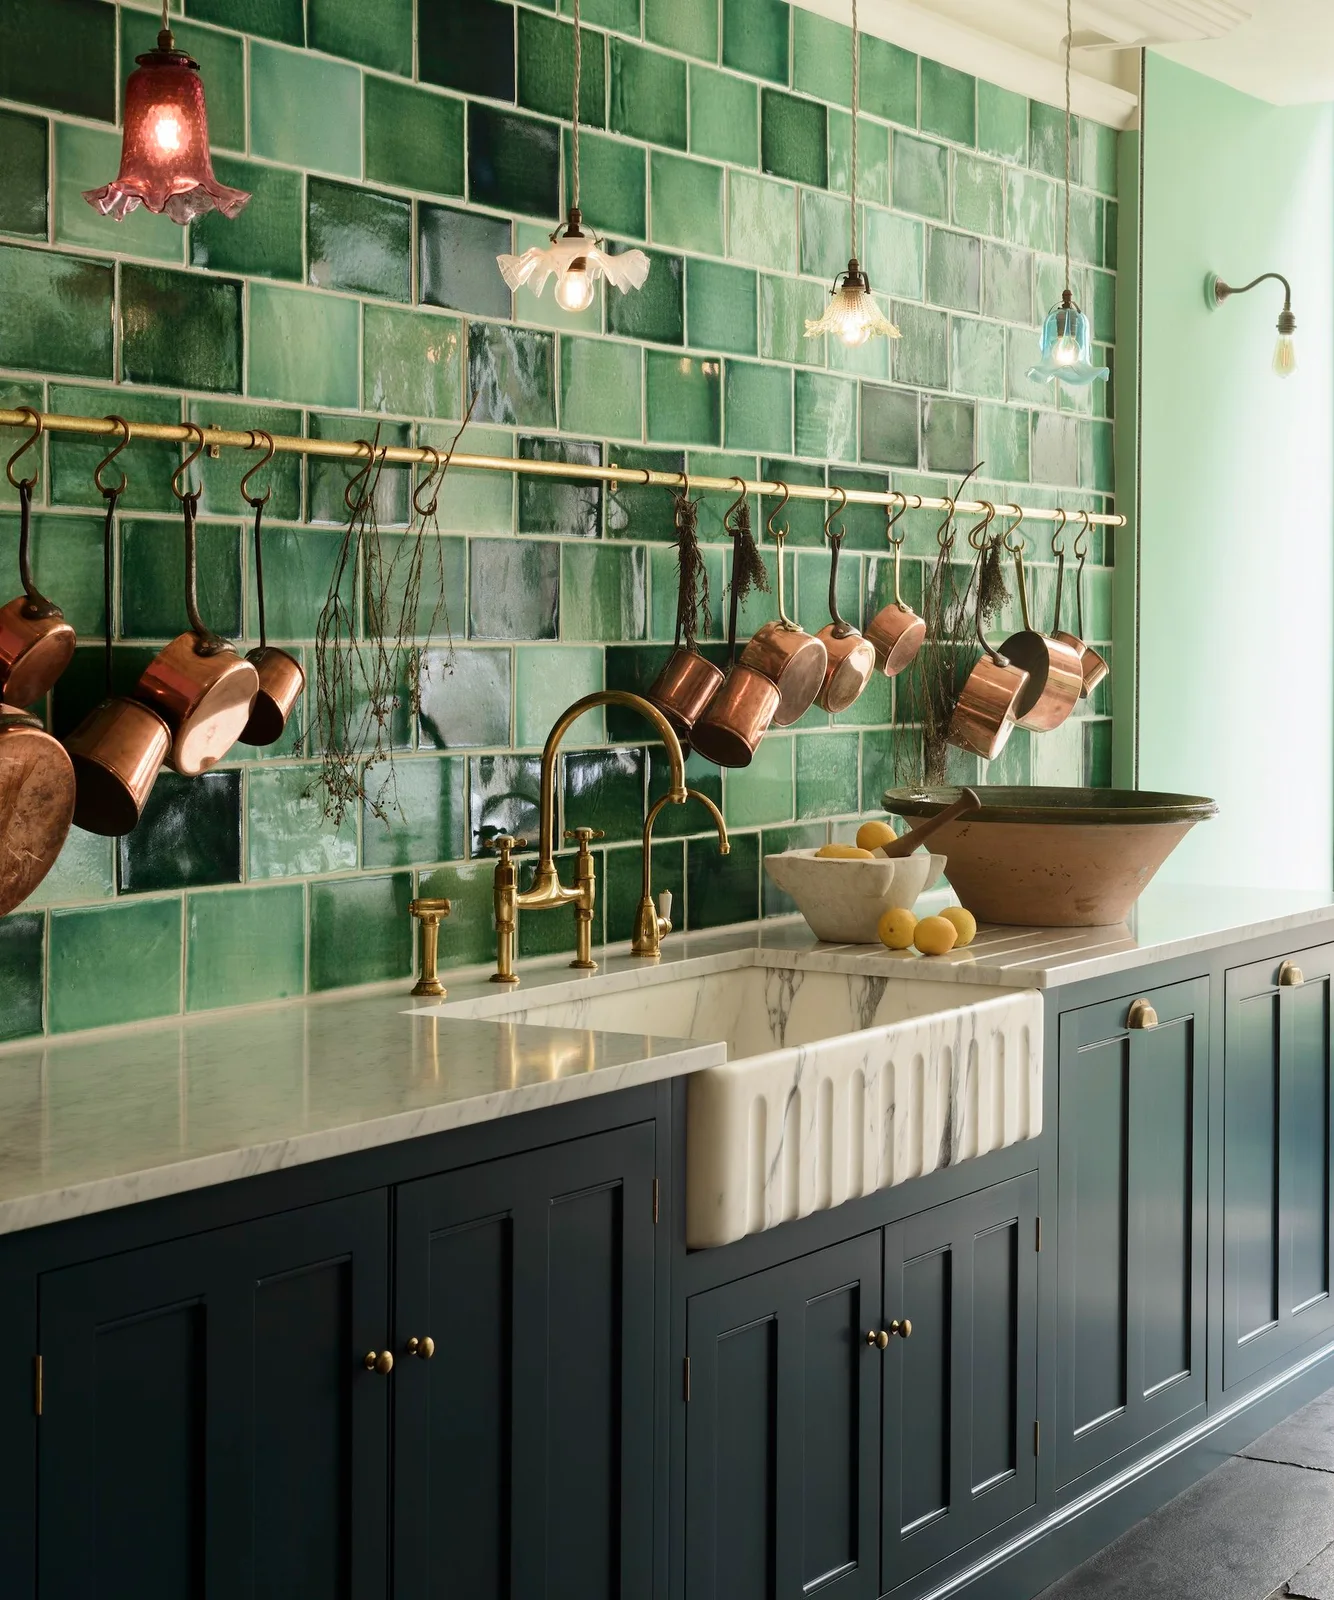
Different green shades repeat across the rectangular wall tiles, giving the larger sink area variation within a consistent layout. The pale fluted basin introduces another texture below, while warm metal taps and the hanging pans add contrasting details. The dark lower cupboards keep the green wall as the stronger patterned surface.
View several actual tiles together before choosing a finish with visible shade variation, checking their appearance under both daylight and evening lights. Plan joints, edges and fittings with the installer rather than copying their positions by eye. Keep a hanging rail practical for the items it will hold, with suitable supports and clearance from the sink workspace.
IDEA 02 / 18
Use Green Rectangles Beside Warm Cabinets
 SaveSupport Non AI Creator
Image credit: Photo: Kari McIntosh Dawdy. From: Kari McIntosh Dawdy
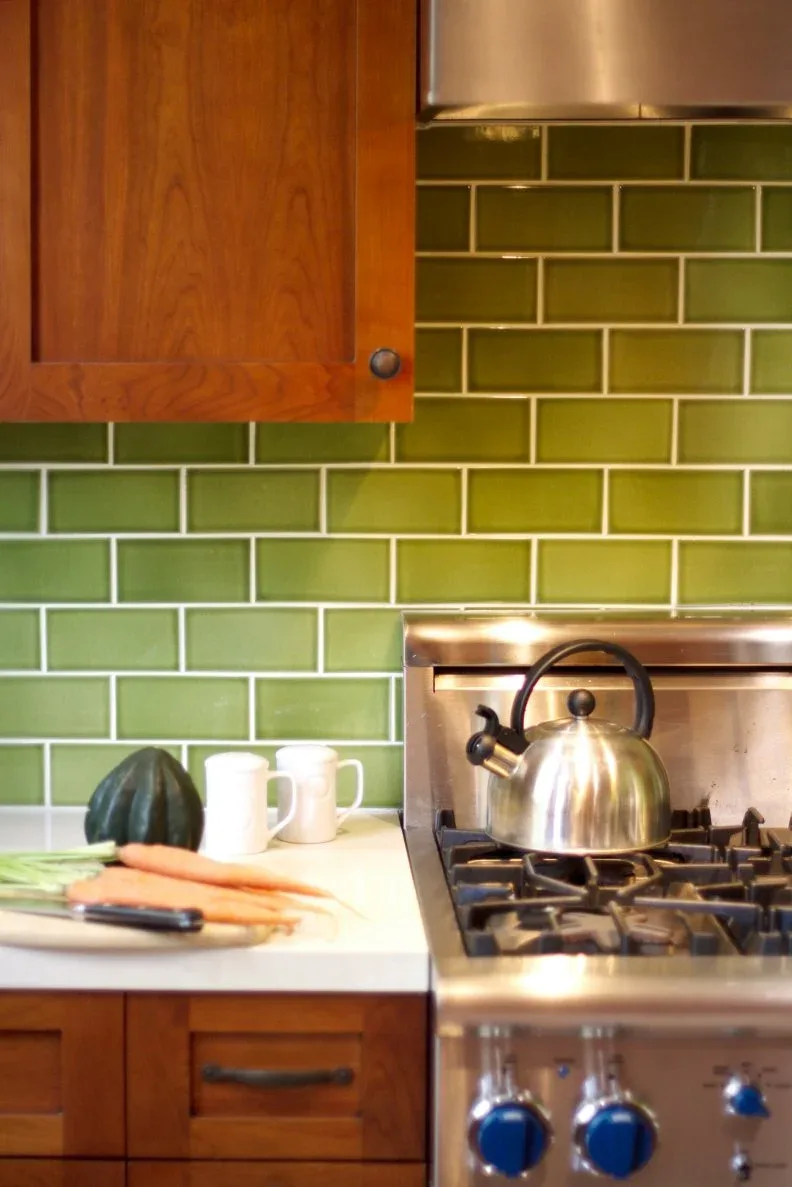
The glossy green rectangles form offset rows between the warmer wood cupboard and the metal cooker. Light grout makes each tile outline visible, while variations in the green surface add detail within those repeated shapes. The pale counter gives smaller food-preparation items a simpler background beneath the stronger tiled wall.
Compare a grout sample with the actual green tile before installation, since a lighter joint makes the layout more pronounced. Check the tile and grout cleaning requirements for cooking splashes and choose products suitable for both. Classic kitchen backsplash ideas compare other repeated layouts if you want to judge the green rows beside a quieter or more patterned alternative.
IDEA 03 / 18
Connect Green Tile with Open Wooden Shelves
 SaveSupport Non AI Creator
Image credit: Photo: Dabito
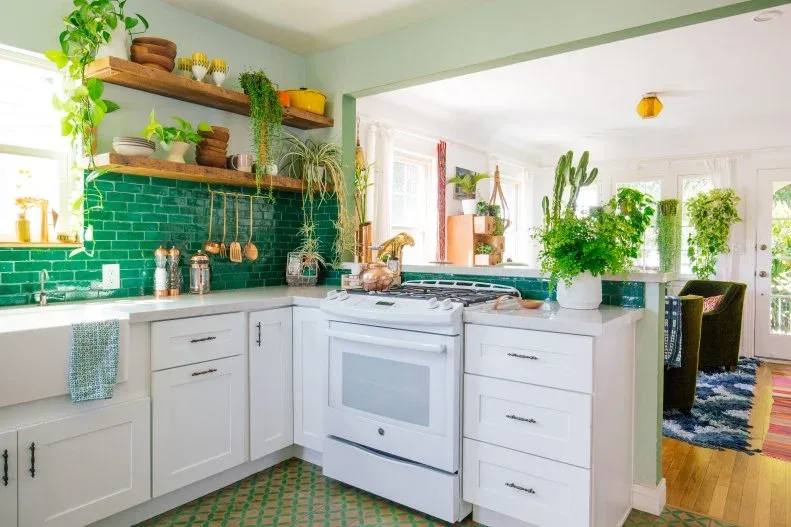
Green tiles provide the larger patterned background behind the open wooden shelves. Pale lower cupboards and the white cooker keep the base lighter, while wood and hanging utensils add smaller warmer details above. Plants repeat green in different shapes without changing the tiled wall’s clearly visible rectangular layout.
Keep shelf contents manageable so the wall and joints remain accessible for cleaning. Plan appropriate supports and appliance clearances before placing shelves near a cooking area. Choose hanging utensils around regular use rather than filling the rail completely, and keep plants positioned where watering and trailing leaves will not interfere with preparation or electrical fittings.
IDEA 04 / 18
Concentrate Yellow-Green Tiles Behind the Range
 SaveSupport Non AI Creator
Image credit: Brent Darby / Future
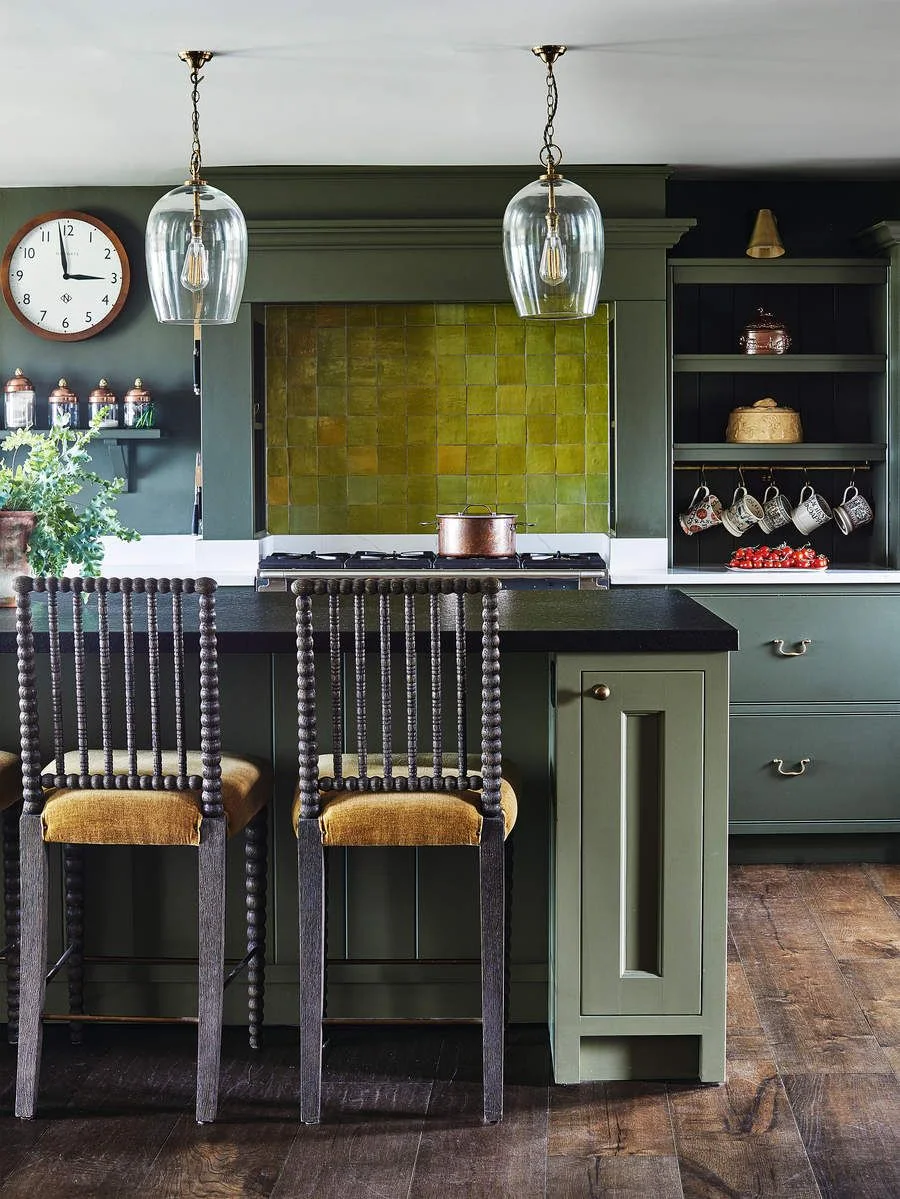
The yellow-green squares create a brighter tiled section within the darker painted range surround. Their visible shade differences give the small wall area variation, while the surrounding cupboards remain solid-colored. A dark island top and tall stools provide simpler outlines in front, leaving the tile as one contained decorative feature.
Compare the tile sample beside the cabinet paint rather than assuming different greens will automatically blend. Plan the tiled area’s boundaries and appliance clearances before selecting decorative trim. Keep the counter beside the range useful for cooking, and follow the actual tile and grout instructions for cleaning without treating their glossy appearance as proof of stain resistance.
IDEA 05 / 18
Frame an Arch with Deep Green Pattern
 SaveSupport Non AI Creator
Image credit: Photography by The Good Things
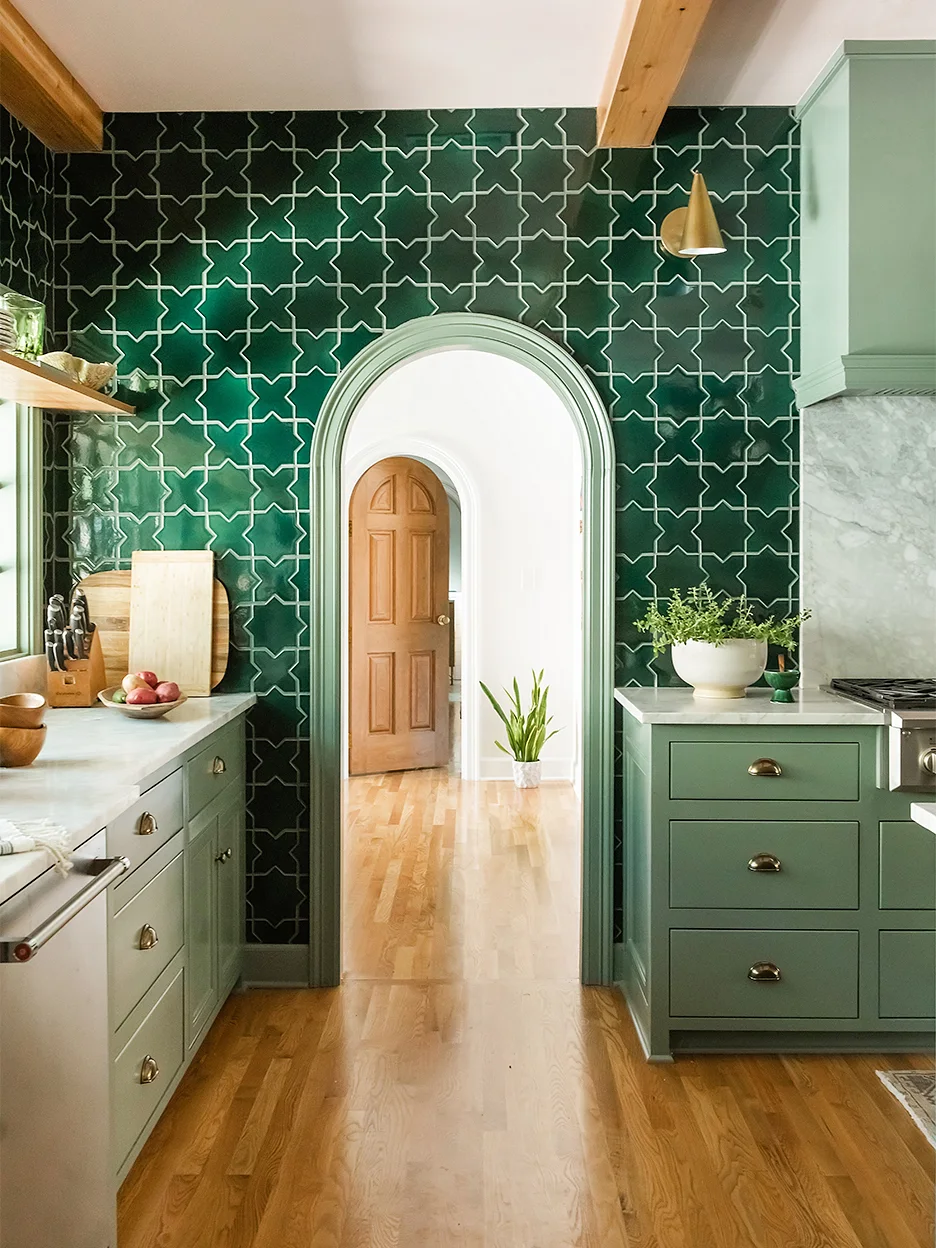
Deep green tiles cover the wall around the arch, with pale joints tracing a larger geometric pattern across the surface. The light arch trim gives the opening a clear separate outline. Green lower cupboards repeat the color more quietly beneath, while the wooden floor adds warmth through the central route.
Plan how the pattern meets the arch and counter edges before installation, checking the cuts across the whole wall rather than one isolated sample. Keep the doorway route free of extra furniture. A fuller tiled wall needs a practical cleaning approach as well as an attractive pattern, so compare maintenance requirements before extending tile beyond the usual backsplash area.
PART 02
Compare repeated layouts and color contrasts
IDEA 06 / 18
Pair Pale Green Tiles with Blue Storage
 SaveSupport Non AI Creator
Image credit: Photo: Jared Kuzia Photography. From: Kristina Crestin
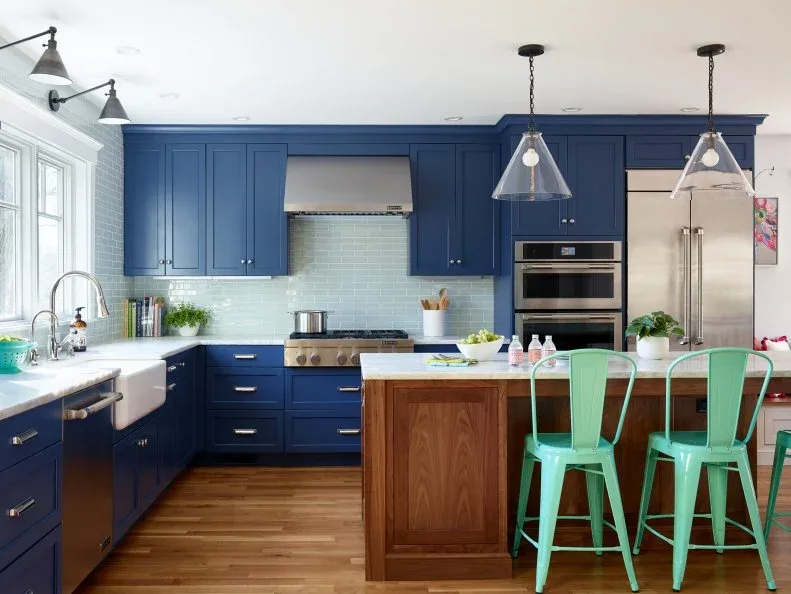
The pale blue-green backsplash provides a lighter band between the stronger blue cupboards and pale counters. Its smaller rectangular joints supply detail without covering the room in another large motif. A wooden island adds warmth, while mint-colored chairs repeat a related green accent at the seating edge.
Compare the tile’s actual shade beside the cabinet finish and under the lights above the counter. A pale tile can still show cooking residue, so choose grout and cleaning products around daily maintenance. Keep the island and seating arranged for useful access to the counters rather than adding more green furnishings only to repeat the wall color.
IDEA 07 / 18
Make a Small Green Tiled Nook Distinct
 SaveSupport Non AI Creator
Image credit: Photo: Kacey Gilpin. From: Mel Bean Interiors
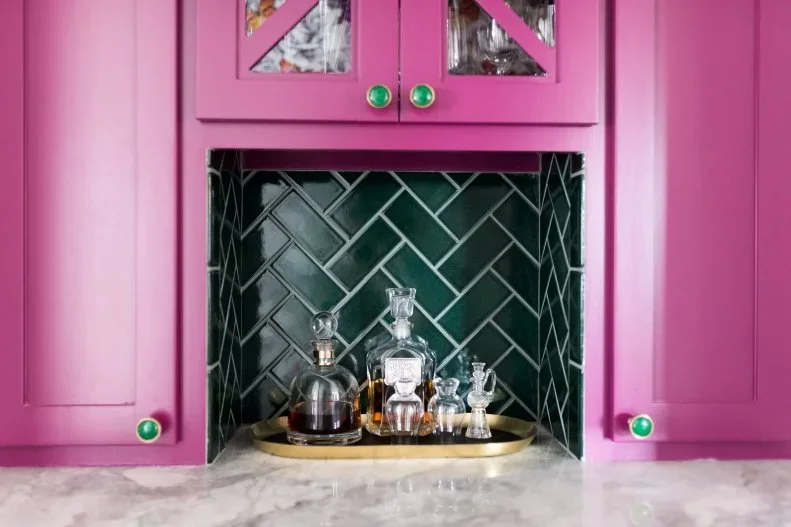
The green herringbone pattern gives the small nook its own darker background within the bright pink cabinetry. Light joints make the angled tile layout visible behind the glass bottles. The pale counter separates those stronger colors below, allowing the tiled feature to remain concentrated in a limited section.
Plan the herringbone cuts around the opening before ordering tile, including the edges beneath the upper cabinet. Keep bottles on a stable usable surface and leave room to lift them without knocking the cabinet or one another. A small colored nook can be enough when nearby cupboards already provide a stronger painted background.
IDEA 08 / 18
Use Green Squares Behind a Warmer Accent
 SaveSupport Non AI Creator
Image credit: Rachael Smith. Louise Robinson Interiors.
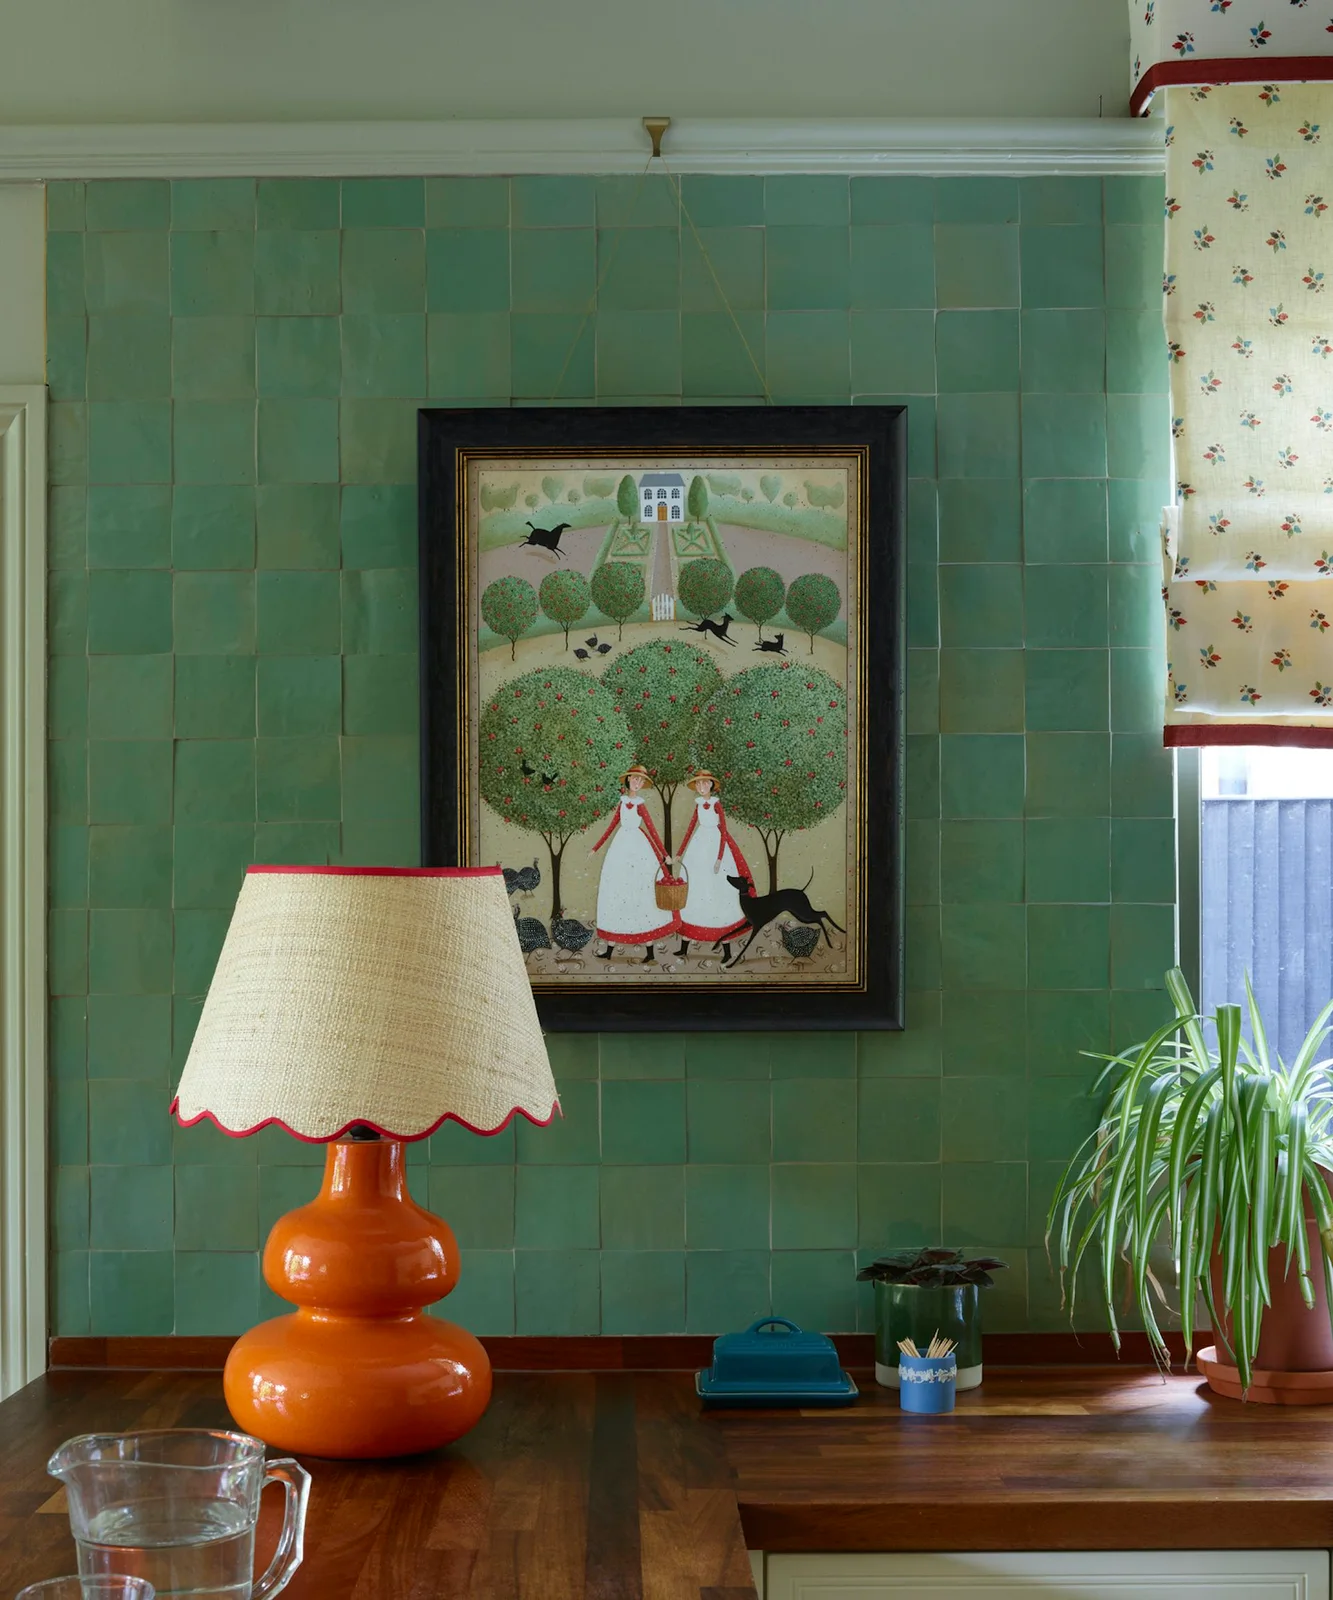
The green squares create a consistent tiled background behind the framed picture and orange lamp. The lamp’s warm color gives the small arrangement a clear contrast, while its pale shade keeps the larger object lighter. Wooden counter surfaces and floral window fabric add different warm and patterned details beside the green.
Choose a tiled display area away from the messiest preparation tasks if you want artwork and a table lamp nearby. Use electrical fittings only in an appropriate position for the actual kitchen conditions. Keep objects movable enough to clean the tile behind them, and compare the lamp color with the green sample before adding other strong accents.
IDEA 09 / 18
Put Smaller Green Motifs into Pale Mosaics
 SaveSupport Non AI Creator
Image credit: Julie Soefer. Creative Tonic
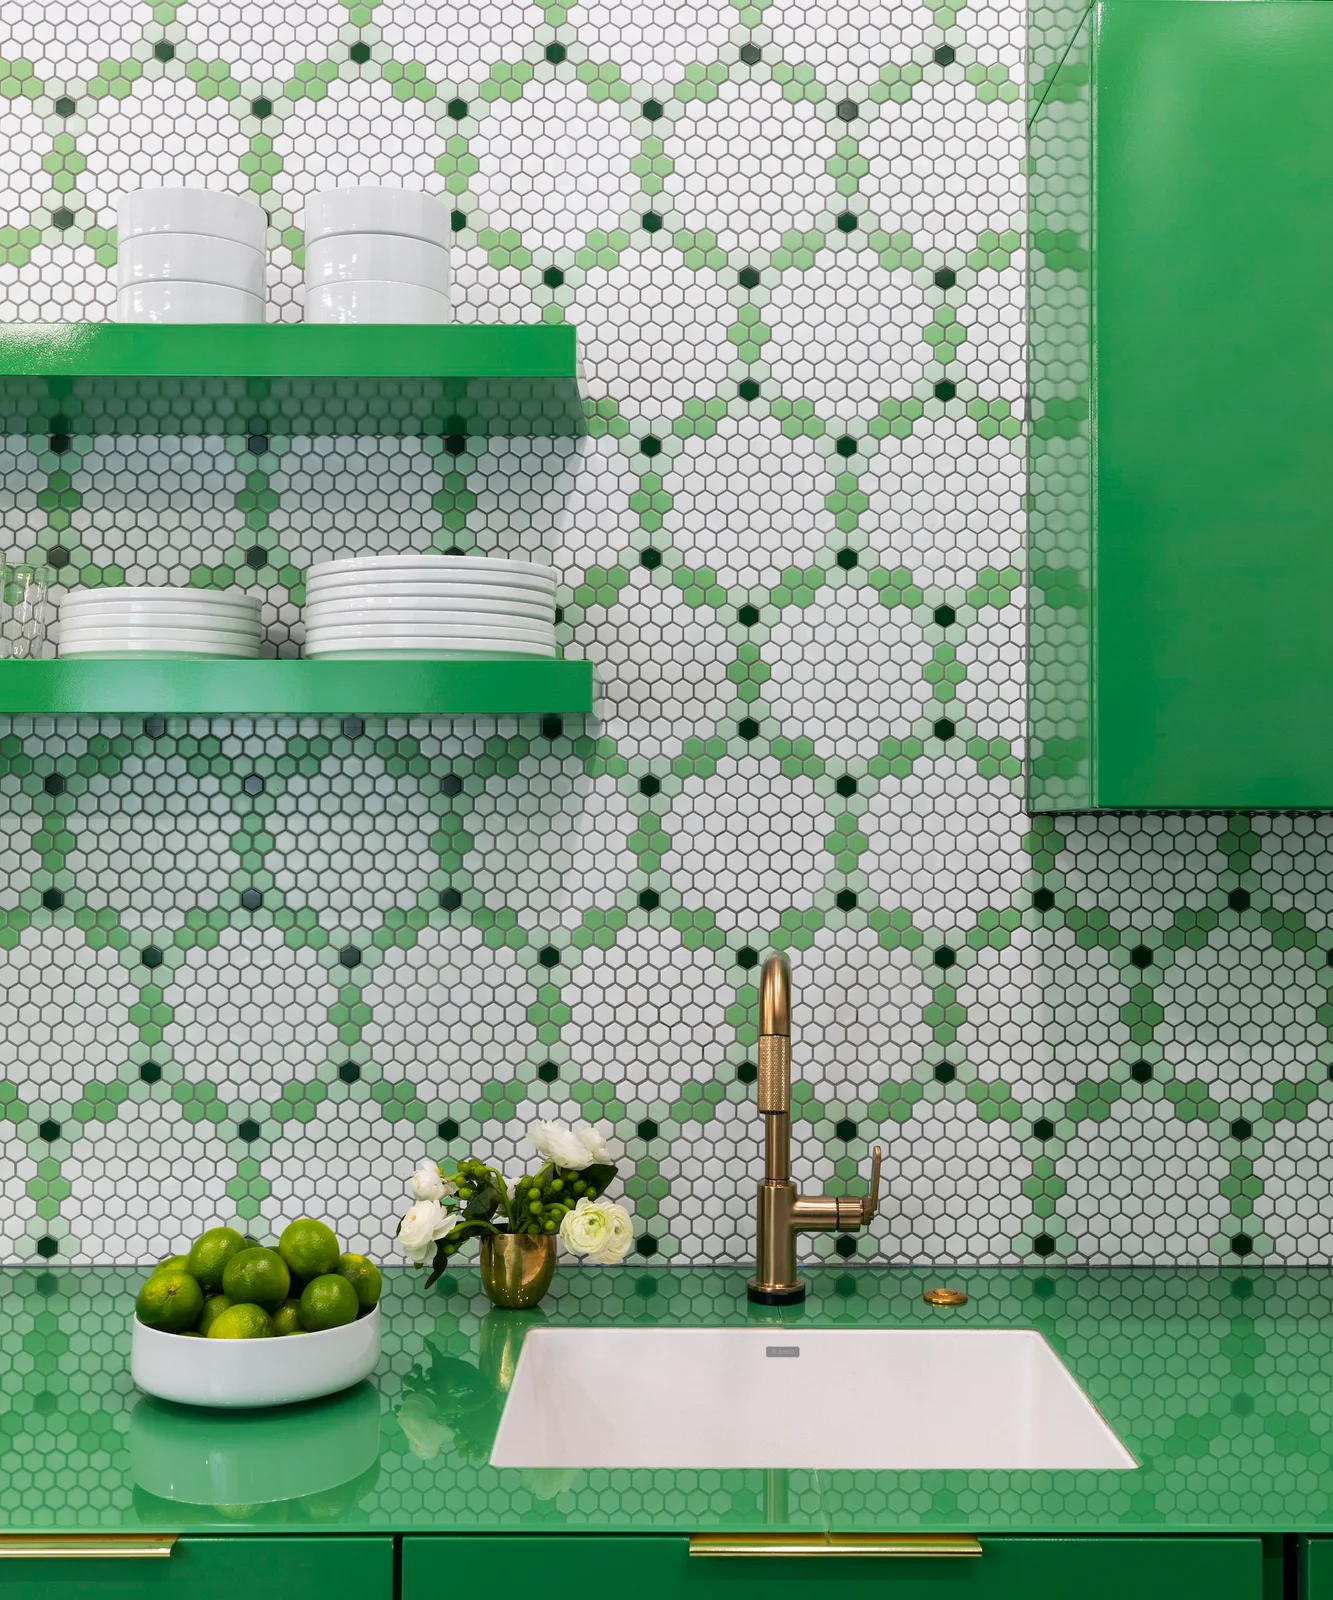
Green motifs appear within the pale hexagonal mosaic, repeating the stronger green counter and shelves in smaller patterned areas. The mostly pale wall keeps the dense joint layout lighter than a fully solid green treatment. A pale basin and crockery provide simpler shapes between the brighter surrounding green surfaces.
Look at a substantial mosaic panel before choosing it, including where sheet edges and the repeated motif will meet. More joints create a different cleaning routine from larger tiles, so compare grout care as well as color. Plan shelf supports and fittings with the tile layout, keeping the useful sink surface available around the basin.
IDEA 10 / 18
Alternate Green Squares with Pale Ones
 SaveSupport Non AI Creator
Image credit: House of Hackney x Craven Dunnill Jackfield
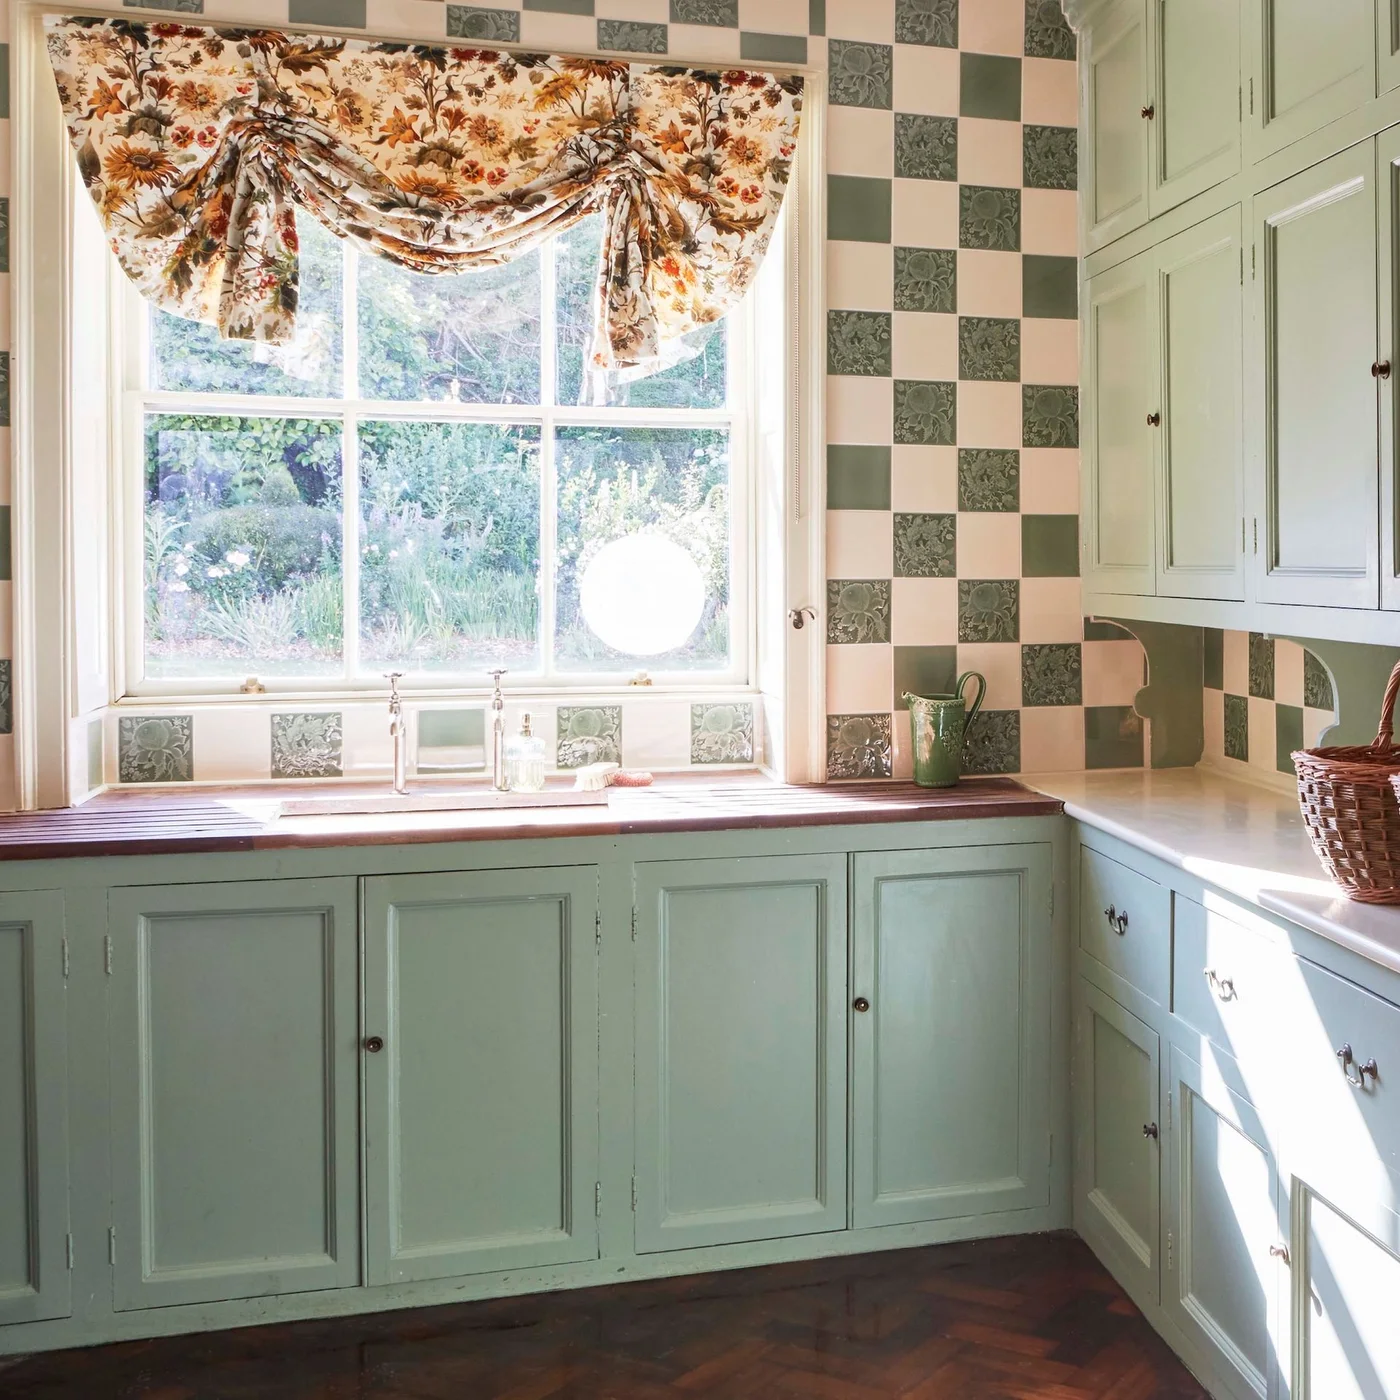
The checked wall alternates green and pale squares, with selected green tiles adding finer decorative pattern. Pale green cupboard fronts give the wall a related solid-colored base. The floral fabric introduces warmer colors above the window, while the counter remains a simpler light surface below the repeated checks.
Lay out a full checked section with any patterned pieces before fixing tiles, checking the arrangement around the window and adjoining cupboard. Compare it with the complete fabric repeat rather than a small clipped sample. Green kitchen cabinet ideas show other ways to coordinate solid door fronts with a more detailed wall treatment while keeping the storage useful.
PART 03
Connect smaller patterns with useful cabinetry
IDEA 11 / 18
Keep Pale Green Tile Along a Narrow Galley
 SaveSupport Non AI Creator
Image credit: Photo: Shelby Bella Photography. From: Kim Lewis Designs
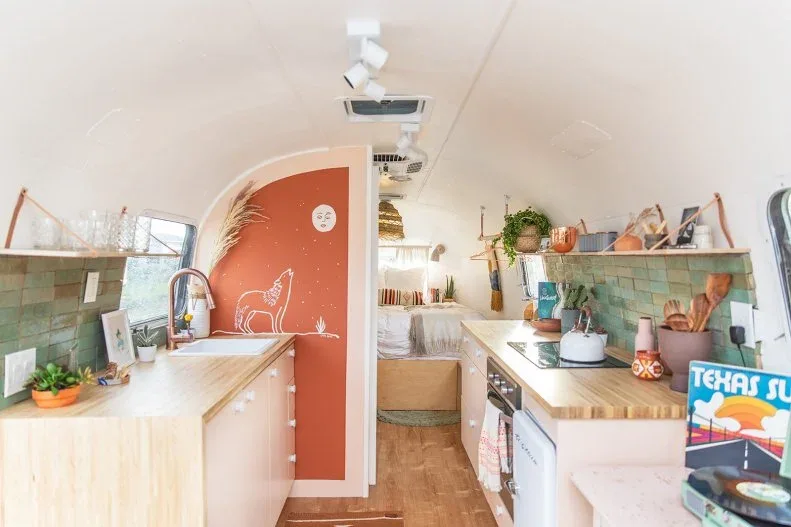
The pale green tiles repeat along the two counter runs, connecting the narrow work area on both sides. Lighter cupboards and counters keep the larger lower surfaces quiet. The curved coral partition introduces a warmer contrasting shape at the end, making the small tiled bands part of a more varied compact arrangement.
Check the aisle with appliance and cupboard doors open before choosing additional storage or decorative shelves. Keep tile edges around windows and partitions planned as part of the full layout. Boho kitchen ideas offer more compact arrangements with varied colors and useful furnishings if you want a similarly mixed character without crowding the working route.
IDEA 12 / 18
Let Pale Green Herringbone Wrap a Larger Wall
 SaveSupport Non AI Creator
Image credit: Casagrande Studio / Read McKendree Photography
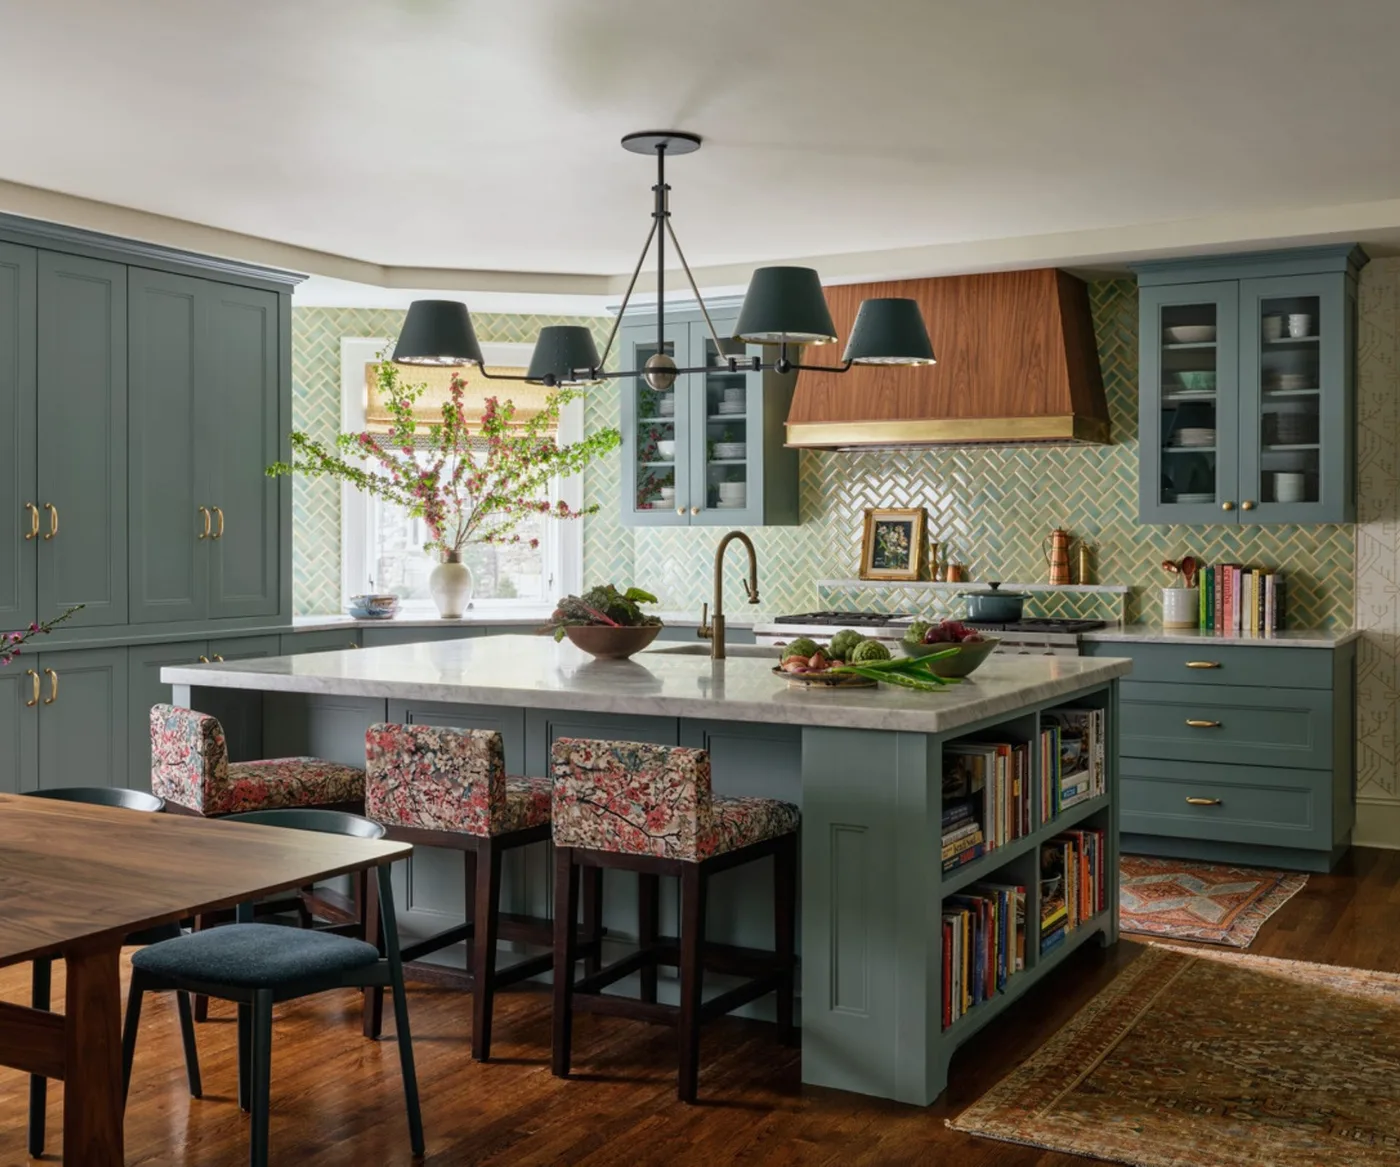
The pale green tiles use an angled herringbone layout across a larger wall, providing a lighter patterned background behind the blue-green storage. The wood-clad hood adds warmth within it. Patterned stools introduce a different motif at the island, while the counter supplies a simpler central surface between those decorative layers.
Compare the full tile layout with the stool fabric and cupboard sample before deciding how much pattern to combine. Plan the tile cuts at the hood, corners and cabinet edges with the installer. Keep a larger patterned wall easy to clean by choosing shelf and display positions around daily access rather than covering every tiled area with additional objects.
IDEA 13 / 18
Repeat Small Green Patterns Around Pale Storage
 SaveSupport Non AI Creator
Image credit: Future PLC/Caroline Mardon
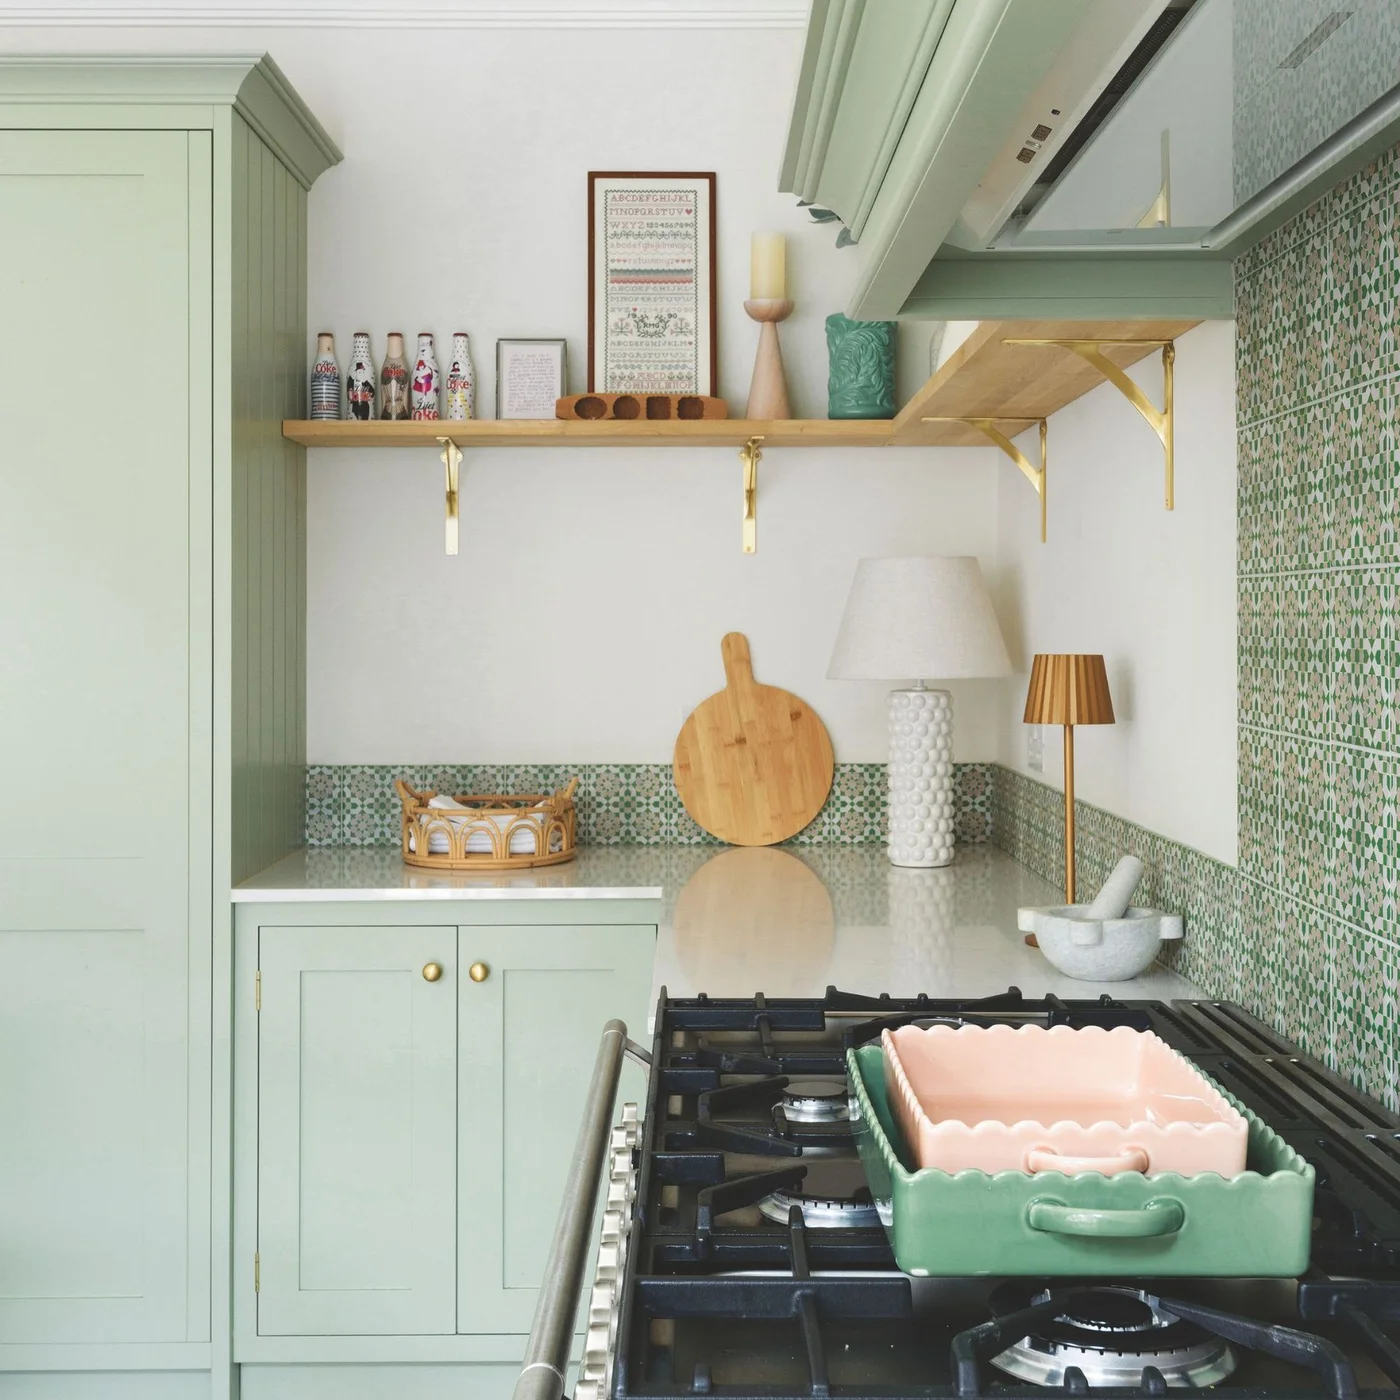
The small green tile pattern fills the corner beside the paler mint cupboard fronts. A narrow band continues along the counter edge, connecting the larger tiled section with the simpler adjacent wall. The wooden shelf and warmer metal brackets introduce different textures above, while the pale work surface separates the repeated patterns below.
Check how a small repeating pattern meets the corner and cabinet lines before installation, using a larger sample to judge its overall density. Keep decorative shelves appropriately placed around the cooking appliance and plan supports for their intended load. Choose the tiles and grout for the actual working conditions, then leave useful preparation space rather than matching every countertop object to the green.
IDEA 14 / 18
Use a Green Pattern in a Limited Cooking Section
 SaveSupport Non AI Creator
Image credit: Green kitchen
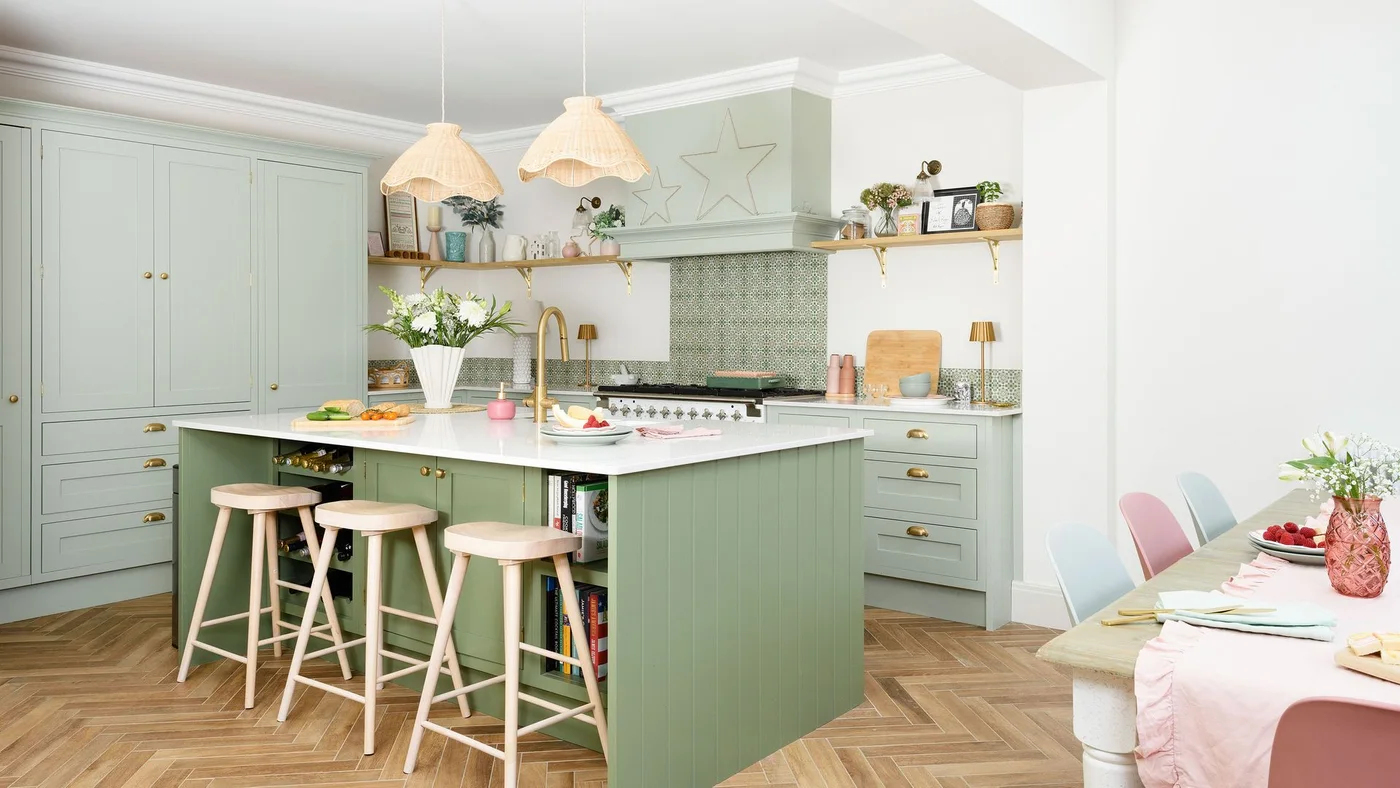
The green tile pattern is concentrated behind the cooking area, with pale walls on either side leaving it as one smaller feature. The island uses a stronger green than the surrounding tall storage, connecting with the tiled accent below the shelf. Woven pendant shades and wooden stools add warmth around the paler counters.
Choose the tile boundary around the cooking and cleaning needs of the actual kitchen, not only the decorative shelf line. Check all appliance clearances and select a practical edge finish where tile meets the painted wall. Keep the island storage and stool positions usable so the smaller tiled feature complements an arrangement that works when people are cooking and seated.
PART 04
Make stronger tile surfaces and painted scenes work
IDEA 15 / 18
Surround Warm Wood with Olive Tile
 SaveSupport Non AI Creator
Image credit: Rebecca Hughes Interiors/Astrid Templier
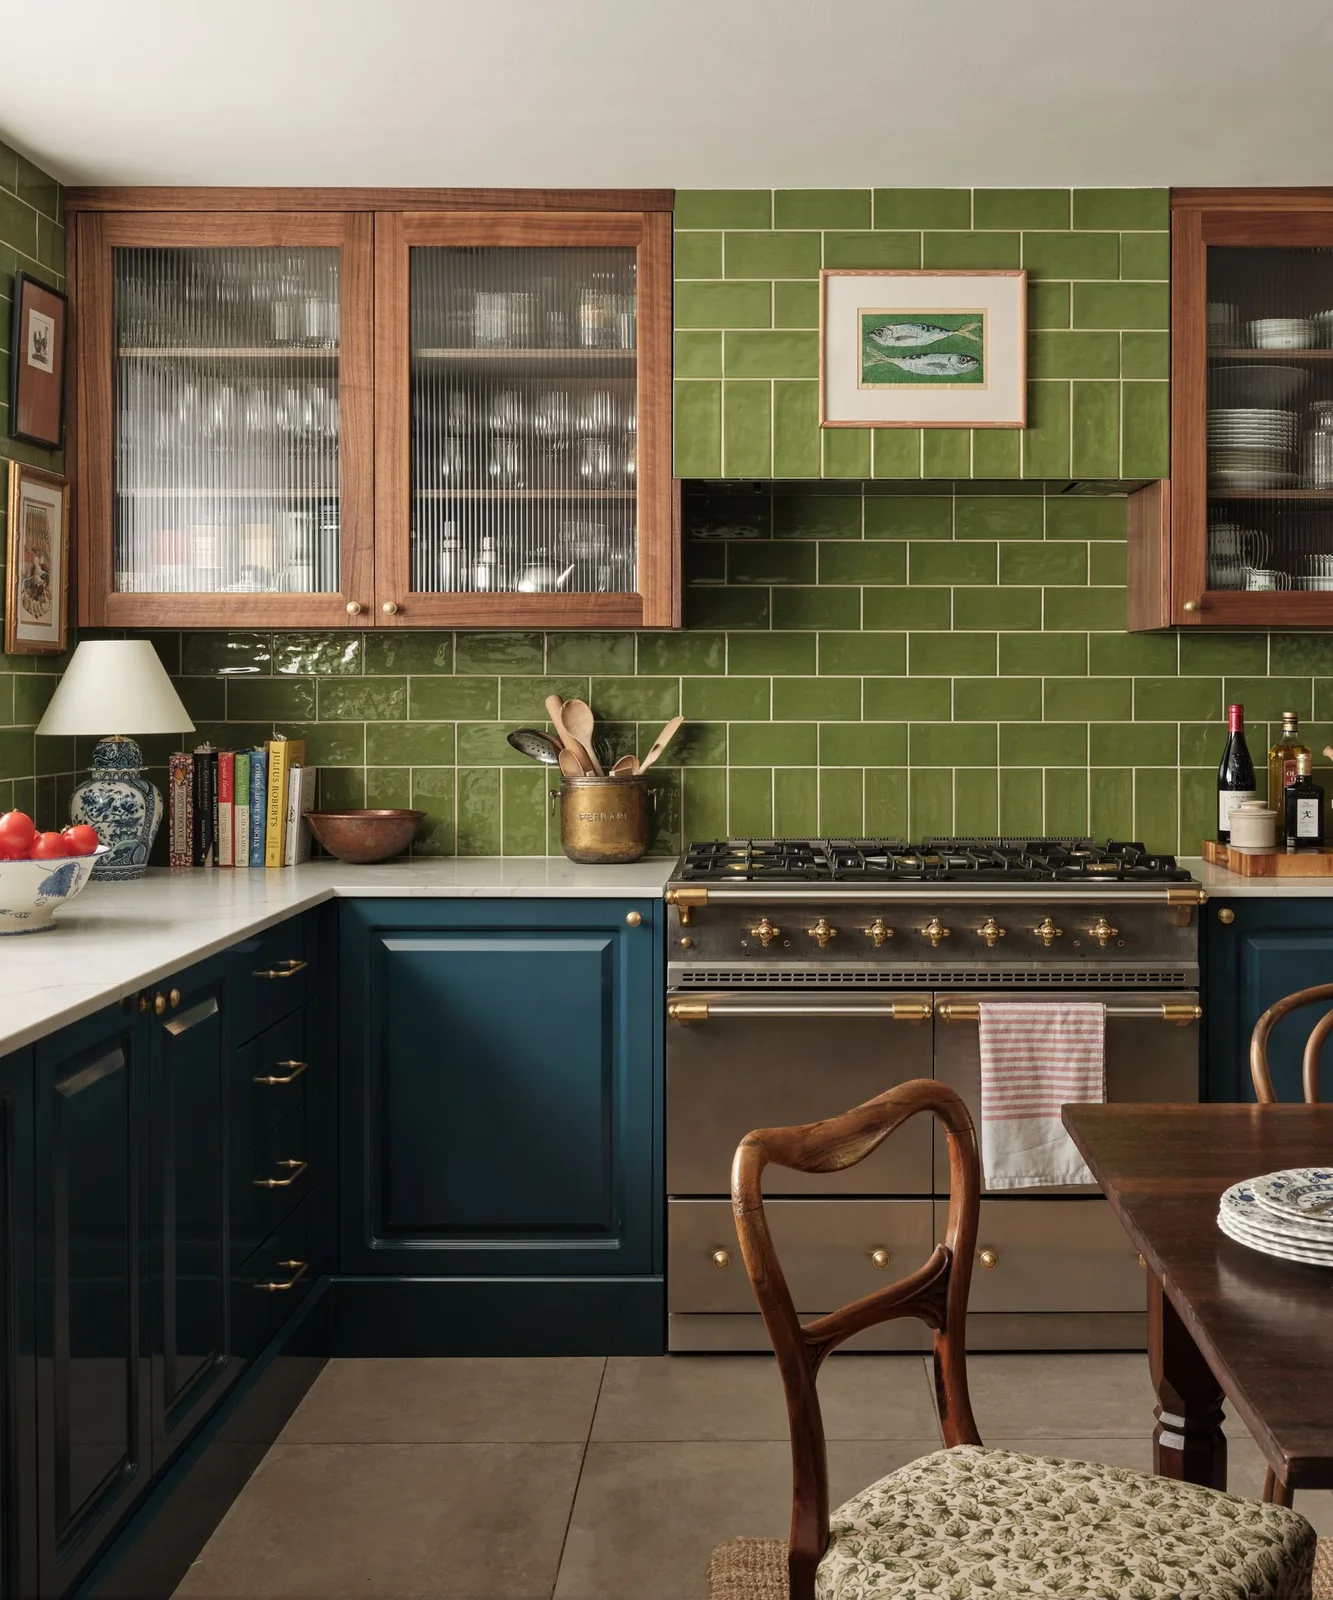
Olive tiles extend around the upper storage and cooking area, giving the wooden cupboard frames one consistent green background. Light grout makes the rectangular layout visible beneath and beside the glass fronts. Blue lower doors introduce a separate cooler color, while the pale counter creates a lighter line through the storage.
Plan how tile rows continue around cupboard openings before installation, including the cuts at the hood and corners. Compare the olive sample with both the wood and blue cabinet finishes rather than choosing each separately. Keep the display inside glass-fronted storage manageable and follow tile and grout cleaning guidance around the range.
IDEA 16 / 18
Let Deep Green Support a Larger Tile Mural
 SaveSupport Non AI Creator
Image credit: Charlotte Fuller
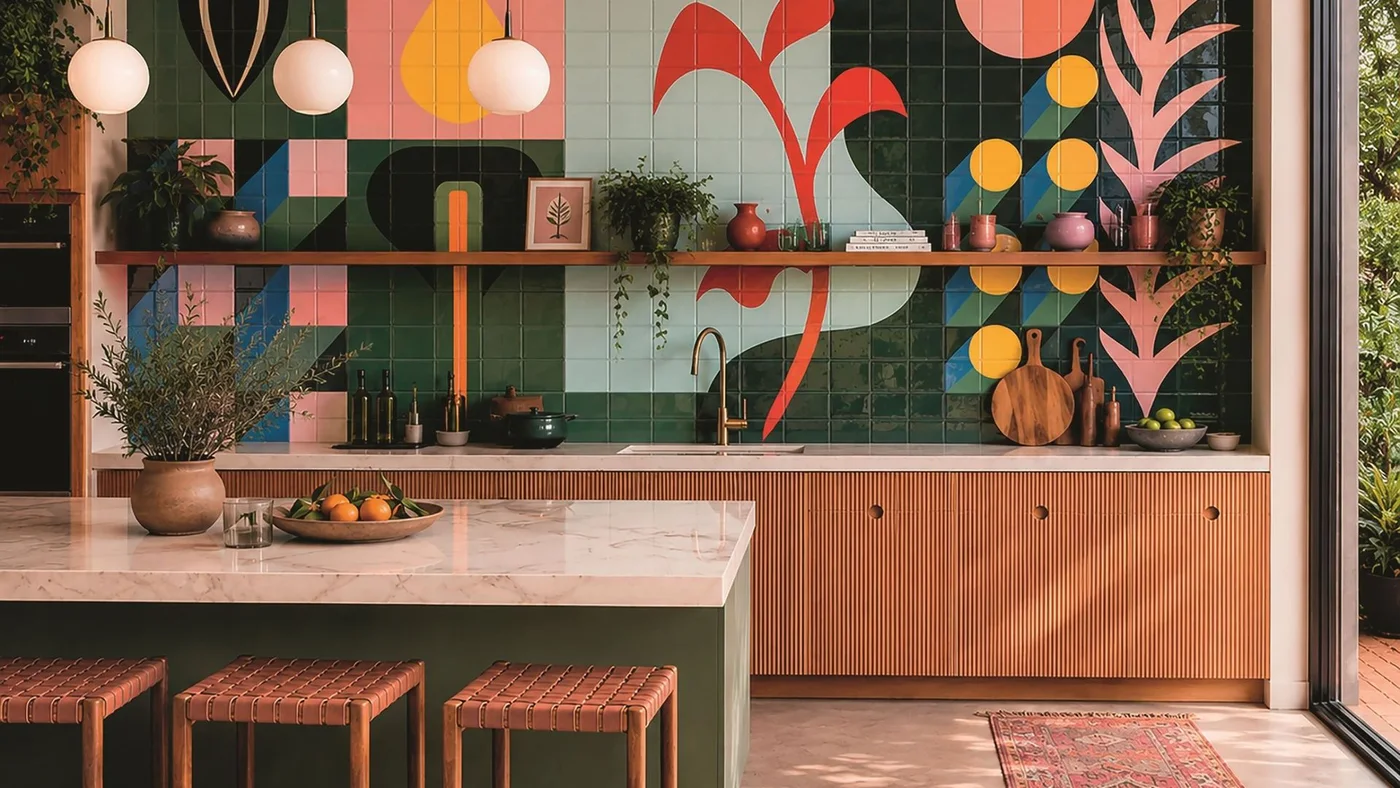
Deep green and paler green areas form much of the tiled mural’s background, with pink, yellow and red shapes creating larger decorative contrasts. The wooden lower fronts and long shelf add warmer lines beneath and across the artwork. A pale island top gives the center a simpler surface apart from the stronger wall.
Compare the whole mural arrangement with the room’s visible wall area before committing, checking how cabinets, shelves and sockets will interrupt it. Keep the remaining larger finishes quieter if you want the artwork to lead. Plan the tile specification and cleaning needs around the actual kitchen tasks rather than assuming a decorative mural is suitable for every working zone.
IDEA 17 / 18
Bring Green into a Hand-Painted Wall Scene
 SaveSupport Non AI Creator
Image credit: Kensington Leverne. Design: Studio Ashby
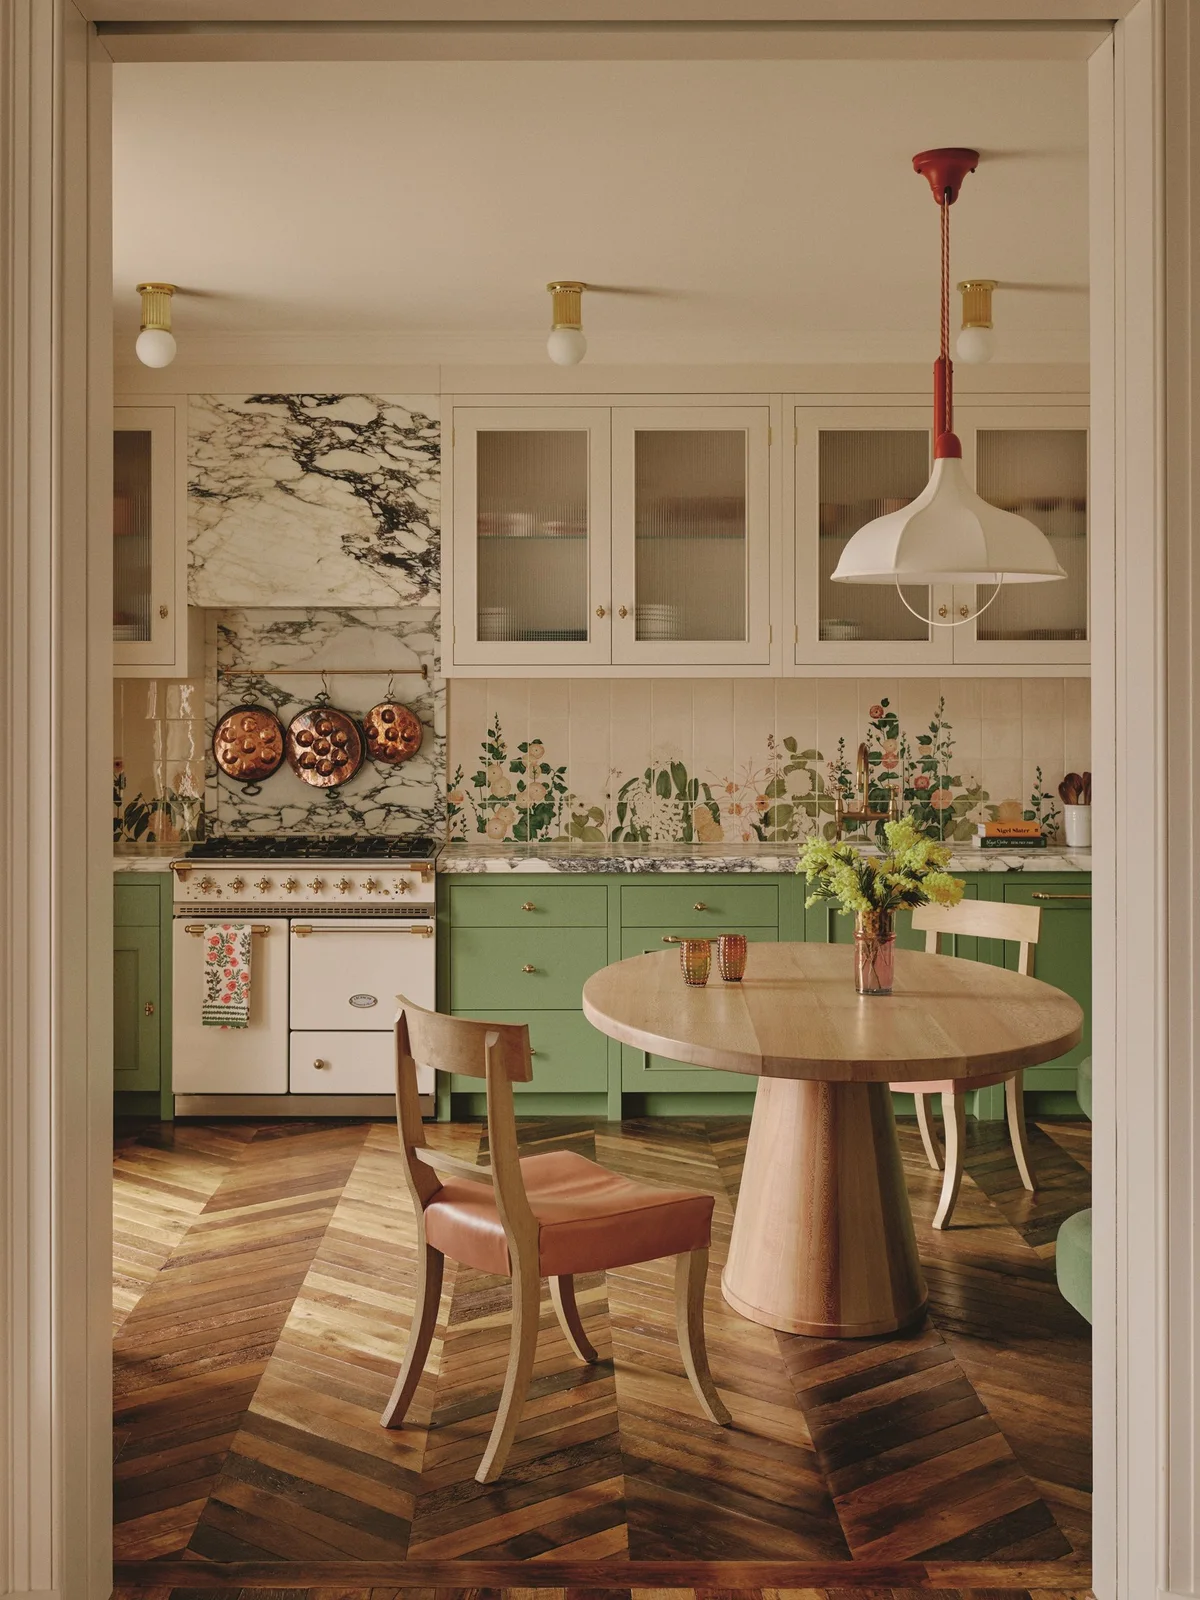
The painted tile scene introduces green foliage on a pale background, connecting with the solid green cupboard fronts below. Pale upper units keep the wall treatment lighter around the scene. The wooden table and chairs add warmth nearby, while the cooking area has a separate veined vertical surface above it.
View the full painted composition before selecting it, deciding which parts need to remain visible after cabinets and fittings are installed. Compare its greens with the lower doors and keep other fabrics selective. Choose a tile finish and cleaning routine suitable for the kitchen, and plan edge details so the picture does not end awkwardly at corners or sockets.
IDEA 18 / 18
Use Green Within a Smaller Painted Backsplash
 SaveSupport Non AI Creator
Image credit: Giulio Ghirardi. Design: Pierre Yovanovitch
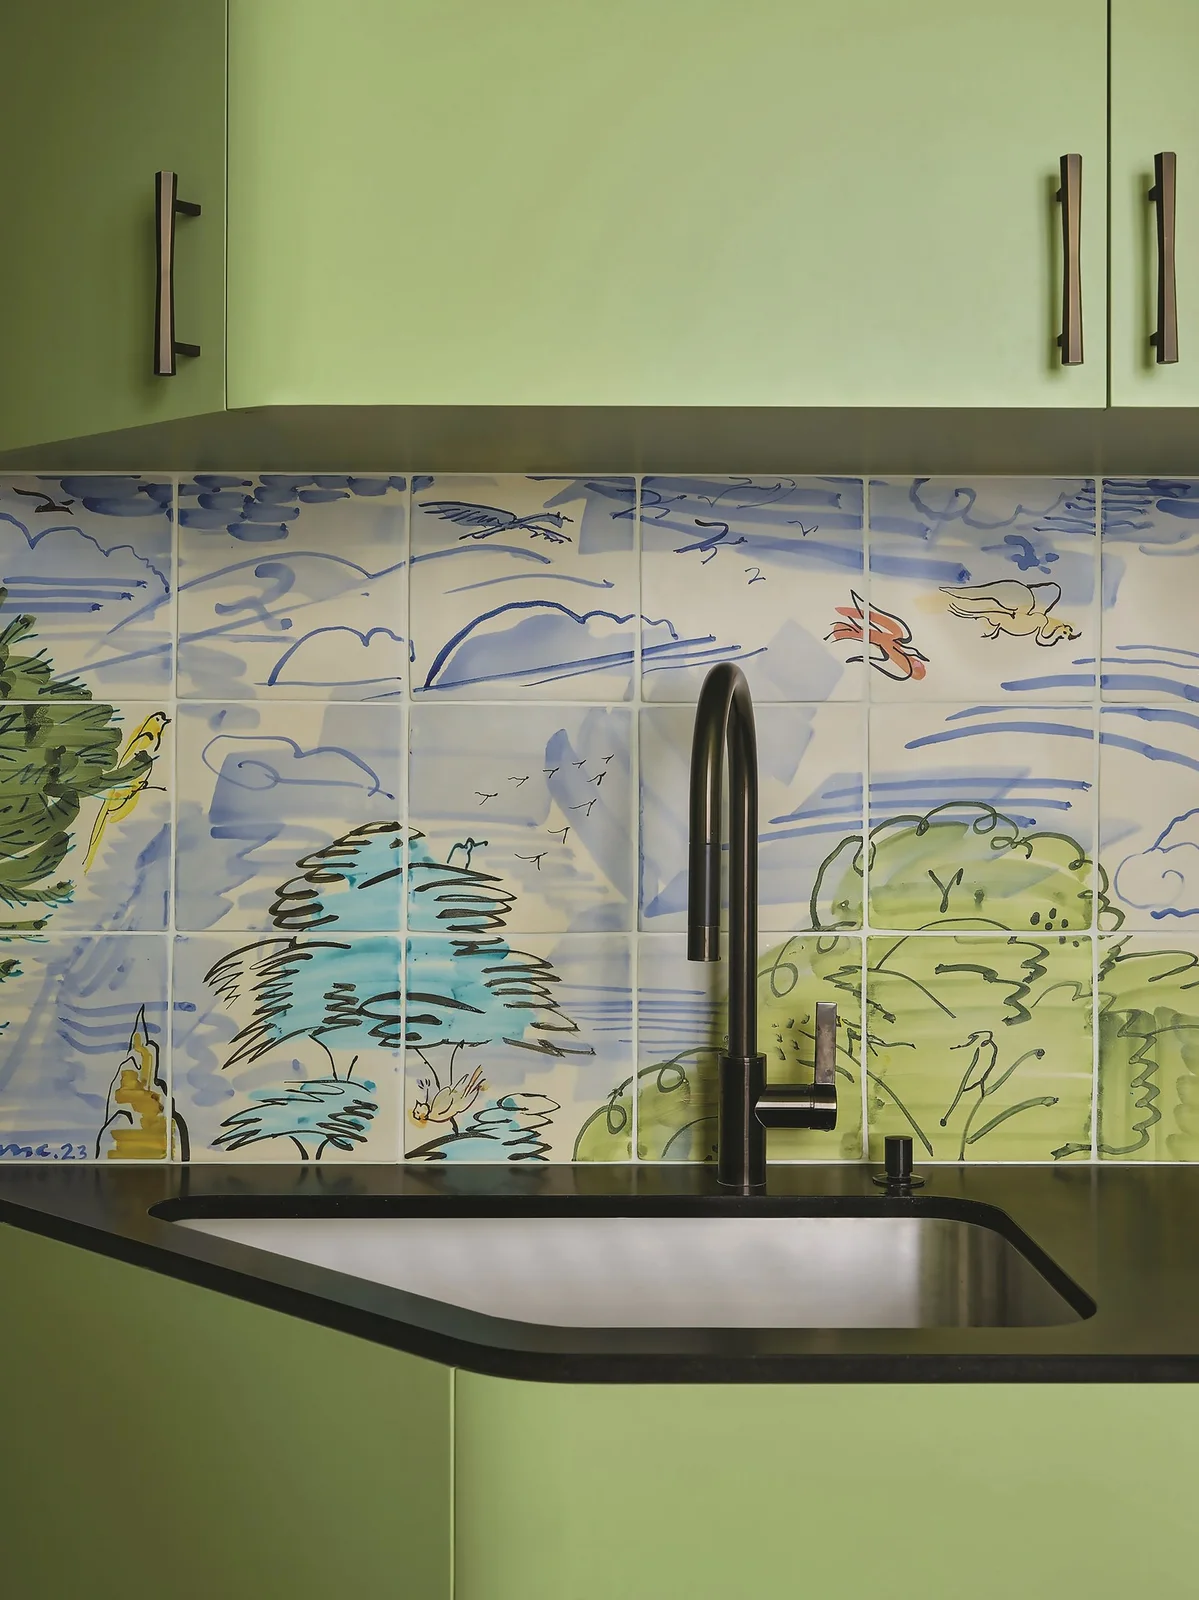
Green appears within the painted tile scene rather than covering every square in one solid shade. Blue lines and paler areas give the backsplash varied detail beneath the pale green upper cupboards. The dark counter, basin and faucet create simpler outlines below, letting the smaller illustrated wall remain clearly visible.
Compare the complete tile scene with the cabinet sample and decide how its pattern should meet the sink and wall edges. Keep soaps and everyday cleaning tools contained so they do not hide the smaller artwork. Ask for care guidance for the decorated surface and joints, then choose fittings around useful access to the basin rather than appearance alone.
BRING IT ALL TOGETHER
Plan the joints and edges with the green itself
Choose a tile layout using a substantial sample rather than one isolated piece. Compare it with the cabinet and counter finishes, then plan how rows and motifs will meet windows, corners and fittings. Grout color changes the pattern’s visibility, while the number and shape of joints affect how the finished wall will be cleaned.
Follow the actual tile, grout and appliance guidance for the kitchen’s working areas. Keep decorative shelves selective, leave counter space for preparation and choose stable useful storage for everyday items. A small green tiled section can provide enough character; extend it across a fuller wall only when the layout, access and maintenance also suit the room.